

dnb
-
Posts
581 -
Joined
-
Last visited
-
Days Won
10
Everything posted by dnb
-
Way back when I was at uni, 5A round pin plugs and sockets on the lighting circuit were used for this purpose. Not sure if this is still the way to do it.
-
I found that too when compared to mounting panels on rails.
-
I asked my BCO about lap. We discussed the local area weather and how sheltered the site was and settled on a number. I selected 600x300 slates because it meant fewer battens and fewer slates to nail so was cost neutral over the 500x250 slates. The roof is big enough to look right with larger slates.
-
I am getting ready to buy in the cabling to have electricity in the house. The plan (as discussed in an earlier thread) is to leave the meter box at the site boundary until the garage is completed and run SWA (from a switched fuse that will replace the existing site consumer unit) to the house. This will be approximately 20m distance. Looking things up in the blue book, it looks like I need 25mm^2 SWA if I want a 100A feed to the house on the assumption that approximately 15% safety margin is sufficient. The voltage drop looks to be insignificant compared to the requirement at this distance at full load. The other alternative is 35mm^2 but this feels like overkill and it probably has the same bend radius as my Range Rover's turning circle! Thanks.
-
I am about to start putting the services into the new house from them being "parked" in the old garage. The water supply is currently a 25mm connection from the meter. I am wondering if it is worth laying 32mm from the garage to the house (I intend to leave an outside tap on the garage wall, with a view to doing something more interesting with the old garage later.) and in time getting the supply changed to 32mm. Total pipe length from the stopcock to the house will be approximately 35 metres, and the old garage is close enough to the direct path to make little to no difference in pipe length. My thoughts are that 32mm over a relatively short length makes little difference to the water supply quality but I am not sure where the break point is for this. My usual luck says it's at 35 metres... ?
-
It's always the windows...
dnb commented on dnb's blog entry in Building in a woodland on the Isle of Wight
1. True. Although the kitchen isn't big enough etc... we did work on the plans together - this has to be a team game. 2. I give her little choice on that one! Yes, "long suffering" might be a good choice of words! 3. Tool purchase is encouraged! My limit for living in chaos is lower so I tend to tidy up first. 4. No, it's not that. But I do not have a completer finisher personality so I could understand if it were! The boss is about the most thorough QA inspector I have ever known along with a fantastic eye for details. 5. I think not. Anyone who lets you repaint a TVR chassis in the lounge is worth keeping. ? -
My boss says "It's always the windows that go wrong in Grand Designs". I think he might have a point. Not that I'm building anything particularly grand, but certainly about the windows. This is the outside prior to fitting the large window. The cladding job is going well, so we are hopeful of a good day. Having spent a few evenings fitting frames in the recent cold snap I think I ought to spend some time with SWMBO on valentines weekend. So I treat her to fitting the second largest frame in the house, and of course some glazing. It's because I'm a really nice person and like to share. The frame is 2.5 metres tall and 1 metre wide, designed to take a single glazing unit so I was particularly concerned with distorting the long edges as it was installed so we paid particular attention to shimming it correctly. I'm pleased to say that the Alien declared it to be straight and level after the screws were tightened. So concludes fitting the last frame in the first floor. The view of the site will be particularly good from the stairs. Now on to the glazing. We carefully plan how we are going to lift 49kg of glass up the scaffolding and swing it into the frame. We have a selection of glazing handles, ropes and platforms set up ready, and then I look at the glass in detail and announce that there's no way I'm fitting it. SWMBO then looks at the glass and storms off in a sulk. Not the reaction I desired, but understandable when you see the bars inside the unit are Y shaped and not straight. We then checked all the others, and found another with a dodgy bar, meaning 2 units out of 48 have a problem - not exactly achieving 6 sigma QA! I have to suffer on site with SWMBO sulking while we do some other jobs that need doing - all she wants to do is go home and be cross with the local window people, which I can understand, but it won't progress any of the handful of little jobs blocking the big day of seeing the house without scaffolding. I pointed out (in the words of one of the members here) if you can't take a joke don't start a self build. But this went down like a cup of warm sick. That evening we found what looks like water in the oil of the Range Rover engine. Happy valentines day Mrs dnb! Fast forward to Monday, and the photos arrived at the window supplier. His first words were "Well, they didn't try very hard, did they? I'll tell them to have another go and hurry up about it". I'm happy that it will be sorted out, but it's a bit more delay. We'll get there eventually... The last frontier for the cladding before we look at scaffolding removal. There's no point in hanging on to it for fitting the arch windows unless they arrive in the next couple of days. The window suppliers assure me that everything can be done from inside for these. I've always liked this view of the house.
-
At my local scrap yard they just ask you to take ID (photo driving licence is enough) and then they pay you through the banking system as a debit card refund. It all works simply enough and I haven't had to go through a complex account making process. They publish prices on their website but these are always a bit out of date. I'm sure you'll get the hang of it quickly enough so there won' t be much waste. It's a shame we are in lockdown etc - I weighed in a load of old lead at the end of last year that would have been ideal practice material. I could have sent some up to Lincoln with the family.
-
I have to watch the costs of my build so there does have to be an economic aspect to everything. Things don't have to necessarily "pay for themselves" but they do need to have some intrinsic benefit over and above the eco aspect. Solar PV makes sense to me for instance because the house should self use most of the power and thus pay back in 3 years (no mains gas etc...). Installing the PV wasn't particularly expensive and allows other expenses to be saved from the build. E.g. I can trade 7000kWh per year of "free" electric against the cost of say fitting more efficient but expensive heating. Rainwater harvesting does indeed fail the cost benefit analysis if i were to buy a kit of parts, and I can see little way for it to displace any other build costs. I will still do it but the system will definitely be done on the cheap. Happy to share the maths behind my (somewhat crackpot) plans in a couple of days when I am less busy with windows and scaffolding.
- 28 replies
-
- 1
-

-
- solar pv
- rainwater harvesting
- (and 1 more)
-
Those black scouring pad looking things in a grinder are excellent for removing rust and scale. Then my choice would be to paint with a couple of coats of POR15 and something like Jotomastic (another epoxy mastic paint) on the inside and whatever colour you want outside over the POR15. (The POR15 is not UV stable so needs something to cover it.)
-
The OP's pic could very well end up in the how not to do it section of my next working at heights refresher course at work...
-
Modern classics I suppose... A TVR Griffith 500 that needs partially rewiring, paintwork (fibreglass is star crazed all over the place) and new carpets etc. A Jaguar XKR that needs a fair bit of welding and making good. Plus a rear suspension rebuild.
-
I have a couple of classic cars to restore and a garden to landscape. I am nowhere near old enough to retire so no plans for a change of day job right now. Thankfully there are still plenty of interesting things going on at work. It will be nice to not have to take all my annual leave for building. Not that I can do anything else with it right now...
-
The End of the Beginning
dnb commented on dnb's blog entry in Building in a woodland on the Isle of Wight
I assume those are elevations and noon UTC. The idea l have in mind is that the longer than average eaves act as sun shades as the sun elevation increases in summer, so hopefully if my maths is any good there will be at least some shade for the bedrooms for the warmest part of the day in a summer. -
The End of the Beginning
dnb commented on dnb's blog entry in Building in a woodland on the Isle of Wight
I got the first few windows levelled, shimmed and screwed in today. Lots of careful measurements with the laser level to make sure the frames didn't become parallelograms... I believe them to be good to less than 1mm for squareness and levelness. Hopefully I will get a bit faster because 3 windows took me all afternoon! It was cold but sunny today and it was the first time I have had the window apartures opened up. I can believe there will be significant solar gain from the mostly south facing windows. It would have been good to see them with glass in to get an idea of this. Maybe tomorrow... -
The End of the Beginning
dnb commented on dnb's blog entry in Building in a woodland on the Isle of Wight
It's stainless rodent mesh (slightly thicker wire, but same pitch) at the bottom - we have quite the collection of critters on site so it seemed more sensible. I made a former and bent it into a U profile so the battens clamp it. This was much more fun to do than I was expecting, right up until it came to moving an 8 metre length of it to the front of the house. The cladding is definitely vertically vented all round, apart from the bit we know wasn't done right! I don't have any good pictures of the bottom mesh and stuff because it has been far too muddy and wet to want to go near it again. I kind of hope I am done before the weather warms up!! You're right there. I'm not seeing much price difference between places on line so I am making sure I only buy the minimum I need. -
The End of the Beginning
dnb commented on dnb's blog entry in Building in a woodland on the Isle of Wight
There is an 18mm void space inside the window, and they aren't quite so tight on the outside because the OSB of the SIPS sits away from the timber. My plan was 10mm x 12mm compriband on the outer edge and filling the void with (very carefully injected) foam. The compriband then seals to the outer OSB and is partially covered by the external detailing. The gap is nominally 5mm all round butwhen I took the photo I hadn't centred the window in the openings so one side does look very small. The bathroom window has 7mm all round. SIPS tolerances are tight, but they are still not perfect! I am going to fix through the frames because it's the easiest option for me. -
The End of the Beginning
dnb commented on dnb's blog entry in Building in a woodland on the Isle of Wight
You're right - and embarassingly enough I hadn't noticed it (yet). It's one of the very few slip ups stemming from someone else helping. All the others have a gap! At least it won't be hard to put right with a correctly set up circular saw. -
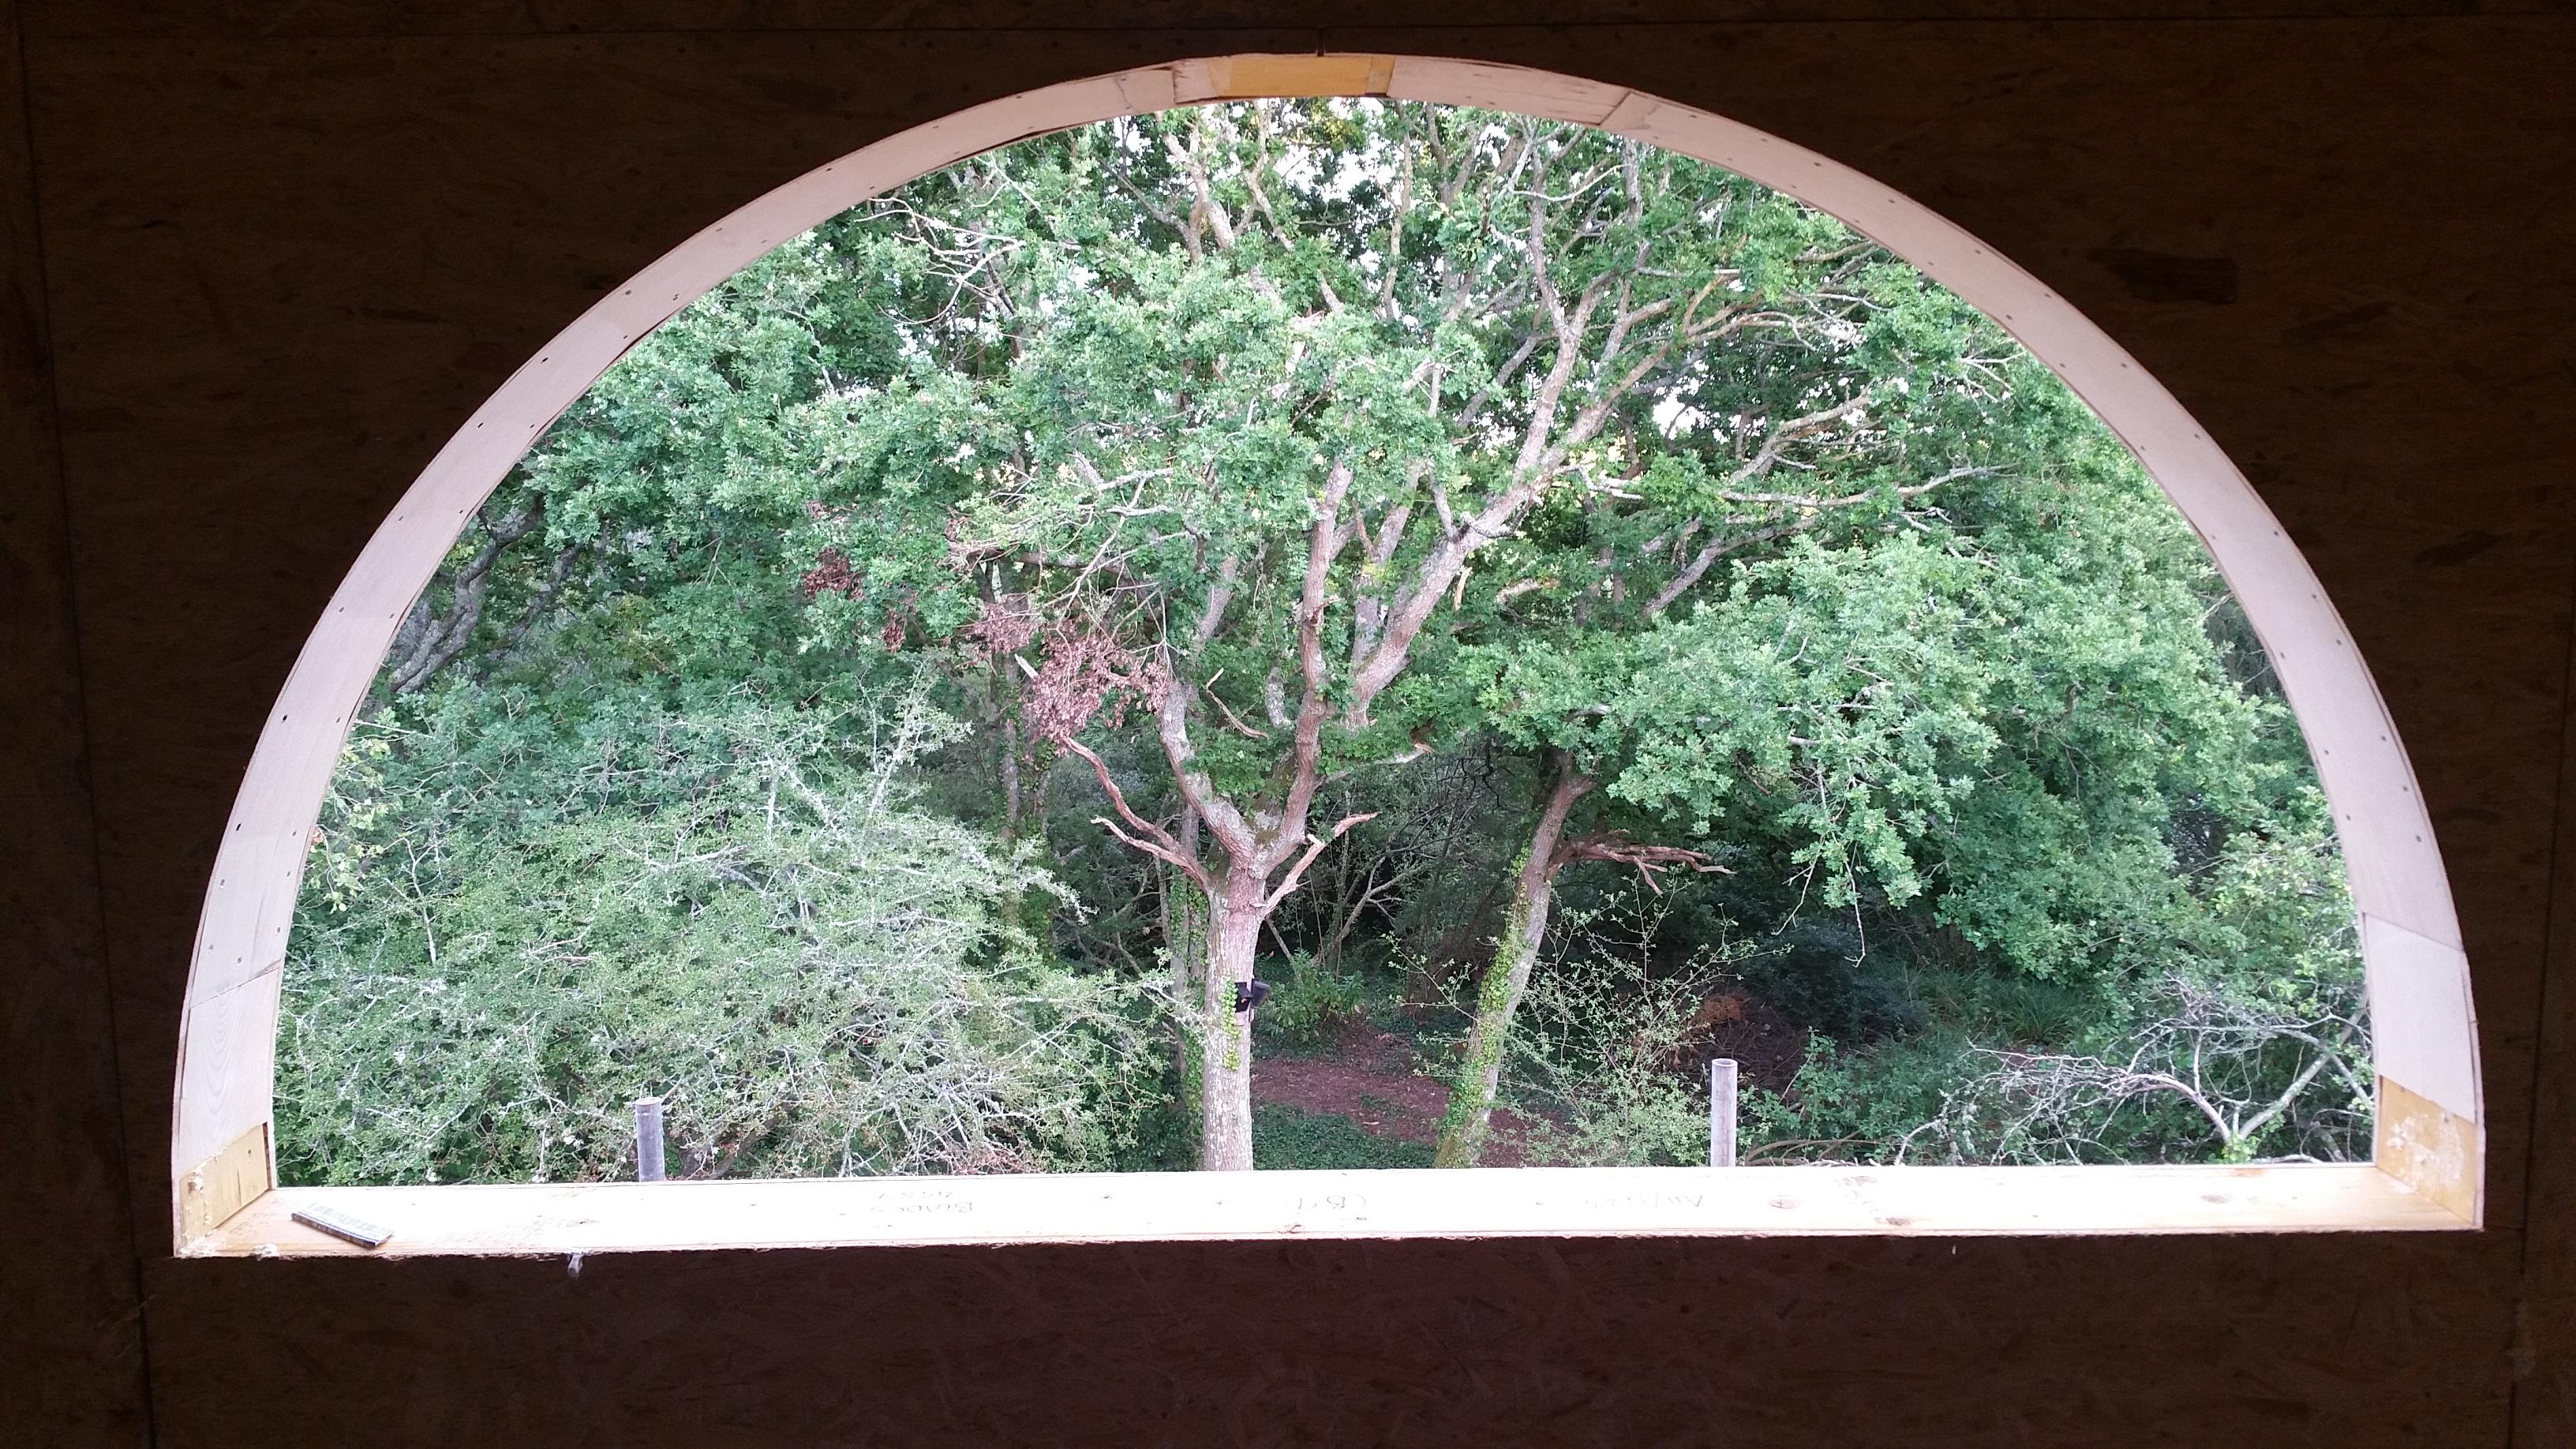
I have finished crawling round on the roof so my attention turns to finishing off a few bits of fascia, then battening, fire breaks and cladding. I left most of the battening to Jeff while I put in the first few bits of wiring for the (almost Blackpool level of ?) outside lights and made the last cuts in the fascia ends so they meet the soffits nicely. This ended up as several hours of work, making what felt like tiny progress while the battening seemed to fly along. This is the fire break and battening surrounding on of the gable end arch windows. Next job here is to install the insect mesh over the top vents and I'm not looking forward to that much because the mesh is marginally more vicious than the autumn insect population and likes to tie itself into gordian knots. We have had more than our fair share of wind and rain over the last fortnight, so I quickly gave up on the fascia trims because the scaffolding was slippery and I didn't like the idea of gluing plastics when it is likely to be very wet, so I opted to start cladding on the finished battening - it all needs doing! This is the first corner near the front door prior to cutting the excess lengths off. A bit more cladding done. The priority is to get the gables completed, then we can think about getting the scaffolding down because it's at the point where it is hindering almost as much as it is helping. We now have a scaffold tower to finish off the last few jobs when the time comes. It's beginning to feel like a house now. I needed to attend work for a lot of this week but was able to escape when I got a phone call out of the blue from my window supplier. I was in there the previous weekend for something else and they had no news, but by Wendesday my windows were in their yard and they wondered if I would mind awfully taking delivery fairly quickly because they could hardly move. They agreed to my timescale of "Now is a good time" very quickly. Three round trips later and I had 48 pieces of glass and 15 frames. We opted for aluminium framed windows so that we could get away with very thin frame sections as well as having a reasonable performance. They aren't the best performing window on the market, but they are pretty good and the cost difference would never be recovered in efficiency savings. Besides, there are easier and cheaper ways to claw back the "lost" performance should it be required. We elected to store the frames near the apartures they are supposed to fill. The old bed frame and furniture is there to try to get some engagement from my not quite teenage daughter about room layouts and colours. It was partially sucessful. My first attempt at window fitting. I have put in wedges to hold the windows at the right position on the outside of the building and another to stop the frames tipping back so that I can see how the windows are going to fit before I drill holes and get out the expanding foam, in case I need to change anything with my plans. So far, so good... ... Apart from the scaffolding being in the way again. Only 12 more to go.
-
I plan to fit aluminium frame widows into my SIPS build very shortly with any luck so would really appreciate some advice, mainly about which products to use to give best chance of air tightness. The winow supplier suggests that expanding foam round the windows on both sides will provide insulation and help achieve good air tightness. The windows should be screwed into the SIPS through the thermal break using self drilling fixings that will go into the wood by at least 50mm and shimmed appropriately to prevent frame distortion. I am wondering if these are the best materials or if Compriband or similar would give noticably better performance? I understand that air tightness tape to the VCL is needed whatever the outcome.
-
Home now, and have found the regulation I think we are talking about: 522.6.202 My understanding of it is: A cable is in a wall at a depth less than 50mm shall be in a permitted zone as per the diagram @TonyT posted AND be protected by RCD. Where the accessory (etc) is on the other side of the wall and can be determined as such the permitted zone extends to the other side if the wall is up to 100mm thick (so essentially single skin blocks and stud walls only) OR it must comply with reg 522.6.204. This is the case I find myself needing to use. And strangely the RCD requirement seems to now not apply, but I see no reason NOT to have one!! Reg 522.6.2-4 gives 5 options for various earthed, mechanical and isolation protections, SWA looking like the easiest. So my choice seems fairly clear - the wall is about 250mm thick, so clearly the permitted zone does not extend. I therefore need either steel conduit or SWA on the inside. Incidentally, I can't find a reg that stops me putting conduit on the outer skin of the SIPS having had a read of "the book" for a couple of hours. I know we've already established it's not the done thing, but I would like to understand the reasoning.
-
Don't worry. I can look it up myself. I have acquired a copy of the blue book from work.
-
There's the issue. The plan is for dmx controlled lighting. Does a low voltage computer interface type switch count as a switch for the purpose of safe zones? Are you sure the ands and ors are typed correctly here? The wording implies I can do anything as long as it is NOT in a zone and within 50mm of the surface.
-
I thought this only applied to thin walls. But then reading a bit more there is a rule that you shouldn't back to back sockets in stud walls to stop fire spread. So I am more than happy to accept and rely on this argument. It should be obvious from looking through the door. For what it's worth I am insisting on lining holes through the structure with conduit (and filling the end with intumescent sealant) so there can be no possibility of reaction with the insulation. Yes. Exactly this. 25mm or 40mm depending on the services required in the area.
-
I was rather hoping it was going to end up a daft question and I was overthinking it in very specific ways while missing the fairly obvious (as is my usual practice ? )
