Russdl
-
Posts
1722 -
Joined
-
Last visited
-
Days Won
6
Everything posted by Russdl
-
@SimonD which side of Bath? I’m in Salisbury and can recommend one - no idea how far he’d travel.
-
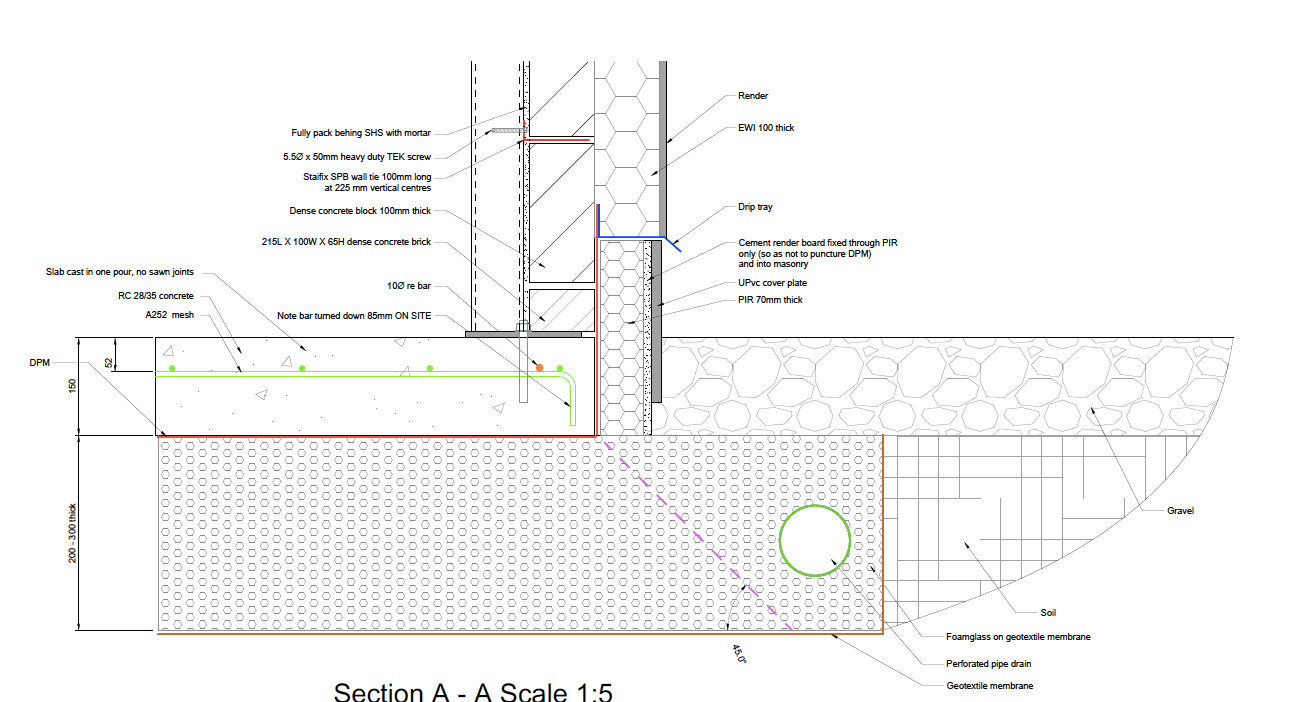
Solving that thermal bridge was a big concern of mine in the very protracted thinking stages and once I had (well, I think I have, happy for contrary feedback) it drove everything else and I went a bit nuts on the rest of the plan. Hence the insulated slab, walls, roof and door. Hopefully it’ll stand the test of time - if we get a proper winter I’ll report back.
-
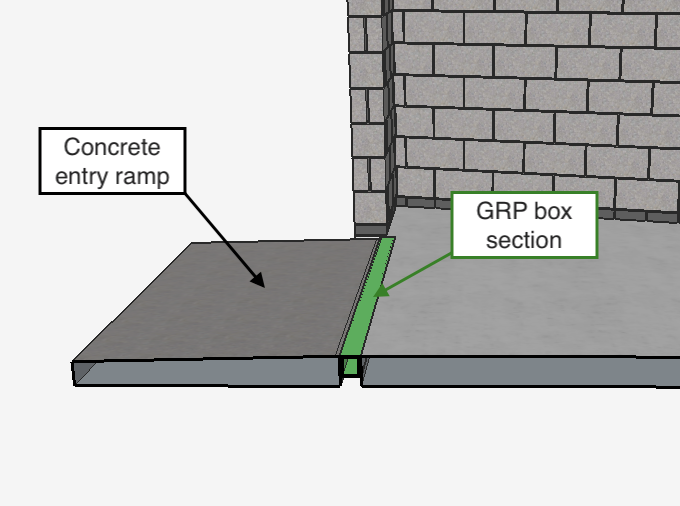
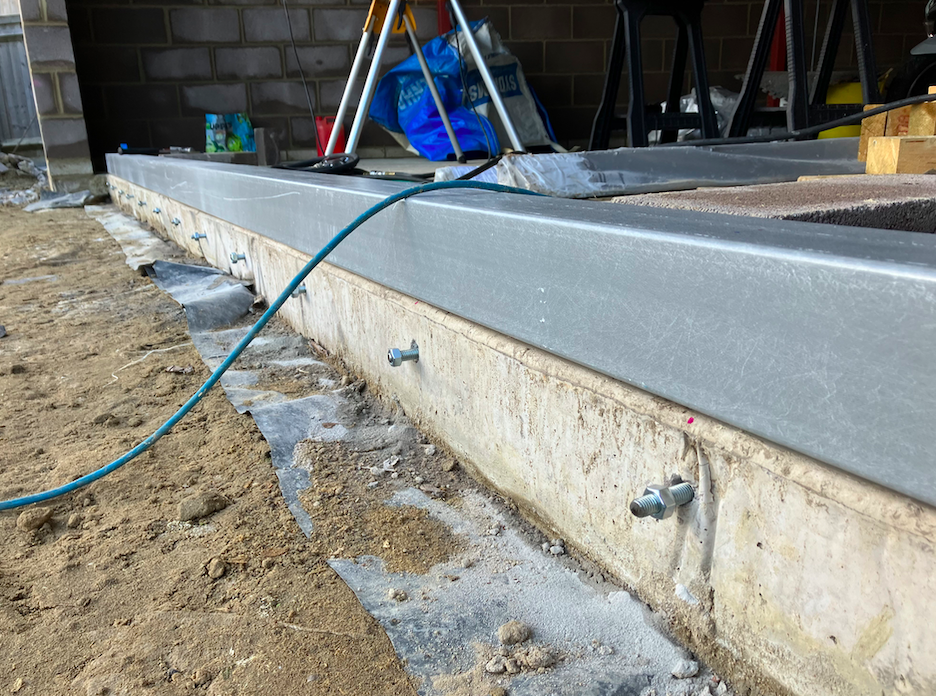
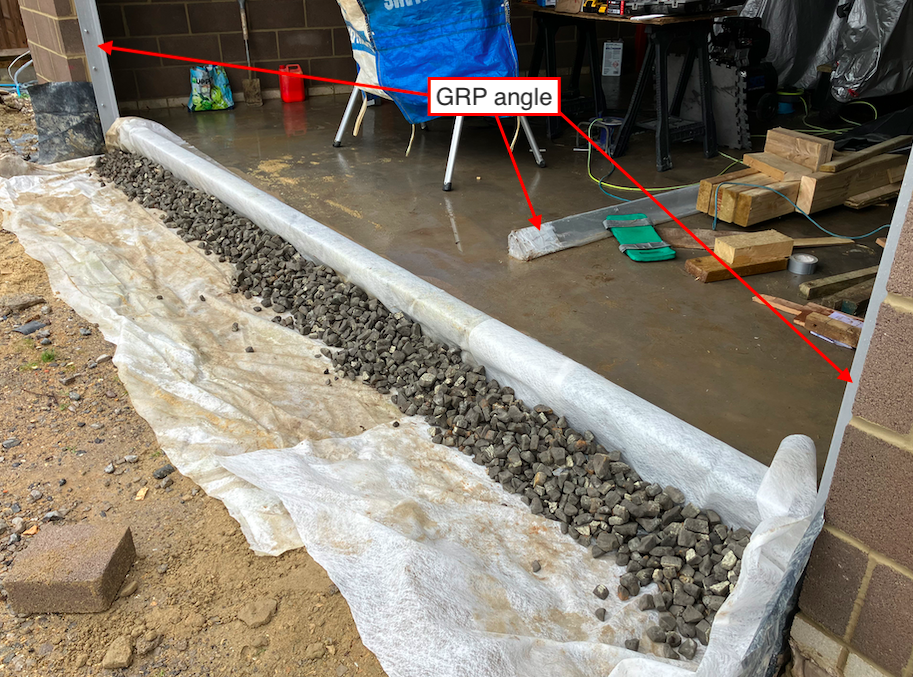
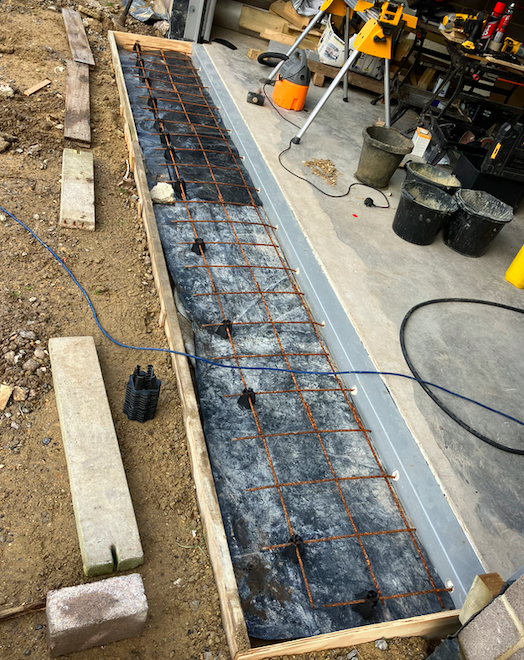
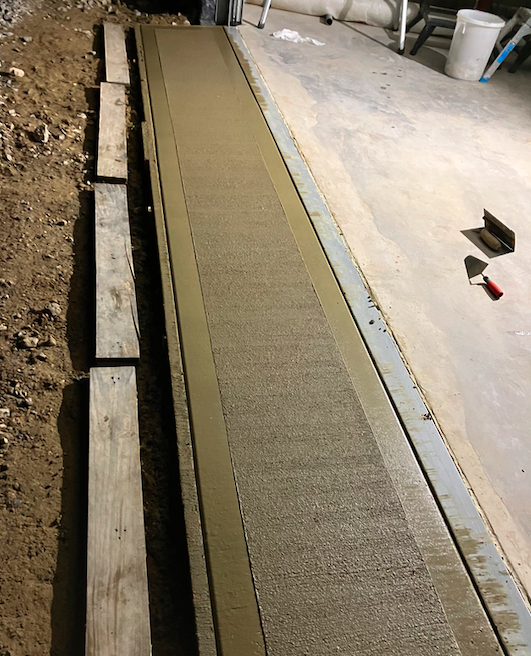
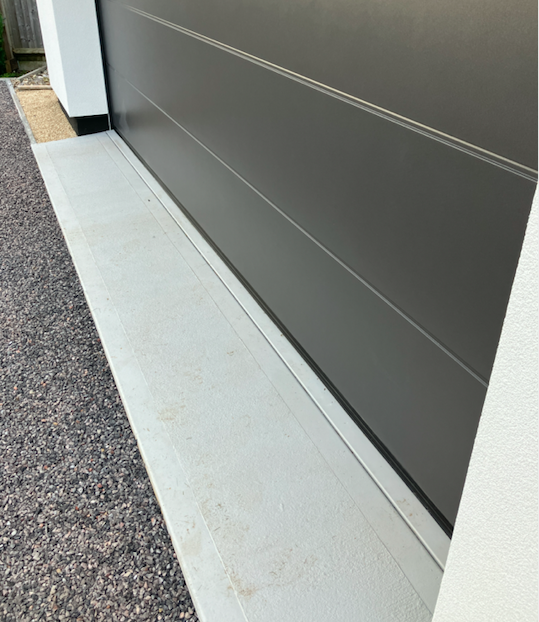
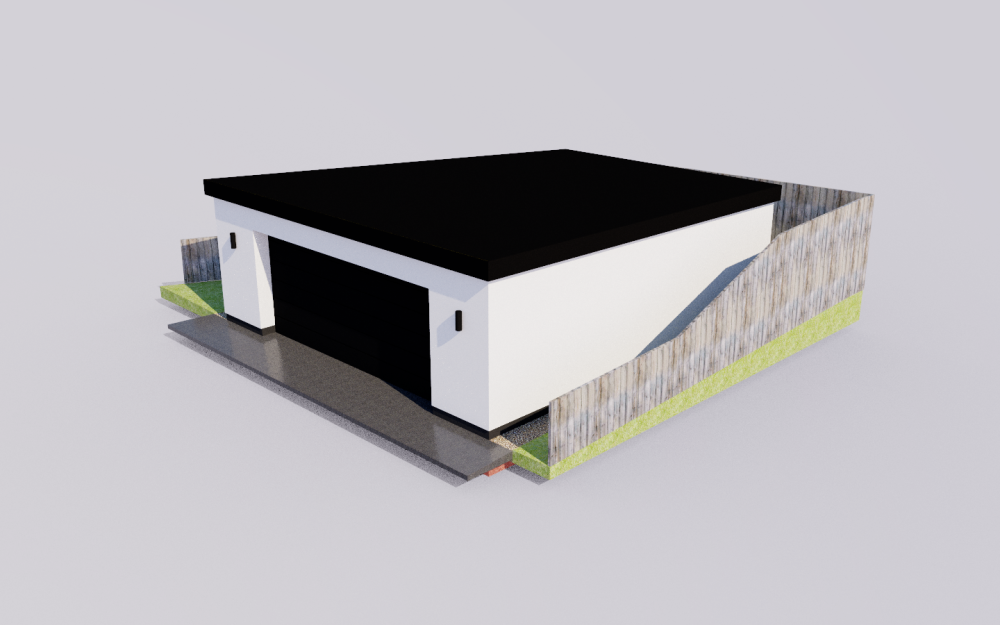
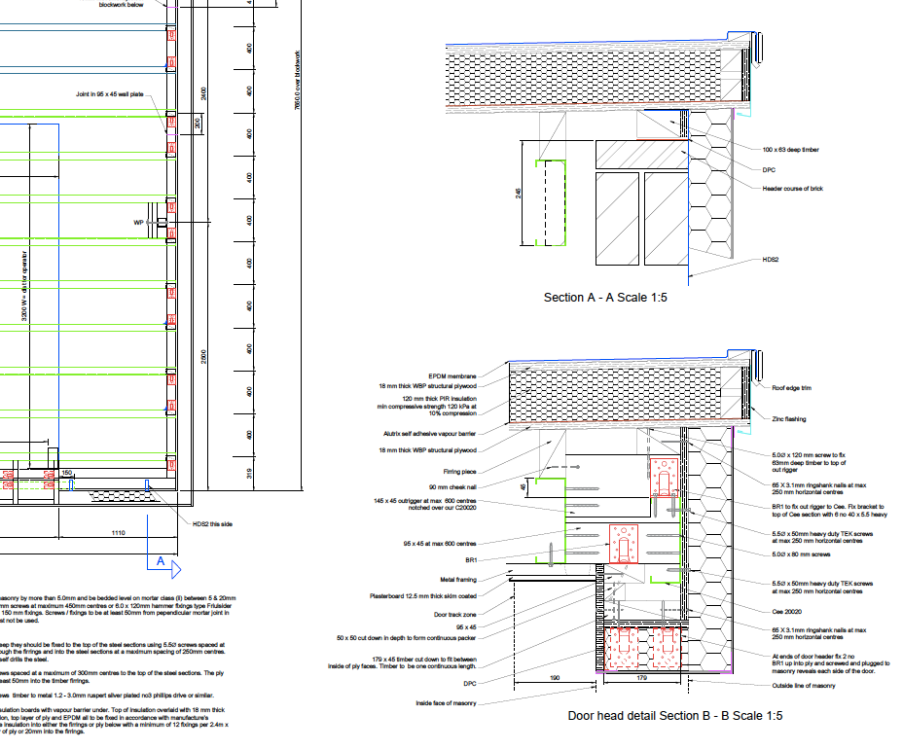
After going to the effort and expense of insulating the slab, walls, roof and door I had to do something about the transition from outside to inside the garage. Garage slabs normally extend beyond the door creating a big thermal bridge that I didn't want. What I decided to do was use some GRP box section to thermally break the inside from the outside. It's early days but it seems to work well and it hasn't fallen to pieces with cars driving over it yet, which is a bonus. I may be on to a winner. To start with I resin anchored some threaded bar into the slab and then bolted the GRP to the slab. I then rammed some left over foam glass into the gap underneath the box section for added support. I also used GRP angle as a 'stop' for the EWI on the returns to the door and the door head. I'd filled the box section with left over insulation and finished it off with expanding foam, added some left over mesh, shuttered it and made myself a concrete entry ramp. A quick lick of paint finished it off and it all largely seemed to go to plan as well. Here's hoping it stands the test of time.

-
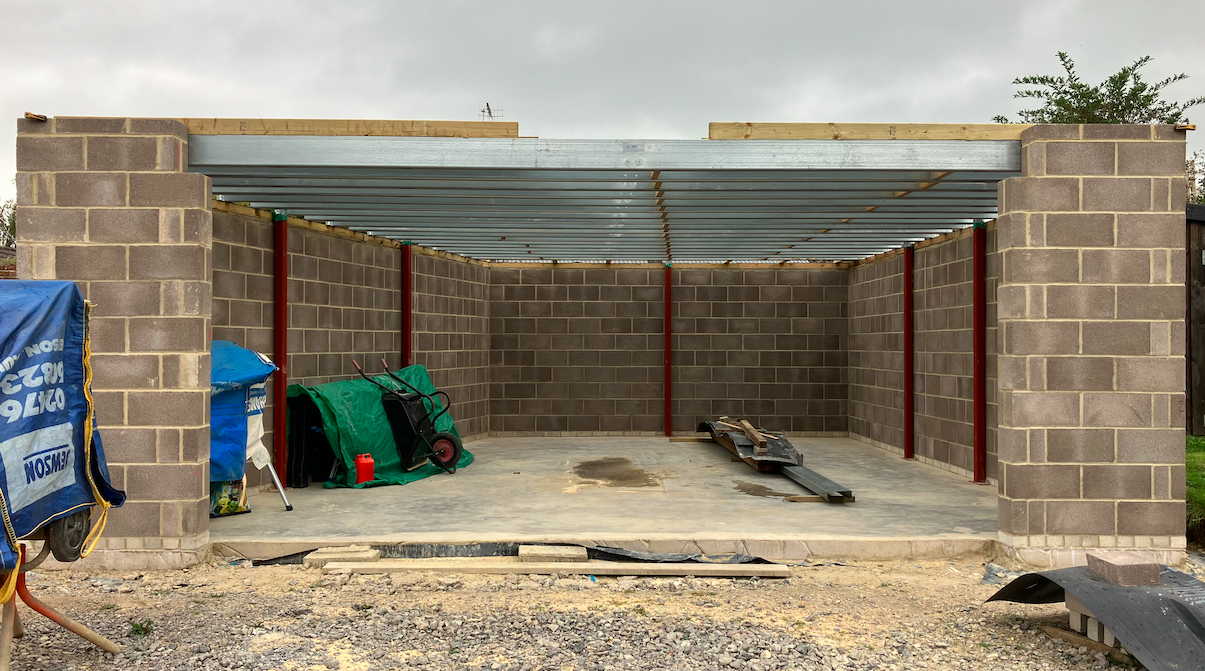
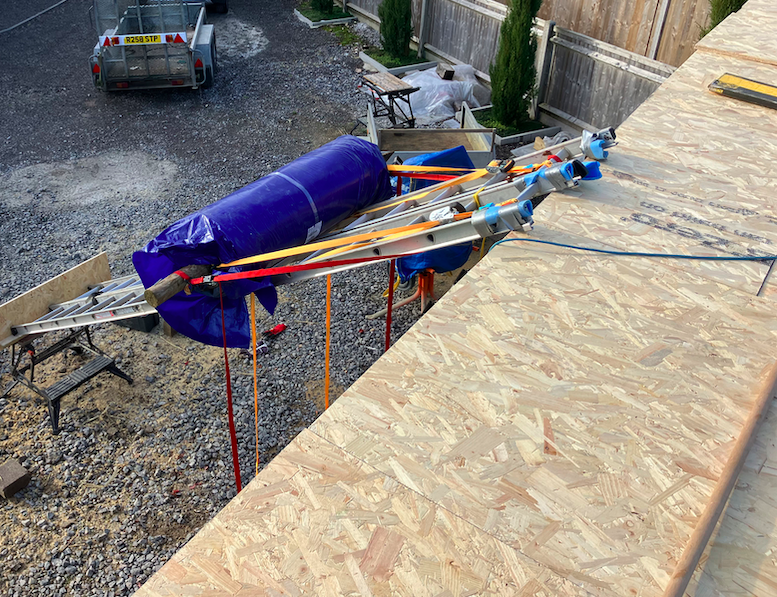
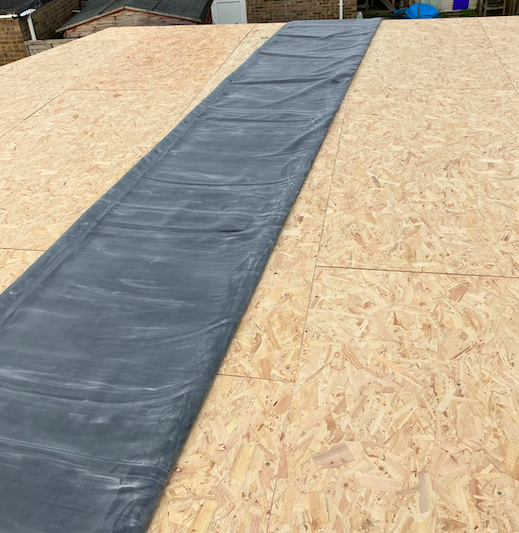
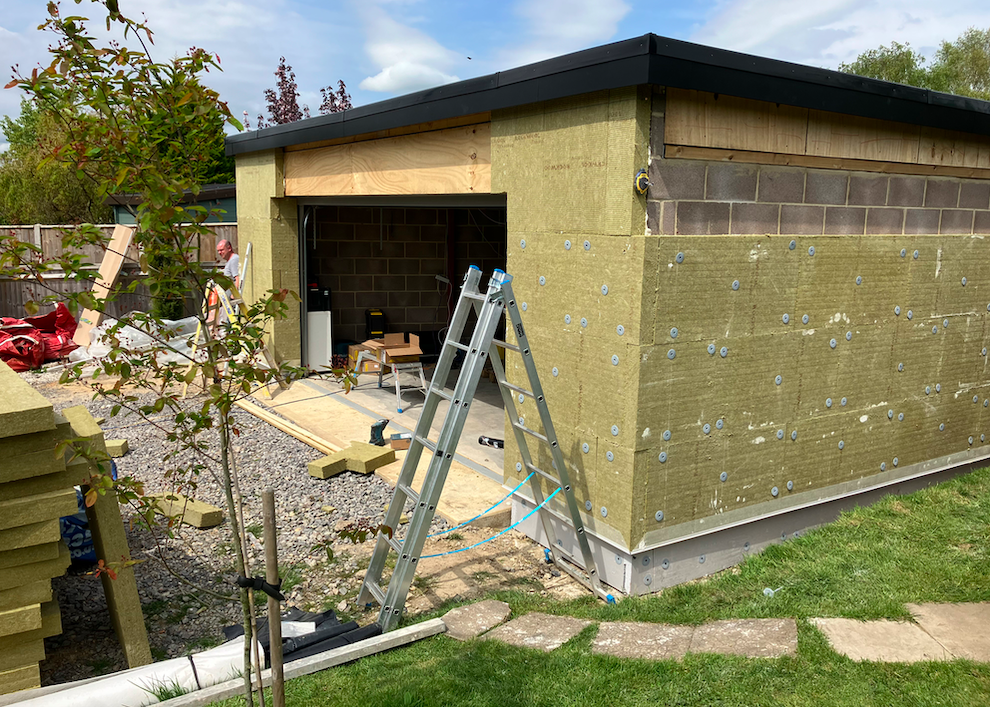
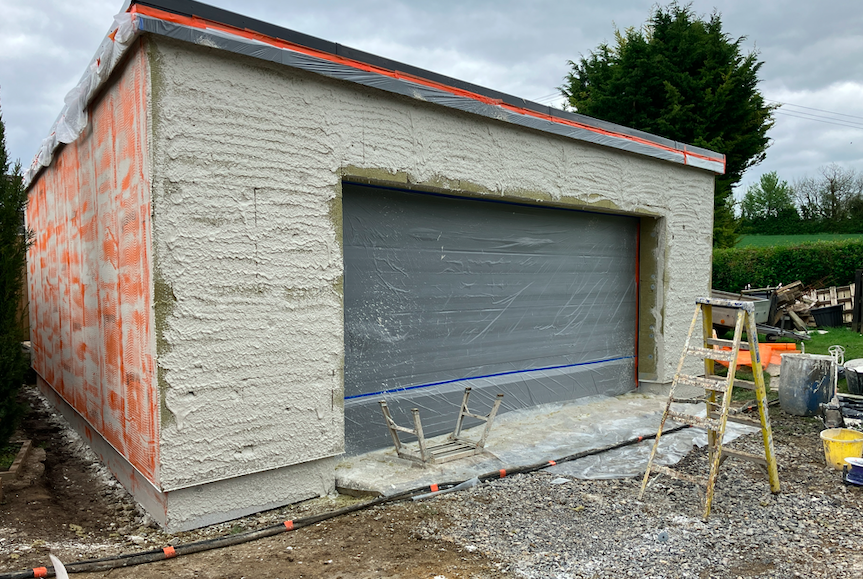
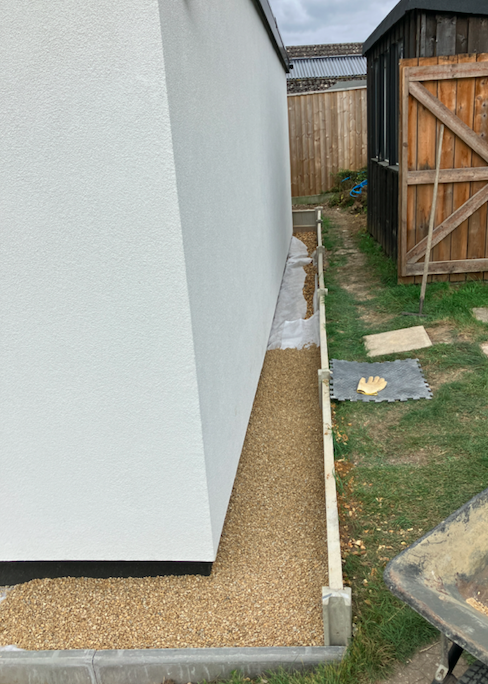
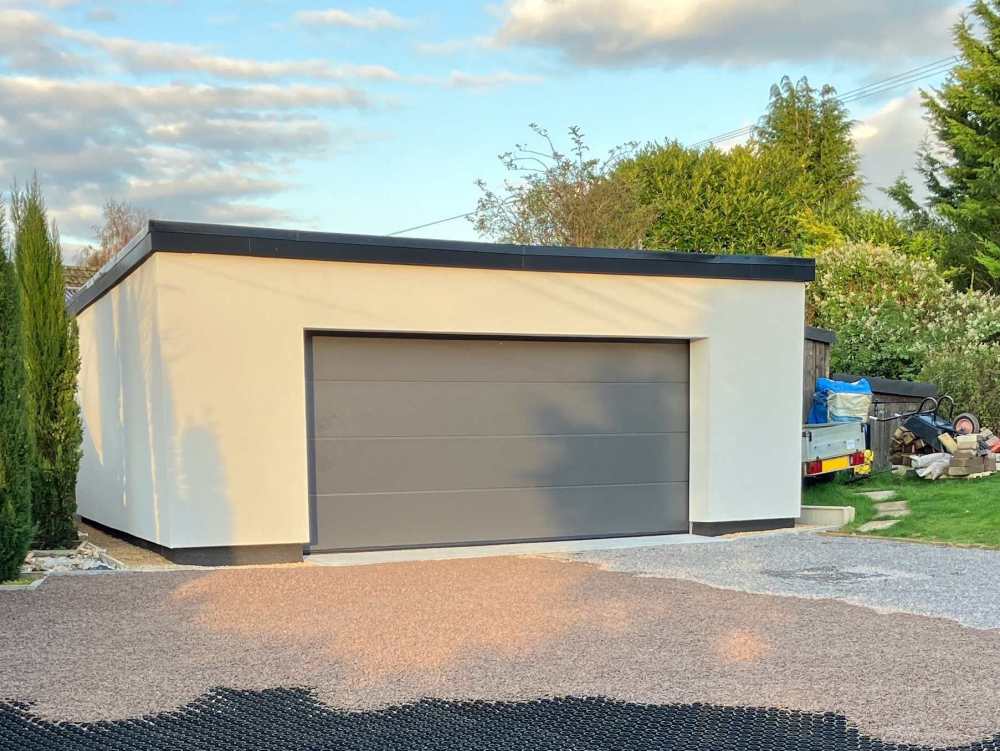
A total of 19 'C' Section steel joists were used for the roof. We had two different sizes, the taller ones were for the larger span at the front of the garage and the smaller ones at the rear. The joist were mounted side to side and the 'fall' of the flat roof was to be front to back of the trapezoidal garage. To get the required fall I needed firring strips on top of each joist but with the fall being front to back and the firing going side to side each firring would be a different size. I couldn't get a saw mill to cut me 19 firings that were all completely different sizes so I did it with a skill saw. I also put a slight taper on top of each firring so that the roof boards would sit on the whole of the firring. That all seemed to work a treat and was less tedious than it sounds. The rest of the roof was standard warm roof build up: OSB - Vapour Barrier - 120mm PIR -OSB - EPDM. Getting 56m2 of EPDM up on the roof proved tricky. It arrived rolled up and I thought it might actually roll. Not a bit of it, it was reluctant to go anywhere. In the end we placed a couple of ladders against the roof and then used ratchet straps to hoist it up bit by bit. Once the EPDM was up on the roof the rest was a breeze, really easy to work with and stick down. For the external wall insulation, we started with a 300mm high band of XPS around the base, sat on top of the foam glass. Above that was Rockwool for the breathability and fire resistance. The XPS was finished in black render and the Rockwool in white render, we then filled the trench around the garage with gravel leaving 150mm of the rendered XPS as a plinth. I couldn't quite get my head around how the finished rendered rock wool would feel, it's quite amazing, solid as a, well, rock. You'd never guess it was rock wool under the render.


-
- 4
-

-
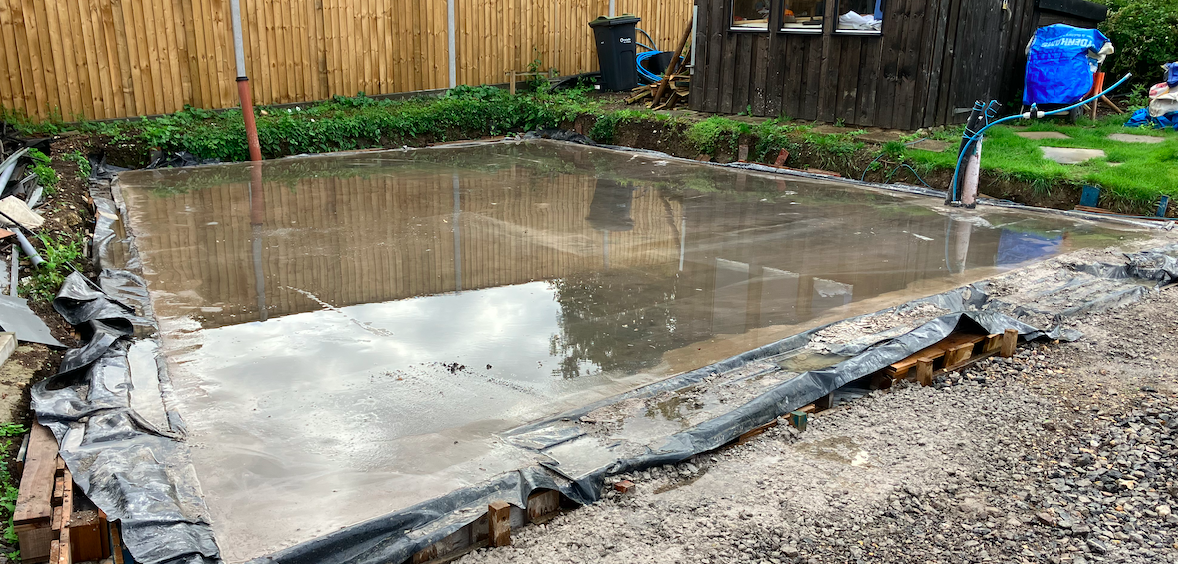
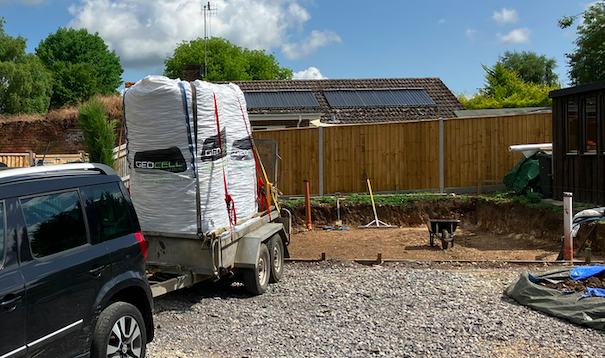
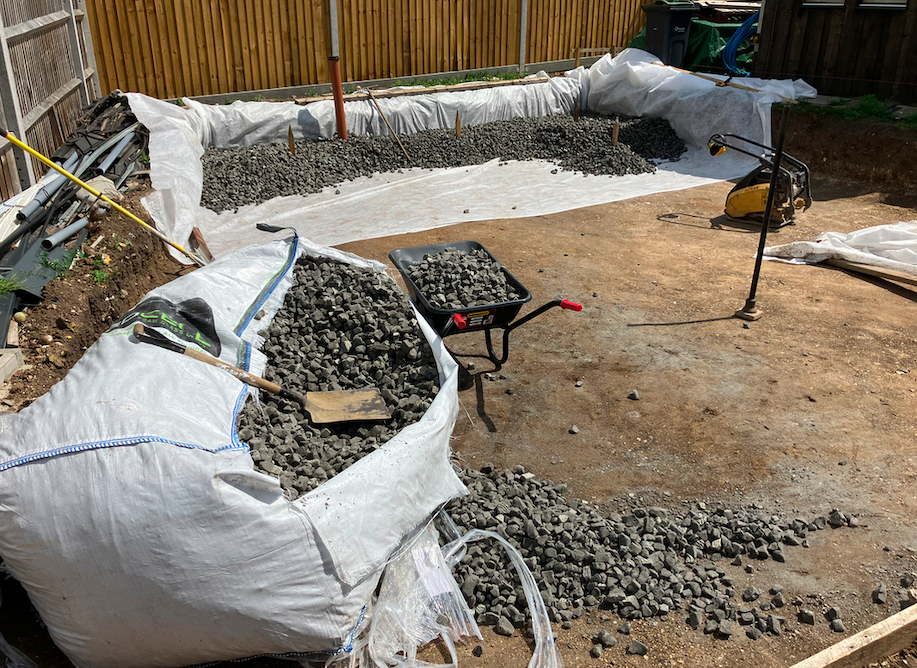
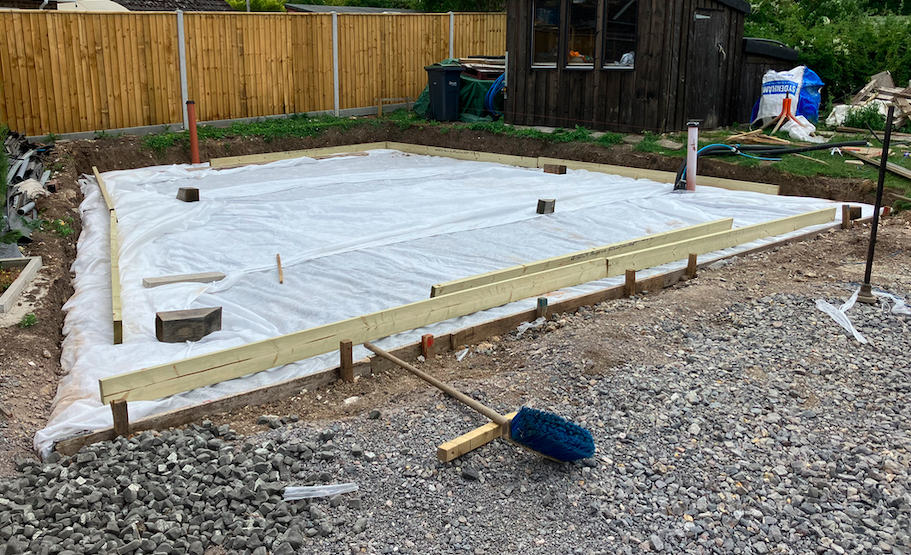
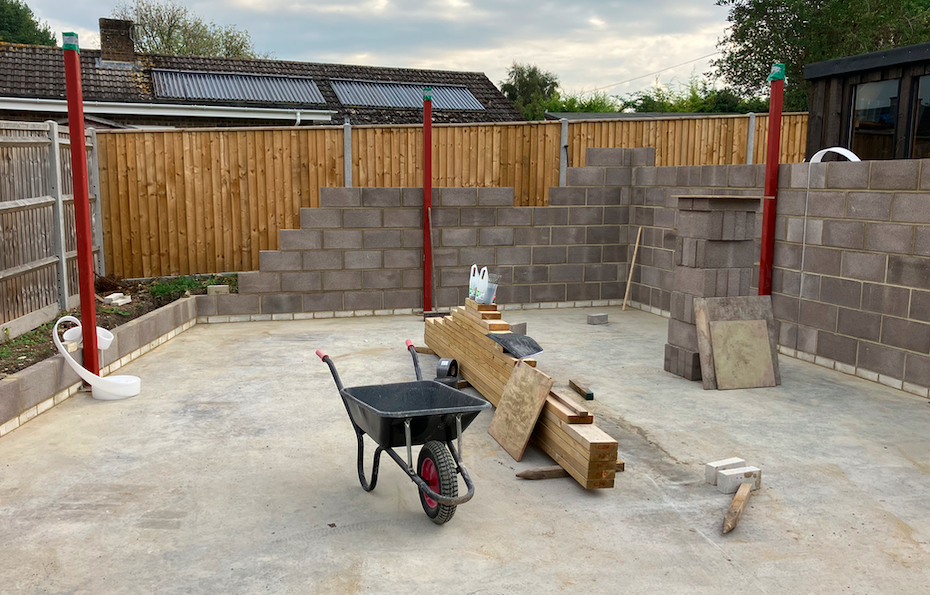
I wanted to build a garage/workshop that would be comfortable to work in year round and also keep the cars, bikes and tools that are stored in there in good condition so I decided I would insulate the slab and eventually settled on Geocell Foam Glass as it looked like it was going to be a pretty straightforward way of achieving an insulated foundation. We dug a hole and took the spoil to a local farmer on a Transit tipper, lined the hole with Geotextile Membrane and then bought the Foam Glass in. Access is a real problem for us so I had it delivered to a nearby builders merchant and then I trailered it in, two 2 ton bags at a time. We pushed the bags over into the hole and spread it about. Foam Glass doesn't really like being spread about, it has a coarse texture that grabs hold of everything, but it is very light and we got there in the end. Once filled to the required level I whacked it down. That was quite a difficult task as well as when I turned the whacker it would lift up the Foam Glass that I'd just whacked down. Again, I got there in the end though and covered the compacted Foam Glass with the membrane. It may actually have been easier to cover the Foam Glass with the membrane and then whacked it. Next time I'll try that (there won't be a next time!) I then built the formwork for the slab, lined it with DPM and set out the steel work following the very comprehensive plan provided by the SE. Concrete was poured and power floated as I was going for a painted floor finish (that changed...) The concrete was covered and left to cure following more comprehensive instructions provided by the SE and that worked well, not one crack has appeared in the circa 7m x 7m slab. The walls were going to be single skin blockwork so wind posts were required. I resin anchored those in place and then awaited the arrival of a highly recommended bricky. If the bricky had known how to use his laser level he would have been dynamite... Unbelievable really. I took the inaccuracies in the block work out with the wall plate so that I had a level starting point for the roof.


- 2 replies
-
- 1
-
-
- insulated slab
- detached garage
- (and 1 more)
-
SketchUp fantasy Garage. Drawings for building control
Russdl replied to Russdl's topic in Garages & Workshops
Thanks @Iceverge I’ll start another thread a bit later today regarding the Foamglass etc.- 27 replies
-
- 1
-
-
- detached garage
- structural engineer
- (and 1 more)
-
SketchUp fantasy Garage. Drawings for building control
Russdl replied to Russdl's topic in Garages & Workshops
@Andehh That’s really interesting, my original plan was a side opening door for all the reasons you mention but then changed my mind because I didn’t want to loose the inside wall space and I had heard how difficult they were to set up properly, I hope it’s 3rd times a charm for yours. We went for the Hormann sectional door in the end which doesn’t take up too much head room and the six strip lights are around the perimeter so the open door doesn’t obscure them. -
SketchUp fantasy Garage. Drawings for building control
Russdl replied to Russdl's topic in Garages & Workshops
I should have posted all this yonks ago because the garage is up and functioning now but you’re absolutely right, a piece that big was really really heavy. It came in a roll. That didn’t roll! -
SketchUp fantasy Garage. Drawings for building control
Russdl replied to Russdl's topic in Garages & Workshops
@Andehh that’s our experience as well, similar door but slightly thicker (I did go over the top). The garage temperature is really stable. -
SketchUp fantasy Garage. Drawings for building control
Russdl replied to Russdl's topic in Garages & Workshops
The garage door is well insulated and thermally broken from the outside as best I could. -
SketchUp fantasy Garage. Drawings for building control
Russdl replied to Russdl's topic in Garages & Workshops
I’m waiting to see how this winter goes but ready to add ventilation if required and I’ve got water and drains in there so I could do that if it looks like it needs it. So far the temperature is very steady but humidity follows the outside humidity but around 5-10% lower so that may be a problem with this grand design. -
SketchUp fantasy Garage. Drawings for building control
Russdl replied to Russdl's topic in Garages & Workshops
Good question, I got a bit carried away and it is over the top I guess but I wanted a warm dry garage. No heating and the door does open and close as required to get stuff in and out. The other night it was 3 degrees down here, the garage was at 18 degrees the day before and 17 degrees the following morning. It gains heat from a warm car getting put in there and/or charging up a hybrid car overnight. No ventilation requirements, at least none that I could find and it’s been signed off by building control so I guess they weren’t aware of any either. No, no secondary door or windows but the electric sectional door can be opened from inside or outside in the event of a power failure.- 27 replies
-
- 1
-
-
- detached garage
- structural engineer
- (and 1 more)
-
Designing my new build detached garage in SketchUp was easy. Finding someone to convert my fantasy garage into something that Building Control would be happy with was more difficult. I wanted the detached garage to be well insulated, and I may well have got a bit carried away. I wanted to use Geocell Foamglass for the foundation topped off with a concrete slab. I then wanted single skin blockwork clad with external insulation that married up with the Foamglass so that the slab and block work where inside the thermal envelope. I also wanted a warm flat roof. On top of this the garage was to be trapezoidal in plan to make the most of our odd shaped plot and big enough at the front to take a 5m garage door and finally I wanted a thermal break at the door between the slab and the outside world I contacted a local Structural Engineer who came round for a site visit. There more I spoke the more bewildered he looked. He'd never heard of Foamglass, not necessarily an issue but he didn't seem even vaguely interested in finding out more about it and its utilisation. I rapidly came to the conclusion that I couldn't work with him so I pondered my next move and decided to get in touch with a (well known on here) Structural Engineer/Architectural Designer who happens to live at the other end of the country. I wondered if he'd be able to help me out or steer me in the right direction. It turned out that he could. More than that, he took on board all the odd things I wanted to do and worked with me brilliantly. He's an absolute mine of information and had lots of great input with which to finesse my design and he clearly knew what he was talking about which is so reassuring. A site visit wasn't necessary, I provided a site survey and soil survey from the house build and then photos and Google Earth filled in any blanks. I probably drove him nuts, every drawing he sent I added to my SketchUp design because I really wanted (needed) to understand how it was going to go together and didn't want the standard "the builder will know what to do". There was a great deal of detail in the drawings: The upshot of this long story is that working with a Structural Engineer/House Designer who I'd never met and who never visited the site was a great experience and I'm glad I looked further afield than the local offerings and would recommend the same approach to anyone else looking for an SE/Architectural Designer. You’ll find him here:@Gus Potter and if you’re looking for a Structural Engineer/Architectural Designer I would heartily recommend you get in touch 👍🏻
- 27 replies
-
- 4
-
-

-
- detached garage
- structural engineer
- (and 1 more)
-
Garage construction. Stick build or blockwork?
Russdl replied to Russdl's topic in Garages & Workshops
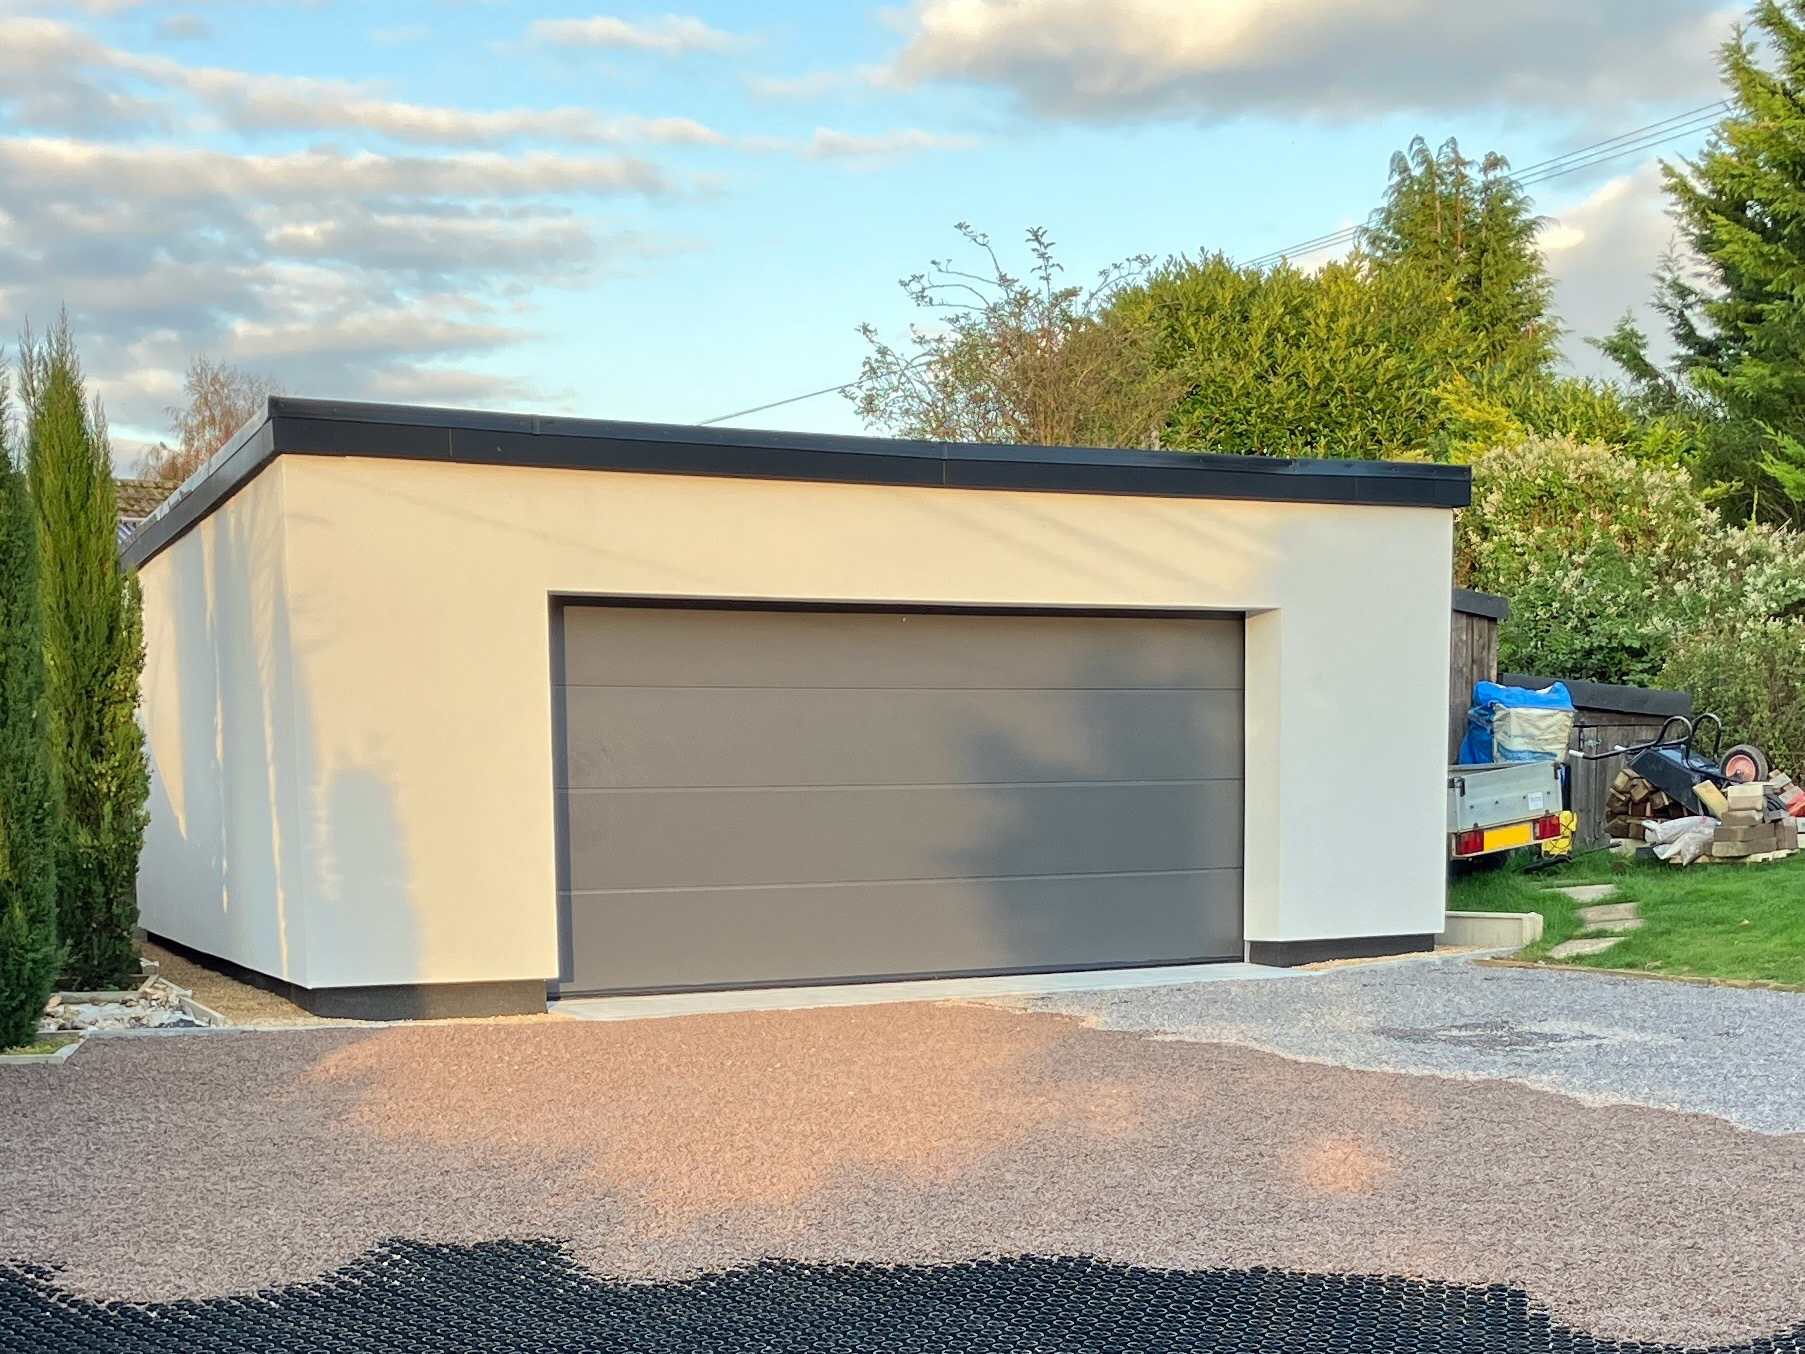
Well I took my own sweet time as ever but I've finally made it from SketchUp dream. To block built reality - and even a driveway going in after three years of occupation! The build was a long slow process, fitting it in between work, other projects, trades availability etc but I'm very pleased with the end result and so far it's performing as planned (should a garage perform?) One thing is for certain, it will never pay back the investment, a bit like the cars and motorbikes that reside within, but I'm not concerned about that. Anyway, it was not all 'standard' construction so I'll put a few posts up seperately highlighting the different stages that may be of use to others.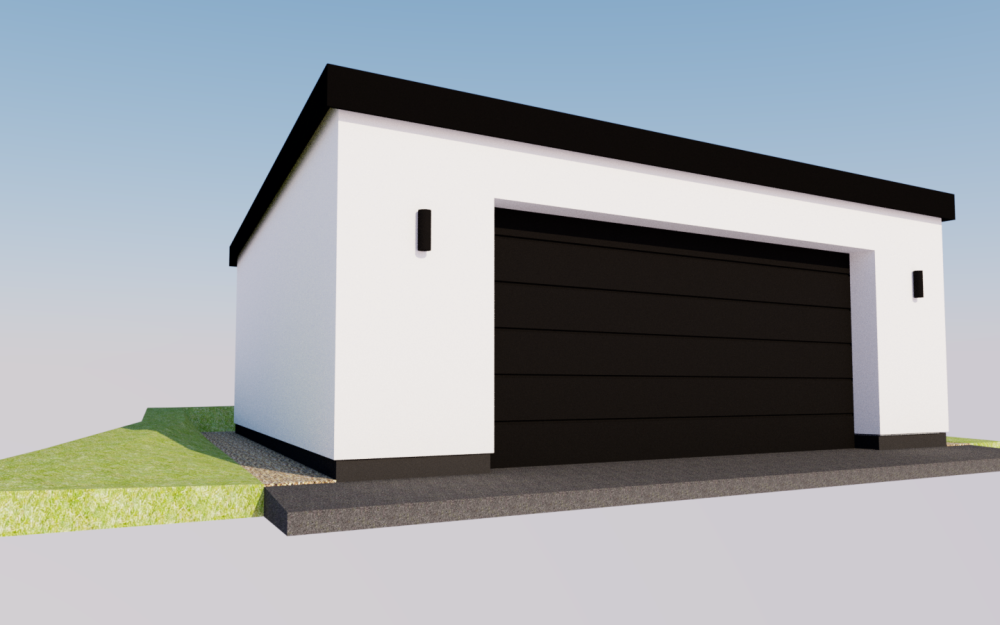
-
Agree with all the above, especially the advice re ditching the gas, an induction hob is superior in every conceivable way. Work on the insulation and air tightness. If you can get the 3 phase for a few grand more I think it would be well worth the expense to future proof your house. Who knows how many EV’s you’ll be charging overnight in 10 years time, or how big your household battery is that needs charging overnight etc etc.
-
Speak to a planning consultant?
-
I can see your concern there from the photo. I’m guessing there will be door’s/stud wall to hide the gubbins? If so, I would route a channel through the wood floor where the doors/wall will go and then waterproof seal the gap between the two sections of floor (which would be hidden by doors/wall) and then install a tiny flood barrier so if the worst did happen it wouldn’t affect the whole floor.
-
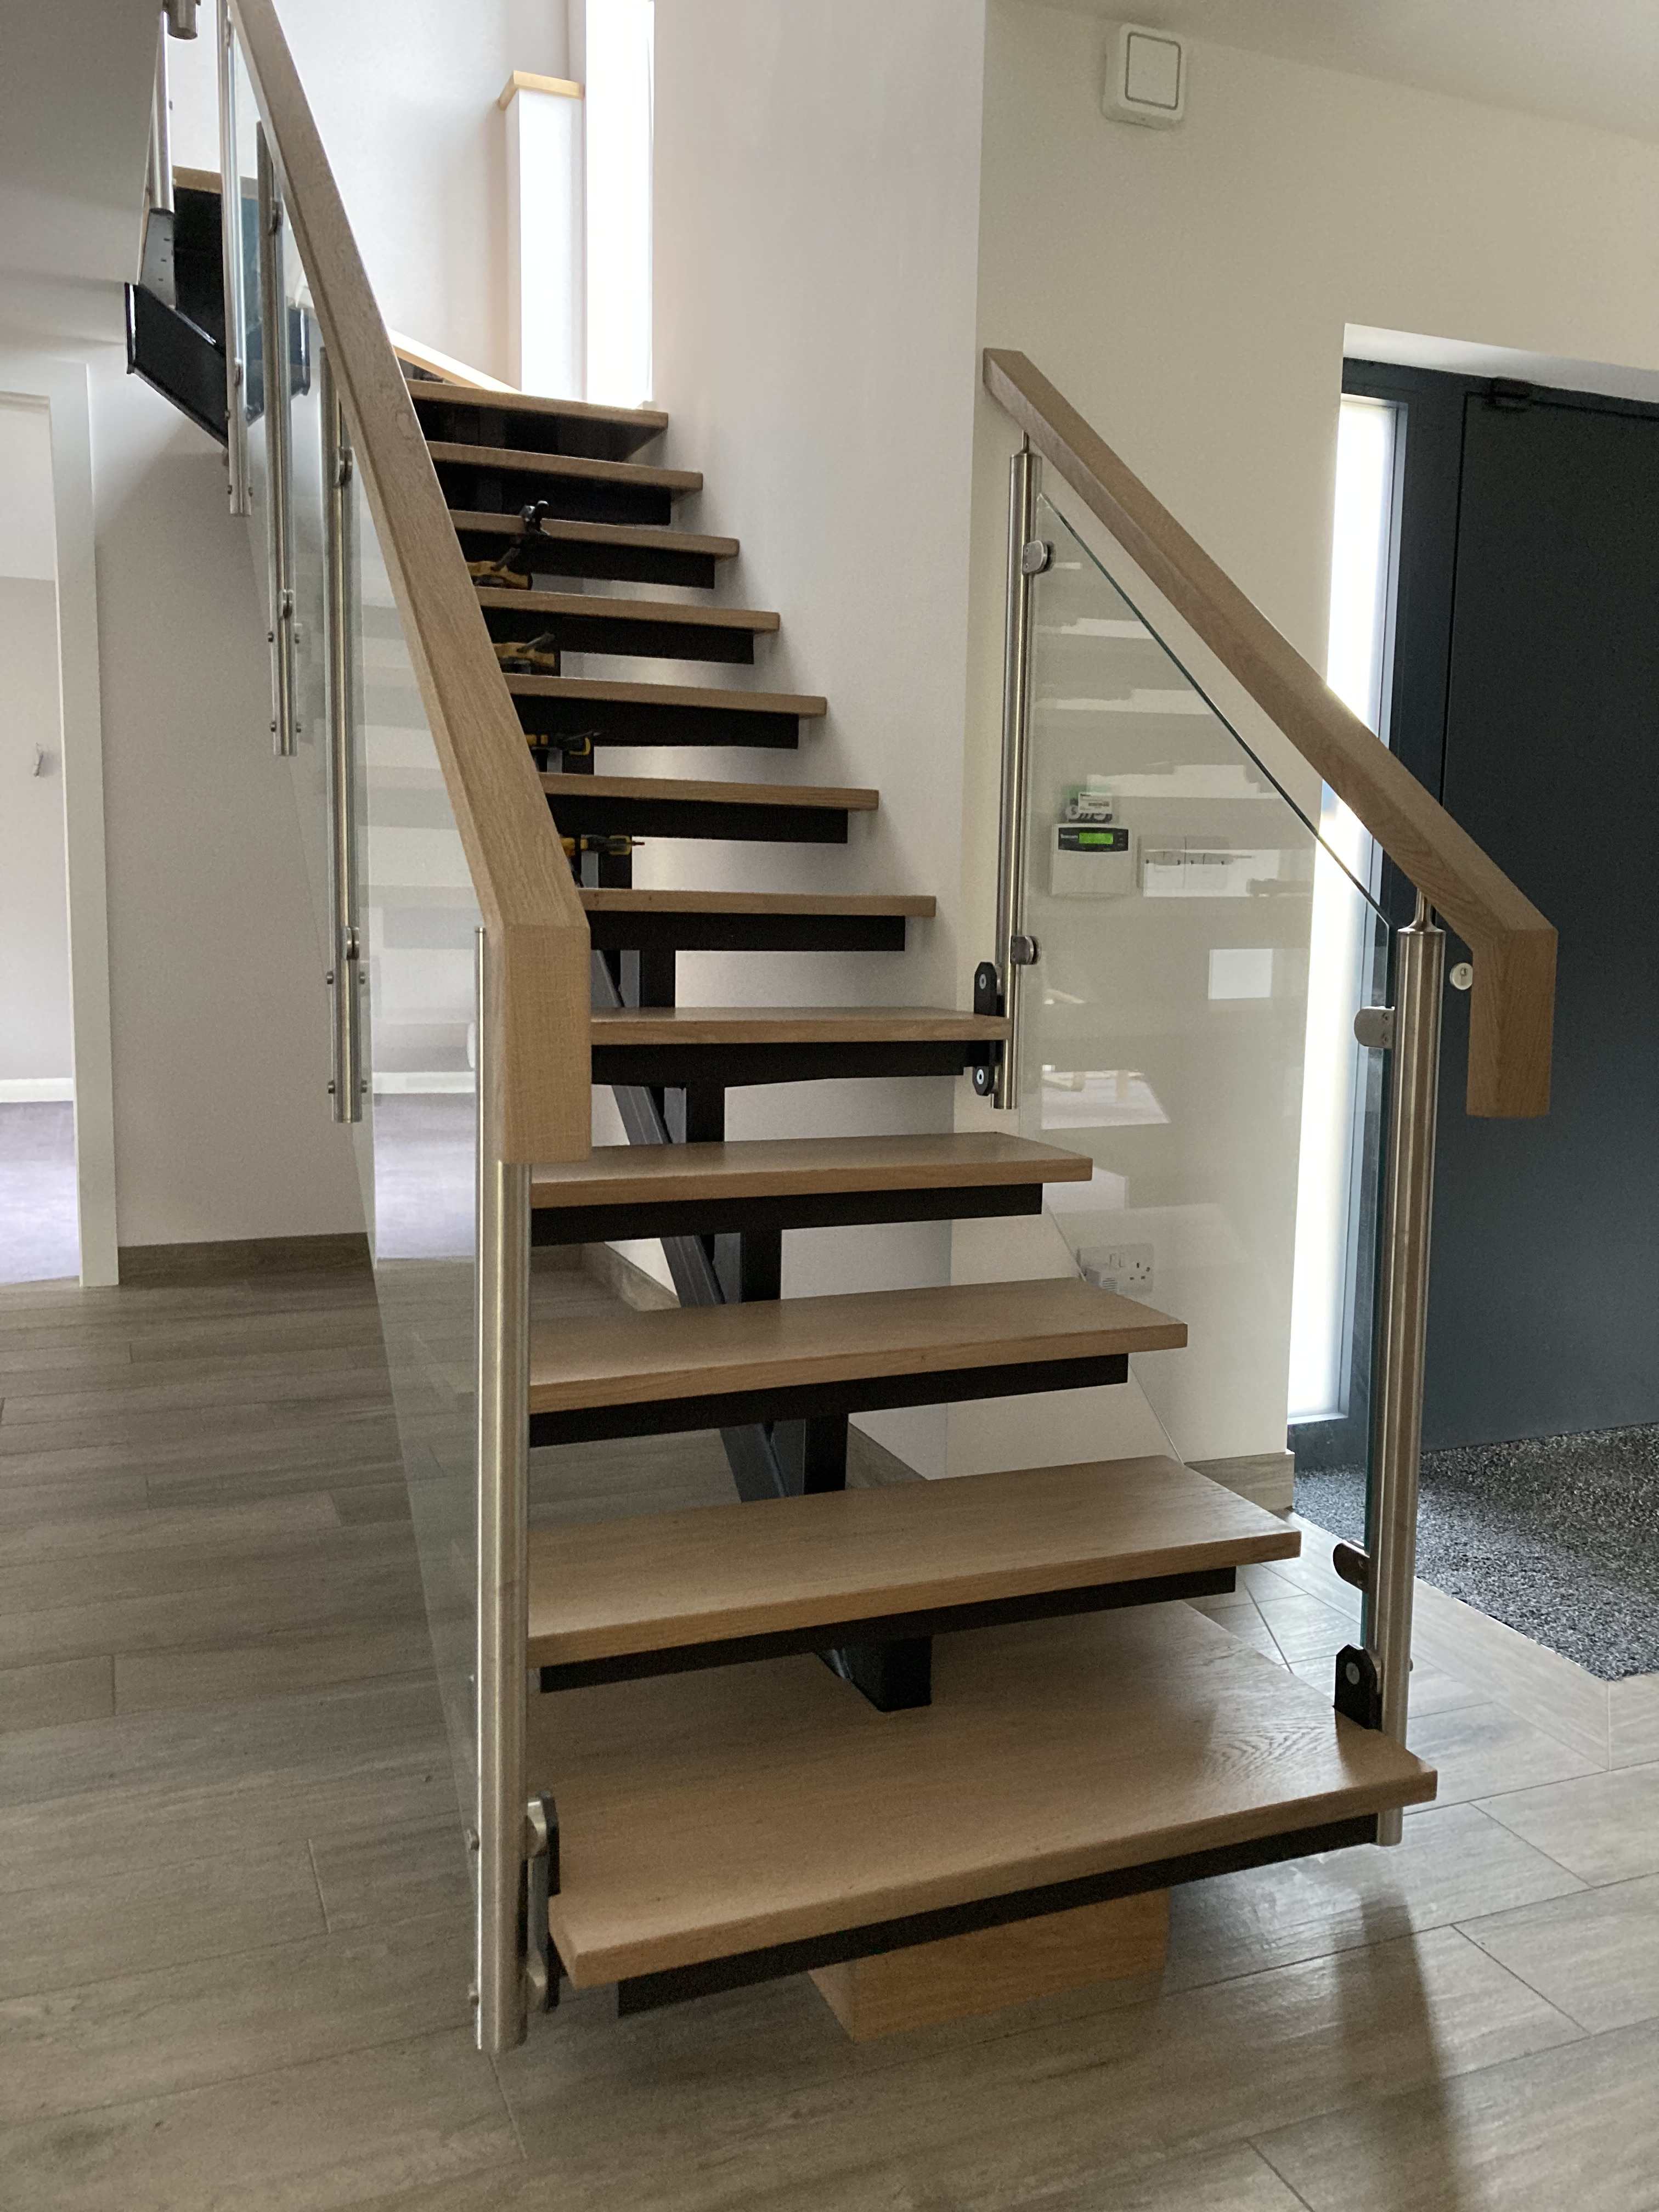
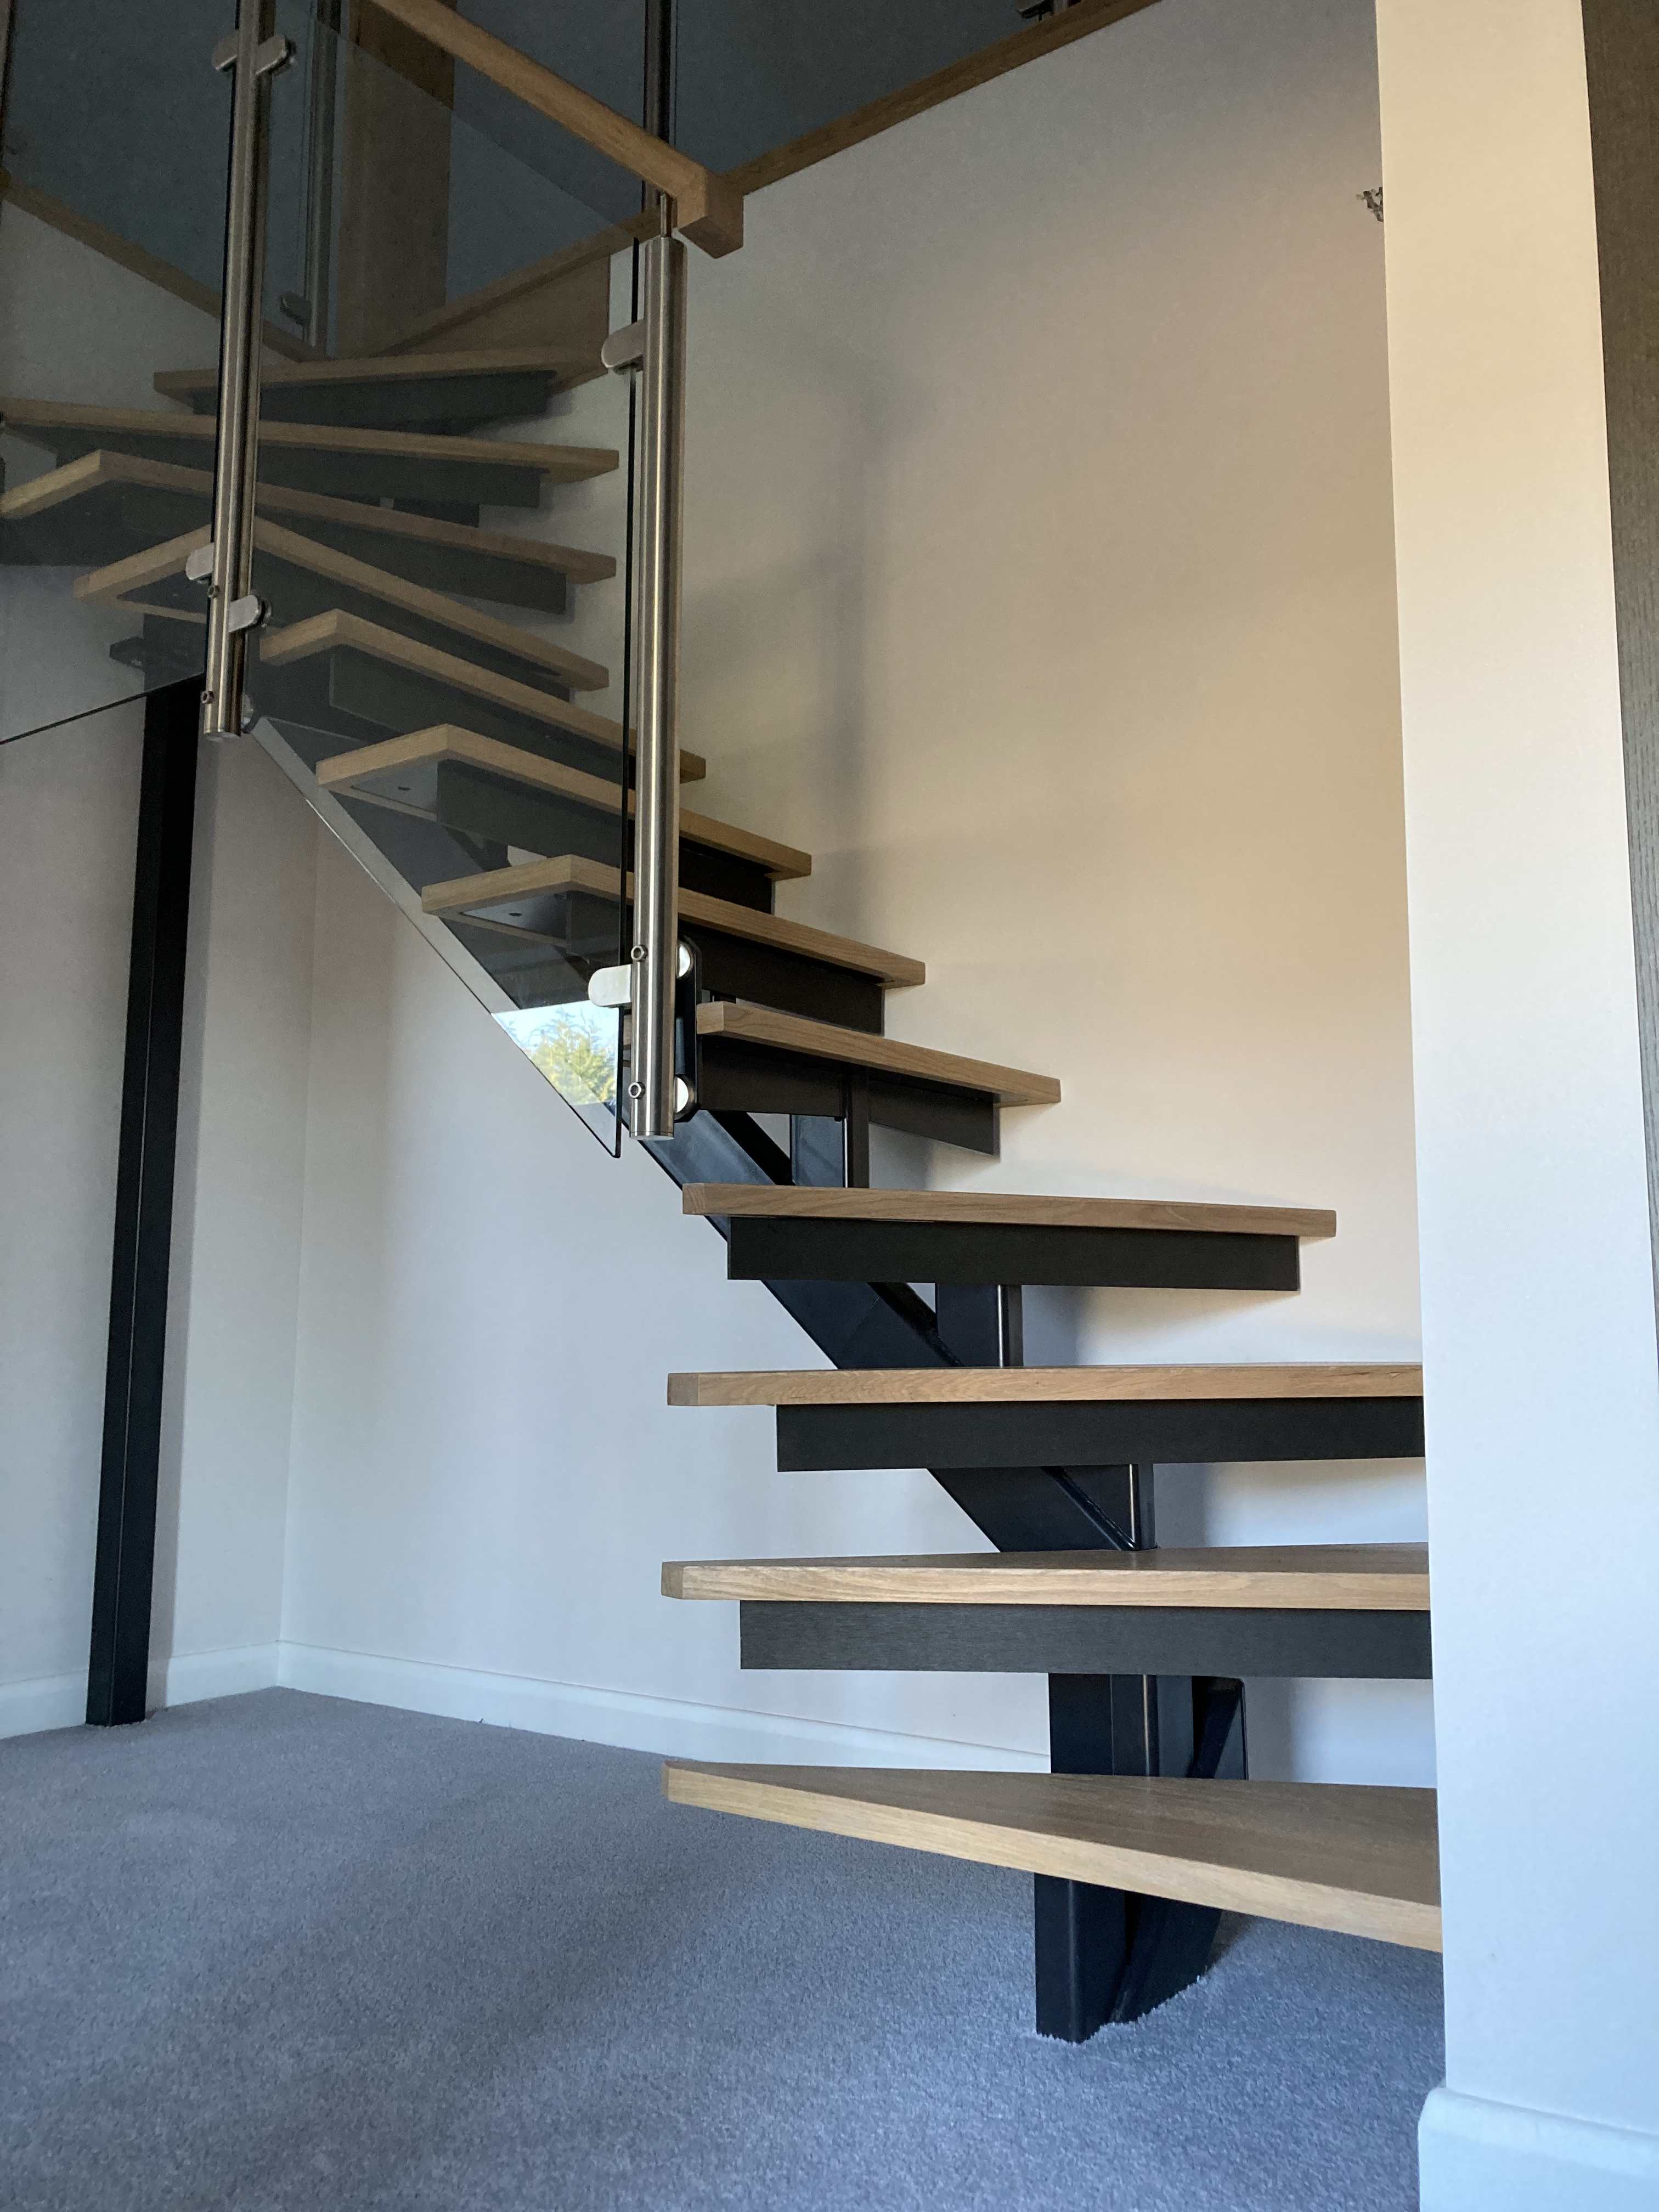
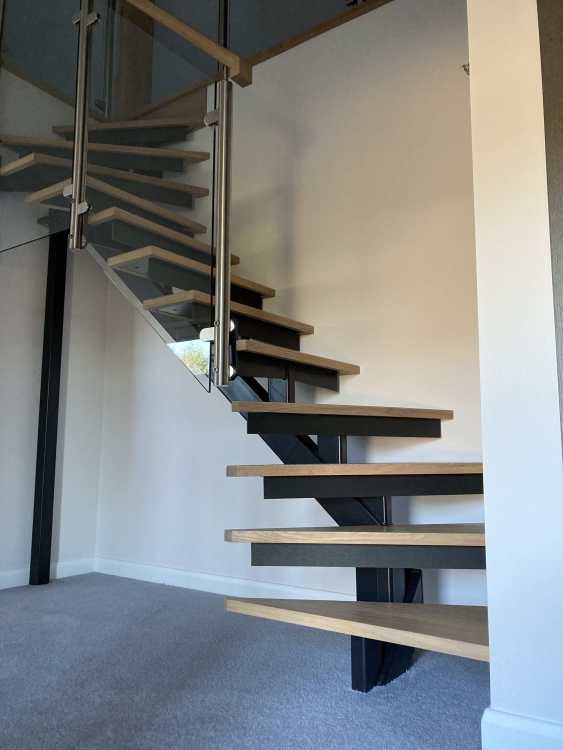
We have two steel spine staircase, designed on the mighty Sketchup and fabricated by the local metal fabricator. The main staircase is relatively easy going and then there is a smaller, steeper one up to the accessible loft storage space.

-
Grey sticks out like a sore thumb.
Russdl replied to CalvinHobbes's topic in General Self Build & DIY Discussion
I’m not entirely sure I understand the question but if I have got the right end of the stick: We used spray paint that was suitable for plastic on several external power outlets to turn them from grey to black and they remain very black four or so years later. No sign of flaking. -
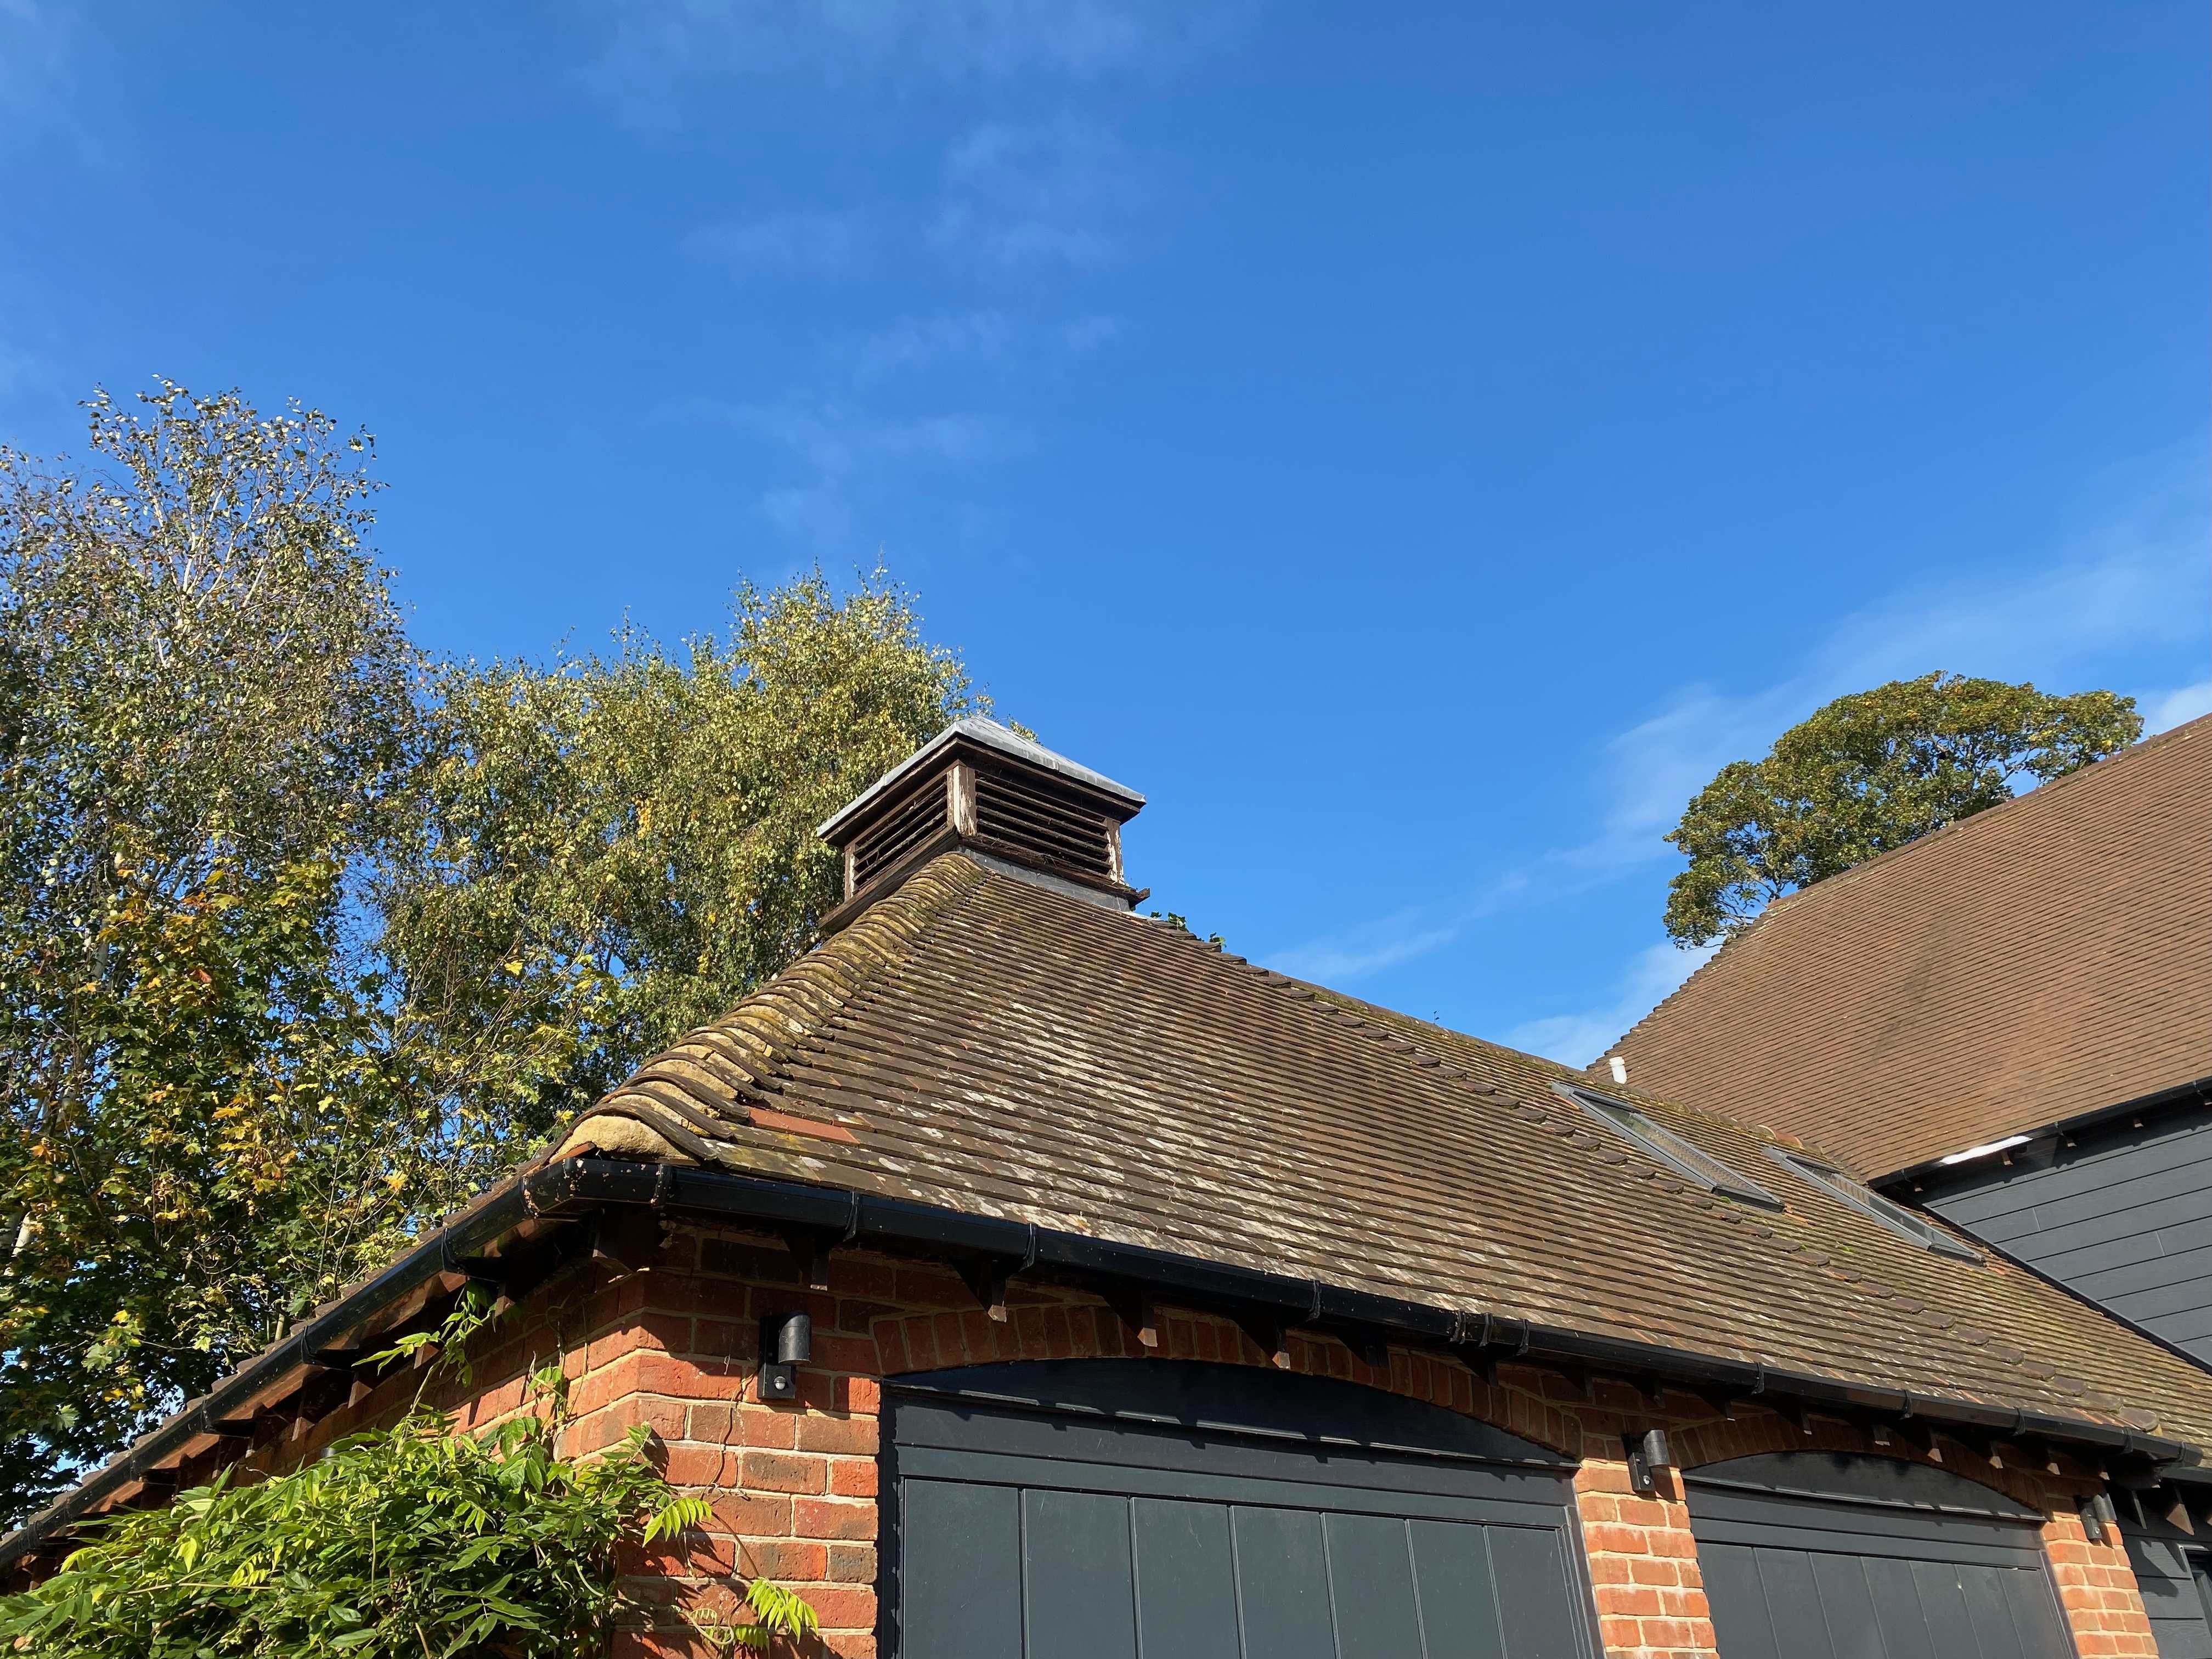
Best way to access 'pyramid hipped' roof.
Russdl replied to Russdl's topic in Roofing, Tiling & Slating
I guess it would make completion of that roof joint a whole lot easier if no one can see it. -
Best way to access 'pyramid hipped' roof.
Russdl replied to Russdl's topic in Roofing, Tiling & Slating
Supplementary question. What is the wooden thingy? I presume it's a fake ventilation thingy. I'm guessing it serves no purpose, the house is around 25 years old in a cul-de-sac of similar looking buildings with similar wooden things on their garage roofs. -
Best way to access 'pyramid hipped' roof.
Russdl replied to Russdl's topic in Roofing, Tiling & Slating
@Andehh I initially thought they wouldn't be suitable to work off but having a look at some maybe they would. I found one nearby that seems to have plenty of reach.
-
Anyone using Intelligent Octopus....
Russdl replied to NSS's topic in General Alternative Energy Issues
It seems that what I did was correct and last night it worked as required, my problem would appear to be solved. -
My son has been asked to quote for a job repairing a purely decorative wooden thingy on top of a garage which has a pyramid hipped roof. It's not immediately obvious in the photo below but the ridge joining the house to the garage is a good couple of feet lower than the top of the pyramid roof. He asked me what would be the best way to access the wooden thingy in order to work on it. I stared at him blankly. So, over to the hive mind if I may. What would be the best way to access and work on the wooden thingy? Is there a better option than full scaffolding? Thanks in advance 👍

-
Anyone using Intelligent Octopus....
Russdl replied to NSS's topic in General Alternative Energy Issues
I have an Intelligent Octopus Go / Zappi question. I’m trying to reduce the rate* at which the Zappi charges the car overnight from the standard 7kW to around 4kW. To do this I changed the ‘Device Limit’ in the Installer Settings from the default 31.8A to 15.0A as research indicated that would do the trick. Turns out it didn’t do anything and the car is still charging at around 7kW. Does anyone know whether this is because IO Go overrides the Zappi settings? Or have I got something wrong here. *My main fuse is 80A and if everything electric is on overnight at the same time I believe it’ll go pop. Clearly with the IOG tariff I want everything electric to be on during the 6hr cheap rate but I can’t decide when the car will charge during those 6hrs.