


Radian
-
Posts
2586 -
Joined
-
Last visited
-
Days Won
15
Everything posted by Radian
-
There ya go
-
I prefer the Australian & New Zealand versions. Much more interesting projects going on down under IMO.
-
Search for 'fishing magnet'
-
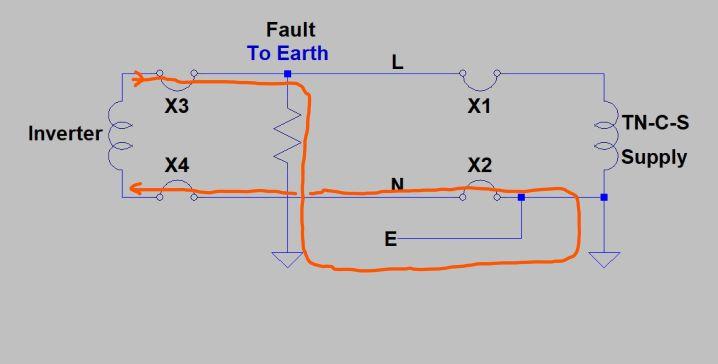
Permanent installations connecting back at the meter tails (Henley blocks or inside CU) via MCB/isolators (not shown) are referenced to TN so residual current protection for inverter sourced currents is maintained: Just getting this 'straight' in my head and putting it somewhere for when I next forget it. 📌 in about a week's time

-
Interesting subject... large isolated conductive structure. Might be able to harvest a small amount of power from local radio transmitters. Or make it into a radio telescope if no transmitters nearby. If it were mine I'd definitely want to be able to make a connection to it.
-
Yes, the valve is often another part that needs cleaning. Is it just there to seal the foam inside the gun when you change cans? Good write-up @Onoff
-
Path of inverter generated current flowing through fault from Live to Earth, returning via TN. Balanced current seen in inverter, unbalanced in CU RCD: Of course this is for a temporary plug-in style grid-tie inverter, a 'proper' installation would make the connection the other side of the main breaker X1, X2. Then that would provide Earth leakage protection for the house circuits but not for the separate connection to the inverter. 'Proper' installations would have circuit breaker protection for this separate cabling to the inverter but do these also combine RCD protection as well?
-

How to board loft - advice please!
Radian replied to Porthole's topic in Lofts, Dormers & Loft Conversions
My house in Weymouth is built from your local stone 😀 -
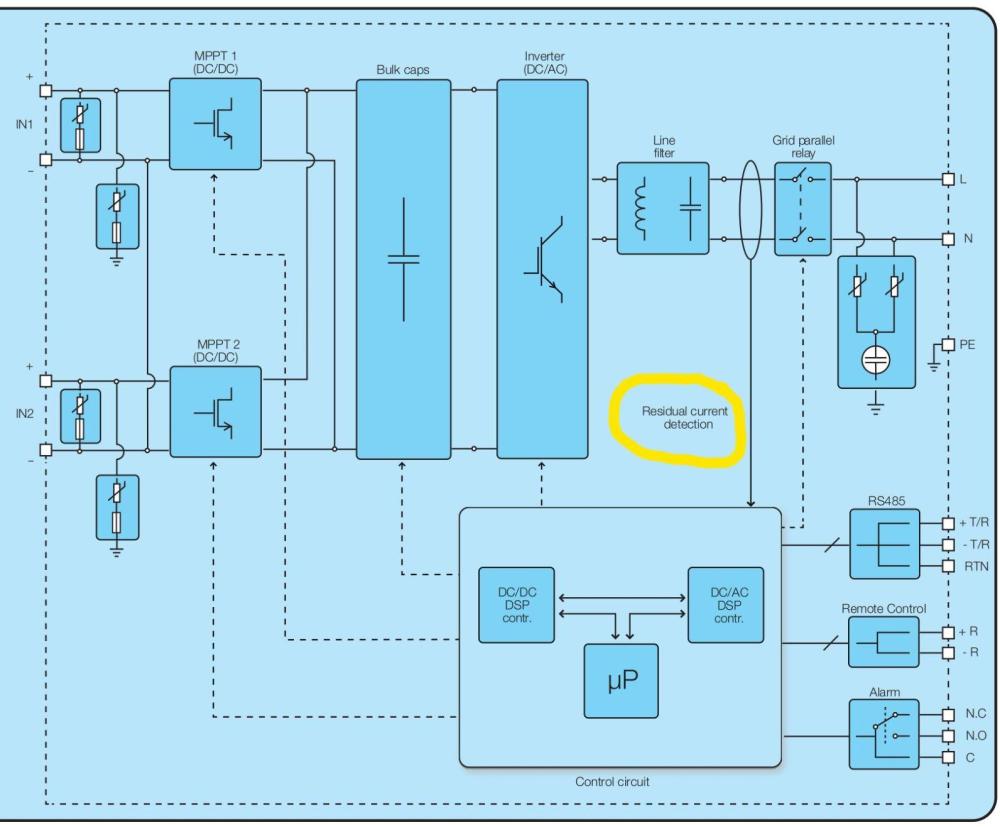
I understand that Solar PV inverters have residual current detection built-in, e.g. But what is the primary reason for this? Is it to disconnect the generation if a leak to Earth fault occurs within the inverter or solar panel array - or is it to disconnect if a leakage to Earth fault happens in the AC wiring connecting the inverter to the incoming mains? I.e. if the inverter was providing the current to a Live circuit in the home which was accidentally touched then the inverter generated current would be shut off? While this latter case would be desirable I can't see how the residual current detection in the inverter could accomplish this as it's Neutral is not referenced to its Earth the unlike with the incoming mains. All current flowing out of L can only be matched exactly by current coming back into N as there is no internal link between N and E. I can see how the current path being completed through the TN connection back at the meter might trip the main RCD in the consumer unit but the inverter will only disconnect for anti-islanding purposes which have a different set of criteria to RCD protection.
-
How to board loft - advice please!
Radian replied to Porthole's topic in Lofts, Dormers & Loft Conversions
That's what I plan to do. I'm going to top-off my stack of original 200mm fiberglass and recent addition of 200mm mineral wool with Superfoil breathable insulation for a number of reasons - least of which is the R3.6 insulation value. Primarily it's to give a maintainable surface as all the fiberglass already in place has suffered over the years and is covered in dead insects, cobwebs and other detritus. No way can you vacuum or otherwise keep the surface clean. The other slight benefit should be the silver reflective coating helping to reflect IR off in summer and reduce emissivity in winter. Reduction in wind wash is yet another advantage. -
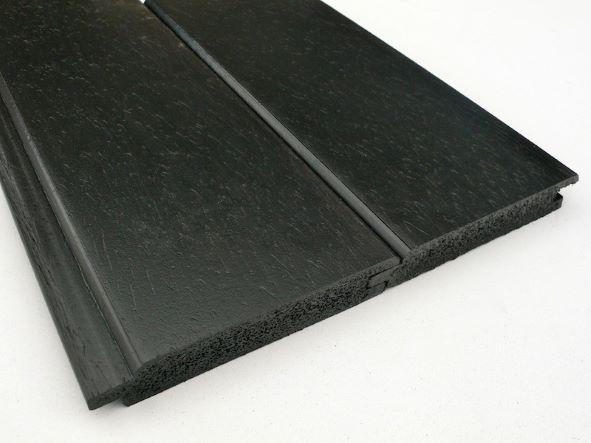
Unless you ca be sure it will drain down through the earth below (assuming it's not solid concrete) then yes bore some drainage holes. You can always try filling with a hose and see how long it takes to drain now. Render at low level is a nightmare to keep looking smart and tiles will be a real challenge to keep stuck on. But you can also get composite or solid plastic deck boards in a variety of finishes. In this case there's no need for battening and spacer gaps as there's no need to ventilate behind. Some very sexy finishes in these although a tad pricey compared with timber. The timber option I described has lasted me for nigh-on 20 years in some planters I made although that was Douglas fir. For a clean finish you could also look at Kedel recycled plastic T&G cladding: Cuts and screws together like real wood but lasts for 1000's of years unfortunatley.
-
Not sure what adhesive you would use to hold tiles on when that gets waterlogged. If it were mine I think I'd clad it in deck boards. Probably start by totally wrapping in 1200g black DPM then do vertical 25mm battens every 600mm then screw on deck boards (S/S screws) leaving a 10mm gap to allow air to circulate. If you used 150mm wide planks then you can frame the top with the same planks. Mitre the corners for a really neat finish.
-
Could be pumped in afterwards, or possibly not done at all. Even if filled, some types of full-fill cavity insulation can be unsuitable for exposed locations and if they get waterlogged can actually cool your house in the same way evaporative wine coolers work. How much wind/rain has the outside wall of your coldest room seen and what construction materials make up the cavity you're describing?
-
You spelt algae wrong.
-
I don't need to go that far, I've got my own collection. Waiting for me to take them to the recycling centre.🙄
-
I saw someone on YT use an isolating xformer followed by a Variac and bridge rectifier+smoothing capacitor. I don't have a Variac but then I thought about using an old shaver's transformer which is isolating and has a 120V tap which would give about 170VDC when rectified. Not much power though so didn't think it worth the bother.
-
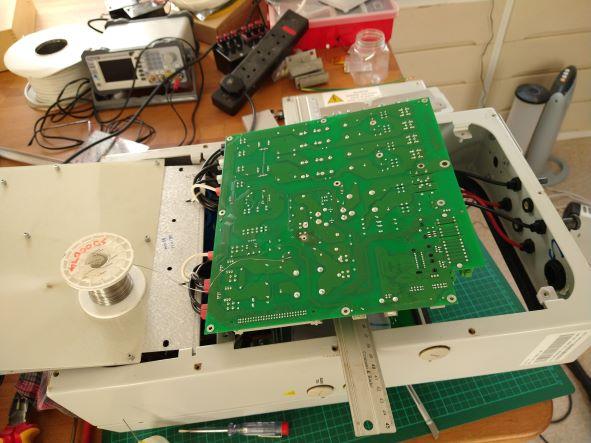
Very impressive array eh? 🤣 Well, I've had these panels loitering in the dark recesses of our garage for a few years now. Picked them up for beer money from a company that had gone into admin - from their showroom, hence why all different. There's a fifth 250W panel up on the 'treehouse' roof that's been running the garden lighting from a 24V LifPo4 all the while (the reason I got these in the first place). The white box lying on the deck, behind the ladder, is a more recent acquisition - an Aurora PVI-3.6-TL-OUTD (AKA ABB) inverter that a local Farmer was chucking out as it had failed. About that: Just a bad solder joint on a relay pin that got all scorchy. Easy Peasy fix. But how to test the repair? Drag out the unused panels of course! Such fun. Oh but they're all different sizes/powers... no problem. As luck would have it they're all very similar in current so in series there's no problem. Their wildly different voltages at MPPT is inconsequential. Their powers just sum. Today was overcast but it still managed 700 Watts so yes the fix worked. Now before anyone asks if I've notified the DNO, this is not permanent which got me thinking: what do inverter repair shops do to test their work?

-
That's why you really don't want it 'grounding out' on something solid. The same applies to brick/block/stone - your building units can then become loose after the mortar has cured. There is one little 'trick' that springs to mind though - if you're whacking something down to a level on a full bed and you overdo it, then usually you just have to take it on the chin and lift off and redo the bed. But because the muck is hydraulic, i.e. incompressible, you can sometimes hammer-in a strip of plywood or something a bit narrower than the bed thickness (and the same width as what you're lifting) as a drift which will force the mortar to bunch-up and push up the thing that needs lifting at one edge. You definitely don't want to just lever it up as that will create voids but having it being pushed up by the mortar is fine. At a given point though, if you've squeezed all the water out, it will just lock-up solid. If it does work you can then pull out the drift and point in the gap you made at the edge. I've often done this successfully with heavy concrete patio slabs but you'll certainly need a big old lump hammer to persuade your bigger stones. Go careful!
-
I bought the even cheaper one which despite being advertised as a fence & decking sprayer behaves just like all the other models. It accepts all the different spray heads (although the fence head is good for walls) and paint containers so you can get a 1800ml pot. I've even sprayed some furniture with water based satinwood. I have to admit I almost gave up to begin with: the low pressure, high volume mode was new to me and I couldn't seem to get a decent spray pattern whatever I did. Somehow, once I got the right thinning amount and finally got a test surface covered OK, it all became easier thereafter. Another one of those 'getting the knack' kind of things.
-
Bit of an off-label use?
-
Re-boarding the loft (this time so I don't squash the insulation)
Radian replied to HughF's topic in Heat Insulation
I can't really explain why, but I don't like the idea of those either. My best shot at an explanation would be that it puts concentrated point loads on chipboard flooring sheets that are barely satisfactory with continuous support from joists on a typical 600mm pitch. @JohnMo I want to believe though - please persuade me! -
I was talking about corrugated cardboard. Seriously, it has a reported R-Value similar to other common insulation materials: Typical R-values Material RSI-value (m2·K/W) R-value (ft2·°F·h/BTU) Icynene spray 0.63 3.6 Open-cell polyurethane spray foam 0.63 3.6 Cardboard 0.52–0.7 3–4 Rock and slag wool batts 0.52–0.68 3–3.85 To avoid convection on a vertical surface, you would align the flutes horizontally. Insulation is primarily a matter of trapping air (one of the lowest thermal conductors) in an envelope with low thermal conduction/contact surface area. Fluted cardboard sheet meets these requirements. The downside is that it is not as robust as mineral wool of the other cellulose products. But sandwiched between ply sheeting it should perform equally well - provided it has a vapor control layer to prevent condensation forming on the cold side.
-
Air source heat pump on very old stone cottage
Radian replied to blankton's topic in Air Source Heat Pumps (ASHP)
Calculating the heat loss will be super-tricky if you're uncertain of the wall makeup. Even if you took a core sample it probably varies a lot anyway. Another approach is to temporarily use a thermostatically controlled electric heater and monitor power consumption vs. average outdoor temperatures over a period of time. If the heater (or possible more than one) does its job and maintains a fixed indoor temperature then the average daily outdoor temperature difference divided by the total kWh for each day will give you a slope from which you can read off the heating loss per degree difference indoor to outdoor. From this you can estimate your space heating demand for whatever worst case you require. Domestic hot water is a separate exercise that you can do with made-up figures. -
Or a few layers of corrugated cardboard possibly for free 😄 I think the idea is to keep it horizontal to limit convection. Also it needs to be vapor sealed to prevent it getting damp from condensation on the cold side.
-
Another 'Cool Energy' heatpumps thread
Radian replied to HughF's topic in Air Source Heat Pumps (ASHP)
The model I'm thinking of is small CO2 Laser Cutters. They are pretty much all assembled in china, big sheet metal boxes with a handful of standard components like NEMA stepper motors and HV PSU's and, of course, the big glass tube. The almost exact same looking product is then sold by a few 'reputable' US or European companies. With warranties, and sometimes better microcontroller boards. But at 5 x the price. I wanted one but £2k vs. £400 from Ali was no contest. The thing arrived from China on a palette and was workable. About £100 in replacement parts over the 6 years or so still seems like a bargain. The key is to have enough standard components in the product and then DIY service the thing. It requires intimate knowledge of how it works and a particular attitude towards time vs money. But sometimes the stars can align.


