

BotusBuild
-
Posts
1258 -
Joined
-
Last visited
-
Days Won
10
Everything posted by BotusBuild
-
First off, keep it simple and easy to do. Cutting PIR to a required angle, or using mineral wool is the easier route. Personally I would use PIR and Illbruck FM330 (check this, may not be right) closed cell foam to close the gaps. For belt and braces, then tape the joints with a some air tightness tape. You'll be doing all this while the trusses are open from above and below so should have room to do it. Just a bit fiddly and time consuming, but easy!
-
Getting there, and time to sell up
BotusBuild commented on BotusBuild's blog entry in South East Cornwall Low Energy build
Have you heard about my Wow! fines system. That'll be another £1 to collect towards the build cost 😁 -
Getting there, and time to sell up
BotusBuild commented on BotusBuild's blog entry in South East Cornwall Low Energy build
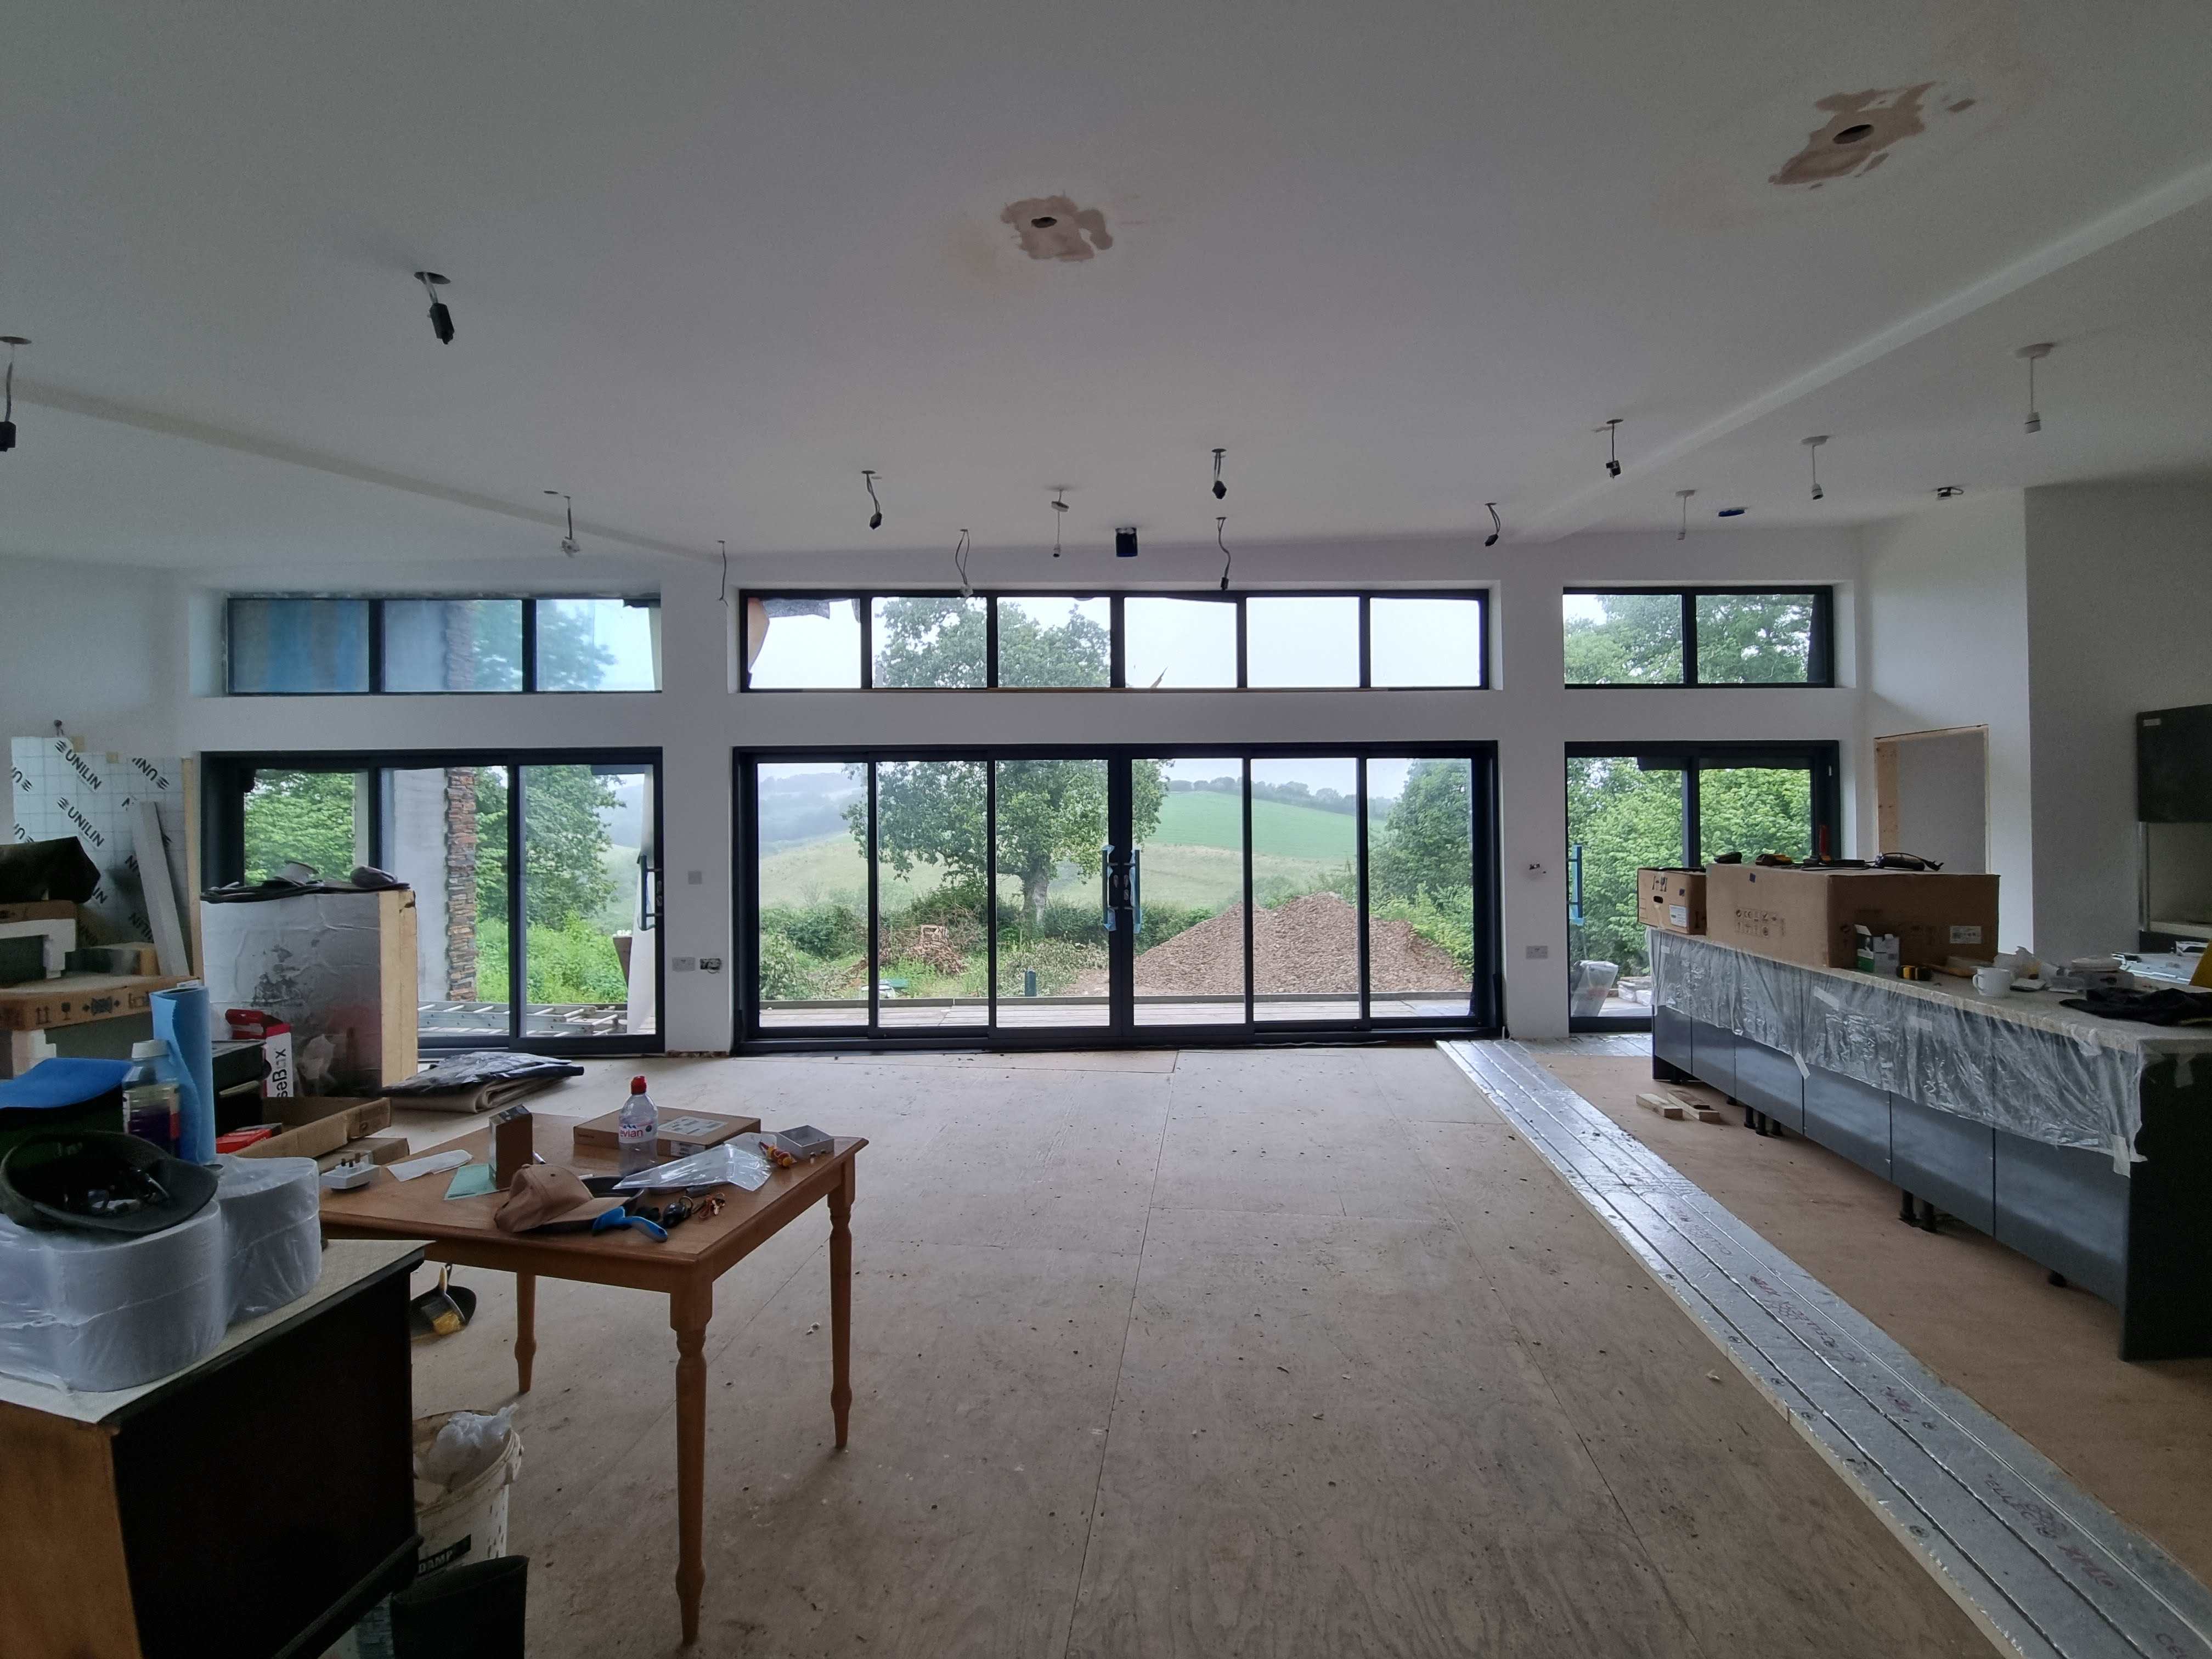
The bifolds are actually sliding doors. We did actually remove a smaller one to the right of it, and there is a tentative plan to remove a protuberance on the top left of the one that is left, but you can't see it in the photo. We have the field behind which we plan to plant replacement trees in for the 3 we have removed for the build (the walnut, a diseased horse chestnut, and the little tree). -
The last was always (still is) our biggest variable. Getting things right (quality) comes naturally to someone with a level of OCD (thank goodness not a high level) that i think all self builders have to one extent or another
-
Yes, it lasted all of 6 months and then is cut off, after paying in for close on 40 years, you get next to feck all in return
-
Talking to a conveyancer recently about this and they said most likely that stamp duty will disappear and an annual property tax will be introduced instead. This will be in place of the CGT rumour/kit flying. It beggars belief that in a little over a year, the UK finances are apparently in such a poor state. There's a lot of reasons, people, past governments that have a hand in this situation. We really should have followed the Norwegian model of handling North Sea oil revenue to create a sovereign fund.
-
I think you may have just taken the crown for length of build 🙂 I presume this is an old photo and that you do now have the downpipes from the guttering 🙂 It all looks very neat and tidy
-
Getting there, and time to sell up
BotusBuild commented on BotusBuild's blog entry in South East Cornwall Low Energy build
19-0088-BR-01-C.pdfOsmo oil https://www.screwfix.com/p/osmo-0-5ltr-clear-matt-solvent-based-interior-wood-finishing-oil/911ym?ref=SFAppShare Plans, some minor mods during build 19-0088-BR-01-C.pdf 19-0088-BR-02-C.pdf -
Getting there, and time to sell up
BotusBuild posted a blog entry in South East Cornwall Low Energy build
Don't Panic - we're not selling what we've been building. Back at the end of April (I thought it was longer ago than that - time either slowed down or we sped up, not sure which) SWMBO had just had a toe joint fused together to try to resolve a long period of pain following the critical infection she got over 3 years ago. We're pleased to say that it seems to have done the trick, and she has now rejoined me in getting the house ready for habitation. I left you all with another list to contemplate. So here it is with some brief updates: Hassle the SH1T out of the window installation company to investigate and fix the leaks (three fixed windows and a sliding door) that came to light after we did the first lot of plastering - it worked, and the window no longer leaks - yeehah!! the rest of the plastering - was all completed the rest of the mist coating and painting - one bedroom and an ensuite left more stone work - still on the list moving as much stuff into what we now call the attic (a very large room downstairs as we don't have a real attic) in order to clear all the other rooms - done Install the UFH upstairs with plywood cover - done, and manifold connected up and filled fit the bathroom - done fit the kitchen - done fit the utility and cloakroom, utility done electric 2nd fix - done and signed off rainwater soakaways - still on the list rainwater collection system - still on the list backfilling - partly done, still on the list concrete lego brick retaining wall - delivered, to be fitted Flooring - in progress Wood cladding - still on the list Air tightness test (as I write this, I think "oh, sh1t, I must get that booked in") - done and certificate issued Fit internal doors - still on the list Fit en suite - still on the list Build MY garage - still on the list A green roof system, because its on the planning application, and may be required for certificate of completion (unless someone can enlighten me as to how to avoid this, and be able to delay the installation) - still on the list So, that big window, the one in the middle bottom below. First chap who came to inspect and report back left the company without doing anything, so two chaps came out (I think mainly as protection for each other from my wrath). Suffice to say they inspected thoroughly having listened to the fact that we had investigated excessively to find the point of ingress of the water. The ensuing repair entailed the whole window (glazing, individual door frames, and the outer rail frame) being removed from the hole (thank goodness for the steel beams above), a manufacturing fault being rectified, and the multiple installation faults also be repaired and then finally reinstalled correctly. A few days later to allow the massive amounts of sealant that were applied to cure, we sprayed a large amount of water at the window and gladly it seems to be OK. We now await a traditional SW'ley storm this coming winter. All the remaining plastering was completed, and not only did the mighty SWMBO mist coat all but one bedroom, she also painted all the walls bar the bedroom and the en-suite. I'm not sure she wanted to see a paint roller for a few weeks after doing that lot. As you can see in the picture above, on the right hand side, we started laying the UFH insulation and pipes and overlaying that with 6 or 9mm ply, depending on what the final floor finishing was going to be (we planned ahead 🙂 ) In May, we were joined by our son who had stated clearly that he wanted to help us with fitting the kitchen. This was very welcome as there were a few heavy units to move into place, and it was fantastic to have a pair of stronger arms (than mine) around. And so with his help we managed to get to this point (left photo). Since then I've been doing all the finishing off (doors, plinths, hidden handles etc..) But the "pièce de résistance" was having the breakfast bar made from planks of the trunk of a walnut tree that we had to remove to build the house. Here it is in the right hand photo Having done the kitchen, focus turned to the bathroom. Here's the result We started putting down final flooring. In the breakfast bar picture above you'll see the stick down LVT that we had fitters into do, and we've done LVT click flooring in the bathroom, a bedroom, the utility and cloakroom, and one other room. We also had some of the backfilling done, meaning we could do away with the temporary steps upto the front door and the areas around it. So, still a lot to complete. This last week has seen the temporary utility removed and the permanent one installed, and a bed has arrived into the one floored bedroom. Selling up: We've sold our "holiday home", and our primary residence is on the market (anyone want a four bed detached with double garage in the Reading area?). Next week we begin the process of moving into a building site, albeit one with a few luxuries (like the ability to cook a full roast dinner without the electricity tripping, and have the option for a bath!) No new list this time around 🙂 -
Actual vs nominal door lining depth
BotusBuild replied to Omnibuswoman's topic in Doors & Door Frames
Did you get an answer? Such wood is sold with its pre-planed dimensions. After planing it is less, so 32mm becomes 27mm when you measure it. -
There is no harm in thinking about UFH manifolds placement, and how each loop would get to the one it needs to connect to (remember 2 pipe per loop when it gets to the manifold, leave room!) Starting using LoopCad to form some ideas on where pipework will be. For the MVHR, there are two main ducting systems, I refer to them as hard and soft. Hard ducting is unforgiving if something is built in the way of a route, difficult to put perpendicular to joists. Soft ducting (flexible, narrower pipes) actually needs a lot of room when you get to the manifolds (I know 😀). So think about options where the main unit can go and how it would impact on ducting design. Soil and waste pipe layout!! Discuss where all those sinks, basins, baths, showers and toilet etc. are going to go and don't forget possible plant room condensate and safety valve overflow pipes. For showers, think shower trays, steps, wet room??? And then make sure the builders know so that waste pipes can be located accordingly (don't ask me how I know!) HTH
-
Its true what you lot say!
BotusBuild replied to mjc55's topic in General Self Build & DIY Discussion
Well done. We're in our 60's, although when I started I was in my late 50's!!! Nearing the end of the tunnel, and overall it is immensely satisfying. Hint: put out a Wow tin. Like a swear tin but for all those people who will come along and express hiw well you're doing. Minimum donation is £1. Paid for our 3G windows already 😀 -
Openreach taking the proverbial for tree lopping
BotusBuild replied to BotusBuild's topic in Electrics - Other
Alan, I have not paid anything to have this work done. I applied to EE for broadband, their 74 Mbps service, on Jun 6th. The router was sent very quickly, and sat around waiting for the OR work to be carried out. Can't recall when the OR survey was carried out, but it seemed to take a long time before first OR activity on July 15th (telegraph pole). July 22nd was the box on the outside wall to the box inside and associated piece of fibre. Then another 2 weeks until the external fibre was laid from a neighbouring pole to the new pole and to the location of the external box. Finally a week after that (yesterday Aug 9th) that external fibre was connected at both ends. EE were then immediately on it. As soon as I connected the router to the internal box, we had interweb connection and Wifi inside the house is acceptable for now. They have also very quickly issued the first monthly bill. (£26.99 pcm) So from order to completion, about 2 months, so not bad, all things considered. -
When the house is done 😀, then the garage, the ... 😀
-
Snap
-
Openreach taking the proverbial for tree lopping
BotusBuild replied to BotusBuild's topic in Electrics - Other
RESOLUTION TIME: On Saturday lunchtime I got a call. Two engineers from OR have turned up to splice the fibre. Turns out we are 1200m from the "cabinet", which isn't actually a cabinet, its one of those multi-manhole-cover pits in the road. They also had to splice in the "cabinet" as well. 2 hours later EE hub plugged in and we have interweb access JIT for the move in. Happy days- 16 replies
-
- 3
-

-
- tree lopping
- openreach
- (and 2 more)
-
Zehnder Aura Electric - operation/user manual
BotusBuild replied to BotusBuild's topic in Other Heating Systems
Done. They got it right on the second time of asking 🙂 -
Openreach taking the proverbial for tree lopping
BotusBuild replied to BotusBuild's topic in Electrics - Other
Which is fine if you have a decent 4G signal -
We picked one of these up unused off FaceAche Marketplace, but there was no user manual. Wondering if anyone has one they wouldn't mind sharing with us. Model number PBECZ-120-50/MF with this on the bottom of the heating element

-
Openreach taking the proverbial for tree lopping
BotusBuild replied to BotusBuild's topic in Electrics - Other
Update: OR visited us on Monday and connected the cable from the pole next door to our new pole and down into the trench. The cable went into an OR supplied duct in the trench, and the end got left by the external box that Kelly Group had already installed (see above). Then, they found out that the cable at the top of pole next door was not connected to anything - you couldn't make this up. The guy went to the junction box (about 1/2 mile away) and sure enough there's a bundle of cables in there not spliced in. So, we are now waiting for the splicing team. FFS.- 16 replies
-
- 1
-

-
- tree lopping
- openreach
- (and 2 more)
-
Openreach new fibre connection
BotusBuild replied to flanagaj's topic in General Self Build & DIY Discussion
OR just put our fibre cable in from one pole to the new pole, down into a trench we dug to the house and the external box. From the bottom of the pole they installed a small ducting (~15mm external diameter, black with a yellow trace) in the trench through which the fibre is fed. We were told we can fill the trench now. -
Installing skirting boards in first room. Cut and ready to fix. CT1 seems like overkill and may be difficult to remove (if that became necessary). So, which glue? Or sealant? Or silicone? And would you screw in as well, if so what screws? Something that is hidden would be requested 😁
-
What is the floorers reasoning for not using a leveller? Looking at the drawings, I would go that way; pre-seal the gaps around the sides of the area to be levelled to stop the leveller running away (a mistake I made) with tape or your favoured sealant (allowing it to set off), then apply leveller. Apply flooring. There'll be an expert along soon 😉
-
Only problem I now have is the size of cable ducting I put in 🤣🤣
-
Radio we will have DAB or google speakers for. Will look at the 8 LNB option - got any links to recommended products?