TerryE
-
Posts
3822 -
Joined
-
Last visited
-
Days Won
30
Everything posted by TerryE
-
Dual Hobs in Worktop, design vs structural engineering
TerryE replied to TerryE's topic in Kitchen Units & Worktops
As I said, I can't fault the kit itself, but I suspect that a lot of the issue avoidance is down to the competence of the kitchen designer. We were impressed with ours. We didn't have a single issue with the Bill of Materials, though we did need to order the extra pelmet/capiital to get around this extra 70 mm issue. But again Wickes supplied this free in a two-day turn around. -
Dual Hobs in Worktop, design vs structural engineering
TerryE replied to TerryE's topic in Kitchen Units & Worktops
This is the one gotcha in the wings. The Slabtech FAQ also mentions a minimum 120mm behind gas hobs, however this doesn't square with examples in the Wickes showroom where a ~500mm deep gas hob is in a ~600mm work surface -- that is with 50mm front and back. We will have a heat resistant glass splashback that's rated up to 400°C. I don't think scorching is going to be a material risk in our case as we'll generally be using the induction hob for an longer duration cooking. The gas hob will tend to be used for cooking that needs fine and rapid heat control, e.g. making sauces, scrambled eggs, etc. But the Sheridan guys are coming to template the worktop tomorrow PM, so we can discuss this all with them then. BTW, the steel 30×30 angle worked fine. I used steel rather than Alu because of availability / lead times. -
Cheap, Thermally Efficient Non-Structural Wall Detail
TerryE replied to Nick's topic in General Construction Issues
@SteamyTea mentioned the SHC of Cellulosic filler, what he's talking about is the specific heat coefficient, also loosely referred to as the thermal mass. The ratio of the SHC to U-value has the dimension of time and drives what is called the decrement delay factor which is the lag it takes for external temperature variation to transmit through the wall fabric. This profile gives a DDF of days, which means that you can ignore diurnal variations in your heat calculations. IMO this is more useful that the nominal extra 0.1kWh that you lose from the drop in U-value. Especially as the main issue that you will face in a room of this size is not so much keeping it warm, but controlling excess heat and how to divert or dump it. Big rooms usually have big windows and you can easily see solar gains of ½kW / m² on windows which can play havoc with your temperature control if you haven't designed to accommodate this. -
Cheap, Thermally Efficient Non-Structural Wall Detail
TerryE replied to Nick's topic in General Construction Issues
+1 on service cavity and cellulosic filler. You can also get a special airtight version of OSB that has a plasticised film on one surface and is designed for use as air tightness barrier. Also the is some advantage in using a breathable outer layer such as Panelvent cover by a tenting fabric. Consider using Foamglass as a thermal isolation layer. You will also need the whole thing signed off by a decent SE. -
What method is best to determine floor levels from defined point
TerryE replied to oranjeboom's topic in Tools & Equipment
Can I raise a dissenting POV? Surely there are two different answers here: What's the best way if you are a professional and need to do this on a routine basis? What's the best way if you are a self builder and only doing it once? In the first case, you really need a tool which is accurate and quick; no doubt about that. In the second case you only need to be accurate, but is it really worth spending an extra £100 or so to save yourself an hour's fiddling around getting it right? I think not, but then again I am not cash rich at the moment. Though if you haven't any accurate laser level, then ~ £100 seems a reasonable price. What you need at a minimum is a way of establishing a set of datums, one per room that establish a common level throughout the house, and preferably each near the door connecting to the common hall / access. There are loads of ways to do this. The water level works really well (I did a blog post about this). So does a Dumpy if you have one, or any kind of calibrated laser level. If you are using levels then IMO it is important to chain from room to room at the doorways. If you want to double check then back chain from the extreme back to your primary reference. This will throw any systematic errors in your level. Do this a fixed amount above FFL and mark each datum well so they don't get lost in subsequent building works (e.g. screw or bond a bit of wood to the wall and cut a notch in it and mark it with a sharpie.) Then if you do need to redo any room you only need to measure down the fixed amount from the datum to reset the level in that room and you can be confident that it will still be correct. And then you need to establish reference levels around each room, and here pretty much any type of calibrated laser level will do the job. The expensive ones will only save you 10 mins extra setup per room. And I wouldn't worry too much about a few mm systematic error across the chain, because if you think that the builders or you will end up laying the FFL exactly to that level then you are mistaken. Even if they use a decent self levelling cement to finish off each room, do you think that they are going to use the exact amount of cement to hit the level? They make it up, pour it in and give it a float and leave it to find its level, and if they are good then you'll still end up using the door thresh or carpet bar to hide the hopefully few mm offset between rooms. In my current house some of our "level" floor slabs are about 1cm out across the room.- 13 replies
-
- 3
-

-
- floor level
- laser
- (and 1 more)
-
Dual Hobs in Worktop, design vs structural engineering
TerryE replied to TerryE's topic in Kitchen Units & Worktops
@Onoff, we've got full with drawers under the twin hobs. If my design authority would allow me to remove the top one and put in a dummy then it wouldn't be a problem. -
Dual Hobs in Worktop, design vs structural engineering
TerryE replied to TerryE's topic in Kitchen Units & Worktops
Seriously, she should talk to Jan. The doors and panels for all of the major kitchen suppliers are made by a couple of companies. Ditto the carcasses. Wickes kitchens just use the standard suppliers. Ditto the hinges, closers, drawer units, etc.; these are top notch suppliers such as Blum. I can't fault the quality here. The major decisions that you have to make are: Self fit or trade / subbie fitted. IMO, anyone who has very basic carpentry skills can fit a kitchen, though knowledge of techniques such as scribing a profile and a level of adeptness with a table saw or the like help a lot, as well as tools such as a decent chopsaw. Fitting can be ~30+% of the total cost (and often a lot more if the fitter is supplying you the kitchen at "trade" prices, but actually buying it a 30-40% discount). If you have disposable time (as we as pensioners have) then I would recommend that you seriously consider doing a lot of work yourself, especially if you can get a couple of days help from a friendly chippie for the more difficult bits. Flatpack or pre-assembled carcasses. In terms of the finished kitchen, IMO there is nothing to chose here. Flatpack is going to add a few days assembly time, but same test as above. If you do go pre-assembled then you have to get JiT delivery because storing assembled units is a total pain in the arse. I really don't think that anyone looking at our kitchen would think anything other than "quality product". I just can't see why paying a 50% mark-up to some fancy kitchen designer for nowt material makes any sense. OK, if both partners are working and doing 50+hrs a week then your decision might be a different sweet spot, but you two are in a very similar situation to us -
Our Jeremy's in a podcast !
TerryE replied to TheMitchells's topic in General Self Build & DIY Discussion
Time to move on, everybody. Please. Let's just focus on self build. -
This is a classic dilemma, isn't: under-think or over-think -- 'cos you'll almost never get it just right. When you've got a lot of experience then you can do a lot on "instinct", but most of us are doing so much for the first time, or maybe for the second or third time but everything has changed since the last time that we did it. So yes, I also tend to overthink stuff -- Jan calls me anal (which I hope just a familiar abbreviation for analyst, but I think it has something more to do with something else). But when you overthink, you are just inefficient in terms of your time. This is a lot better than under-thinking and missing something fundamental that will end up causing loads of grief. One other think about trusting other people's instinct: this can be seriously wrong. For example, most builders don't appreciate the true consequences of designing the heating system for a house that needs about 1kW heat to keep it warm in the depths of winter, or the consequences of cutting a few corners in doing the insulation or airtightness.
-
Dual Hobs in Worktop, design vs structural engineering
TerryE replied to TerryE's topic in Kitchen Units & Worktops
Richard, both hobs have a glass top surface which sits on the work surface. The gubbins underneath is set back just about 15mm and hangs from the top surface and is 47mm deep. The work surface is 30mm, so the gubbins drops down about 17mm below the bottom of the work surface. So we will have a what is in effect a composite beam of roughly 50×50mm polyacrylate / polyester resin, 30mm wood faced in 3mm steel and a 3mm steel bottom plate. Hopefully this will be stiff enough and strong enough under load to maintain the integrity of the worktop without subsequent catastrophic failure. Rob, I am continuously bonding the wood to the steel because I want this composite beam effect and a hybrid polymer like CT1 is better for this. -
Neil, even if the model was totally accurate, you would still expect 5-10% variation from the predictor year to year. That the actual is 2% above the PVGIS to me underlies my view that this is a reasonably good model / predictor of solar radiance on surfaces. Thanks for this.
-
Out of interest have you compared this to the PVGIS prediction for your configuration?
-
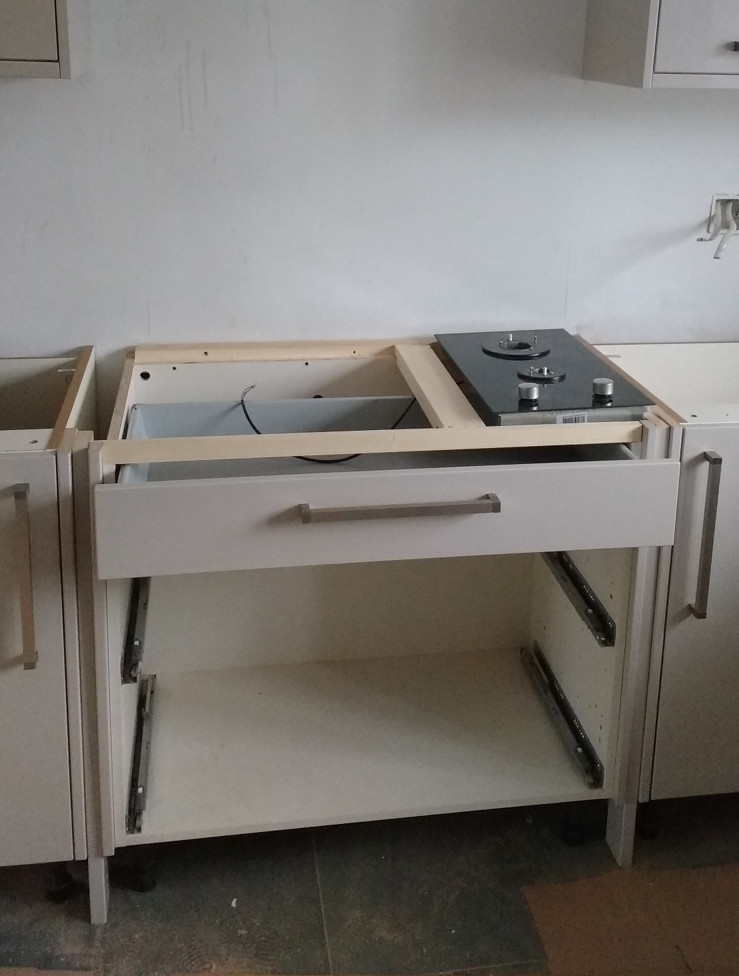
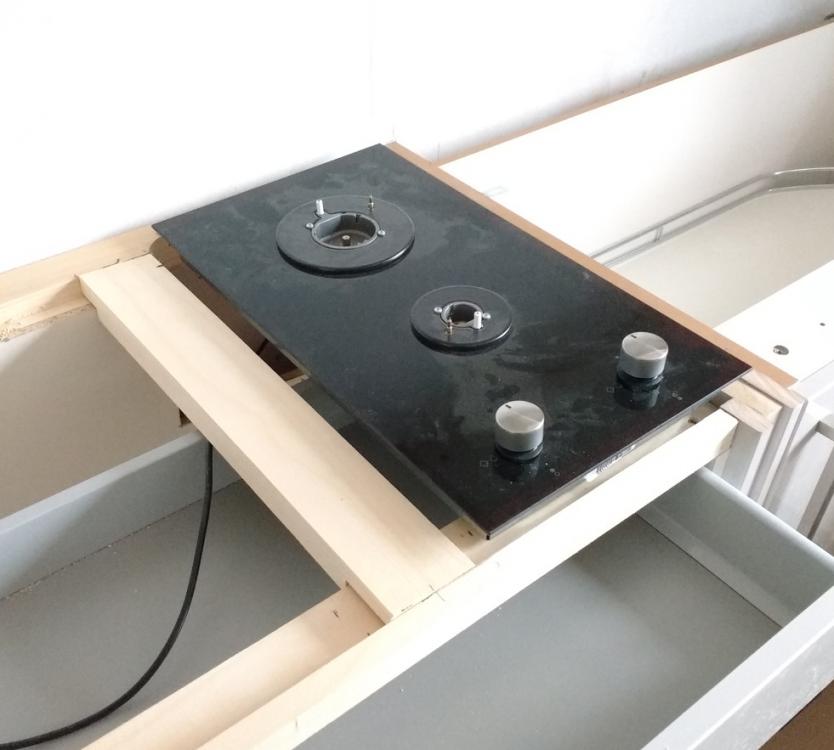
We have a Wickes Kitchen fitted by ourselves. The product is excellent BTW, but that's really the subject of another post. Jan has specified a split double hob -- four induction rings on one hob unit to the left and 2 gas rings on the other too the right, positioned side-by-side over a 900mm unit with draws underneath. She chose a work surface that is supplied by a subcontracted worktop specialist Sheridan - Apollo Slabtech. This is a 30mm deep mineral filled polyacrylate / polyester resin worktop that is templated and fitted by the supplier. This all looks good on the Wickes designer's CAD system and visualisations, and the Sheridan fitters are coming to make the template on Thursday. However this layout has created two issues during build: Sheridans require a minimum of 120mm between the two cut-outs rather than the 50mm specified in the Wickes layout. Luckily after a bit of head scratching we were able to lose this extra 7mm by creating a column effect either side of the unit as you can see in the picture below. Luckily had the room to move the units and wall cabinets the extra 86mm that this added so whilst not as clean a line as I would have preferred, it works and I doubt whether any visitor will regard this as anything other than a design feature. The joint between the two hob units is in the middle of the 900 unit, and therefore not directly supported underneath. The creates a structural weakness between the hobs. (See second picture). What I've had to do is to replace the unit front with CLS machined down to 32 × 80mm and a 16 × 60mm area removed from the top rear to create an L shaped profile that the hobs sit in. However, I am still concerned that this will give inadequate support, in particular against any point loading at the front of the work surface, so my current thinking is to remake this front piece with an 30mm L section of 3mm rolled steel angle CT1ed onto the wood to form a composite as shown here. However, I would appreciate any thoughts / comments / sanity check, because I need to implement this before the worktop is installed in 3 weeks time.


-
Our Jeremy's in a podcast !
TerryE replied to TheMitchells's topic in General Self Build & DIY Discussion
It's a bit of dynamic html that's being written by JavaScript running in the browser. It might be silently failing on your Opera browser. The actual download links are: http://traffic.libsyn.com/houseplanninghelppodcast/HPH154.mp3 http://traffic.libsyn.com/houseplanninghelppodcast/HPH155.mp3 If you've got a modern phone (possibly not including Android 2) then you should be able to see and listen there. -
Our Jeremy's in a podcast !
TerryE replied to TheMitchells's topic in General Self Build & DIY Discussion
Jeremy, you've got a hell of a lot of supporters on this site who value what you've done for them and the community as a whole, and there's a couple of members that make the odd dig against you and others. It just seems a shame that you disconnect yourself from this large body of people that support and respect you because of a couple of jibes. I am glad I am not a moderator, because finding the right balance of freedom of speech and censorship, and the upset that some comments can cause is a difficult one to make Anyway, l listened to both the podcasts last night and found them informed and interesting. The site seems a resource worth looking at. -
Lock system for parcel delivery cupboard
TerryE replied to Auchlossen's topic in Doors & Door Frames
A simple unlocked box will be adequate for most uses since the risk of theft really involves someone coming into your property and actually deciding to "open the box" . If this isn't secure enough for you then you need a simple one-way mechanism, i.e. one which makes it easy for a casual caller to leave a parcel but difficult for a second caller to retrieve it. Our neighbour asks delivery drivers to drop any package over her side-gate -- which pretty much achieves this, but might be a problem with fragiles If you do have a side access or gate, then why not make up a short chute at say 1m at 45° into a box so that the parcel drops the last 10cm. This would make it easy for callers to slip a parcel into this and the parcel would slide down the chute into the box, but that it would be extremely difficult to retrieve it. Another option is a 135° swing lid, the sort of things that you see on garbage chutes. But then again, I'm a "make it yourself" sort of guy. -
I am an idiot. 4.2 kJ of heat will raise 1kg of water by 1°C not 1kJ. Hence the figures in my first post are now a lot more sensible. I also see from Jeremy's recent Mayfly.eu post 44 that he has broadly came to the same observation. It's now got to the point where I need to document my design properly.
-
Volume of a complex shape: a bit of head scratching
TerryE replied to ToughButterCup's topic in Foundations
BTW any quadrilateral can be thought of as 2 triangles and if you want to calculate the area of a triangle, just google it The easiest way is to measure the four sides and a diagonal; you can crank the numbers from this. -
Single Room MVHR
TerryE replied to Crofter's topic in Mechanical Ventilation with Heat Recovery (MVHR)
Anyone who has to dry clothes in winter would make good use of a dehumidifier!! -
Wel, we've just finished installing our Wickes kitchen and I've got to give them top marks (but that's a different topic). The water system is next on my list. I suspect that the SunAmp is going to be a long lead item.
-
Single Room MVHR
TerryE replied to Crofter's topic in Mechanical Ventilation with Heat Recovery (MVHR)
I am sure that a couple of the other guys have hard experience of these, as I can recall a couple of strong recommendations (from @ProDaveor @Stones ??) However as an alternative to one of these for a build under development, have you considered just using a standard budget dehumidifier? We have used one to great effect in drying out excess moisture after plastering, -
Thanks Nick -- that's the way I'd have done it in the past, or at least turn the mains on for 10 secs say, enough to bring the loop(s) up to mains pressure then off, so that if I did an immediate leak then at worst I'd end up dumping only a little water into the room. The HEP2O brass manifolds have per circuit isolation valves, so I can bring the appropriate manifold up to mains pressure and only open one radial circuit at a time to test it. One issue that we have here is that the mains pressure isn't brilliant because it's pretty flat where we live in Northamptonshire. It used to under 2 bar when the water was coming from a water tower in the next village (right next to @Vijay's plot), but it is a lot better since the put in a supplementary booster pump about 5 years back ; it's typically 2-3 bar at quite times, now. However, I've got no guarantee that they wont upgrade the pumps in future so I've rather test the system to a min 5 bar, to give us some headroom.
-
@Alphonsox, Neil any update on how your install is going? I am just about to order an identical configuration as yours
-
Yes, it's a radial design from a set of HEP2O manifolds. All runs are a single continuous HEP2O pipe within the fabric of the house, and to a single appliance connection (with the exception of the dishwasher which is cold-fill and T'ed of the cold tap feed in the adjacent kitchen unit). We also have the odd elbow behind the plasterboard -- for example to turn into the 15mm copper tails for the 4× mixer connections for the 3 showers and the bath. I will be pressure testing all of these well before tiling, so if any of these fail during testing, it will only be a relatively minor pain fixing / replacing. No joins or elbows in inaccessible places such as in the floor voids.
-
OK, in the past, I have done all my plumbing in copper mostly with soldered end-feed joints and the occasional compression joint. Leak detection involved filling and pressurising the system and going around with a piece of paper towel to wipe joints and look for weeps (and I have had a couple ). We are now plumbing in HEP2O and the risk seems to be not of a weeping joint, but of the catastrophic failure of one. So I am now looking at proper pressure testing of runs before leaving them connected to the mains. This one is new to me. I can see various options: Hire a pressure tester. The trouble is that I will be commissioning the system incrementally over a couple of weeks and the weekly hire for a standard testers is ~ £50. Buy one of the same (and subsequently resell). They seem to sell on eBay for £50-80 depending on condition and frills. Do something home brew, @Onoff, you did this didn't you? I've just done a quick bit of research and Wavin "do not recommend compressed air, only a water pressure test. Water will identify any small leak, and is far safer. Use of leak detecting fluids with an air test may damage the fitting and would invalidate the guarantee." So water only. There general advice is: "First carry out a low pressure water test at 0.5 - 1 bar when the system is just demountable fittings, then a pressure test at 1.5 x the normal working pressure with a recommended minimum of 10 bar for a minimum of 45 mins." So my current plan is buy a tester on eBay and follow their general recommendation. Any general comments or advice. @Nickfromwales, I am sure that you will have some pearls of wisdom. Thanks in anticipation, guys and gals.