


Simon R
-
Posts
262 -
Joined
-
Last visited
-
Days Won
6
Everything posted by Simon R
-
Good point, the plenum box is right next to the MVHR which has a condensate drain.
-
I had figured as it would be inside the house the 10+ should not be a problem. Regarding the flow rates .45lt/s is 'normal' for 22mm which equates to about 1.6m3 an hour and more than the units required flow rate.
-
Good point, the MVHR has a shut down temperature so should protect it. You can also get central heating inhibitor/anti freeze for central heating on boats.
-
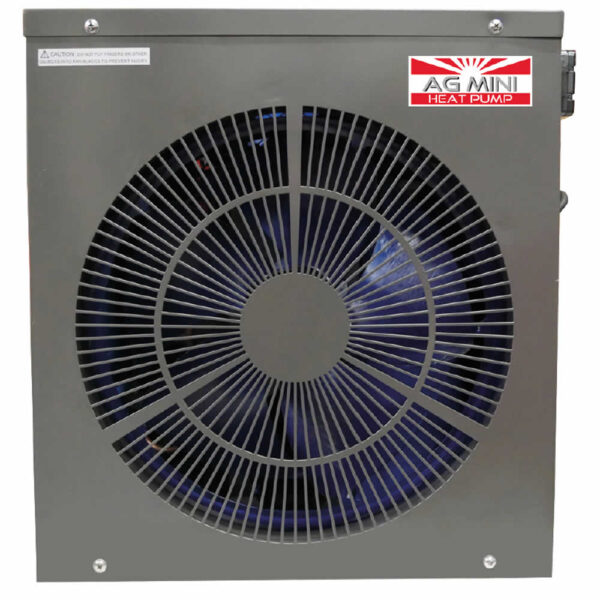
Our house is very well insulated and our heating requirements are tiny, in the range of 2.5kw for a 20 degree temperature difference. At the moment we heat the house with two towel rails, that are fed from a gas boiler. I'm considering installing a matrix heat exchanger in the flow plenum of our MVHR fed with water from a small ASHP to effectively replace the heating from the towel rails. Having looked at the available ASHPs and came across a suitably sized unit the 'AG Mini' intended for pools at less than £500 it looks a good option. It needs a pumped flow rate of about 1.3m3 and hour. Does anyone have any experience of these AG Mini units or spot a problem with what I'm proposing. The plenum box is plenty big enough for the heat exchanger not to cause flow volume issues. Potentially I can also run it in reverse in the summer to provide a little cooling (would only use available PV power for this).
-

the concrete is (finally) done and it is.......a garage floor
Simon R commented on Patrick's blog entry in Timber Portal Frame - but stick built
We had a few problems but nothing as serious as poor guy with the stroke. Our raft looked smooth and level but we still ended up using a self levelling resin screed to make the surface suitable for a karndean floor. We did the screeding ourselves, it's not perfect but it's a self build. The stuff we used was the Mapei ultraplan, mixed up a bag at a time with and electric stirrer. It goes off very quickly so you need to have everything ready before you start. -
Could try these, nice and simple https://www.johnlewis.com/umbra-sticks-multi-hook/black/p1885062 As it happens we have one of these going spare as it didn't work for us... https://www.johnlewis.com/vitra-hang-it-all-coat-rack/p5425641
-
Hello all. New build ICF house - 4 years on and need help!
Simon R replied to Peg n Bru's topic in Introduce Yourself
Sorry to hear you've had such a torrid time so far. A self build is stressful enough when things go reasonably well. One additional point not mentioned is CIL exemption. Do you have this in place, you really need to have it in place before you even start clearing the site. If you don't have it contact your council and plead your case, they may be sympathetic. On our project the architect was probably the least value for money, mainly down to high hourly fees and poor communication. I've just used a architectural draftsman who's been really good value, handled planning, structural calcs etc, (robin@lowmasdesigns.com) he's on the south coast so may not be able to help you. Google 'Architectural Services' for your area for people providing this kind of service. You do need to get the design and planning sorted before going forward.- 22 replies
-
- 1
-

-
- icf new build
- plans
- (and 1 more)
-
Dual MVHR Units
Simon R replied to DanJepp's topic in Mechanical Ventilation with Heat Recovery (MVHR)
We've got the Blauberg SB 550 which is a tad larger than the one BCP recommended at 690 m3. Very happy with the unit and support. The 5 bed kit cost £2046 (not including VAT) in 2019. They also do the system design for free. If you do go that route make sure you say you're a builder when you create your account on their system to get trade discount (the Blauberg sales guys told me to do this). https://www.blauberg.co.uk/en/blauberg-large-heat-recovery-ventilation-kit-whole-house-self-build-diy-system-ec-sb-550 -
Yes, several, I installed them on top of 11mm moisture resistant MDF which I've found to be very stable even in damp conditions. see:
-
Rainwater harvesting tank
Simon R replied to Happy Valley's topic in General Self Build & DIY Discussion
it's the Divertron 1200x, Anglia Pumps have it at £227 which surprisingly is less than the 235 I paid quite a while back. We would not have gone the rain water harvesting route if we had had the option of a mains connection. In our case the surface water connection was prohibitively expensive. For a private dwelling rain water harvesting systems save no carbon and give you additional maintenance. -
Another one not to be overlooked. https://www.recosurfaces.com/ they do a huge range and allow you to provide your own images, which surprisingly reduces the cost.
-
Suggestions for new 12V gel lead-acid 200Ah+ battery?
Simon R replied to DamonHD's topic in Energy Storage
I've used Trojan t-125 on our boat for some time and found them good value for money. They're 6v deep cycle and do require regular maintenance, top up with distilled water every month. They put up with a lot of heavy use in fork lifts and golf trolleys. -
Rainwater harvesting tank
Simon R replied to Happy Valley's topic in General Self Build & DIY Discussion
Just a little to add to the topic. We have 4600L Kingspan Klagester rain water harvesting system which we installed primarily to take care of surface water as the cost of connection to the surface water drain was prohibitive. The system cost £1789 back in January 2019. The system has a few benefits over just a straight tank and pump solution, allowing levels to be monitored and also top up from mains water if required. We use the water for the washing machine, to flush toilets and the garden. It looks and smells like clean water. The tank has a leaf filter, we also added scotch brite mesh filters to the down pipe drains. Keeping light from the water is pretty fundamental and I would not go the IBC route myself. On the minus side. We didn't have a good experience with Kingspan as our pump was found to be faulty but was deemed out of warrantee which is just one year from delivery, We didn't commission the system in the first year of our build! The pump has been replaced with a better one from Divertron which cost less than the £300 service charge that Kingspan wanted just t look at the problem. A bonus from the pump swap is that the pump has a float intake so water is taken from the tank surface rather that the bottom of the tank where sediment will inevitably build up. -
Thanks, we hope your project goes to plan.
-
Thanks, we did pop a cork and no glass broken. It would have been nice to have a house warming but that can wait.
-
Indeed it was pretty full on, especially as we spent the summers on our narrow boat. Surprisingly very little impact from CV19, just a few problems with supplies. We lucked out on our plasterer who had a gob postponed and did ours just as we were going into lockdown. Doing the work ourselves was rather fortunate as we didn't have isolation issues
-
Building controls have issued our “Completion Notice” a big milestone for any self build and definitely called for a celebration. A big sigh of relief from both our councils building control and us.? Our many thanks to all the contributors at BuildHub, we certainly could not have done it without the support of the forum members. Particularly Jeremy Harris @Jeremy Harriswho’s broad knowledge and good advice...goodness knows where he’s disappeared to but the forum is a poorer place without his input. It’s been a while since we first broke ground in January 2019 and it certainly has had it’s moments and a good few sleepless nights. There is no doubt in our minds when doing a self build that you have to be doing it for yourselves. We’ve ended up with a house that we could not have gone out and purchased and learned a whole lot on the way. Our initial vision was something small, manageable and future proofed. Hopefully we have achieved this and have added a decent quality house to the housing stock. When we started we visited the building research establishment (BRE) and looked at the Zed Factory house that was there. We decided to take a look at that route. ZED provided either a shell or turnkey solutions, both of which were within our budget. The cost per square metre in the ZED literature at BRE indicated a very competitive turnkey price in the region of £1,350 a square meter. As with all things the low price came with compromises as it was a “cookie cutter” solution and the finish was not all that we would have liked. What we have ended up with is our own vision at a comparable cost of around £1,400 a square metre built to our specification. Sounds like a great result, that is until you factor in the fact that we did the majority of the labour. It’s easy to see why the prices from ZED increased to more like £1,600 a square meter when we asked them to quote. From a design point we still need to live a full year in the house to know if we got our energy sums correct. Early indications are that we should need very minimal input in winter but may have too much solar gain in spring. Our east facing windows are great for the clear winter morning but a little too warm for April sun. In the big scheme of things it should be easily fixed by adding blinds. Our EPC rating came out as a “B” marked down from a due to our use of gas for heating and water, a bit daft given it’s the lowest CO2 emissions at 0.184kg per kwh compared to electricity which is in the 0.233kg region. It would be simpler and better just to do EPC on a kwh per square meter basis, putting the emphasis on input reduction. The MVHR is certainly helping, here's a screen shot from the duct temperatures on a frosty morning. We’ll draw our blog to a close at this point, just got to dust off our resumes and add house building to the skill set ?.
- 6 comments
-
- 10
-
-

-
Confused by Triple Glazing Justification
Simon R replied to MortarThePoint's topic in Windows & Glazing
Thought I would just throw in my pennies worth. I'll start by admitting I'm no expert, but the importance of keeping inputs to a minimum is key. When we looked at the building cost and energy consumption, I did very similar sums to your own. It depends on site orientation etc, but our build thermal input worked out at a theoretical 68w/per degree for the structure. So a 10 degree difference is 680 requires 680w input. We have quite a bit of glazing and doing it all triple glazed meant we did not require the cost of complexity of an ASHP significantly simplifying the build. A couple of small towel rails are all we need to heat the house. Looking at our gas use over the past two weeks the heating has only come on twice and our total gas use has been just 70kWh mainly for hot water. -
Well, the sensor in the vaulted ceiling over the kitchen is a heat alarm and it's within 600mm of the apex. We do have a smoke alarm in another room with a vaulted ceiling, again it's within 600mm of the apex. Our kitchen/living room is one area with a staircase and landing joining the two areas. The flat ceiling over the living room has a separate smoke alarm.
-
We also have vaulted ceilings. For the kitchen we have a heat rather than smoke alarm. Bedrooms, living areas have smoke detectors and the garage/workshop has a heat alarm. We opted for LD1 just because it was a new build and we wanted to do thw best job we could. https://www.fireangel.co.uk/your-guide-for-smoke-alarm-positioning-to-meet-building-regulations/
-
I fitted these after a bit of looking around. They are mains powered and use wireless communication, not your wi-fi. Got them from "your IT delivered". Cavius 8080138 Main powered 230V smoke 8080138 5 £13.69 GBP
- 9 replies
-
- 1
-
-
- smokealarm
- electrics
- (and 2 more)
-
Renaissance Wax should do the trick.
-
Helen is bound to know, I'll ask here and get back to you.
-
The stairs are really important, especially when they are in a windowed void. The price of bespoke stairs tends to be very high, so it's nice when you can get a kit that looks the part and does not cost an arm and a leg. Our three stair cases came in at 8k(not including VAT) which makes them a bargain.
-
Seamed metal roofing or catnic SSR2 advice required
Simon R replied to ruggers's topic in Roofing, Tiling & Slating
Most of the work isn't that difficult, it comes down to attention to detail. Having said that, dealing with light materials in a windy environment is no fun, definitely a case of doing it when the weather is on your side. Our roof from inside to out is made up of: VCL membrane stapled and taped (air tightness is all important as you don't want any vapour getting into the foam) Rafters are C24 225x40 wood at 400 centres. Spray foamed to a depth of 200. 18mm OSB board over the rafters. Moisture proof breathable membrane overlapped and tacked Battens running up the roof slope 18mm OSB in 400mm horizontal strips with 80mm gaps between the strips. HPS 200 roof covering. The VCL and spray foam were done after the standing seam roof was complete. No water should get under the standing seam, but there is always a risk of condensate, hence the dual layer of OSB which makes a natural chimney to give good ventilation. Interestingly Greg, one of the three who ordered our roof together did put another membrane under the standing seam roof. It was an expensive membrane not required by the manufacturer and we decided not to include it. Patrick will know what the membrane was.