
Simon R
-
Posts
262 -
Joined
-
Last visited
-
Days Won
6
Everything posted by Simon R
-

Blocks delivered and we're up to the first floor
Simon R commented on Simon R's blog entry in South coast ICF build
Most of the blocks are 390mm for better thermal performance. The garage and sun room use 300mm blocks as the insulations was not as important. The structure came out as 68W per degree. so even in the depths of winter we should need less than 1.5kW to maintain a temperature of 20C. -
Microcontroller & single board computer technology suggestions
Simon R replied to dnb's topic in Boffin's Corner
Have you considered the Arduino, it has 6 x ADC's and supports things like RS485. It's got a good help community and plenty of project examples. Good bit of kit for glueing things together. My son used one in a university project and I was pretty impressed with it. I've no experience of the Pi. -
Three pours down..none to go - thank goodness
Simon R commented on Simon R's blog entry in South coast ICF build
Hi Nick, the gables, windows dors etc all come pre-cut. The JUB system is unique in that respect as far as I know. -
One option you may want to consider is to take the samples and get them analysed yourself. We had to get a soil survey on our sit and used Ashdown Site Investigations. They offer a soil analysis service at £45 a sample. In our case I dug a trial pit to 2M and took samples at each layer I came across, noting the depth for each sample. In our case this was just 4 samples. The SE was happy with the sample reports. We are on clay and have gone the insulated raft route. We dis get a couple of soil investigation quotes and they were very expensive and it was debatable that the detail of information they would provide was required for our site.
-
We have a 4600ltr tank. Connecting to surface water drainage for our project was £20K and we could get a rainwater harvesting system for £1773 (excluding vat) last January, the price took a bit of haggling with KeyLine. The Kingspan Gama Rain Water system's quite a neat with nice controls. I have had a problem with the system pump which I found was faulty when I came to commission the system and would you believe it was out of guarantee. I'm talking to Kingspan at the moment as I don't think their 12 months from delivery is acceptable especially considering the pump had never done a days work! I've replaced the pump with a Divertron 1200x which I hope is a better pump than the Grundfoss 35. The hole and concrete etc added to the system cost another 1k by the time we had got rid of the spoil. To try and keep the water as clean as possible we have put filter medium in the drains. The water in the tank which had accumulated over the last year is clean and doesn't smell. The system has a feature to allow mains water to be used to top up the tank, so if it does start to show any signs of becoming smelly we can give it a shot of chlorinated water.
-
If you're only interested inside repeaters, then the type that uses mains cable is simple and very flexible as you can add one anywhere you have a mains socket. The TP-LINK TL-PA4010 is a one I've used. It's very useful as you can move it and you don't have to predict which areas are OK or dead spots, plus it's cheap.
-
50 sounds achievable (provided scaffolding is up). We came in below £50 m2 using JUB rendering system last June. The materials/labour cost were 40/60. The rendering company we used were recommended by JUB and did a first rate job (ejl.plastering@gmail.com). They were not fans of pump systems, preferring to mix and trowel. It's very weather dependant work and our job took three weeks elapse to complete. There was no "roughing up" of the ICF it's not required, well at least not using the products we used. It was also good to use materials from a single manufacturer.
-
Thanks for the wisdom, it's not so much as they can't be re-glazed it's that they can't be bothered. I must confess it seemed highly unlikely that they could not be re-glazed. I'll measure the existing glass then smash the glass to get it out to give me proper access to the silicon to make it easier to remove from the frame.
-
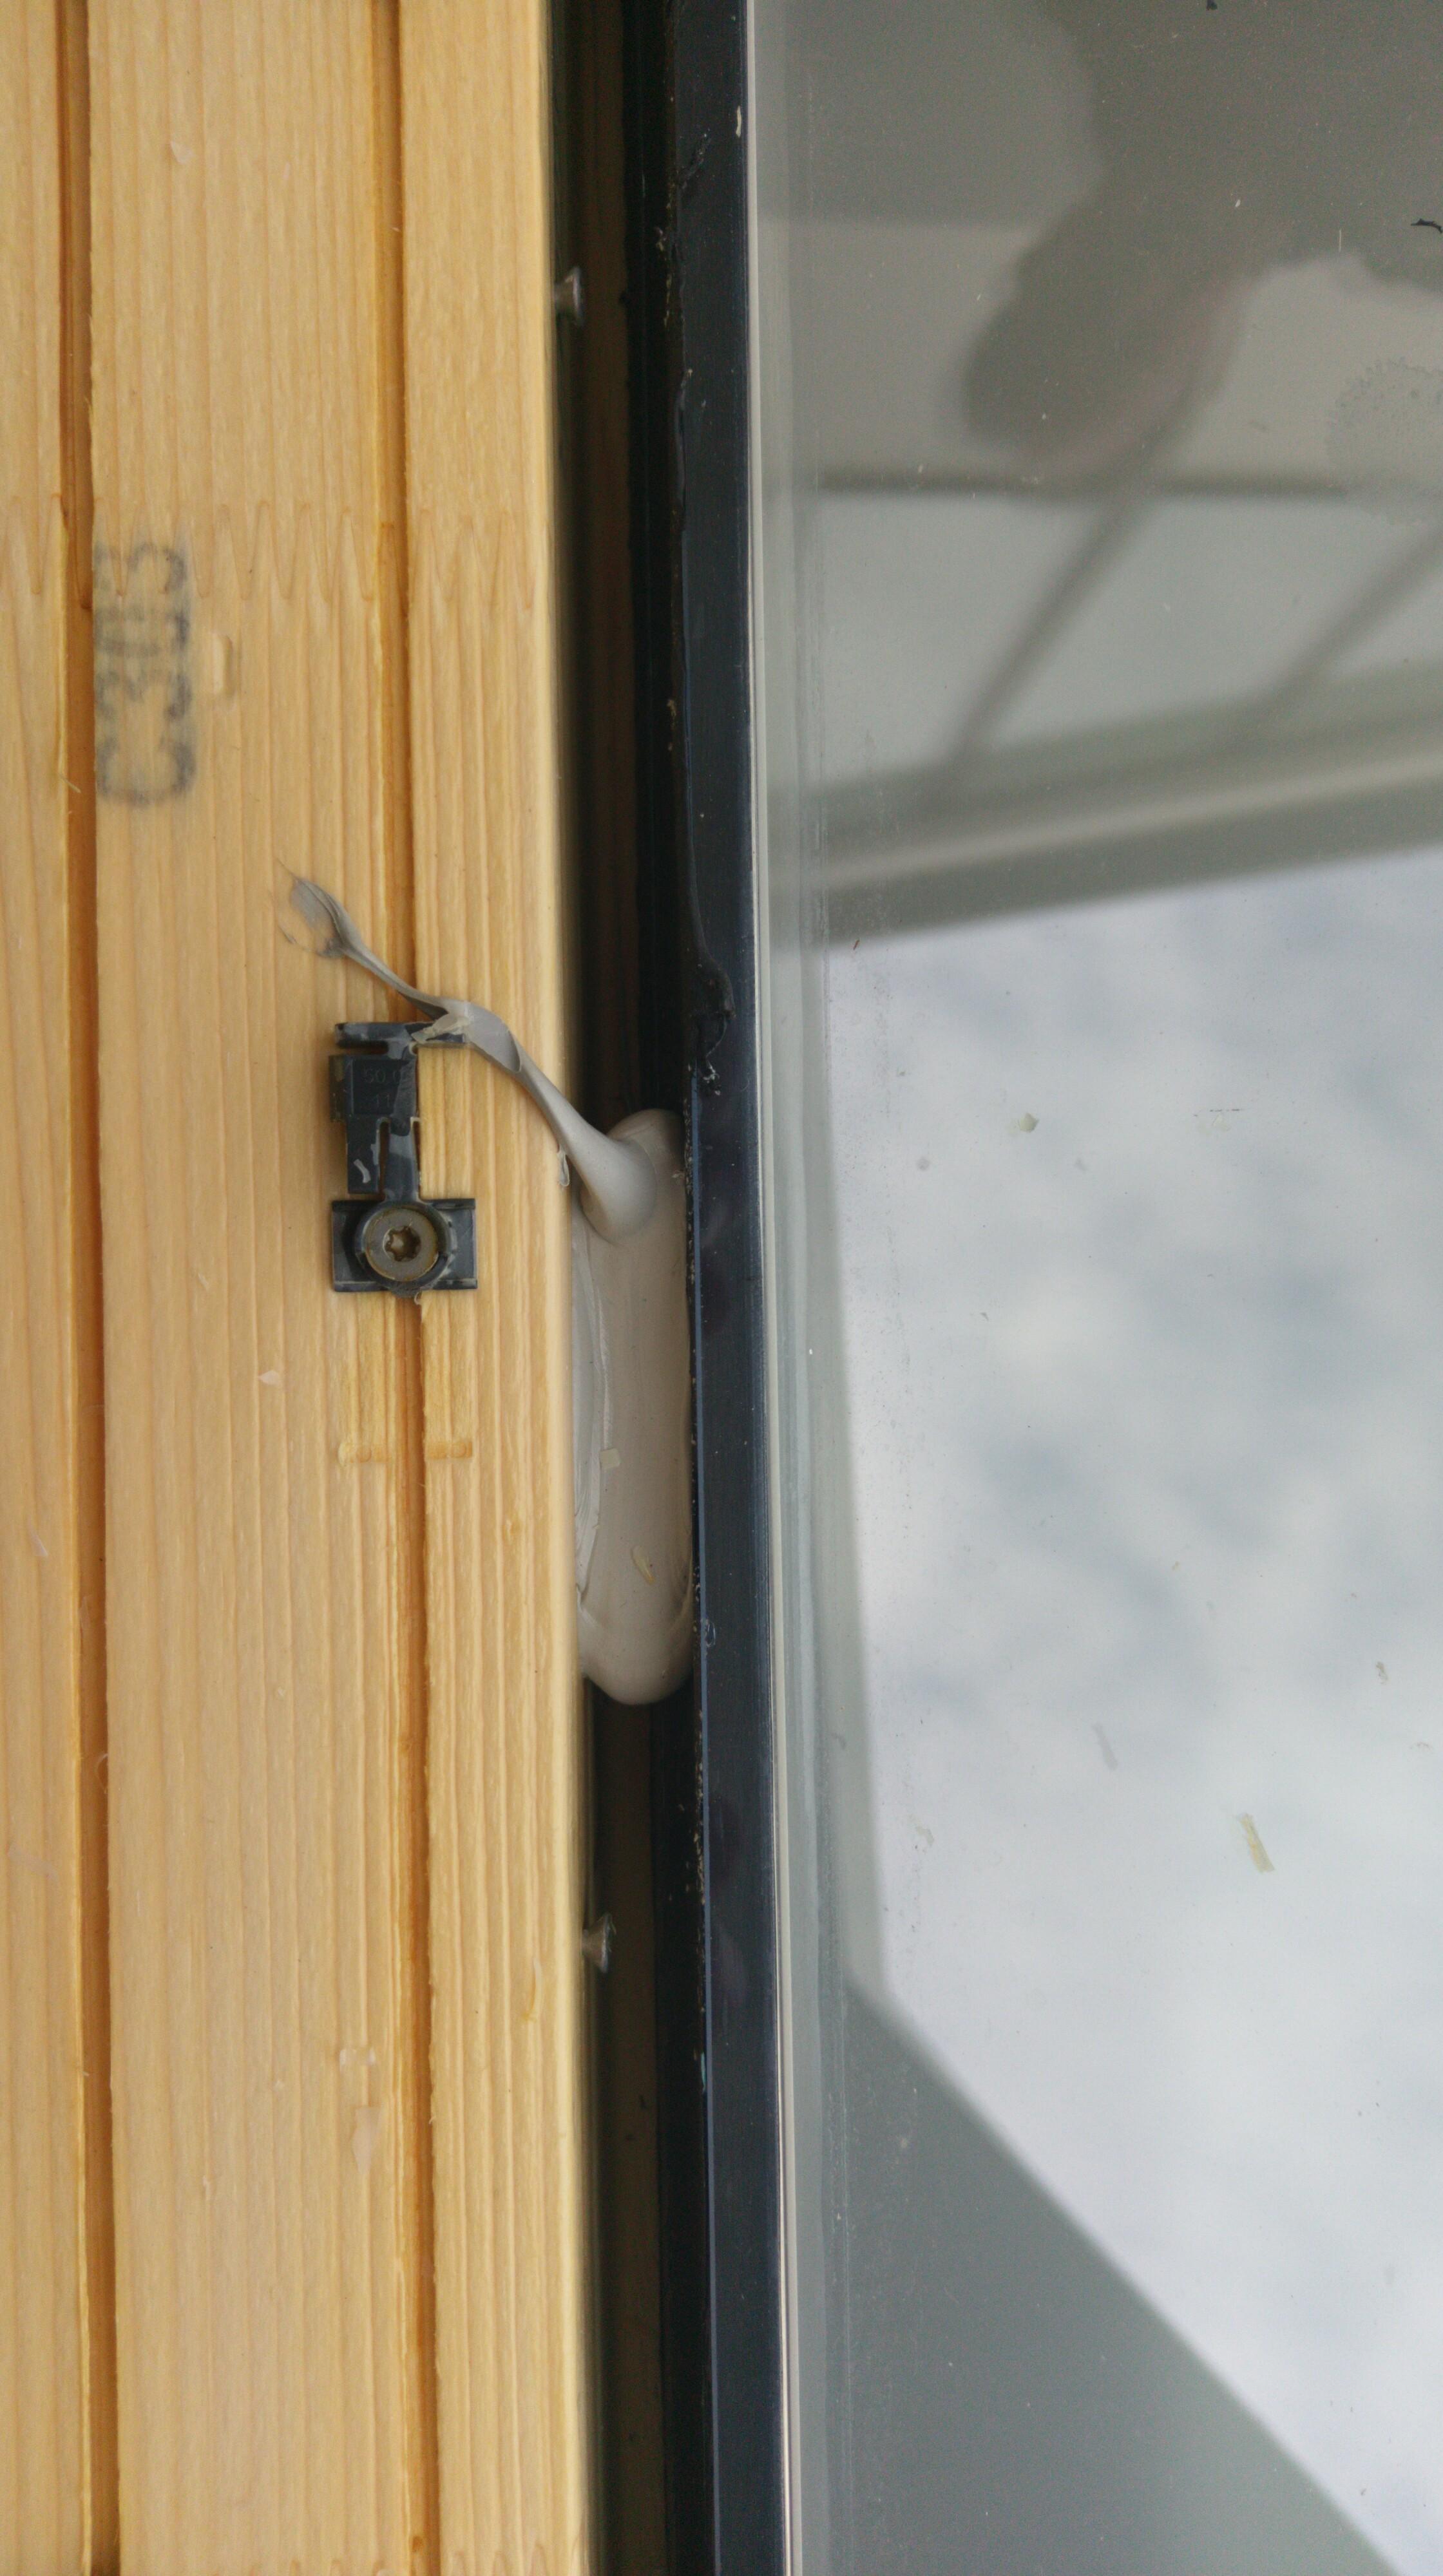
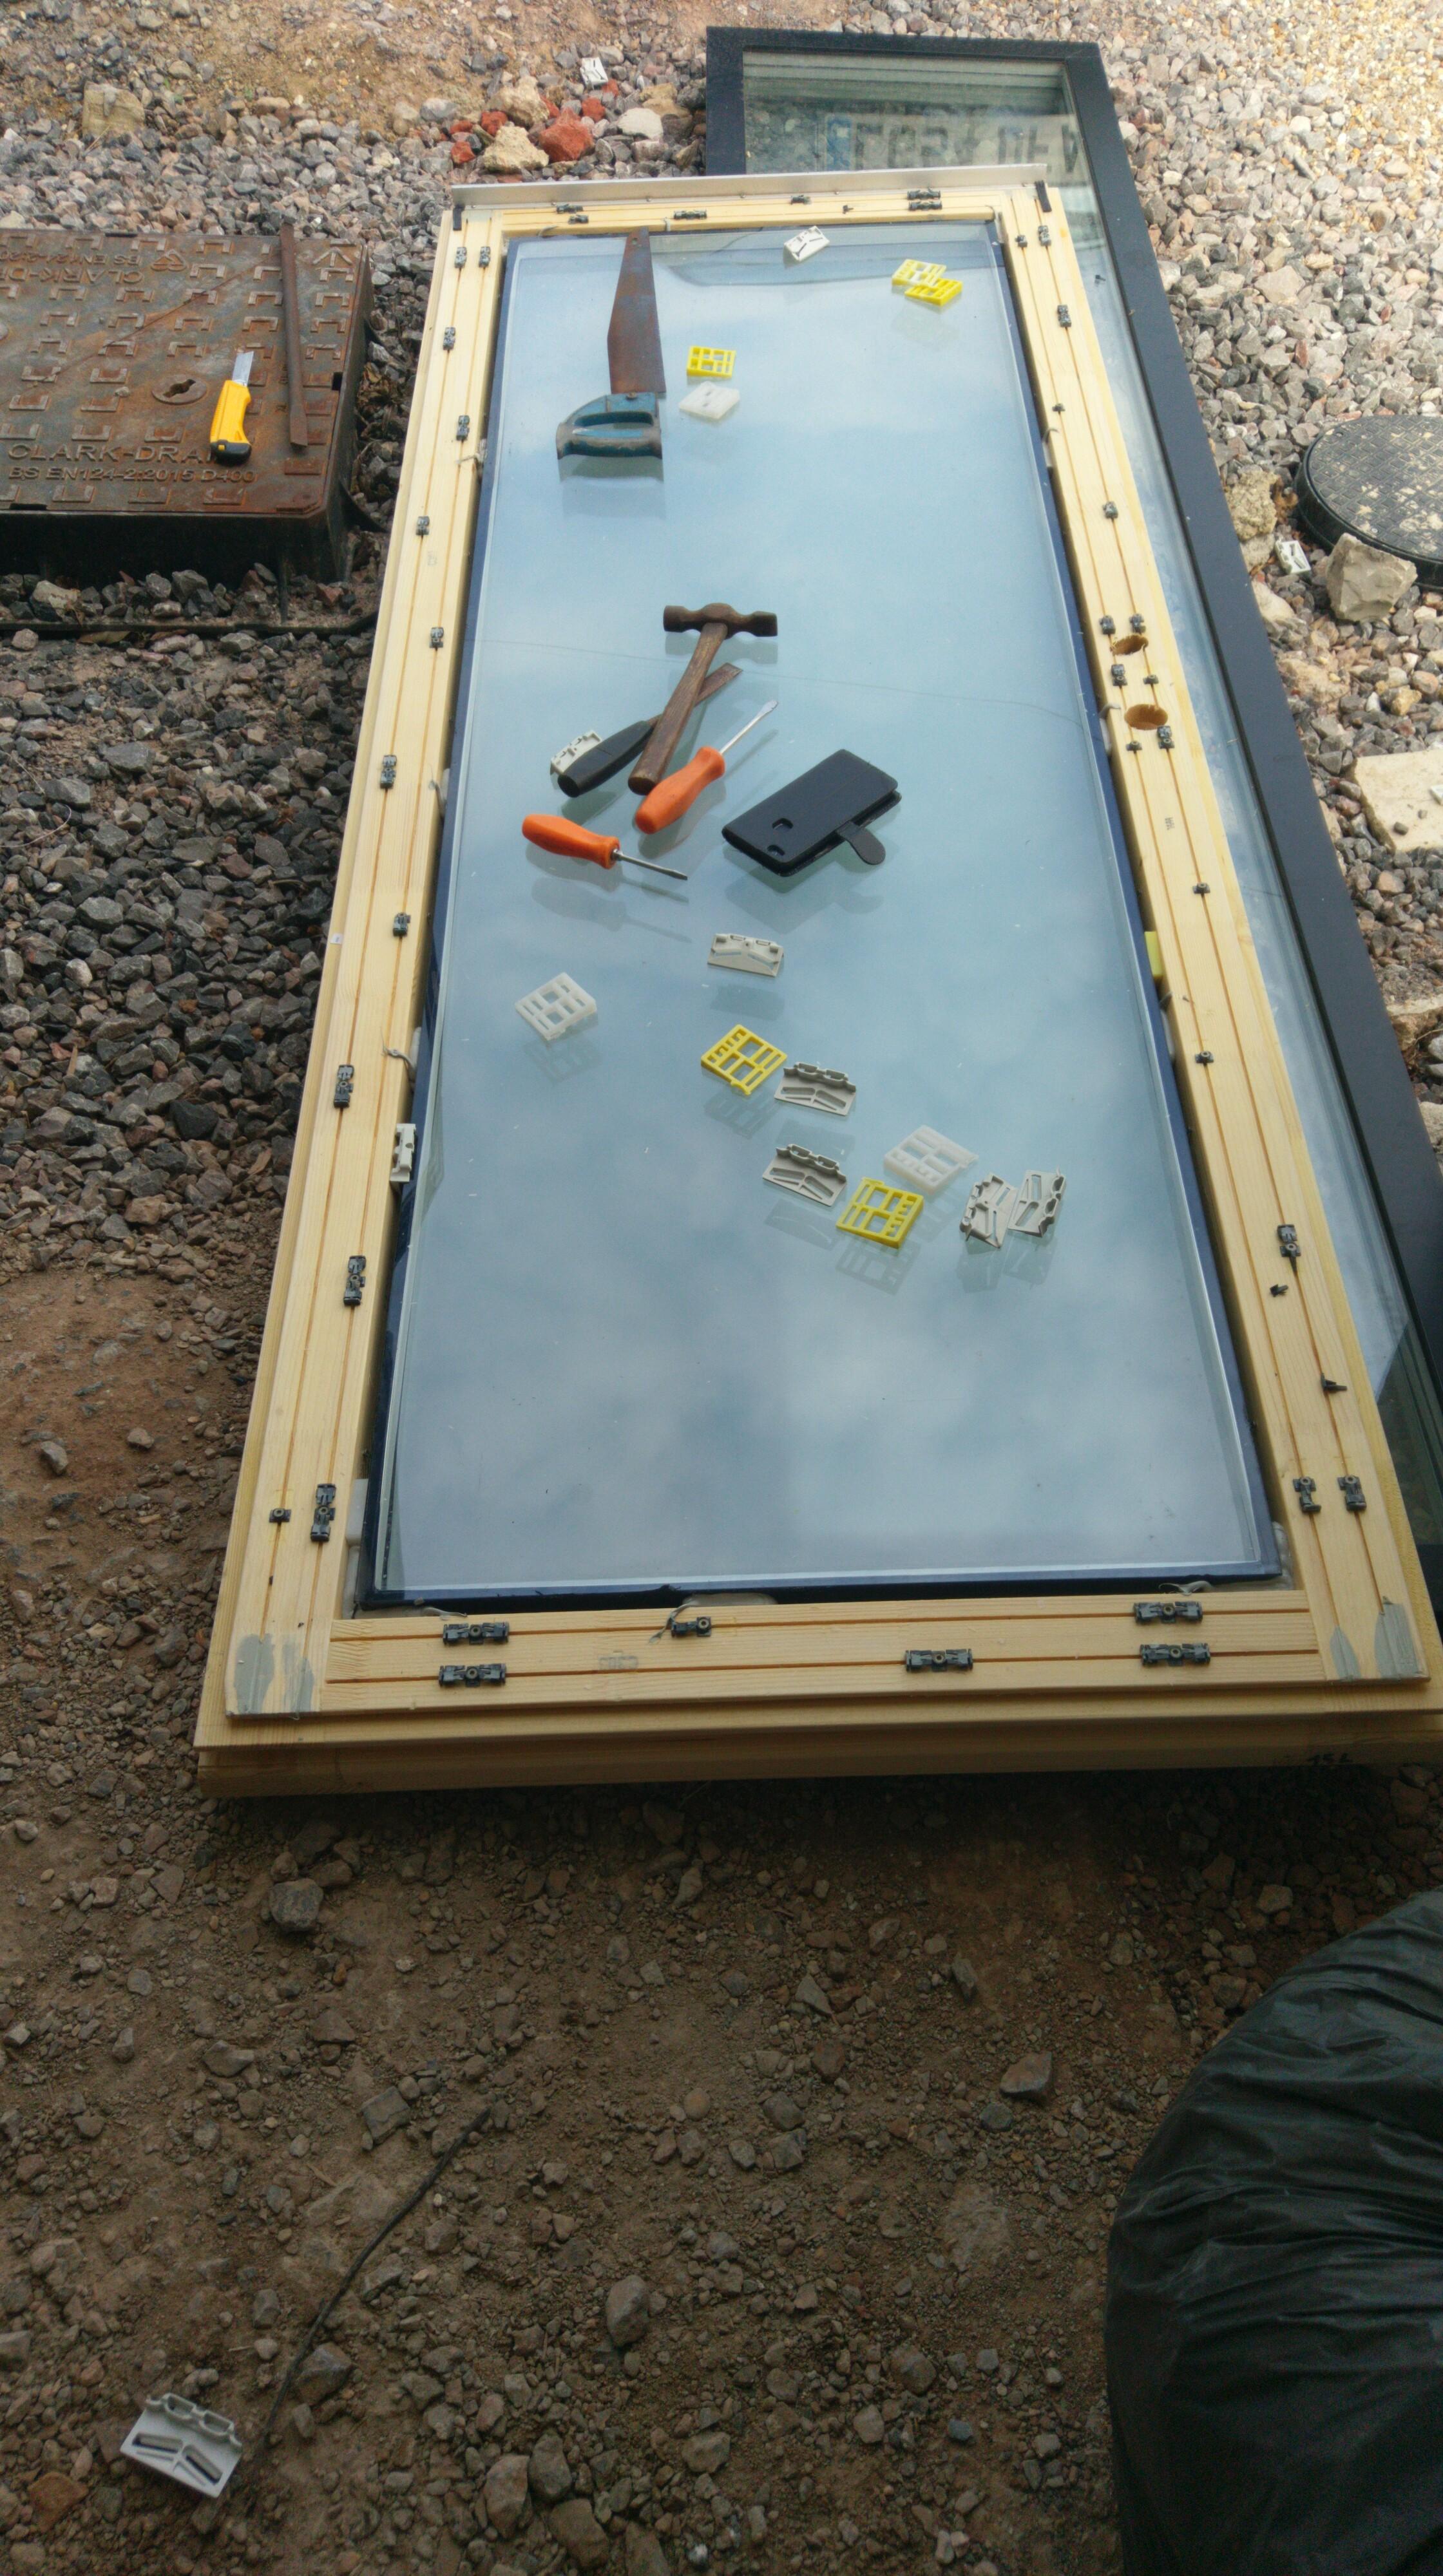
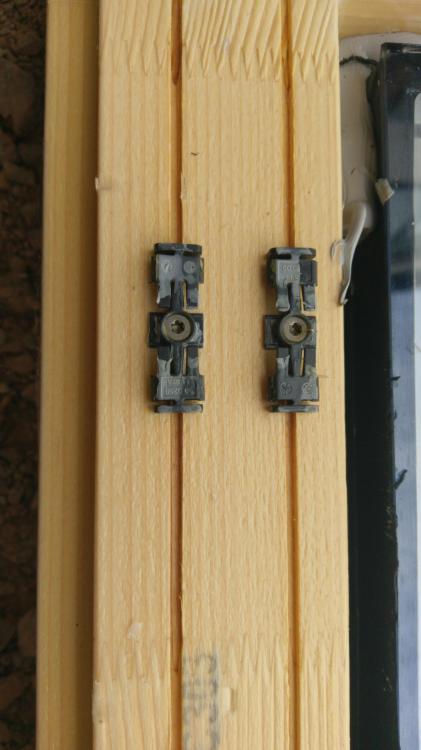
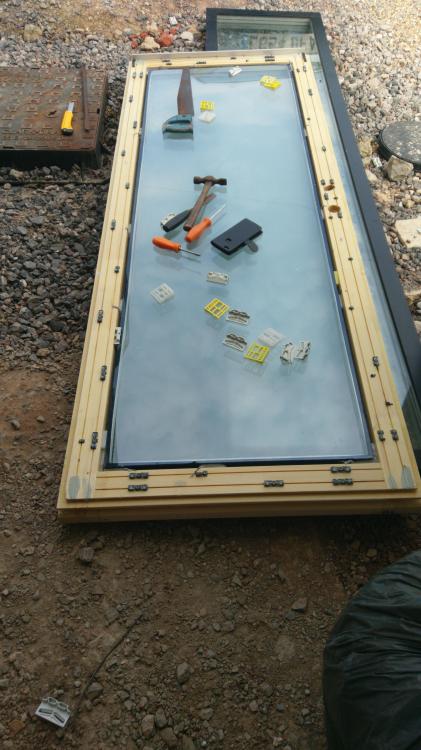
We have Velfac windows and doors and are very happy with them. However we recently had an incident with a RIBO door glass being broken. It turns out that the doors may not be re-glazed, so if you have a case where the glass gets broken it’s the cost of a new door to fix it. There is no mention of this in the sales literature or other online resources from Velfac. For us it cost more that the original door as we had a discount on our order. The cost of replacing the door and re-hanging is over £1200 plus in excess of a three week wait for manufacture. I’m not happy that the doors are fit for purpose and have complained to Velfac, being able to re-glaze seems pretty fundamental. Glass does get broken and glazing units do fail. As we had to replace the door we decided to take the door apart to establish why it’s not possible to replace the glass in situ. Removing the external aluminium trim was fiddly but not difficult. It’s held in place by click tabs similar to those used in the car industry. With the trim removed it looked as though the glass could be removed. There we numerous spacers to hold the glazing central, in addition to the spacers there were areas about 200mm long x 20mm wide and 40mm deep where the space between the frame and the widow was filled with silicon, a LOT of silicon. Trying to cut through these and get the glass out was very difficult, which I would guess is why they say it's not possible to re-glaze.

-
Following on from the plastering work we did a quick stock take. Our plan was to be back on our narrow boat for the summer but with the current problems that was out of the question. We didn’t have materials to start flooring or fit bathrooms or kitchen and there was little hope of getting them. After a bit of head scratching and phoning around we found we could get fencing material and paint. We also had a few other jobs on the list that we could tackle, commissioning the water harvesting system, second fix electrics. We decided that the fence should be at the top of the list. Our plot has been behind Heras site fencing for a year now and although we’ve kept the site tidy it still was not that pleasant an outlook for the neighbours. We’re not far from the coast and strong winds are the norm so over engineering the fence makes sense so we don’t get a long term maintenance problem. Some while back we erected a green oak fence with the expectation that it would last a good thirty years. That proved a false expectation with the post rotting out after 15 years. We replaced the post with galvanized steel, but it was a lesson hard learnt and a problem we would avoid this time round. Initial thoughts were to use galvanized post and larch stringers, my Larch is expensive! After a bit of searching around Pat found a fencing product by an English company Marano who make aluminium fencing and had a nice contemporary product called Breeze. It’s an aluminium product and didn’t cost a fortune, and as it’s name suggest is designed for windy locations. The only down side was that it is not the best from a privacy point of view. On the subject of wind we also had a pane of glass broken. It happened overnight and we think it must have been broken by flying debris as it’s on the first floor with no access. Annoying but no big deal we thought. The glass that got broken is in a door supplied by Velfac. Contacted Velfac to ask about re-glazing only to be told it was not an option and the door would need to be replaced. Unlikely we thought and contacted the Velfac specialist fitting company who has fitted our windows, they agreed and said they would come back with an estimate for re-glazing the door. After a week they got back to me and rather apologetically confirmed re-glazing was not an option...so repair was an eye watering £1200. I’ll add a thread in the glazing section of the forum with more information so at least others will be forewarned. Back to fencing, at the front of the property we needed something cheap and cheerful to smarten the site up pending some art work fencing courtesy of one of our daughters who is an artist blacksmith. We decided to go with park fencing really low cost but looks surprisingly contemporary. I guess it’s cheap because it normally gets put in by the mile. Fencing complete, attention was turned to commissioning the Kinspan water harvesting system. Pretty strait forward, wire in sensors, pump, and connect water pipes. Half a days work, year right! All went really well, followed the initialisation instructions, tank set up OK, gauge reading set, pump pressure test...RCD trips. Meter across pump, sure enough earth and live not separate. The tank is just over a year old and the pump is a Grundfos SB3, quick look on their site confirmed a two year warranty. Contacted Kingspan to ask for new pump only to be told their warranty is one year from delivery, never mind installation. We’ll send out and engineer to look at the problem, OK how much is that £350 and how much is a pump £350...OK I’ll take care of it myself. The pump it turns out is not the simplest thing to dismantle, the parts PDF line drawing is not the best so It’s been put on the back burner. After a bit of searching and some good technical assistance from Anglian pumps, a new Divertron 1200x pump ordered £235. Still painful as it was not on the budget and had not done a single days work. With the plastering done we also wanted to get a mist coat applied and now we had more time get a finish coat as well. With a lot of area to cover, spraying looked a good option as I already had a HVLP setup. It turned out not to develop enough pressure for the emulsion, time to get an airless sprayer. Being a single use project I decided to see what was on Ebay and found a Wagner 418 sprayer being sold after use on another single project, looked clean and genuine, result I thought. Sprayer arrived and setup with paint to experiment and get to know how to use it. Not easily as it turned out, the spray was tailing badly, this is a solid central strip with a gap either side then a thin line, not what you need. Read the manual, googled it and it looked like it was down to low pressure. The 418 has no pressure adjustment, and the manual said it was down to cleaning out the inlet valve and paint filter. Lots of cleaning, no result, more research, cleaned outlet valve. Tried new nozzle, tried another gun and so on. Several frustrating days later opted to return it and buy a new one. Thank goodness this worked brilliantly and we were soon painting. Allowing for a 50/50 mist coat mixture we should have had plenty of paint. Half a day later, half the rooms done and all the paint gone. Fortunately the local Toolstation had stock. Another half day and it was done. All I can say is airless sprayers are brilliant, but boy do they have a drink problem. For the top coat we are using a really tough mat latex paint that you can scrub. This of course was special order and ordered before we knew about the sprayers drink problem. Needless to say the 45lt disappeared in half a day. It did cover the majority of the house, and we just have two bedrooms left to finish. The finish is very pleasing.
-
Having given up on the second hand unit I purchased a new Wagner HEA 250M. What a difference, the unit comes to pressure more or less instantly. Spray pattern very even, although there is a little pressure hysteresis as the pressure switch kicks in and out. Very pleased with the results of spraying, it took just two half days to paint the entire interior with a generous mist coat. It's now ready for the finish coat of mat white latex which hopefully will give years of service.
-
As far as tools are concerned, a nibbler was invaluable. Other than that, tin snips and a wooden mallet and block did most of the other bits, I did end up using a pair of bolt cutters to trim assembled seam ends. Contact @patrick to get more information as he's now an agent for the roofing company. Please excuse the very slow response.
-
Torqued it down, sadly with no effect. The person who sold it did so with a 30 day return, so in good faith. Looks very much as if I'll be returning it.
-
Ah! we may well be headed that way. My wife has taken to the roller in exasperation with my ability to the sprayer running ?
-
On the wagner the paint is in a gravity feed hopper so no tube to leak. Having said that the inlet assembly which is a screw down affair with O rings may need torquing down harder. I'll give that a try.
-
Hi, thanks for the help and yes, I've been through the airless sprayer thread which is very useful. The flow rate is for clean water straight from the pump outlet, no hose attached. The paint I'm using is Leyland trade diluted for the mist coat. I've convinced myself that the root problem is the pump just not coming up-to pressure due to lack of volume. Can't find any obstructions in the inlet or outlet that would explain the problem.
-
Having purchased a second-hand Wagner 0418 sprayer I had high hopes of cracking on with getting paint on our new plaster. However it's turned into a lot of frustration and wasted time. My first attempts at using the spray resulted in tailing. Reading the manual, which suggested cleaning the input filter and gun filter. They were clean to start with, but I never the less gave them a good soak, scrub and blow out with an air line. Tried again, same result. Tried thinner and thicker paint all to no avail. Tried different tip sizes again to no avail. Ordered some new tips....again no improvement. The unit sprays nicely for the first stroke then starts to tail again. I noticed that it was slow to come back up to pressure. It looks like the pump is just not functioning as it should, the manual says it should pump 0.9L per minute at 14 bar and 1.6L at 0 bar. It's pumping just 0.3L at 0 bar. I expect there are several forum members with airless sprayer experience, any suggestions as to what the likely fix it would be much appreciated. Thanks
-
Yes, they do have representatives in the UK. Gary Peacey is the product manager gary@jub.org.uk. They also have bracing available in the UK for hire. Delivery gets combined with the order if requested.
-
My HVLP sprayer in the Apollo 150, it's been a useful bit of kit. I've not had problems with it putting a lot of paint into the air. Having setup to try it with emulsion today it's proved a step to far, it simply doesn't generate sufficient pressure to atomise the paint. After a fair bit of trial and error I've decided that it won't work and have bought an Wagner airless sprayer.
-
Not polished concrete, just a trick of the light on a self levelling screed, we got warned of polished concrete ?
-
We've a good HVLP setup that works well with alkyd paints, it'll be interesting to see how it copes with emulsion paint. I expect we may need to try a few different jet sizes.
-
Well it’s been an exhausting and rewarding three weeks. The plastering work started on the 25th February and finished today the 18th March. Keeping ahead of Shaun our plasterer has been a real challenge and has meant we have not had a day off. Our internal doors arrived from Germany intact which was a welcome diversion, we've stored them safely in the garage until we get the painting done. The heat and humidity that goes with plastering has been interesting to say the least in a relatively air tight house. We don’t have our MVHR balanced yet but it’s been a real life saver being able to increase the fan speed and get a surprisingly comfortable working environment. Getting the MVHR up and running early in the build is not something we had planned, but in practice needs to be done as soon as you start making the structure air tight. The filters will be trashed but it’s a small price to pay for comfort. One things for sure getting plaster board up focuses the mind on the details of first fix work right. We had left plenty of wire at the sockets we thought but some were a close call after cables were fixed into place so they didn’t interfere with boarding. The water pipes were more troublesome. Our build uses wall plates (timber bolted to the ICF concrete) that support the joists. The wall plate is 50mm thick and ends just 30mm before the ceiling, so pipes have be bent round a tight curve, too tight. We ended up notching the bottom of the wall plates and even then some were a really tight fit. One other problem we had to overcome was a curved wall. The curve is a “design feature” and like a lot of things looks great on paper but rather more troublesome to turn into reality. The curve has an outside diameter of 1800mm. We took a look at the options and decided against using doubled up 6mm sheets of mdf as the long term stability invariably results in cracking. After a bit of internet research we found a plasterboard product “V-Cut” that looked an ideal solution. The boards are standard plasterboard cut every 10mm with a fine kerf saw. The result is very flexible in one plane, they were rolled into 400mm tubes. When it came to using them however the very fragile nature of the sheets became very apparent. Plaster board is very friable at the best of times, cut into 10mm strips makes it nigh on unusable. For example the plasterboard screw driver would simply pass straight through it. We ended up using the solvent free version of pink grip to hold it in place. The curve is in our hall so it’s exposed to potential knocks and needed additional protection. After discussing it with Shuan we decided to apply rendering mesh with a base coat plaster and then apply a skim over that to complete it. The end result looks and feels durable. It would have been a far better product if the boards were laminated with an additional layer of mesh and paper before they get cut, as it is I would not recommend V-Cut in it’s present form. On the positive side it’s been immensely rewarding seeing the house turn from a building site into something that looks like living space. It’s quite curious how your perception of the space changes, it looked smaller and the ceilings lower before boarding, then got bigger again once plastered. At times it’s been reminiscent of the track laying sequence in “the wrong trousers”, needless to say we’re going to take a couple of days off to recover. Next on the list of things to do is mist coat the plaster to seal it before applying a spray of latex mat white.
-
The extension arm takes it to 4.6M. The standard arm is in the region of 3.4M.
-
The board lifter is not the best engineered bit of kit in the world, but very serviceable and excellent value for money. It lifted 29KG 2.7 boards with no problem, The wheel locks worked well and held the lifter in position well. It was better than I thought it would be. For the collated gun I used the other end of the spectrum, a corded Hilti. I did take a look at a cordless option, but I could get a "like new" driver gun on ebay for £30 and bought the collated head new for £100. Beautifully made and will last a life time, total overkill but I'll probably recoup that cost when I sell it at the end of the build.
-
In my last blog entry we had done the majority of first fix and were about to tackle the lighting circuits. We had intended to do this in the conventional ring and switch runs. Reading up on our options it soon became obvious this was not the best option and that running radial circuits made much more sense. A radial approach will let us install led drivers and any automation in a central area for ease of maintenance and to allow us too upgrade with wi-fi switches at some point in the future. Initially we are installing RF controlled relays with switches that look like fairly conventional switches stuck on the walls at appropriate places. There are a couple of of lighting circuits where having Shelly controlled switches will be beneficial as we can programme them to come on at sunset for a couple of hours. All has gone reasonably well, our council building controls visited and gave us a clean bill of health and said they didn’t need to come back before completion. They’ve been really good to us drawing our attention to possible problems, so getting the news was a nice vote of confidence. It’s been hard work and we’ve been on site most days, so when it came to the 14th I did little to help my cause by buying Pat a new set of overalls ? … we both had a laugh about it. Our plans were to get the plaster-boarding done by mid March, which is when the plasterer was scheduled to finish a large job. This schedule gave us plenty of time to fit service battens on the vaulted ceiling and get everything as true as we can to give us a nice flat ceiling. Not having plaster-boarded before we decided it was prudent to call in the plasterer to take a look at what we had done and point out anything we needed to do differently. So when Shaun our plasterer came on Tuesday last week and told us it all looked good and the big job he had been due to start had been delayed as the electricians had failed to come on site. Quick discussion and we decided to break our plastering into two pieces of work and start on the 25th a full three weeks before we had planned. It was an all hands to the pumps week to meet the schedule. Our house has a two story stair case in a 1.8M by 2.4M void so when working on the ceiling over the void it looks like a very long drop...a good 8 meters. The boarding above the void is in full view, so we wanted to get a nice straight line on the intersection on the apex. We set up staging in the void on the second floor. Well supported but still knee quaking. Getting the board lifter into the work area was also a problem. Just to help the wall on one side of the area was not true so getting a 2.4M board lined up and fixed true proved a bit of a mission. In the end it took four attempts and some use of packing shims to get it right. Not a good start as it had taken the best part of a day to do a comparatively small area. Our kitchen ceiling is vaulted and we had bought a board lifter and an extension arm to allow us to do it. This extension arm allows the boards to be raised to 4.6M plenty we thought. It turned out to be just 800mm less than we needed so we ended up putting the lifter on blocks to get the additional height. In the end it worked out fairly well with minimal trauma. Can’t imagine how people do it without a lifter. Progress picked up well from this point and we put up the last few sheets with a little time to spare. Plasterer arrived on schedule and got to work fast. Such a transformation.
- 6 comments
-
- 11
-