


pudding
-
Posts
193 -
Joined
-
Last visited
-
Days Won
2
Everything posted by pudding
-
Hey all, I've had a longstanding issue with our driveway and rainwater runoff from the fields above us on the hillside. When we bought our plot and built our house about 10years ago, the fields were grass and had livestock in them. We had a channel drain put in at the top of the new driveway to catch rainwater running down the road. This was all fine for a couple of years, rain soaked into the grassy fields and just the rain falling on the road went into the channel drain which coped fine with that amount of water. Then the tenant farmer changed in the field, he now plants crops, which drastically increases the amount of rainwater that runs off the fields, through hedges and onto the roads, as half the time, such as the last few months, the fields are just mud with nice trenches in from ploughing and the tractor wheels which channel large amounts of water from the whole field and dumps it onto the road. This water is usually muddy and full of silt which clogs up the drain and slotted grills on top. I removed the grills and cleared all the mud last week thinking that might sort it, but despite that, the sheer amount of rain water that runs off fills and overwhelms the capacity of the drain which happened the very next day after clearing the mud out. This muddy water then flows down our driveway, and unfortunately we're the bottom of the 3 properties on the site, the water now goes straight down to our front door and house. There is another channel drain in front of our house, but that again doesn't cope with the huge amount of water that's now filling it. It was only designed I think to take the water falling directly on the tarmac driveway. This drain then overflows right in front of our house giving rise to a few inches of water, and has in the past been just cm from entering our front door. Now in the last couple of weeks, the soakaway where all this water goes has been backing up and water coming up and out of the metal lid, so I assume the soakaway is getting clogged with all the silt and crap going into it. Here's some pics of the area. This is looking up the lane, fields on the right, and channel drain in the middle with a few grills off from when I cleared the mud. Looking down the lane. Here's the channel drain full and the water is just flowing over the top. This was before the mud was cleared out and it was just lightish rain. When it rains heavy, a LOT more water flows at this drain and even with the mud cleared, just fills it and then flows straight past it as if it weren't even there. We then get a nice stream going down our driveway down to our house at the bottom around the corner there. Then the ACO drain, hidden beneath the muddy water, in front of our house just fills up before this amount of water can drain away, and theres a couple of inches or water up against the stone wall there. So, I need to come up with a solution to stop this before the soakaway is completely buggered, and so our front door can be used without having to navigate a stream and sludge with the potential flooding, and ensure the water doesn't get into our house. My thinking is some kind of hump/lump/slope at the top of the driveway to completely stop the water getting onto the driveway in the first place, although I'm not sure of the best way to build that. Tarmac/concrete/granite setts/speed bumps/something else? And then build the bump in front of the drain, or behind it? Or, dig the channel drain out completely and put in something else better? Or..... Any suggestions and comments appreciated. Would love to get this sorted soon before the next deluge. Not too nice wondering if the next downpour is going to make its way into the house. Pretty stressful and anxiety inducing as I work away from home and can't always be there to put concrete blocks and things in the way to try and divert the water away from the house and front door. Also slightly complicated by the fact the driveway isn't owned by is, its the neighbours and we just have access rights over. They're not affected by this problem, so cheaper solutions the better in the hope of splitting costs. Cheers.
.thumb.jpg.a37f75fd7544bbde08231a92c81414f5.jpg)
.thumb.jpg.cfb0bf9c09eb87ab35a0492653a8e338.jpg)
.thumb.jpg.f57049c959ae76517a496440275ff66b.jpg)
.thumb.jpg.b731917ec883863965babd09bbd8fa4f.jpg)
.thumb.jpg.9c484b96cb78594e1589f75b59491671.jpg)
-
Builder recommending insulation in joists under flat warm roof
pudding replied to swank's topic in Flat Roofs
Sorry. not quite. 2/3rds above - 1/3rd below refers to the insulation above/below joists, not air space. So if you had 100mm PIR boards above the joists, putting 50mm of mineral wool would be fine, push it all the way up next to the deck above. Then vapour barrier below joists, then plasterboard on top. -
My vote would be in the middle if the empty wall space left of the window, then you could build some boxed/cladding around it with sloping roof.
-
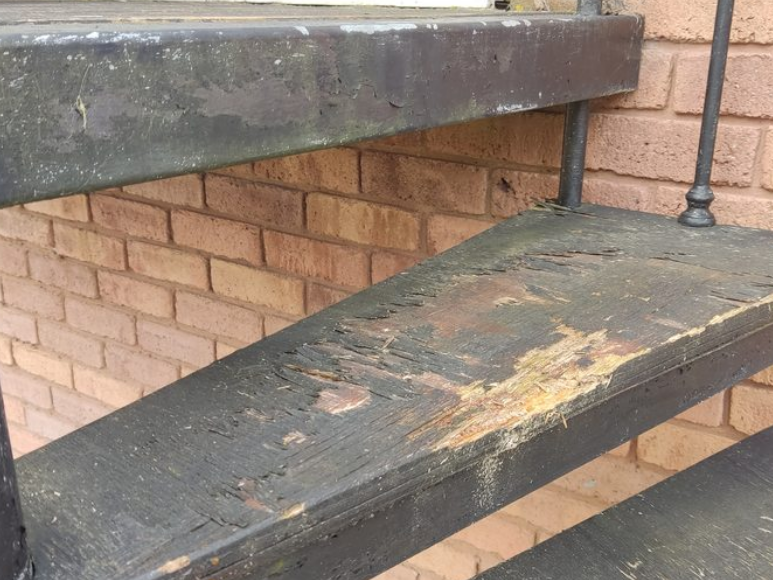
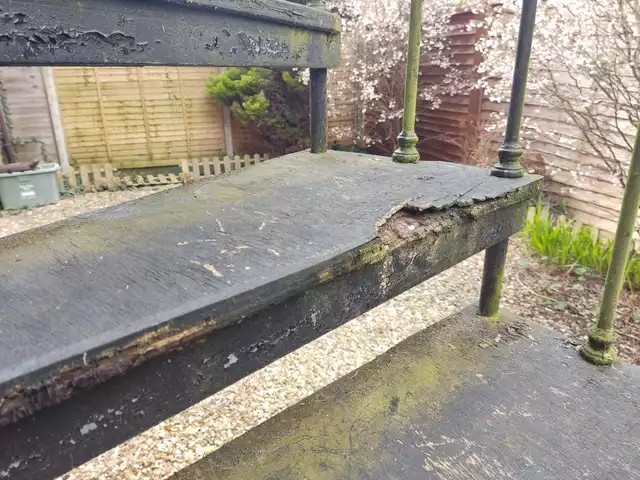
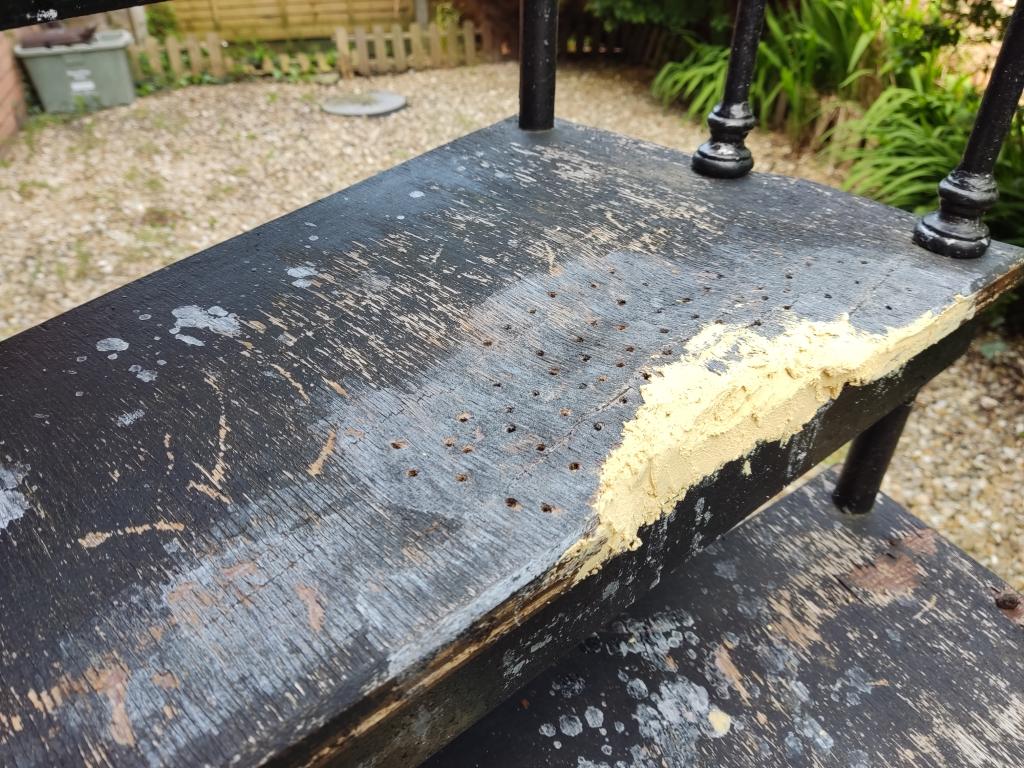
Another update. Steps refurb finished. Wet rot wood hardener added with extra holes drilled to really get it into the wood. Filler to pack out the damaged areas then sanded, 2 coats of this elastomeric paint - https://www.promain.co.uk/heavy-duty-elastomeric-floor-coating.html , finally fibreglass tread nosings stuck on with sticks like sh!t. Looking waaaay better, plus not a death trap anymore! 😁

.thumb.jpg.d75c962155765212fa2827ea8460480e.jpg)
.thumb.jpg.445bb980d92f6f568f48d06de8632d7b.jpg)
.thumb.jpg.92ac27360bdb8e1b1d6cce3a6a94f541.jpg)
.thumb.jpg.ccd257226dda0161225c3c48a98bac90.jpg)
.thumb.jpg.f9c459f2972c560aaa77d49d31fe3d9e.jpg)
-
Decking wall refurb and wind break
pudding replied to pudding's topic in Landscaping, Decking & Patios
Update! Pretty much all done now. So, order of works was - scrub&wash walls, repaint 2 coats including painting up into top of walls slightly, then use left over render to render wall tops sealing edges of paint hoping to prevent any water getting behind it, outdoor tile adhesive used then to bed slate capping and a piece of DPC in between each slate beneath the mortar line (the mortar line between each slate was where the worst water run-off marks were leading to algae), then pieces of slate used behind each post, also sanded/re-oiled, so it stood off a few mm from the wall, plus bottom of posts trimmed so any water will drip slightly away from the walls. Decking scrubbed, jetwashed then re-oiled, very satisfying job! Time will tell to see how long this all lasts before I need to clean it all again..thumb.jpg.919e2b51b0a76543931396be7b8c198d.jpg)
.thumb.jpg.e031ece054176afdff38f2f027267a81.jpg)
.thumb.jpg.83fde314f2e825ce1997ac84b30d410f.jpg)
.thumb.jpg.b69cb54df7cdfdc1e1faa9a501661fc8.jpg)
.thumb.jpg.d8936f8be2dae598dabcdf7be1724c5f.jpg)
.thumb.jpg.6b60429fb4e9ed0c46080bfb1a6fad0f.jpg)
.thumb.jpg.a417ad5c8913479c1a74a2d6451acbff.jpg)
.thumb.jpg.d1302d435ab12da95922b7a2100e6d15.jpg)
.thumb.jpg.c6590a5d3e692f5978ee1dd0a8d89500.jpg)
-
PV on a flat roof, how far from the edge?
pudding replied to Smallholder's topic in Photovoltaics (PV)
There is no formula. It just needs to be strongly secured enough, so if BC are involved, that's either according to a structural engineer, or general guidance from a bracket/rail manufacturer that BC will be happy with. 1m I'd say is massive overkill. Usually most will spec 30-40cm minimum. (On a FB group im in, just general UK solar if i remember correctly, some guy who's in the industry had a doc that stated about there being no minimum distance specified anywhere only recommendations, and it just needs to be strong enough, which over the years has led to every install playing it safe and staying 30-40cm away from an edge, rather than actually thinking about it or deviating from the standard install that everyone will throw up) I've gone closer on a couple of corners of mine on a nearly flat roof carport last year, but i've doubled up on the panels brackets/rails through to the timber battens, so i'm happy it wont uplift with strong winds. The older array that another company installed a few years ago stuck to 30-40cm. Here's a pic -.thumb.jpg.07db7f39f08e9a6d1a5109b20c13553b.jpg)
.thumb.jpg.9164f3cbf6e4c4e8c3d4ca9924e5053d.jpg)
-
Air Con single vs multi unit efficiency?
pudding replied to ashthekid's topic in Other Heating Systems
Also, you prob wont need an 8kW unit, 5 or 6 would be fine. Theres very small chance that both internal units will be running and max capacity at the same time, and even if that is called for, it would be for a short time until they throttled down and demanded less. I've got a 2.5/2.5/3.5kW system runnning from a 5kW outdoor unit, all good. In the back of the Daikin manuals and specs you can see what the 5kW outdoor unit can actually provide if all 3 units are running and what they're effectively derated to. -
I've just bought some off this to redo our decking this year - https://www.wood-finishes-direct.com/product/manns-premier-uv-decking-oil I'd never go with paint myself, always something to soak in rather than sit on top of the wood. Its Yellow Balau wood we've got, treated all around with Cutek oil before fitting it, about 5/6 years ago. Then once the colour had faded I put on some dark oak no nonsense decking oil from Screwfix a couple of years ago. When i lifted a couple of boards to get underneath to some cabling, the bottoms and sides are still like new. Now the top of the deck is pretty silver again, but still in great condition, thought I'd give this Manns oil a go as part of my decking area tart up this year.
-
We're in the same boat as Dillsue, 4kWp MCS system from 8years on deemed 50% export, and a new 3.5kWp system from last year non-MCS, which also has batteries connected to it, so we dont really export much at all. No email from Eon yet who our FiT is with, and we had a smart meter fitted last year so can easily if they had to work out exactly what we do actually export.
-
Decking wall refurb and wind break
pudding replied to pudding's topic in Landscaping, Decking & Patios
I've still got a load of black jack dpm paint that I used at the bottom of the wall left, so I could paint the top of the whole wall in that and waterproof it that way? I'll be putting that Mapei flexible tile adhesive I've already got on both back of slates and top of the wall as you would for a normal decent tiling job. With the packing washer idea, with that keeping the post off the wall I'm thinking it would no longer be very sturdy, as the bolts and nuts (there were 2 for each post) were clamping the post against the flat wall giving it strength. Will a little washer won't it then be pretty wobbly as it'll only be clamped against the much smaller surface area of the washer? -
Decking wall refurb and wind break
pudding replied to pudding's topic in Landscaping, Decking & Patios
Thanks for the comments so far. Good tip with the plastic washer/spacer between the posts and wall, will give that a go I think unless any better ideas crop up. With the DPM idea, are you thinking run the DPM along the whole length of the wall edges? I'm not sure how you're thinking of sealing/fixing it to the wall/slate here to stop water getting onto the wall or possible behind the paint, unless I still paint up onto the top of the wall under and before the DPM is fixed on top? I've got some CT1 or stick like sh!t which could do the job for DPM-wall fixing. It did also cross my mind to fix all the slates down with this too, would make a nice waterproof seal between slate and top of wall/paint im thinking? Just it'll take a few tubes of the stuff and it's not the cheapest..thumb.jpg.bd756f0a647148dc7da2502a04916a53.jpg)
-
Hello, I built a wall around our decking a few years ago, and attached to this I fixed some posts and strips of wood to act as a windbreak as we're in a pretty exposed place. This windbreak worked well and helped make it a more usable place. However, the paint on the wall needed a bit of a refresh as it had staining and marks running down it, so i stripped off the posts, and slate capping on top so i can clean it all and repaint. The paint had also started to peel in a few places where water was able to get in behind the paint at the top of the wall where the paint met the slates, which aided the fungal growth there and stains. My current plan is to clean all the walls with a jet washer, (ive already sprayed them with some anti fungal spray too), then paint the walls with some new Sandtex masonry paint, making sure the paint go up on to the top of the walls, before I refix the slates on top, the idea being any water that then runs over and under the slates on top cant get behind the paint any stays on the surface. Refix the slates using full bed of this on the wall and also back of slates - https://www.screwfix.com/p/mapei-keraquick-wall-floor-rapid-set-flexible-tile-adhesive-grey-10kg/5769P?tc=FA5&ds_rl=1249416&gclid=Cj0KCQjw8qmhBhClARIsANAtbocYz28jIVSSOuiULvRUlQ55bQwn00Y4KV1XOsrguJlu405gOmiMmycaAoo0EALw_wcB&gclsrc=aw.ds rather than concrete as I'd done previously, which hopefully will also stop water getting under the slates. Next is the wooden posts and wind break. At the mo I'm not too keen or putting the posts back where they were, as they leaving the marks on the wall, and I'm wondering if there is a better solution to protect this area from wind? Any ideas welcome. If nothing else comes up, I'm thinking maybe just mount the posts on top of the walls this time rather than being fixed to the wall face, but then I'd prob need some horizontal wooden joists between the posts for support and strength? Cheers for any comments and tips.
.thumb.jpg.af026cb5fa1c33a685f247e194481227.jpg)
.thumb.jpg.43720de02193f73e8d70ae15b3f12c2b.jpg)
.thumb.jpg.2fd99a2020476555bdebc2e1de1362e8.jpg)
.thumb.jpg.db8d01a7ddc252197de6177787d4f4a7.jpg)
-
No reason for it not to work if it's designed and sized properly. Stick with the MVHR though, still want controlled ventilation.
-
I don't think the wood is rotten, just a couple of treads at the front have worn down so the paint is gone and wood starting to break up. I could use this kind of product maybe to firm up any front edges before putting nose covers on? https://www.screwfix.com/p/ronseal-wet-rot-wood-hardener-clear-500ml/63540?tc=LT7&ds_rl=1243321&ds_rl=1241687&ds_rl=1245250&ds_rl=1245250&gclid=CjwKCAjw_YShBhAiEiwAMomsEEtg0rcgQjpr0ObpYxAfnaFUlV_drdskQi1YRZct4DjTc4eov_Ka3hoCCZsQAvD_BwE&gclsrc=aw.ds
-
Hello, I've got this external spiral staircase on my coach house, which is in dire need of some TLC after years of nothing. What would be the best plan of action to improve and protect this without dismantling the whole thing? (The ply treads are integral to the metal structure and cant simply be unbolted and removed, they seem to have been installed one by one as each step was added). My current thinking is to clean and scrub the whole lot, sand the treads, paint them with some new, possible grippy anti-slip external paint, then add some metal nosing to protect the front of the ply treads, some of which are starting to fall apart. Stuff like this is what I've currently found - https://www.taindustrialpaints.co.uk/collections/boat-deck-paints/products/non-slip-marine-deck-paint and - https://www.ebay.co.uk/itm/222840275140 but i'm sure there's better/cheaper alternatives? Cheers.
-
Hi, I posted this a few weeks ago on the other Cosy thread:- My old fixed tariff was due to expire beginning of Feb, so I moved over to Octopus in anticipation of that, and in order to get rebate payments as I've signed up to Ripples second wind turbine project. I signed up via a link to join the Cosy tariff. Got switched over to Octopus week and a half ago, and was switched onto Cosy on Thursday last week. For our house we have an 8kW heat pump connected to a 300L DHW tank and a 300l buffer to tank for whole house UFH. We've also got 7kW solar, with 14kWh batteries installed last year. So, there was a lot of fiddling and tinkering with settings and timers to try and get the best out of it, and it'll take a few more days/ weeks to get the temps and timing right. But basically, the whole aim is to try and run everything ad charge everything during the 2x3hr cheap slots so we import the least amount of electricity possible at all other times. At the mo, I've got the batteries set to charge to 75% overnight which sees us through the morning and breakfast until 1pm easily enough with a bit of spare capacity for charging if/when the sun shines, and then to 100% by the end of the 1-4pm window, ready to see us through the night until 4am. The heat pump is set to come on during the cheap windows to top up the hot water tanks, and the room thermostats are set to heat the rooms only during the 3hr slots, morning up to 20/21 for bedrooms/other rooms, afternoon up to 21/22deg, so slightly warmer to keep a decent temp until they come back on at 4am. Seems to be working out quite well so far, and I think this tariff really benefits from having batteries which really take advantage of the cheap slots. I think through the year and more solar is produced I'll be able to reduce some of those battery charge levels as more and reliable solar can top them up. Plus, the heating will be off saving muchos kWhs! Seems to be working really well and we basically use almost no electricity outside of the 2x 3hr windows, but that obviously wouldn't be the case without batteries, but even without batteries, the heat pump topping up the hot water tanks for DHW and heating is fine twice a day, although I think every now and then the DHW tank needs topping up outside the 3hr windows if baths have been used or a lot of washing up has been done. Nothing complicated control wise needed I don't think, just timers on the heat pump and thermostats really.
-
Battery inverter and immersion heater divert together
pudding replied to BMcN's topic in Energy Storage
Yeah I've got an iBoost and installed batteries last year. Pure coincidence but my iboost sender died late last year after 7years or so. I've just bought the iboost sender which is supposed to be designed to match a system with batteries in it; it's specified to require 250W export before it will turn on and start diverting to the immersion. So that 250W export requirement is supposed to avoid small temporary spikes in export and the batteries simply powering the iboost immersion. It kinda works, but I still seem to get it turning on and using battery power for the immersion, but I think this is simply because of lag in the system, and the CT coils not being 100% accurate, and I've got a few A2A units in our house and a few other items, fridge/freezer, that may turn on/off and use a few hundred Watts which must be more that the iboost CT coil and 250W can deal with, and just like right now when the sun is down and we have batteries powering the house, as soon as these turn off, the battery inverter will still be sending that power which seems to be detected by the iboost which then turns on for a small while. It doesn't runaway and will turn off after a while, but today, where we've not had any excess solar at all to export, the iboost still says it's diverted nearly 1kW. Obviously it's not wasted energy, but it's not the most efficient use of it. I'm going to do what Richard says above, and sort out some kind of timer so it can only run in the afternoon before sunset and only divert actual excess solar, and not battery power. Simple, and not exactly an elegant solution and it really shouldn't be required, but it'll do the job. -
Octopus Cosy - new tariff for ASHP owners
pudding replied to George's topic in Air Source Heat Pumps (ASHP)
My old fixed tariff was due to expire beginning of Feb, so I moved over to Octopus in anticipation of that, and in order to get rebate payments as I've signed up to Ripples second wind turbine project. I signed up via a link to join the Cosy tariff. Got switched over to Octopus week and a half ago, and was switched onto Cosy on Thursday last week. For our house we have an 8kW heat pump connected to a 300L DHW tank and a 300l buffer to tank for whole house UFH. We've also got 7kW solar, with 14kWh batteries installed last year. So, there was a lot of fiddling and tinkering with settings and timers to try and get the best out of it, and it'll take a few more days/ weeks to get the temps and timing right. But basically, the whole aim is to try and run everything ad charge everything during the 2x3hr cheap slots so we import the least amount of electricity possible at all other times. At the mo, I've got the batteries set to charge to 75% overnight which sees us through the morning and breakfast until 1pm easily enough with a bit of spare capacity for charging if/when the sun shines, and then to 100% by the end of the 1-4pm window, ready to see us through the night until 4am. The heat pump is set to come on during the cheap windows to top up the hot water tanks, and the room thermostats are set to heat the rooms only during the 3hr slots, morning up to 20/21 for bedrooms/other rooms, afternoon up to 21/22deg, so slightly warmer to keep a decent temp until they come back on at 4am. Seems to be working out quite well so far, and I think this tariff really benefits from having batteries which really take advantage of the cheap slots. I think through the year and more solar is produced I'll be able to reduce some of those battery charge levels as more and reliable solar can top them up. Plus, the heating will be off saving muchos kWhs! -
Heatmiser Neostat v2 temperature sensor problem
pudding replied to Ultima357's topic in Underfloor Heating
Take 2:- Popped open one of the newer V2 stats. The PCB/PSU is slightly different, pics below. New one on the left, old on the right. So, I'm guessing that adds more weight to the fact the original V1 wasn't great and has definitely been improved in V2.- 150 replies
-
- 1
-

-
- neostat
- temperature
- (and 1 more)
-
Heatmiser Neostat v2 temperature sensor problem
pudding replied to Ultima357's topic in Underfloor Heating
Ahh ok, I'll not just copy in the link address to the photos in Google if only those signed into Google can see them then. I'll go back to uploading in Imgur, the filesize limit per post is too small I think for all the photos I've added. How can I go back and edit my posts though, the option isn't there anymore? Is there a time limit to editing for some reason? -
Heatmiser Neostat v2 temperature sensor problem
pudding replied to Ultima357's topic in Underfloor Heating
Hmm, I started by uploading them to imgur on my first posts on this thread, then noticed a copied link form google photots was automatically inserted into the thread. So, are the most recent photos direct from google not there for others? How do I grant public access to them, and how can some see them already but not others? -
Heatmiser Neostat v2 temperature sensor problem
pudding replied to Ultima357's topic in Underfloor Heating
Popped open one of the newer V2 stats. The PCB/PSU is slightly different, pics below. New one on the left, old on the right. So, I'm guessing that adds more weight to the fact the original V1 wasn't great and has definitely been improved in V2. -
Heatmiser Neostat v2 temperature sensor problem
pudding replied to Ultima357's topic in Underfloor Heating
Thanks for the reply. These neostats have the same pre-heat type function. Can you name the stats you used. Could they be wires to the controller as in my pic above? We've just moved over to Octopus, as I'm wanting to utilise a cheaper overnight window to fill our batteries and DHW tank and we have a 300L buffer tank for the UFH, (all from a GSHP) so no huge problem with a narrow temp window calling and stopping the call for heat frequently, although as you have done, I'd set it to target say 30deg overnight in the cheap window, so it gets the house nice and toasty overnight to hopefully last until the next nights heat up. -
Heatmiser Neostat v2 temperature sensor problem
pudding replied to Ultima357's topic in Underfloor Heating
Yeah i'll try and take one of the newer ones apart to check and then chase them up. Alternatives wise if it comes to that, exactly what would I be looking at and needing. Ideally I want something internet connected and preferably Home Assistant capable (I just a couple of weeks ago added HA and go the Heatmiser ones to show in there). This is the wiring center the current stats are connected to, just a rebranded Heatnmiser one I think - Also, while taking this pic of the upstairs heating, I noticed from this pic: My flow and return temps are very similar, with both being just under 30, maybe return 1deg colder. My sons bedroom with 2 loops is currently on so there is flow through there right now. The manifold pump:- was on the middle II setting, which I've just bumped up to 3 III. Was this the right thing to do, or would a slower lower pump setting actually help with the heat making into the floor there rather than being pushed quickly through the loops? (Sorry for the digression, just on a roll with the pics and spare time!) -
Heatmiser Neostat v2 temperature sensor problem
pudding replied to Ultima357's topic in Underfloor Heating
So I've got around to swapping over the power supply/backplate on the broken neostat, and as suspected the front section was fine and working as soon as it plugged back on. Here's pics of it all:- New backplate at the top with vents to aid heat dissipation, bottom is just solid plastic. Old plastic casing with PSU board removed Pics of the old broken PCB: So based on these I couldnt really see anything obviously wrong, no bulging caps or burn marks anywhere. But, based on the fact the new psu/backplate has the vents and the old one doesnt, surely that is an admission of the fact the old casing was leading the heat build up and eventual failure? Ideally I want all of my old neostats replaced with these new ones, free of charge of course! How best to go back to Heatmiser after their fob off email? Or just suck it up, 8years use is a long time and just buy new ones and replace as they fail?
.jpg.aad1fdce81e1872e21e106ef7273f45b.jpg)
.jpg.54c202abd1779ae78252ab1880b37a42.jpg)
.jpg.5c5cc980d3c9be425a927478de580f00.jpg)
.jpg.89700d8d036bc7adcefddba72109186c.jpg)
.jpg.62fb698606289b69d26a6cd03615158b.jpg)
.jpg.2bd4681f4cbd424462a796df5cc3da02.jpg)
.jpg.615398a07567d2eb55e20ed3ebed696c.jpg)
.jpg.7656c972f480b24269cef31a6246d724.jpg)
.jpg.505aba508699e06137e6698a56523d50.jpg)
.jpg.a743ba714a8172be8303269b0d18c365.jpg)
.jpg.2d2c254b9722f85da77f381e8a54d264.jpg)
.jpg.bc3ac92bcc4e34a481365f554eec8d27.jpg)
.jpg.9560b7b29897804dfac14c306bc425bb.jpg)
.jpg.622732a5d360e65d7ce021cc3282093a.jpg)
.jpg.447908b932b19f68bb7919d2b7be7b3b.jpg)
.jpg.7e9b6cfacb7f51e16fbec63d782790d9.jpg)
.jpg.45bdb46acf227fcb415b781e2278aa66.jpg)
.jpg.a5e99d7666730cfbf7467ba39f47a42c.jpg)
.jpg.5600e4f49aa130d373fd16af1027c295.jpg)
.jpg.99ab6d1dc8d8ce27a28863bbafa819fe.jpg)
.jpg.8492c9f243e86fe39d8ab9b672fd8900.jpg)
.jpg.d4d1a630581206d4e86854a477dc6ebf.jpg)
.jpg.604143e24b2da83da173f5f798a53957.jpg)
.jpg.79b2ecc67eef51bac9434a83c26de3c2.jpg)
.jpg.9c32bc949b8d04bdcadf690bc73463a0.jpg)
.jpg.666bceb4fa2ed8dda70163b843411461.jpg)