Crofter
-
Posts
3451 -
Joined
-
Last visited
-
Days Won
10
Everything posted by Crofter
-
So you've effectively got a solid fillet of timber to kick up the angle between the roof and the fascia? For now, I'm just going to do a temporary tack down at the eaves, because I have loads of building materials arriving soon and need the roof to stop leaking!
-
When drawing a line in Sketchup, you type in how long you want it, and bingo. You don't really draw freehand at all. Anyway, I thought I had hijacked this thread quite enough as it was, I'd better be careful I don't get reported to a moderator...
-
I think I checked out a couple of beginner Youtube tutorials and then I was away. It has its problems, and it's not exactly pro software, but I found it far more intuitive than any of the actual CAD packages that I tried. It is worth checking to see if there is a shortcut for certain tasks, e.g. for an embarassingly long time I was unaware of how easy it was to copy and move elements around. Now I know that you can, for example, draw one joist and then just copy if fifty times and voila. I'm sure there are other shortcuts that I don't know about yet.
-
Sketchup. Would be lost without it. I don't have a TP but there is a Jewsons and a Rembrand, I'd be surprised if I can't get the trays there. I was going to get them from Roofingsuperstore, which is where I sourced the membrane, but they were a bit silly on postage and anyway said the trays might not survive the trip. Edit to add: I need a stopgap solution because I have to get watertight ASAP. I am nowhere near ready to fit fascia boards yet. So I think I will leave the membrane over-long and then temporarily tack it down with a bit of batten onto the rafter feet. That should do the job for now and when the time comes to fit the trays and fascia boards, I can just cut it back. I will have to watch I don't fix the battens too close to the edge as well, so that I can slip the tray under. (I know fascias aren't exactly rocket science but there are some decisions on the exact measurements, which depend on some of the cladding details, and it's all stuff I need to kick into the long grass for now).
-
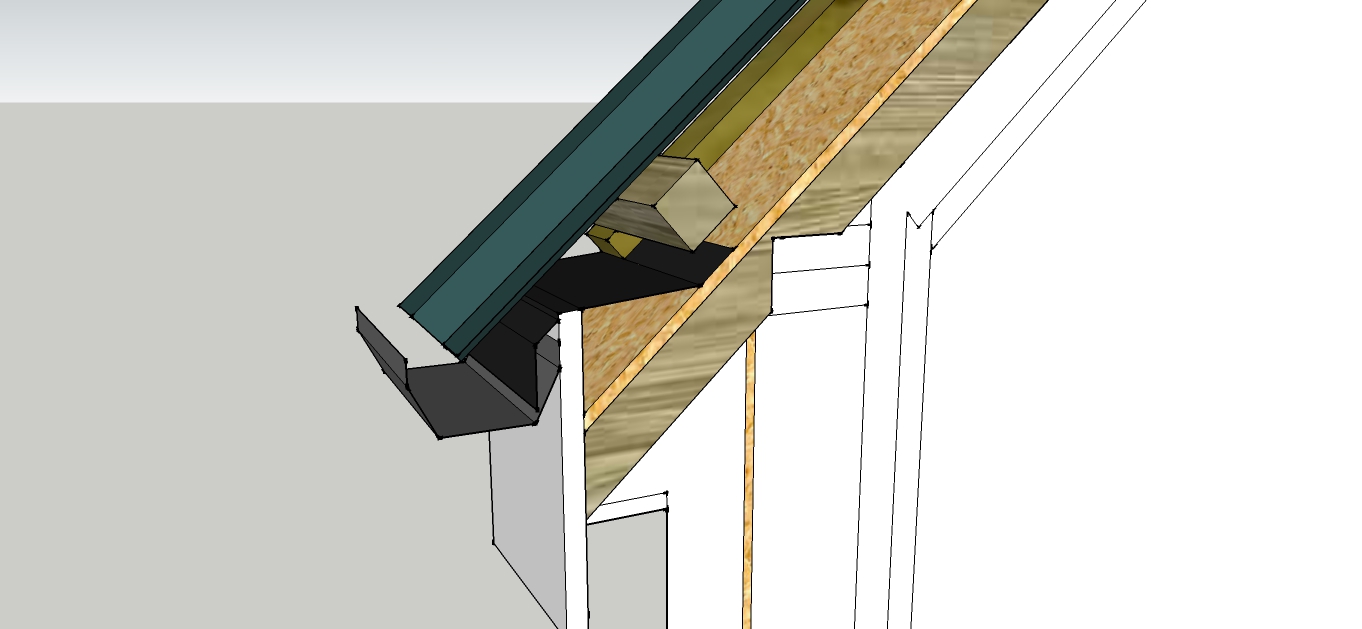
Brilliant, that makes sense now. And also means that I need to fast-track the whole fascia bit. I had assumed that, having got my sarking on, I could slap on the membrane and be wind/watertight for now, then sort out the eaves detail at a later date. Third time lucky- what do you make of this interpretation?

-
Have to admit I'm struggling a bit to interpret your picture, Dave. Perhaps there is some foreshortening going on and the tray is a bit hard to see. Studying it a bit harder, I wonder if the tray is quite flexible and you have battened it down almost to the bottom of the roof, then kicked it up to a shallow (near flat) angle to sit on top of the fascia board?
-
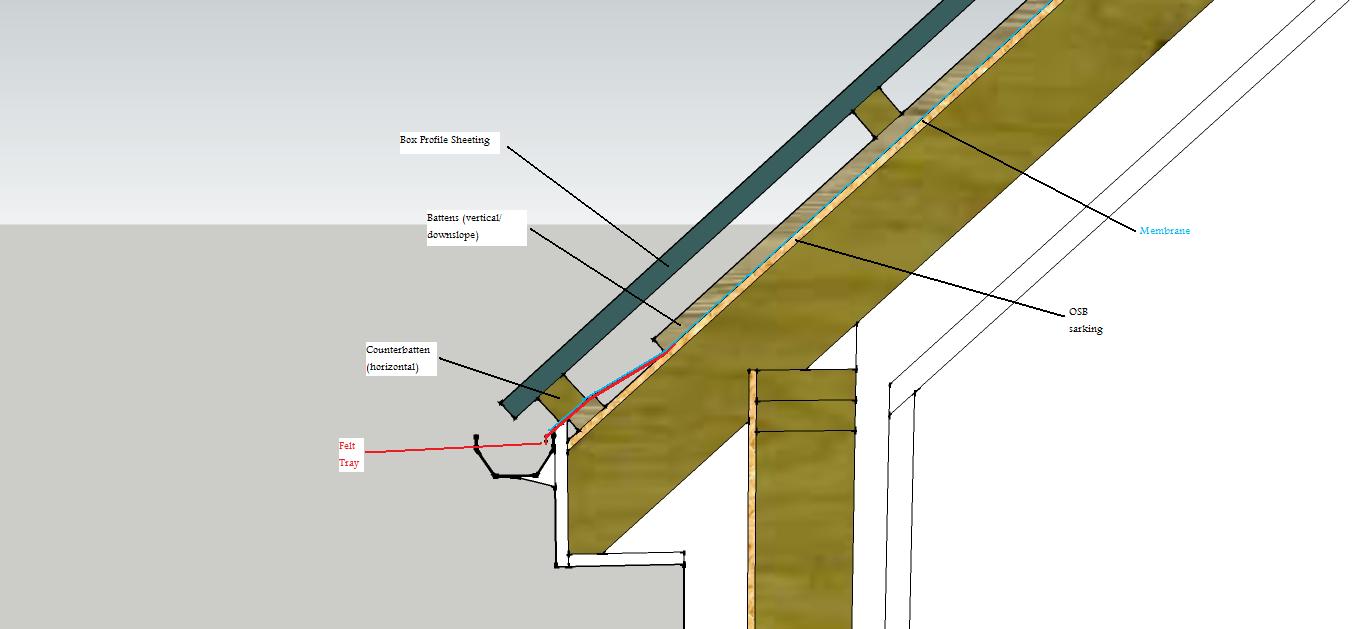
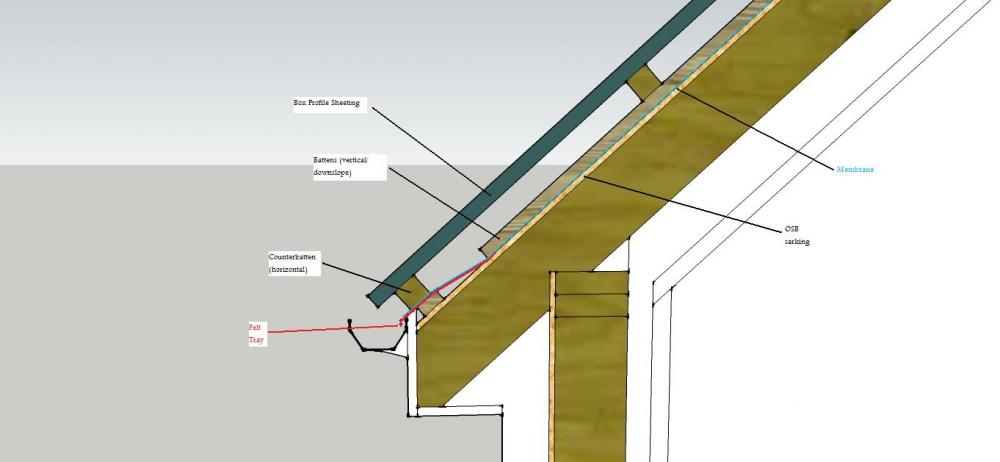
Still wrestling with this one. Membrane due to go on tomorrow so I kind of need a decision! My plan detailed above will not work- the 50x50 horizontal batten would close off the drainage gap under the roof sheeting completely. So I would have to move that batten 'upslope' but this weakens the support for the roof sheets right at the eaves, where support is critical to resist wind loads. New plan is simpler- stick the felt trays down directly onto the OSB, with all the battens on top. I have not shown the membrane for clarity but it would go on top of the osb and overlap onto the start of the tray (googling suggests min 125mm overlap). The downside of this approach is a slightly more open eaves detailing and I wonder what it will look like. I would use a 25mm vent strip (or a DIY version) beneath the 50x50 batten, which would be hidden from view by the gutter; an eaves infill strip would go on top of that batten to close up the gaps along the bottom of the box profile.
-
I believe @Stones had some information on this?
-

£10 handy inspection camera/borescope for Android
Crofter replied to readiescards's topic in Boffin's Corner
These have certainly come down in price- a couple of years ago they were £20+ Are they optimised for close up (macro) viewing, or can they produce a decent image of furhter away objects too? -
Interesting, thanks. One problem I'm finding with using steel roofing is that the normal application is quite different from a house- i.e. an open underside, without sarking needing drained, and installation on purlins rather than rafters.
-
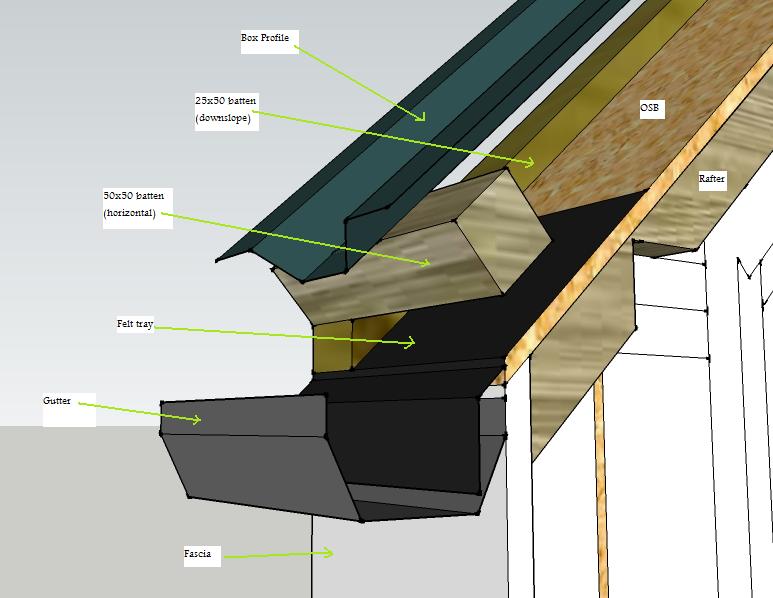
Yes, I fancy the idea of that! Especially for fitting into the box profile, should be about the right size/shape. My decision is whether to kick up the angle using the felt tray or not. It'll be easier not to, but leave a more obvious gap- or at least put the final horizontal batten on show. So the actual gap would be the 25mm beneath that batten, plus the box profile would need infilled above it. The fascia will be deep enough to accommodate a lowered gutter so either option is viable.
-
How does this look for my eaves detail? (sorry for my poor CAD skills!) I guess I'll need some sort of beastie mesh between the underside of the steel and the felt tray (this is a 50mm gap created by the horizontal battens). Main concern is that the very edge gets a bit messy with the tray riding up over the edge of the fascia. I could drop the height of the gutter and keep the tray at the same angle as the roof, which was my original plan, but this leaves a bigger gap which might look a bit odd, and may be harder to find suitable vent strip or bug mesh for.
-
It all began many years ago...
Crofter commented on oranjeboom's blog entry in Kentish RenoExtension
Looks like a good project! Definitely doing reno rather than rebuild? -
All good advice, thanks. The pipe run will be: sink+dishwasher, then about half way along the washing machine will join, and then it will meet the main stack under the toilet (where the shower and basin feed in as well). So yeah I'm up for increasing the pipe diameter.
-
It was written in different sizes. Fixed it for you now! Don't worry, no charge for that
-
Log burner stove for large open plan room but MVHR
Crofter replied to readiescards's topic in Stoves, Fires & Fireplaces
Sounds like a plan. Ideally I think the only way to sensibly use a stove in a low energy house is to bank up all the energy somewhere, e.g. a TS. I guess a big heavy chimneybreast could also work but I'm delving into the realm of thermal mass here and I should know better than that -
I was going to support it on loops of wire stapled to the underside of the joists, so 600 centres. I've got about a 1:40 fall available, it works out about the same whether I run the pipe within or beneath the floor.
-
What's the advantage to that?
-
Don't spill it!!
-
I kid you not: this is where I get my stone from
Crofter replied to ToughButterCup's topic in Building Materials
Although the UK is seen as a gold standard for H&S to which the rest of the EU looks up. -
My wee house sits up on piers, varying from about 150-900mm off the ground. I need to connect the kitchen sink to the SVP, which is at the other end of the house, about 8m or so away. This is all at the 'shallow' side of the house, where the piers are less than 300mm tall. My original plan was to run the waste pipe through the insulated 300mm deep space within the floor (I'm using JJI joists). However I'm wondering if there is actually anything at all wrong with just running it underneath the house- this would be much easier. Will there be any sort of frost risk? In some ways it isn't really different to running pipes under a normal suspended floor, after all.
-
You really don't want the plant to be sitting in a local depression- surface water will end up running into it which is not good. This can definitely be a problem on flat sites (wasn't a problem for me!) Can you move the treatment plant closer to the house?
-
Log burner stove for large open plan room but MVHR
Crofter replied to readiescards's topic in Stoves, Fires & Fireplaces
You should be maintaining a burn that is hot enough that, when the fire goes out, not only is the glass clean but also all the firebricks etc. Doing this minimises ash and flue deposits and gets the most out of your fuel. The design of the stove makes a big difference though. My old stove had its airwash taken from the front, at the top of the door. My Charnwood takes it from the back, via tubes that pass through the top of the firebox before hitting the top of the glass. This ensures that heated air is washed down the glass, which makes a huge difference. The big commercial biomass guys reckon on 2% ash residue- everything else is burnt. The higher the temperature, the more the wood breaks down by pyrolysis. You are really creating a miniature gas plant in a way, driving off volatiles which are then burned. The lower the temperature, the more of these volatiles end up lining your stove, flue, and of course escaping as unpleasant particulates. -
Log burner stove for large open plan room but MVHR
Crofter replied to readiescards's topic in Stoves, Fires & Fireplaces
I haven't seen a Clearview in the flesh, they do seem awfully expensive! I really like my Charnwood which was a fraction of the price. Prefer it to the inlaws' Morso in fact. My installation will use bog standard single wall flue from the stove right up to the vaulted ceiling, and then twin wall where it passes through the roof structure and above. -
Log burner stove for large open plan room but MVHR
Crofter replied to readiescards's topic in Stoves, Fires & Fireplaces
@reddal That's very interesting indeed. One other factor of course is log size. If using actual split logs then yes a rammed full firebox is going to struggle to burn properly. Given that I don't have ready access to trees, the vast majority of what I burn tends to be smaller stuff and scrap building wood etc. Much of it is no bigger than kindling really. Consequently the fire needs attending every 20mins or so to top it up, but the benefit is a very hot and clean fire. I realise that this is not typical of most people's usage though (and most people do not want to spend their winter evenings sat beside the fire feeding tiny bits of wood into it).