


MikeSharp01
-
Posts
5644 -
Joined
-
Last visited
-
Days Won
16
Everything posted by MikeSharp01
-

I demolished your house, but I'm not moving the debris!
MikeSharp01 replied to laurenco's topic in Demolition
IT had, latest research seems to point to improvement as the industry matures, the worst overspend record of them all, fortunately there are no self builders so its either corporate or public sector that bears the brunt of the undiscovered ruins in the spec / test plan / hardware / network / database / integration etc. -
Expertly topped trees...
MikeSharp01 replied to Ferdinand's topic in General Self Build & DIY Discussion
Makes you wonder why Amateurs should do anything - its about learning - how best to crown reduce a big tree, assessing the risks of DIY - tree climbing with a chain saw sort of risks, and then choosing whether you want to save money spending time or save time, and perhaps injury, spending money. -
Is that the Stud width or the finished width - assume stud width?
-
Don't want to rain on your parade but you may need to take advice from a pro because, IIRC my timber technology from way back, your thickness is going to take more than a few years to season fully and when you plane it you will get down to less seasoned wood which may warp again. There is a real art to seasoning long length hardwoods for cabinet making - long time / very slowly as near the finished thickness as possible and absolutely flat. I have friends who do it and 5 years is nothing to them. You could sell your planks and buy 295mm wide by 20mm oak planks ready for cabinet making, not the same as grow your own I agree, from HERE (where I get mine) but there must be someone closer to you. Another way to go would be to use your planks cross wise on the table that way any warping will be less pronounced. Alternatively go for a more rustic look, maybe with gaps between the planks which can accommodate any warping.
-
Welcome to THE forum.
-
If they are not crushed very well you will likely have a lot more voids that will need to be filled with soil over time causing the surface to pucker as the soil is washed into the voids over time by the rain etc. So for a bit you will need to keep topping up the surface. Once the voids are filled however it will be very stable you could speed this up by blinding it with a sand layer and washing it in with hose. If their quote included crushing it I think I would insist they did.
- 35 replies
-
- 2
-

-
- demolition
- bungalow
- (and 3 more)
-
Doesn't sound very usual to me - you must have been very bad surely this cannot be a consequence of a plumbing problem. I have a suspicion that there is more to learn here.
-
Sorry Jeremy didn't mean to give you work to do - will be interesting none the less
-
Yes - I hope mine lasts more than that though, but I suspect that is just another of the variables - you factor in 60 years at the outset to figure out how much energy you are, or think you are, going to need. I was wondering about those that have already been built. EG does @JSHarris's pad do it as is (his SAP is 107 I think although SAP does not really tell you much about energy production as you get points for all kinds of things which, on the face of it, don't count in the energy equation) or would you need need much more generation. I guess you can factor in COP benefits from ASHP's etc as well which might help. Either way you have the, on the face of it, nightmare of working out how much energy was used to create the materials, build the building, run it in energy terms (100 of the 107, simplistically I guess). Throws down a challenge though don't it?
-
Just been reading the latest Passive House magazine (sad I know) but came across the new 'Powerhouse' standard that has been suggested in Norway. In this standard you first have to build a passive standard building and then ensure that it, or systems associated with it, can generate enough renewable energy over the building's lifetime to: (Wait for it) pay back the energy used in manufacturing all the materials. pay back all the energy used in its construction. cover all the energy use of operating the building. cover all the energy used for maintaining and renovating the building - including materials used. pay back the energy used in demolishing the building. So you need a SAP value of more than 100 (if you believe in the SAP values anyway) and then you need to work out / find all those energy consumption values. Wonder how much energy it takes to make 1 meter of 15mm plastic water pipe! So if you have a SAP of 110 I wonder how long the average buildings life has to be? Somebody somewhere seems to get it - the Norwegians, but I cannot see any of our major builders doing it or self builders for that matter. There won't be a collective opinion on this but it would be interesting to hear the thoughts from the forum. Anybody worked it out for their build?
-
Insect Screen Corroding
MikeSharp01 replied to Gone West's topic in Mechanical Ventilation with Heat Recovery (MVHR)
You are a long way from the sea so it's probably not salt corrosion, lets hope @JSHarris has some chemical theory as pretty much everything corrodes given the right atmosphere, might it be something the local farmer puts in the air as you are a bit exposed there - sadly the best solution might be, I hesitate to say it, plastic sorry. -
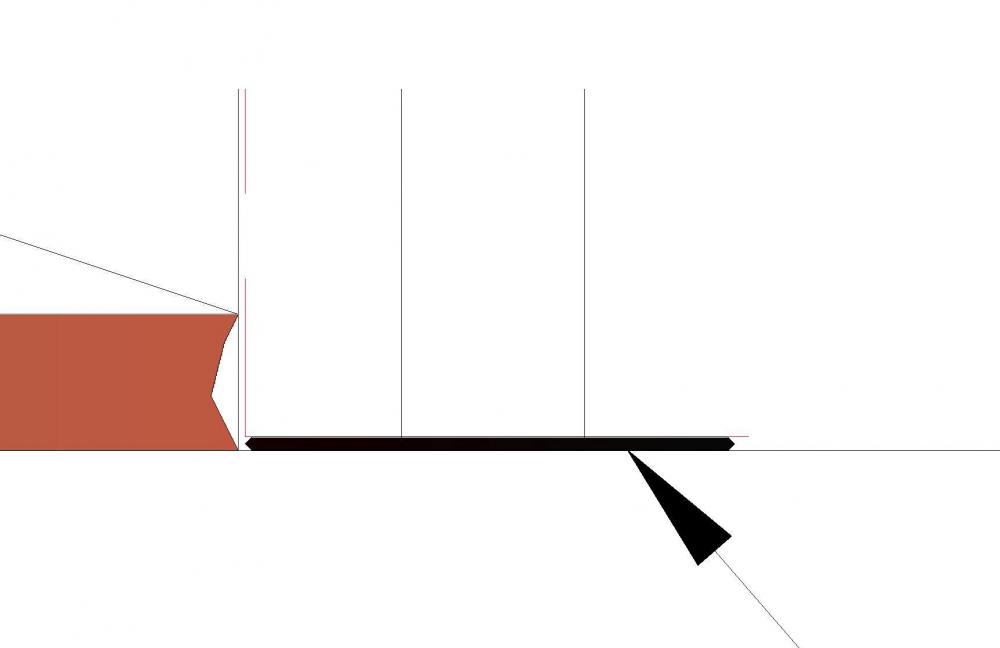
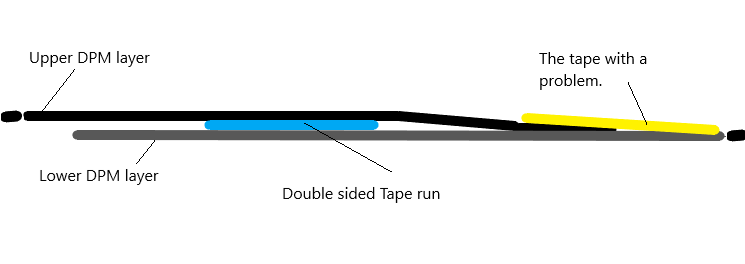
Sorry yes @Mr Punter the VCL should read breather membrane I keep mixing those up. On the air tight membrane and the double sided tape - the air tight membrane is sealed to the concrete slab with the double sided butyl as in: I could use packers and a mortar gun to load up the mortar - I guess you do that before you actually start loading it with studs. The DPC is directly on the concrete and laps over the main DPM coming up the side of the polystyrene former and over the top, then the Mortar and then the sole plate timbers, putting mortar below the DPC feels like a potential damp path. I was wondering if I should bitumen down the DPC to ensure the join between the DPM and the sole plate DPC is sound.
-
Many of you will recall our hickup around the concrete polishing of our new slab. ( ) Well after much thinking and soul searching we have chosen to look at tiling our floor. That means a slight change to the sole plate detail and I thought I would run it past the forum and see if it stacks up OK. The SE has OKed the split format as shown below but I have some concerns. They are: How to tidy up the two DPC / DPM tails that hand over the outer edge. Does taking the sole plate DPC up the out side of the inner sole plate make for a robust detail. How thin can a tile adhesive layer normally be so we can work out the final height based on the choosing a tile of a given thickness. Any thoughts greatly appreciated.

-
You may have seem pictures of the 'incident' in Hertfordshire today https://www.bbc.co.uk/news/uk-england-beds-bucks-herts-45167570 Very bad news but a great way to see how a new house is built. I spent a few amusing minutes looking for evidence of the insulation. What do you make of it?
-
Yes I think so, we are still working out our next step and all the above experiments might form part of it. I am meeting a concrete grinder on site Monday so I hope to have a full prognosis and all the options thought through quickly after that.
-
Ok so I am getting there with potential solutions but I want to press on so I thought I would move ahead allowing for all permutations when fitting the sole plate. The cost of the finish won't change much once the sole plate is down as long as I leave the internal walls out for now. SO I need to get a sole plate detail that ensures we can either go down (easy) or up with a screed. Its all about making sure the DPC comes out above the screed - so here is my thinking which would allow up to 60mm of screed assuming the mortar bed, which sits on the DPC, is about 10mm: Is this a runner, any thoughts?

-
Any chance of a pic @jack to show Jackie and see what she thinks. Mike
-
That is an option but the power floating did remove the fat in places so we will have to go down a good way. I am not sure how far you can go down with diamond polishing. I think my plan at the moment is to scabble it down to an even surface, IE remove the powet float finish, and then see where we are. Jackie is not keen on the terrazzo look and I think that is where we would need to go with it.
-
We poured our slab on Thursday but despite our best efforts we had a couple of problems and as a result our plans have changed. The polish we achieved was not good enough across the whole house and we don't want / can't have level changes between spaces, we knew the risks, so we now need a screed that can look like a polished floor and be less than 35mm thick if a topping is required or 50mm if it's a finished surface. Any ideas on thin (ish) screeds / polished concrete like screeds? I guess I will have to scabble the surface to ensure any render takes which is a pain but at least we are out of the ground.
-
Thanks all. @PeterW I can make a continuous loop so I may do that and then pressurise it a bit. Thanks @TerryE we have the UFH pipes tied to the lower mesh and pressure testing yesterday @ 7 bar went OK once we found that the pressure tester had a slight leak, one, one more loop to test today - concrete pour is tomorrow so no great exposure for the pipes.
-
All sounds great but a couple of things I am still not clear about. Presumably I do not need to keep rhe pipes under pressure during the pour they are only 70mm down on the slab. Secondly I will be pressurising each loop separately as we cannot leave the tails sticking out during the pour. I can leave the water in but not pressurused.
-
Seems to be a lot out there on this but thought I thought I would ask here and see if I can approach a definitive answer. 5 bar / 6 bar and for how long. I will test our UFH pipe work tomorrow and so need a test pressure and duration. Don't say 5 bar for ever! Our pipework says it's good for 10 bar but I doubt a circulating pump will manage much more that a couple of bar worst case. I guess the test is to look for leaks and stretch / expand l the pipe.
-
Looks very interesting - why don't you ask then for a proposal against a draft spec. Are you going for a full passive level build?
-
I have asked the BCO what thy want me to do. Here is a better sketch: of what I am doing - just like the Visqueen Video
-
Yes - so I understand, the weight of the concrete will crush the overlap, in my case further pressing down on the double sided tape in between the sheets as well. Hope the BCO see's it your way.


