TheMitchells
-
Posts
908 -
Joined
-
Last visited
-
Days Won
2
Everything posted by TheMitchells
-
While I am sure prices vary enormously, is anyone able to give a rought idea how much to allocate to knock down a property? Its a 1950's house with a horrible extension on the back. Some of the parts may be able to be sold to reclamation but assuming not, what sort of price would i be looking at? £20k or £50k?? More??
-
Its something we are thinking of too for our renovation - moving a bathroom upstairs but where does the soil pipe go? Down through the floor into the corner of the lounge and then outside or take it outside and run it down the front wall but that would not look nice. If we can minimise the sound using the advice here, maybe down throughg the lounge would be okay. Let me know how you get on, worldwideweb.
-
Gosh, the things I learn on this site - point to remember, dont paint where you intend to tile. Thanks for that.
-
How frustrating! Hope you get it sorted but sounds like it will be hard work getting them to admit their mistake. A company to avoid definately.
-
Snap! We just bought an Victorian end terrace to renovate as we couldnt find a suitably affordable plot.but I am still not giving up on the house build. We will find a plot someday! Welcome!! Where is the house? which part of the country are you in?
-
I love it!! Though I know the OH would take one look and run a mile. Fabulous. Lick of paint here and there and Bob's your Uncle.
-
All excellent advice as we are planning to use the bamboo flooring too. Every build show we go to, we end up picking up some samples; they make great coasters! So if bonded as jeremy has done, you dont need underlay?
-
Dont often get that way, being down in Oxfordshire but will give you a shout when we do. I'd love to see the newts too, I feel they are part of the family as we've heard so much about them.
-

Floor mounted baths and other plumbing snafus
TheMitchells replied to Bitpipe's topic in Bathrooms, Ensuites & Wetrooms
Dont suppose you have a photograph to explain that last idea. I'm not sure i understand it? -
Picture please of those sandstone cobbeles..... Next time I am passing Lancashire I may have to grab a few.
-
Hello..your help will be needed.
TheMitchells replied to mvincentd's topic in Party Wall & Property Legal Issues
Hi there and looking forward to hearing about the build. I am completely green as we still havent found a plot and I love the look of yours. Whats a drain here or there..... Good luck. -
How to clean brickwork of hearth/chimney?
TheMitchells replied to TheMitchells's topic in Stoves, Fires & Fireplaces
thanks guys - I shall give them all a go - starting with the easiest and as you say, maybe it would be cheaper to line with plaster and add a nice wooden mantle. -
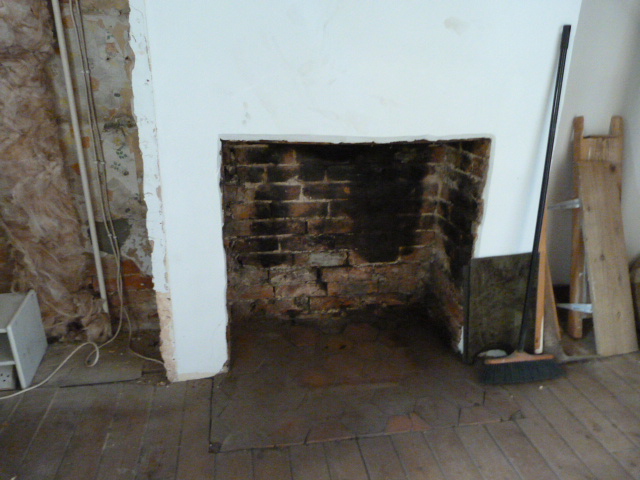
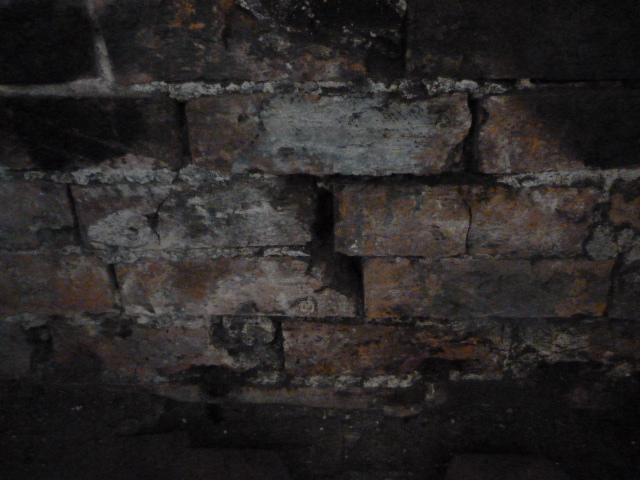
We are thinking about installing a woodburning stove in the middle room of our renovation. After having a quote of £3k for just that one stove, liner and fitting, we are hoping to do it ourselves. The opening is quite wide and has been built from old bricks. however, some of it needs pointing and a few extra bricks. I have been told to use Hydrated lime, is this correct for an old Victorian house, which we suspect had lime mortar used origonally. But the main question is how best to clean up the bricks. It will look lovely if we can clean them up rather than lining with cement board. I am worried that if we just try things, we could be making it worse.
-
We have just hda a quote of 6k to provide and install two liners and two stoves. Needless to say we have declined and are now researching Youtube and www.stovefittersmanual.co.uk hope we can do both for about £1,500, wood burner in one room and open fire in the other and that includes some work to the surrounds and hearth. Just the flue and fittings was about £800 each. and I dont think that included the labour.
-
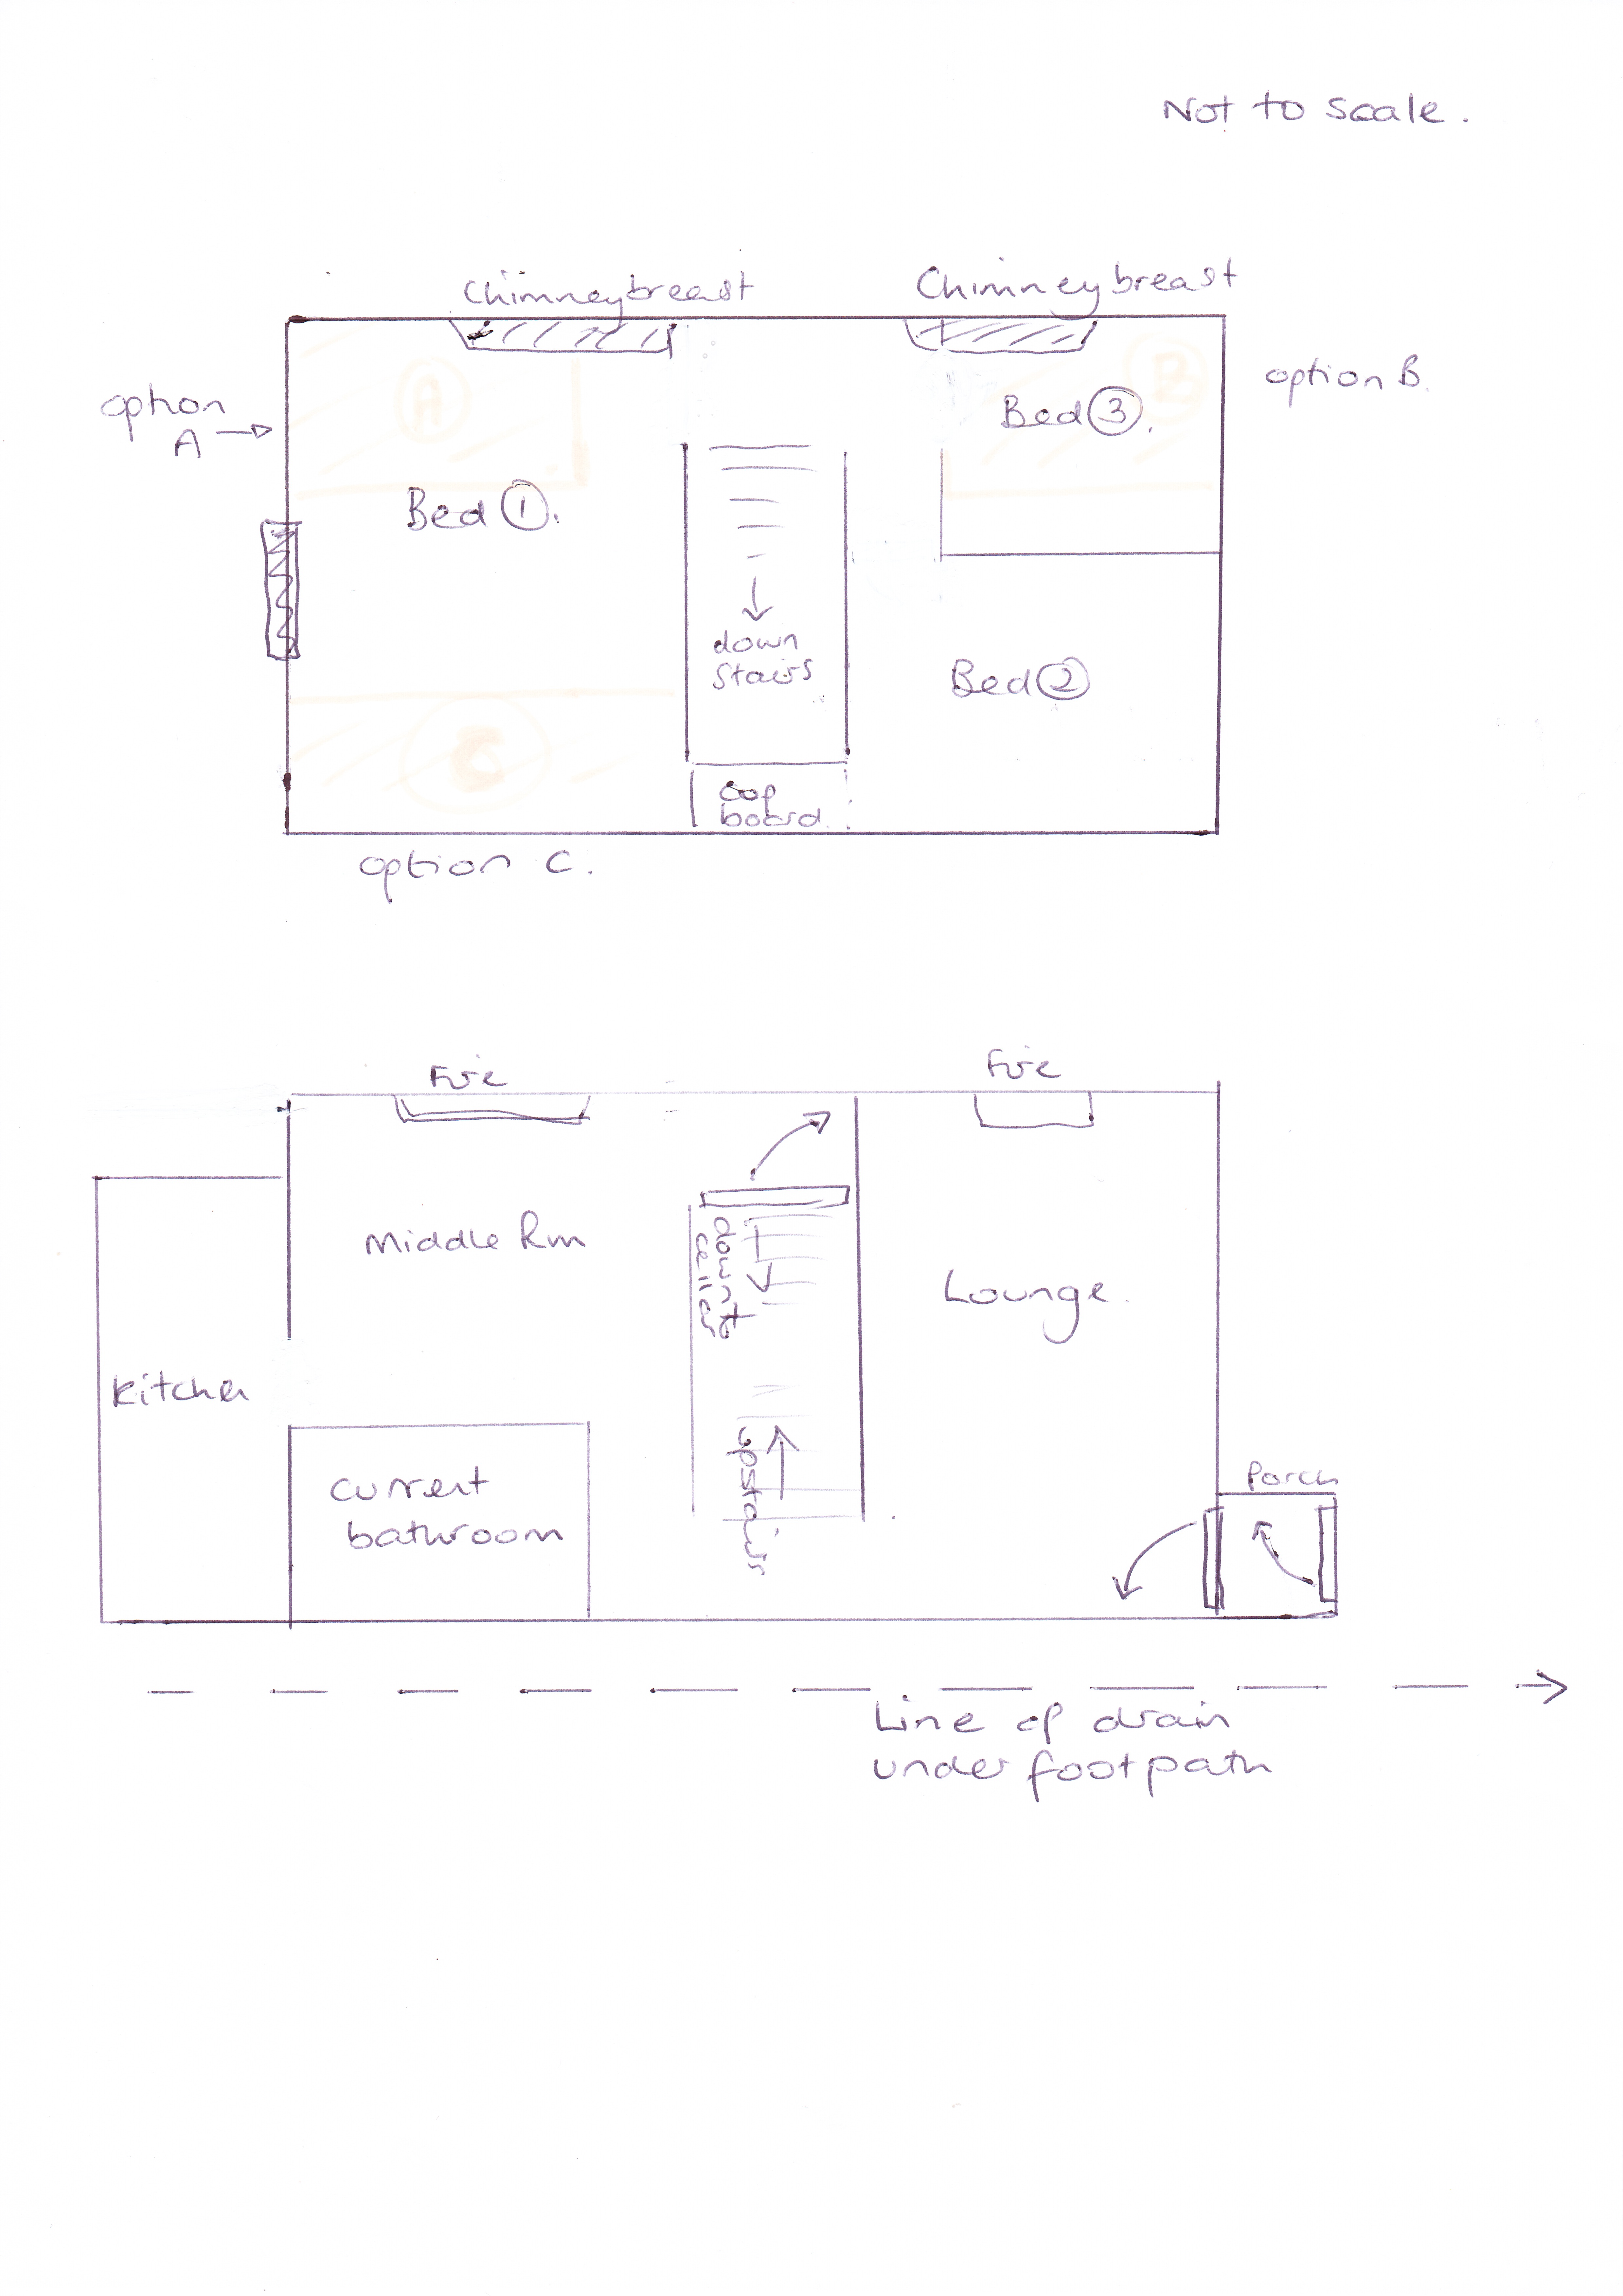
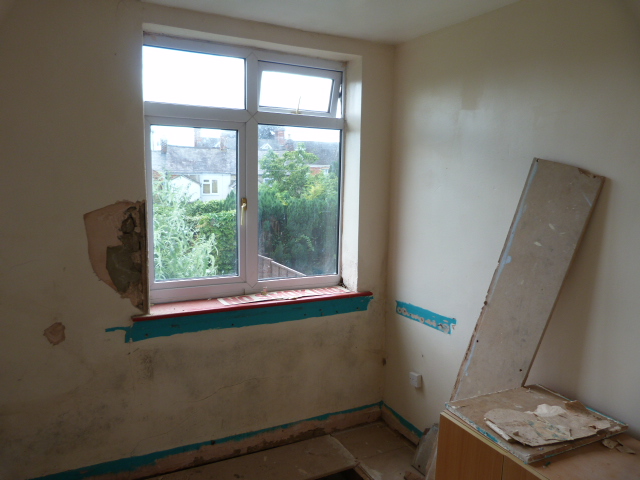
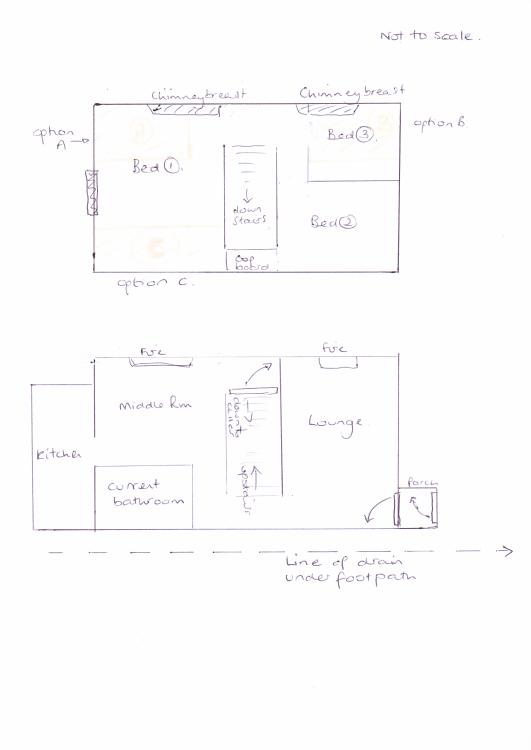
Where to put the bathroom?? Thats been our problem the last few weeks since we bought the house and I decided that it needed a bathroom upstairs. Who wants to have to go downstairs everytime yoy need to use the facilities, particularly in winter. And if the buyer s have children, even more so. But where should it go? There are not many options. Option A - in the large rear bedroom. There is space using the old cupboard where the boiler was, with the stack going straight down, through the cupboard in the middle room into the cellar where it can easily cross to the current drain to outside. Thats the easy bit but we want to put in a bath, whioch could only go along the new left hand wall of the bathroom and that would mean the wall of the smaller bedroom would be almost up to the window which would look odd. And as the wall is 2 ft thick rubble wall, it would be a huge job to move the window. So that is not a good option. Option B - in the smallest front bedroom. There is plenty of room and it could even leave about 50cm to add to bedroom 2, which could do with the extra space and would make it a real double room. Option C was to put it in the back of the rear bedroom 1 but that would mean loosing space for a small corridor, turning the largest bedroom into the smallest, although the front two would be opened up into one large room. This is the small front bedroom. This room could quite easily take a bathroom. I would make that window half size, bricking up the right hand pane, with the right hand side of the room moving into the the other front bedrrom, which would make that a nicer size, its currently only a single and it would make it a small double. But the problem with that part is where would be put the loo waste stack. It could go straight down but thats through the lounge and into the cellar, but its a long way for it to connect across the cellar to the origonal drain, almost the whole diagonal of the house. And there may not be sufficient drop. It could be taken out to the front of the house and down the outside, witha new drain connecion in the alley. That may not look very nice as its the main part of the house seen and would involve digging quite a large trench to connect it into the drain. And the OH is convinced we wouldnt get a mini digger in as the access is bad. I disagree. Any thoughts? And how easy is it to connect a stack into an existing drain? Is it something we could do or would I need to get Angian Water to do it as its their drain?
-
Can I use old style cable?
TheMitchells replied to lakelandfolk's topic in Consumer Units, RCDs, MCBOs
the scrap merchant I visited yesterday said he'd take all old cable, as long as plugs are removed, £1 per kg. OH is now searching the sheds for all the old cables he has squirrelled away. -
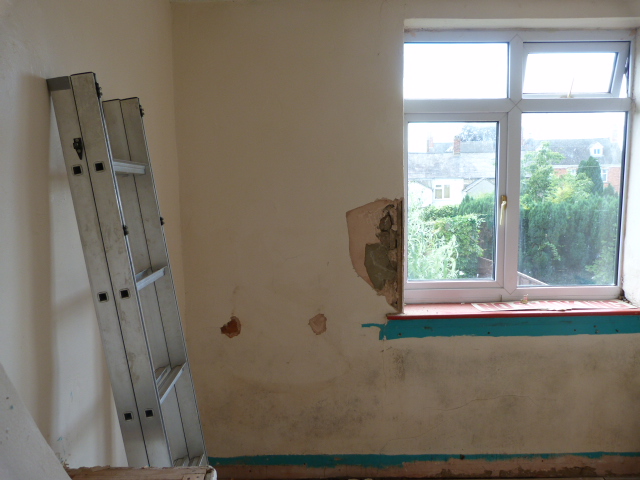
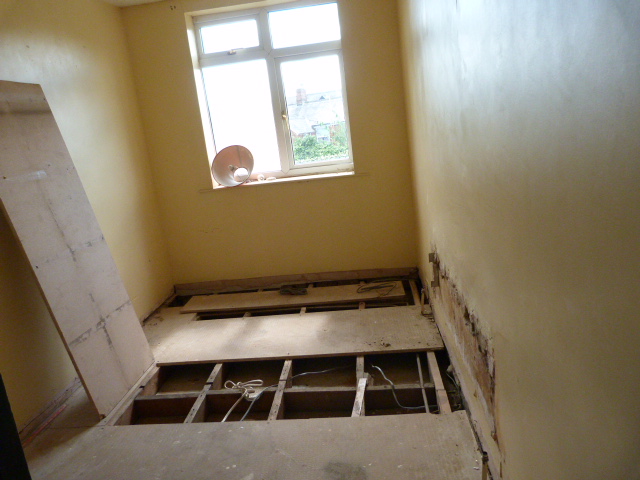
Well, a month into our renovation project, I thought I'd post an update on the progress made so far. Bearing in mind that we didnt plan to do much till OH retires in november, we have not been able to stop ourselves and have been there quite a lot, naturally. Starting in the lounge, this was made instantly better by the removal of the old carpet - less doggy smell now. As the OH plans to redo all the electrics, he has been stripping most of the cabling out, leaving just a couple of working plugs on each floor. the cabling tended to be attached to the outside of doorways and along skirting so easy to pull off, or hidden behind plasterboard at funny angles, which have been fun to trace back and see where they go and what they are for. The electric board is on the outside wall, above a radiator and we thought about moving it along to the bottom of the stairs, so that lounge wall could be clear. But having been told by Western Power that its likely to be around £800 to move the location of the incoming cable, we may leave it where it is and just build a nice cupboard. The Earth was not reading very well even after much fiddling about (my description - not his) so eventually he bought a new long rod and fitted it in the cellar floor and he's very happy now to have a good Earth to the house. Apparently its quite important! Apart from removing all the radiators the other day, thats all thats really happened in the lounge. We plan to replace the window with patio doors to bring in more light and push the garden back giving a nice sitting area. It faces south and is a real suntrap. Moving into the bathroom, this is the one room causing the most discussion. Should we move the bathroom upstairs so we can remove the stud walls and create a large kitchen/diner, leaving the old kitchen to become more of a utility room? I believe most buyers will prefer an upstairs bathroom. Thats option one. Option two is to keep part of the bathroom, swop the loo to the far wall and have it as a small downstairs loo with 3-4 foot gained in the middle room. The problem is the same as option 1 - where do we put it upstairs? Option three is to leave it as it is. This has the advantage of being the cheapest but does mean the middle room is quite small. We plan to open up part of the stairs and put in a sunpipe to add to the light coming into the middle of the house. We have to bear in mind this is a renovation to sell for a profit; it is balancing the cost of doing things agaisnt the possible increase in value. I shall continue this discussion in a post in the bathroom section or I will never get this update done. As it was. So while thinking of what to do with the bathroom and wanting to ripe out more things - its quite addicitve this demolishing business, I suggested we remove the bath to give us a little more room in there. Before I could say 'Scooby Cottage??', the water was turned off and while I ripped off the tiles around the bath and back wall, the OH had disconnected the pipework and we were able to manhandle the bath out. What is great about doing all this work, is that is doesnt matter if water sprays everywhere and the doors/walls get knocked about - its all getting changed anyway! It did reveal a couple of anomolies. When they put in the bath, they had bought the wrong size - it was too big by about an inch.But rather than build it into the stud wall, it was easier apparently to hack out the external wall bricks and fit it that way!! and once we had the bath out we could see that the wall between the bathroom and kitchen behind, was only a short distance, not the two foot thick rubble wall we expected. Which was great news as the new position of the boiler is likely to be the other side of that wall and the OH was worried about getting the pipework through the wall - piece of cake now! Of course the only issue is the large hole in the bathroom wall - but an old towel does the job nicely. We just whistle. And its nice to have plenty of space while we whistle..... Where the floor is wet on the picture below is the only part of the house (apart from the cellar) that we have found damp. The floor board is disintergrating as are the uprights. Its wet in the picture as we had just removed the bath and didnt worry too much about catching all the water. In the dining room, we have done quite a lot. The horrible wooden tongue and groove ceiling has gone so we can see the beams above. (you can still see the nail holes and shape of the Laths that must have been there - long gone though. the cupboard has been stripped and most of the redundant pipework removed. Now the hot water has been disconnected the upstairs boiler could go but we've not done that yet so some of the pipes are still there, running up the back of the cupboard. As I was warned not to nick them, I had the brainwave of using some of the old insulation to wrap around the pipes, protecting them. Well, I thought it was a good idea. The OH has removed the old wood burning stove and back boiler. It was extremely heavy but he managed to get it into the garden along with quite a lot of copper piping. The chimney looks in fairly good order with only a few loose bricks that will need mpointing and securing. A nice small wood burning stove with Victorian surround should bring this room to life but thats in the future. The beams were in reasonable order apart from the one which runs across the room in front of the fireplace. One end appears to be sitting on nothing and the middle has a rather large split, so that will need replacing. The kitchen is pretty much as it was, with only the range and hood gone. It will probably be the last room to get stripped as its useful to use while doing the renovation. After all - we need our cuppa's and biscuits. Upstairs in the large rear bedroom I have started stripping off the plaster but did not know whether to take it all off or just the parts that are loose. At the top of the wall, I was surprised and excited to see that the ceiling appears to still have the laths and plaster. So we will try to keep the ceiling and just repair any damage. How lovely that there is still at least one piece of history still there. Hopefully not long now and the boiler will go. The space will create a nice cupbard eventually and it will be lovely to finally get rid of all those pipes. Although that was one corner of the bedrom where we thought we could put a new bathroom. The disadvantage of putting it there would be the position of the window in the remianing bedroom - I think it will look silly as it will be right agaisnt the new stud wall, rather than in the middle of the wall and thats the really thick stone rubble wall, we cannot easily move the window position. But it would be easy to plumb with pipework running down the dining room cupboard as it does currently. The third bathroom location option is at the back of the rear bedroom which would be easy to install as it is above the current location and it would be easy to plumb in the wastes but it would mean the bedroom becomes quite small as we'd also loose some of the space on a small corridor to give access. The second and my preferred option is the small front bedroom. This room could quite easily take a bathroom. I would make that window half size, bricking up the right hand pane, with the right hand side of the room moving into the the other front bedrrom, which would make that a nicer size, its currently only a single and it would make it a small double. But the problem with that part is where would be put the loo waste stack. It could go straight down but thats through the lounge and into the cellar, but its a long way for it to connect across to the drain, almost the whole diagnal of the house. And there may not be sufficient drop. It could be taken out to the front of the house and down the outside, witha new drain connecion in the alley. That may not look very nice as its the main part of the house seen and would involve digging quite a large trench to connect it into the drain. As said, i shall discuss this in a bathroom post and I'd welcome any comments/thoughts. With regards the rest of the work demolition; as you can see, the woodwork has been removed as well as the radiators. so the rooms are now empty and waiting to be transformed. But thats for the next time. When I will report what advice our 'expert' has given us on what we can and cannot do and what he thinks we aught to do. Some good and some not so good but all doable.
-
Hi Michael - the place looks amazing! Well done - I could happily live in your garage.
-
We have removed an old tin bath, more copper piping and several radiators from our renovation house and I checked, the nearest scrap dealers will take them, though he did say steel is not much at the moment. however,taking it to the tip will cost me money - a pound an item adn I can only take 13 a month and I must be up to that limit by now with all the bags of rubble/plaster I have taken in. So at least its a way of getting rid of it all and I may get enogh for a cuppa at their cafe.
-
I hadnt realised there was any worth in the cables we've taken out of our renovation but we have just removed the radiators and old tin bath. I shall make a few enquiries to see if they are worth taking to the nearest scrap dealer. Unfortunately last week the OH spoke to a scrap dealer regarding the old wood burning stove with back boiler that he'd managed to get into the garden. They said they'd collect it and before I could get to the house to pick it up to sell elsewhere, they'd been and it had gone! That was a lot of metal and probably worth a bob or two. We live and learn.
-
I'd also do without the straw - it will be a right pain to get rid of and as it breaks down, it robs the soil of nitrogen. And be careful not to add too much manure. As that rots down it may cause areas to sink and then you'll not ahve a smooth lawn. I'd wait till sept if possible by which time we should have more rain and less drought, so less watering and also will give time for the manure to rot first. In the meantime, level and rake off stones, and then as the weeds germinate, you can hoe or spray them off so when the seed goes down, there should not be much competition from weeds. (The stale seedbed technique - works very well).
-
thay look the same as the tiles down on my kitchen floor in our renovation house. They are really heavy. Some were laid on wooden shelves and as I took the shelves off, they fell off and narrowly missed my tootsies. God job I had my dickies boots on. Shame they are all coming up when we redo the kitchen. You could have any I manage to get up in one piece....
-
What a great idea. ideal for my work as a gardener as I hate throwing good soil away with the stones we dig up. And less to dispose of in the skip.
-
Day one - we finally get started.
TheMitchells commented on TheMitchells's blog entry in Scooby Cottage renovation.
Managed to sell the Rangemaster for £86! two days cleaning and thats all we got - however, when the young man arrived he was thrilled with it. Just bought a housewith his girlfriend so it went to a good home and I felt much better. And the great thing was it didnt matter how many walls they hit and damaged getting it out. It wasnt easy but after half an hour of manhandling, two doors removed and lots of grunts, we finally got it out. And the space it leaves is quite useful. Now just have to plan the kitchen layout. -
Amazing project, well done! - love the idea of the maps. Just one quetion - what was it that was £100 per metre? You bought 4 m and grouted it?