
TheMitchells
-
Posts
908 -
Joined
-
Last visited
-
Days Won
2
Everything posted by TheMitchells
-
give it a lick of paint and its a prezzie for the granny - latest magazine rack. No??
-

The future - from the land of Chernobyl
TheMitchells replied to MikeSharp01's topic in General Construction Issues
big claims but little to back it all up. will watch that space. -
Coincidentally, I was listening to Ben Adam Smiths podcast this morning and its on that subject, as well as other things so may be worth a listen. Its certainly something I'd like to know more about. http://www.houseplanninghelp.com/hph164-taking-on-the-role-of-principal-designer-with-belinda-and-paul-wilson/
-
I love it when others ask questions that I want to know the answer to - I'm not the only one; thanks OnOff - keep 'em coming!
-
Looks great and the stonework on the house is lovely. Well done to the missus - it does annoy me when we watch the self build programmes and the man does all the work while the woman looks on. She can push a wheel barrow at least, even if she isnt very handy at DIY. We may not be able to do as much as the chaps but we can have a go and help out. So well done Mrs Nod. Its great to see that we can hold our own on these builds. The OH has even acknowledged that I may come in useful occassionally in the last couple of weeks when I have pointed out the error in his plans! Like reminding him that we still had to add noggins to a stud wall, just before he was about to run cables up and into the ceiling...... He siad he was just testing to see if I spotted his deliberate error
-
Any one else have problems with Jewsons?
TheMitchells replied to Leaway's topic in Building Materials
Just had a good deal from Blanchards Builders Merchants for 20 sheets of chipboard for the bedroom floors. It was working out at £200 from TP and they did it for £152 and delivered it the next morning. They seemed very keen to provide a good service so I'll be going there from now on (and will check prices first). They have opened a new branch in Bicester (hoping for the Graven Hill work) so are keen to get their toes in. -
Lights, ceilings and skips full of wood......
TheMitchells posted a blog entry in Scooby Cottage renovation.
Well the kitchen wall has gone and we love the extra space - shame its only for a while till the bathroom wall gets put back. Our neighbour needed somewhere to store her old sofa and asked if we could keep it for a while so the room is now half full with that. It gives us somewhere comfy to sit in front of the wood burner but it is a pain wehen we have to move it back and forward. Luckily we are concentrating on the upstirs so its not getting moved often. Most of the last couple of months has been spent sorting out the electrics upstairs as well as preparing the windows of the front bedroom windows for plaster boarding. The OH has been doing the lights and switches upstairs, with the cables in position for the downstairs ceiling lights. Its lovely that we now have working switches although as the hours of daylight are getting longer, its much easier than it was moving portable lights around to where ever we were working. The surrounds of the front bedroom windows were awful and I ended up taking the plasterboard and various bits of foam/wood and brick from around the sides and bottom of the frames, to enable me a) to clean the frames and b) to actually see a frame. It looks so much better and in one part, there was a huge hole behind the plasterboard and I ended up building a column of half bricks in the cavity to help fill it up. I then used low expansion foam to fill in the gaps (I could see daylight at the top of one side) and stuck some pieces of wood at the top of each side, thinking that at least they now have something to screw into if the new owners decide to fit blinds. It probably looks a right mess as I used spare bits of wood stuck to the foam to fill out the spaces before fixing the plasterboard to the sides, having already fitted the cills, using the Soudal foam to fix it in place. That worked a treat until the foam gun stopped working! The OH spent a good hour cleaning it all out, using the Soudal cleaner that came with it. but when we put the gun back on, the foam oozed out in a trickle! Then when we disconnected it, the foam suddenly squirted out all over the place - and its very sticky!!! It was all over the floor and us. Eventually, he gave up and we binned the gun - he really did clean out every single bit of it but still it just oozed. So I ordered online some hand held ones which come with a straw and were much cheaper than buying them at the BM - but thats another post! They arrived the next day and I had a go - I was not happy as the foam just oozed out too, till I remembered that I had to hold them upside down and then it worked great. (that wasnt the reason the previous day, we were doing it correctly then) So the windows now had new sides, completely covered in plasterboard and they look pretty good, if I say so myself. And we can see most of the frame too. Following the advice from a plaster post here, I have been experimenting with plaster and adhesive, to try to make some repairs to the walls. Downstairs, (actually in most rooms) more of the plaster was loose so had to be removed. but this revealed rather a large crack. This is a wall between us and next door, and next to the chimney breast. The pillar on the left is the new one which holds the RSJ's between the kitchen and middle room. So I dont think the crack is too much to worry about - I cant see that wall disappearing anywhere - apart from into the cellar beneath! Oh dear, hadnt thought of that, So it was out with the pva then I patched up all the holes with hardwall plaster. I plan to practice my plastering skills on that wall, once the wires are in for a socket or two, when the OH gets round to those. Maybe we'll take a look at the foundations under that wall in the cellar and make sure they exist...... I dont want to spend all that time plastering it, for the whole thing to fall into the cellar. One of the things we were concerned about was the way the rear bedroom floor bounced - it was quite a lot.. So we bought some extra joists and the Sawmill kindly cut them down to match the old size of the new ones. I thought the price was quite reasonable - £12 per length - is that good? 110 x 50mm x 3metre. We added them to the old floor, typically adding one every second old beam. Once the noggins were fitted, the bedroom floor scarecly bounced at all! One of the big problems were are having with the renovation is deciding in which order to do things. I couldnt sort out some of the walls till the floor is on place. We wouldnt fix the bedroom floor will we have all the lights fixed in place for the rooms below and I cant fit the insulation into the fllor space till the lights are in. we couldnt fix the lights till we had a dining room ceiling so it was time to get the ceiling done now that the new joists were in. I was a bit worried about doing this as we discovered how heavy PB is when we did the top of the stairs ceiling - my arms were aching holding the boards in place till they were screwed in. I did fnd a large wooden post that I could jam under one end while I held the other but it wasnt ideal. The decision was made to buy 1800x900mm sheets to make it much easier on ourselves. and we also managed to borrow a couple of props which were brilliant. It may not be the best ceiling plasterboarding but it works and I am quite proud of it - for our first attempt (not including the small landing ceiling) We have even managed to cover the RSJ - using a sheet of hardboard, to make up the difference in levels and give us something to screw the light fittings to, then one of plasterboard. CT1 worked brilliantly! We left it overnight and it was absolutely solid by morning. The props youu can see are under a small corner bit left for me to do today. Speaking of hardboard - a week or so ago, I popped to a wellknown brand of kitchen supplier to find they had moved. The guys were just sweeping the floor, ready to shut up shop. Outside was a huge skip, and I could see lots of nice pieces of wood sticking out the top. I asked if I could take some and while they didnt say I could, they didnt say I couldnt. He actually said they'd be gone in an hour..... And the skip was being collected that afternoon...... An hour later I was back and with ladder, was able to get up to the top and I took out 10 sheets of hardboard, around 4x5ft. It was heartbreaking to see so much wood going to waste - and if I'd found out earlier, I would have spken to the manager to see if we could have had more. However, its better than nothing. And to make sure it didnt look sneaky, I parked in front fo the skip in full view of everyone passing and wore a bright yellow jacket! I'm still waiting for that knock on the door... Unfortunately once home, we discovered that some of the sheets were slightly thicker than the rest. But three fitted onto the bedrrom floor really well. Most of the old boards were tonge and groove and getting them up to work underneath was horrible, with most getting damaged corners and sides. so we plan to use the best of the two rooms in one and buy new for the other. Its just a shame all the boards were not thick enough to use. They'd have done one complete room. I am sure they'll all get used eventually. So with the ceiling fitted, we had to make decisions about where the downlighters were going. The OH had put wiring in for 4 in the dining room and two in the bathroom and today we measured and mused and eventaully made decisions on where they'd go. Then it was down to Denmans to get the lights. They had some new ones whch the OH liked the look of. From KSR Lighting, they are 'three in one' LED downlights. on the back is a small switch which changes the light from warm to mid to white light (6000, 4000 and 3000kelvin), they are fully dimmable and easy to install. At £17 each, we agreed to give them a go. He particularly liked the fact that we could choose which light we wanted, once in situ. We'll probably leave them on the mid setting but they can be eased out and changed if needed. I shall let you know how they turn out. They must have been easy to install as I only left him there for a couple of hours and its all done. I can now start getting the insulation fitted into the joists before we screw the boards down for good. Then we can get the walls ready for plastering. Oh, and we've bought radiators so they need to be fitted (or the pipes put in place) too. But I think thats enough for one post. its slow progress as we both have other things which take us away from the house more than we'd like but we're slowly getting there. And as long as we dont start listing all the things that still need to be done, we remain reasonably happy with progress. at least I do - and I am learning all the time. Initially we hoped to have the place ready to sell by spring but thats not going to happen. Maybe we'll be out for Christmas...... -
It all looks great - well done and good luck with the final third! Love seeing the photo's of build and Roger.
-
Think its about time you started a build blog. Where about in Wild Wales are you based? We keep thinking about that area but just cant move quite yet. Welcome!
-
Act II - To Buy or Not To Buy
TheMitchells commented on AliMcLeod's blog entry in A house! A house! My kingdom for a house!
Cant wait to hear the reasons for changing your mind. Its always interesting to hear how/why people decide to buy. I like the look of the plot and I like trains so tat wouldnt put me off. My friend has a local one that slowly goes past a couple of times a day - she regularly gets waves from the drivers. That looks a very complicated structure - isnt it best to keep it simple. Seems they are adding to the cost although it does look interesting. -
Any one else have problems with Jewsons?
TheMitchells replied to Leaway's topic in Building Materials
okay - I'll admit it, I hate haggling. So I do tend to go into the BM and ask for their prices and then pay it. But I do try to look online beforehand so I know whether to go ahead or not. However, when ordering some radiators at Nicholls the other day, the OH picked up a 50m pack of Speedfit 15mm piping so he can get started on laying the pipe around our renovation, ready for the radiators. The advice notice given to me didnt have any prices on it and I queried that, saying that I want to know what I'd been charged, without having to ask everytime. I was told I could ring accounts and ask for the prices to be added in the future, but most builders liked them without prices so the client would not know what the builder was paying. So when I got home, I rang and asked them to change the invoices and also to tell me what the charges had been for the items I'd just bought. most was okay - similar to Wickes prices for the plastering stuff but the piping was £73 plus vat. Checking on Screwfix, they seem to have it for £68 including vat. I make that a difference of £20, or 28% extra. And a pack of pipe inserts was £24 including vat, while screwfix has it for £12.99! So what shall I do - go in and complain? We do have an account and I am trying to get to know the staff but as I said at the start, I am not very good at asking for discounts. What sort of discount should I expect as a renovator of just one house so I am not going to be spending huge amounts but our budget is 20-30k with a fair portion of that being spent at the BM's. If only I can find one that I can trust to give me a reasonable deal without me having to beg every time. -
Founds in.... and lessons from Buildstore.
TheMitchells commented on curlewhouse's blog entry in Sips and stones may break my bones...
great news! hope the builder is available too. -
Not heard of that before. So what else can I use PVA for? Keep the answers legal please!!.......
-
1st Time Self Builder - Fife, Scotland
TheMitchells replied to AliMcLeod's topic in Introduce Yourself
Looking forward to reading the blog! As the other say - chin up and carry on..... I am still looking for a site after severeal years. Hubby keeps saying we should move to Scotland as there's plenty there but I'm settled here and dont really want to move far. But Oxfordshire isnt the easiest place to find affordable plots. I totally agree that Blogs can be quite cathartic and the rest of us love reading them, especailly with lots of pics please. I'm doing a renovation while looking for a plot and I regularly include the things in our blog that I got wrong - hopefully others can avoid doing what we did. Learning from mistakes is often the lesson learnt best. Good luck! -
Okay - I'll get some Browning and use that to build up the layers. And on the leaflet that OnOff suggests, they say use GypPrime and Bond-It for high suction areas - but I can use PVA as an altenative? Thanks for all the advice. I'll take photo's of my attempts.
-
All sounds like good advice. will do it in layers over neat pva - think I'll need to go and get some more pva!. I have Thistle hardwall plaster - is that the same as bonding? So forget sticking plasterboard into the cleared area - just build up the layers with the bonding plaster??
-
And I have been watching youtube clips to see what people do. Watched one where they just sprayed the area with water before filling holes with plaster. they took 4 coats to get it finished. it was american though - they may have different plaster? no pva used there.
-
okay - work out if low or high suction, then what?? sorry for being dim. if high suction, like my brick walls, tacky pva - if low suction, dont bother??
-
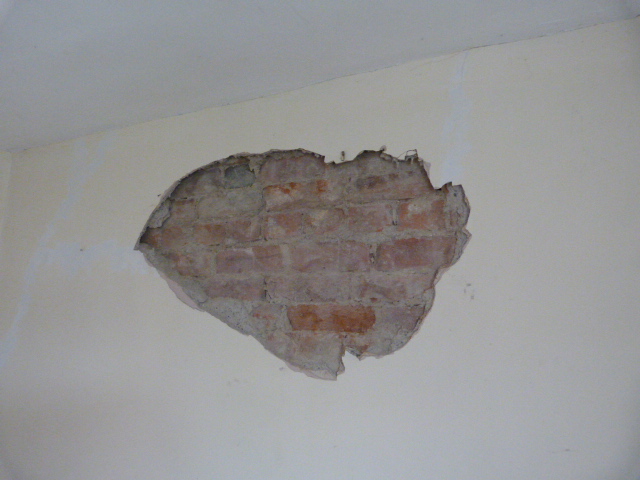
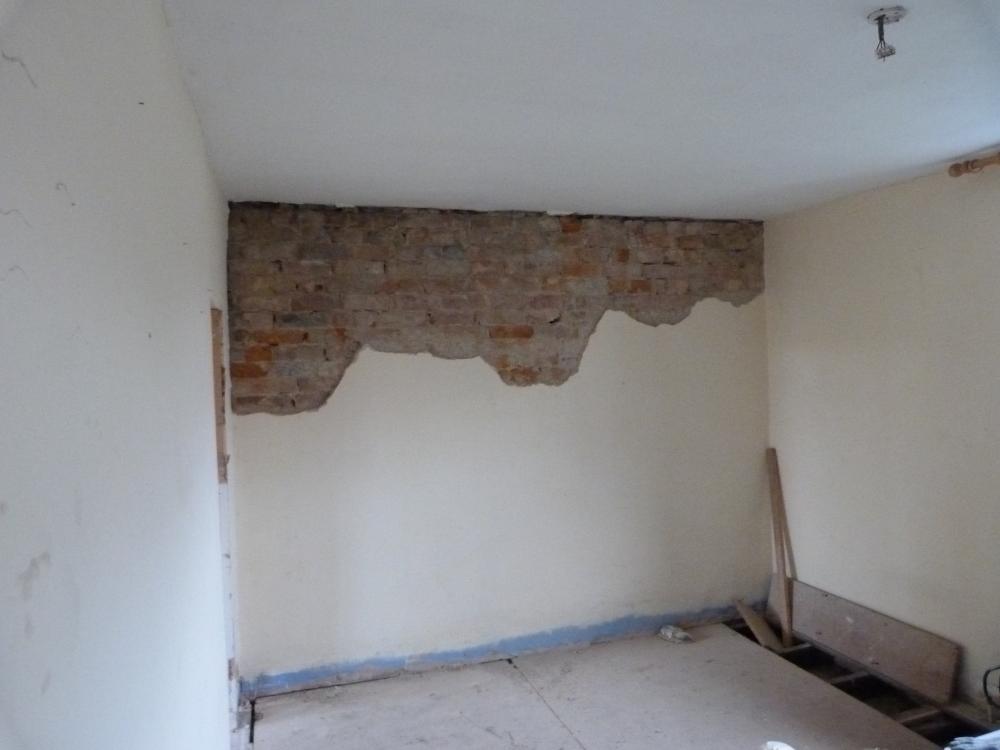
Fill in with plaster layers or plasterboard then patch? Above was half way stage. Below was after all loose plaster removed.
-
I have a wall where i have removed the loose plaster. so now I have areas about an inch less than the rest. Should I build up layers, painting with weak pva beforehand? Or should I stick pieces of plasterboard into the large areas and then patch it to the rest?
-
While renovating our house, I am finding I am using quite a lot of PVA glue, watered down on brickwork before filling holes with plaster. now I plan to try my hand at plastering one of the rough walls, before we get a chap in to make all the walls look nice. Seems an ideal place to have a go as its going to end up in a cupboard. However, I dont know whether I need to pva the wall again and if I do, it is still watered down stuff? or Neat? I thought it would be quite handy for a post on PVA rules. I am sure its something most builder people know but us newbies do not. so has anyone got rules that I would find useful - when do you use pva? what other things can it be used for and how should I use it? Ideas please.
-
you may want to look at Horticultural suppliers as they use the membranes too. Not sure if they'll be cheaper or more expensive though.
-
Replace MVHR every 10 years?
TheMitchells replied to TheMitchells's topic in Mechanical Ventilation with Heat Recovery (MVHR)
That was my thought - most people do not know about MVHR and if they hear they need replacing every 10 years, it will put them off - especially as it 'required constant maintenance.' I shall be sending an email to the magazine to query the article and comments. -
Just going through this months 'BuildIt' magazine and read the following about ventilation systems - its an article about designing a home with a long lifespan and minimal maintenance. "There are two main ways that this (condensation and damp issues) can be stopped. One is to install a relatively complex system of mechanical extract ducts and fans to remove the moist air before it gets into the structure, but this will need constant maintenance and the kit will have to be replaced every decade or so." The article was writen by Julian Owen, an architect and writer of several books on self build and ezxtensions. If he's talking about MVHR, I always thought they were fairly low maintenance with the filters checked every couple of months. And why would they need replacing? Is he correct?
-
Bovis admit to shoddy new build quality - surprised?
TheMitchells replied to Bitpipe's topic in Housing Politics
Can anyone give a rough guide on how much of an uplift in price the developers get when they buy the land and then get planning?