Iceverge
-
Posts
4462 -
Joined
-
Last visited
-
Days Won
32
Everything posted by Iceverge
-
@ggc Sorry to hear about this mess. It's really no fun at all. The large gap between the frame and the wall isn't acceptable. If they plan to just foam it a rat could easily make a nest in there. They should employ some joiners to make the window openings fit the windows by adding timber rips to the openings and compensate you for the change in rendering. It would be nice to have brand new correctly fitting windows but some allowance needs to be made for human error I think. Some people drive perfectly to the rules of the road and still have crashes where a more sympathetic driver might have allowed for someone else's mistake. It's taken me a while to realise that the second driver is better for us all. If buying off plan you probably wouldn't even notice the 30mm but a good supplier should be happy to meet you in the middle here.
-
I assume you mean £3000/m2. If so that is a healthy budget. Ours probably cost about €1900/m2 pre covid once you factor in my labour, but that was beds dressed, walls painted etc etc. That's including VAT too so an equivalent pre covid cost in sterling might be about £1500/m2. MBC were about £390/m2 in 2019 but that excludes quite lot. With the twinwall frame they have the best thought out system I know of however.
-
Free version of Sketchup here too. Alas some of my earlier work is trapped in the 3d warehouse. Maybe for the best really. If you are familiar with the dark arts of some P2P sharing sites you may still be able to find a free version. Just don't update after install.
-

Loft beam, can it be removed?
Iceverge replied to cloud91's topic in Lofts, Dormers & Loft Conversions
You could probably just get your handsaw and hack it out........ probably. Please let us know what happens.............- 20 replies
-
- 1
-

-
- loft
- timber beam
- (and 2 more)
-
Garden wall - am I obligated to repair?
Iceverge replied to jayseeninety's topic in Party Wall & Property Legal Issues
Just make sure it's stable and not going to topple on any small kids etc. There's an awful disease among the long term property owner, they assume they own everything they can see out their window. -
Loft beam, can it be removed?
Iceverge replied to cloud91's topic in Lofts, Dormers & Loft Conversions
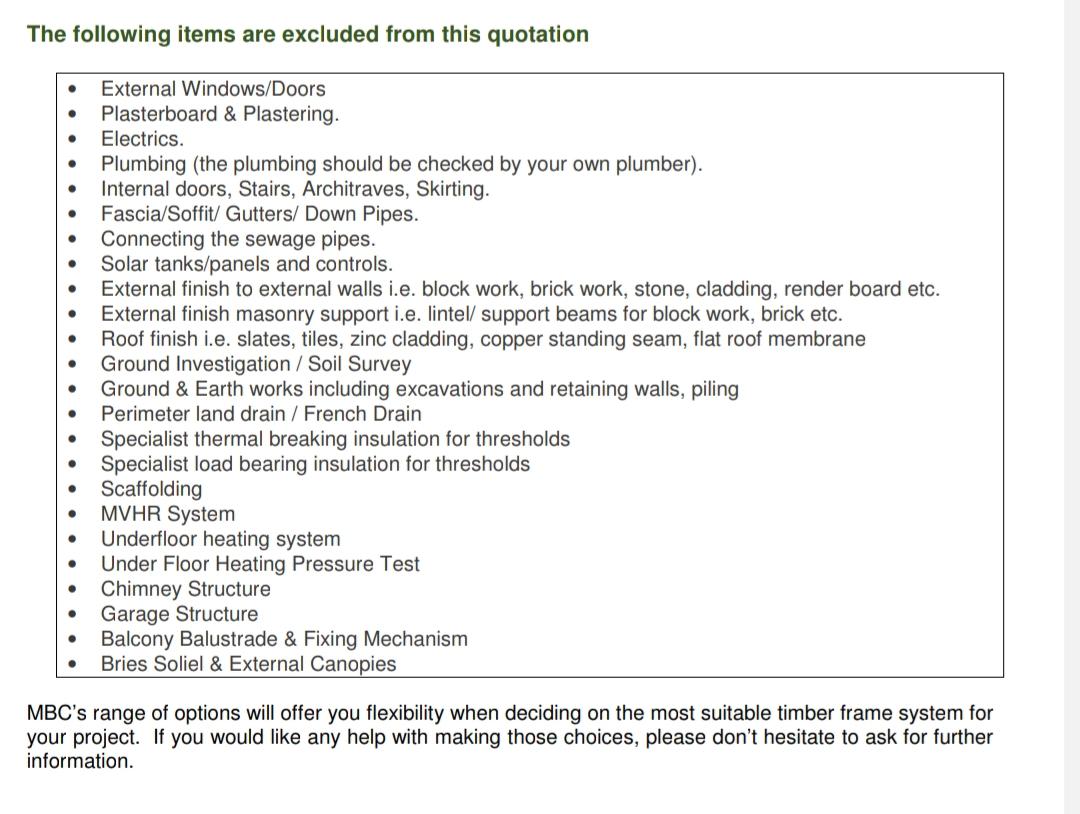
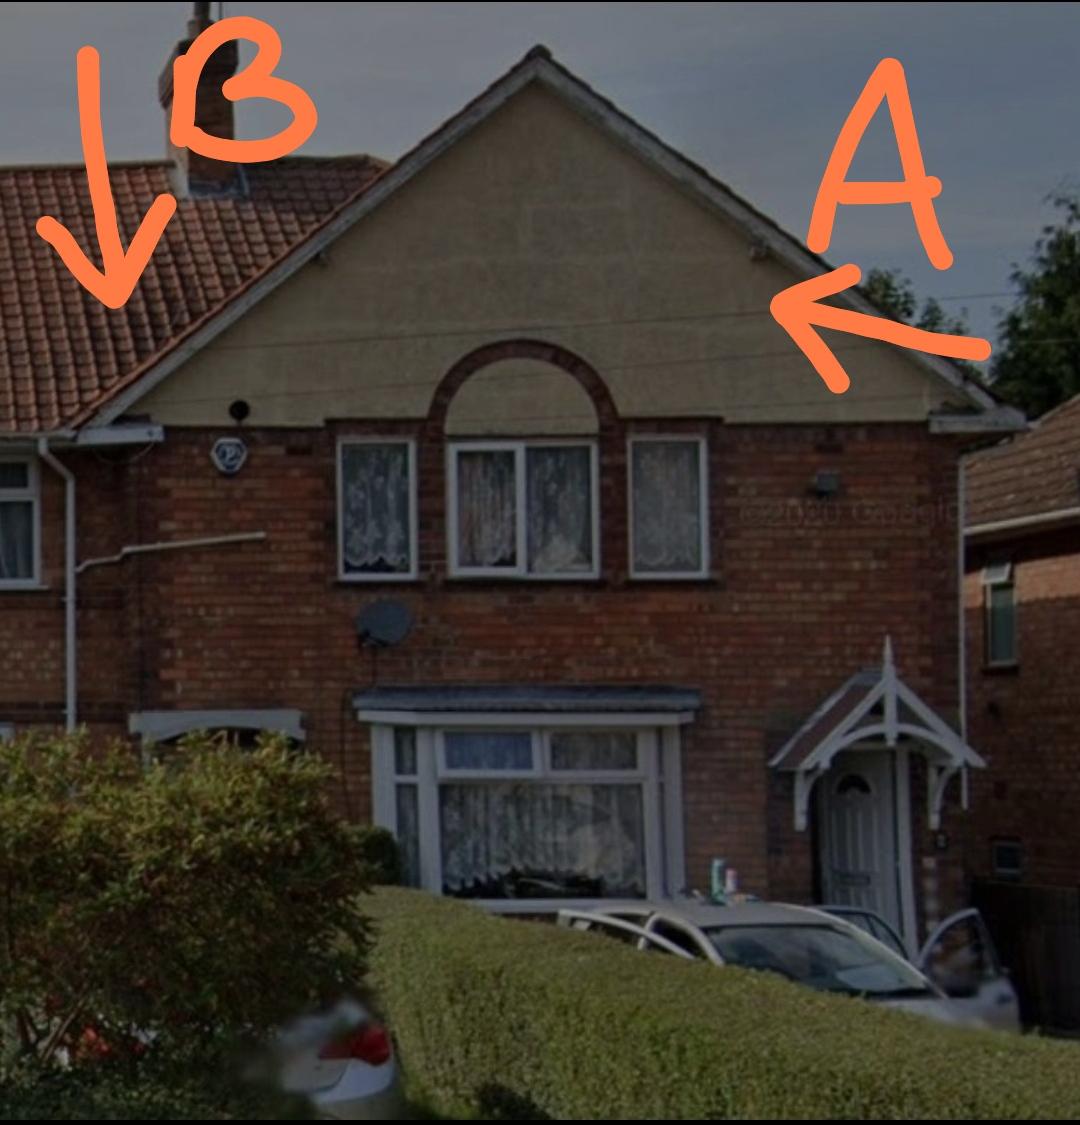
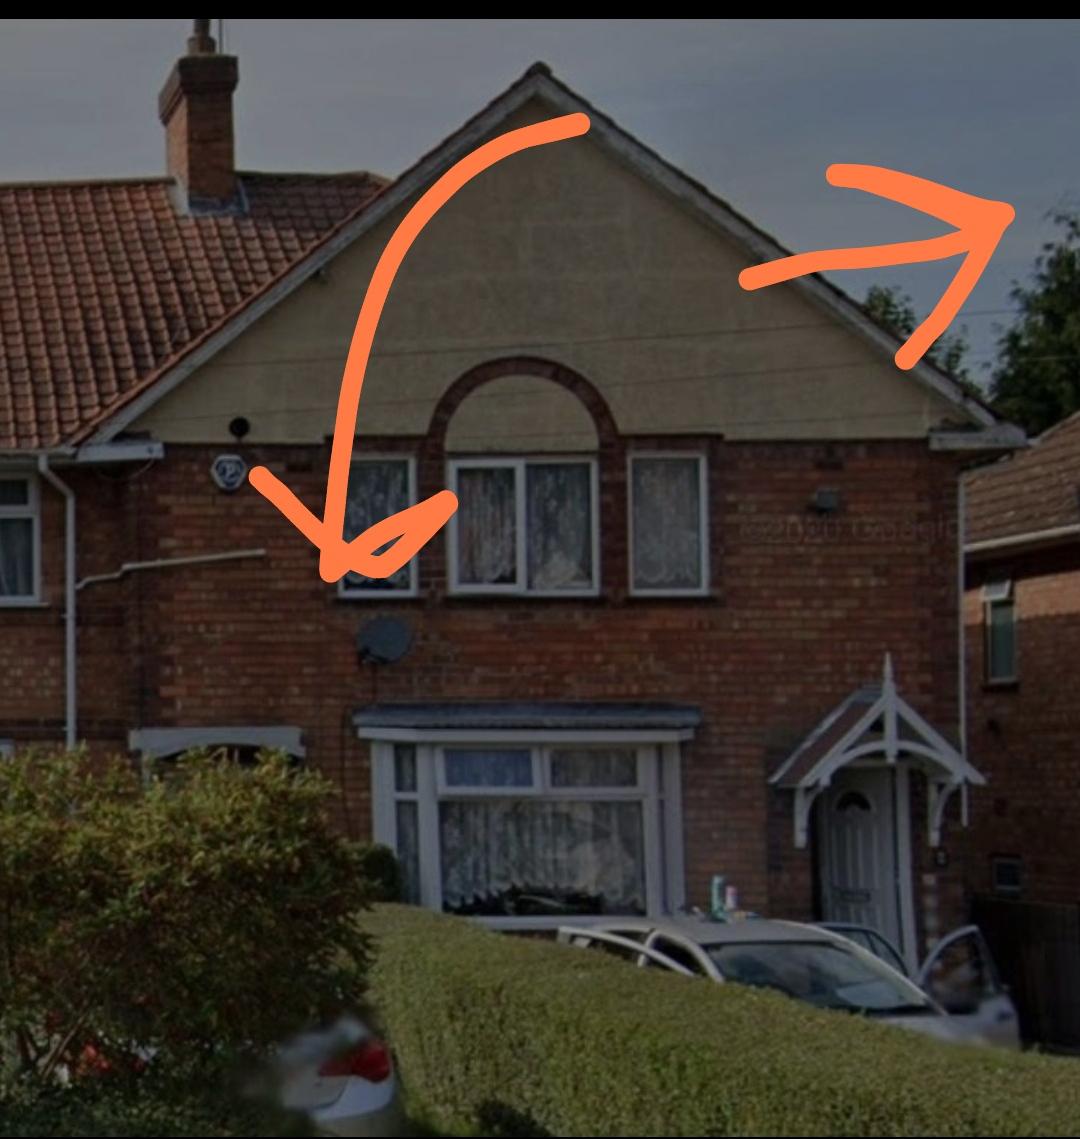
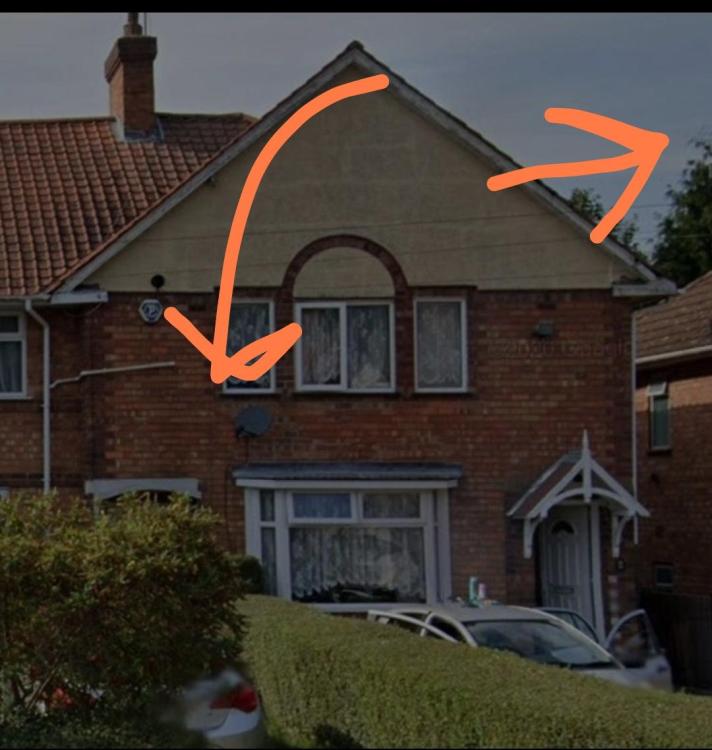
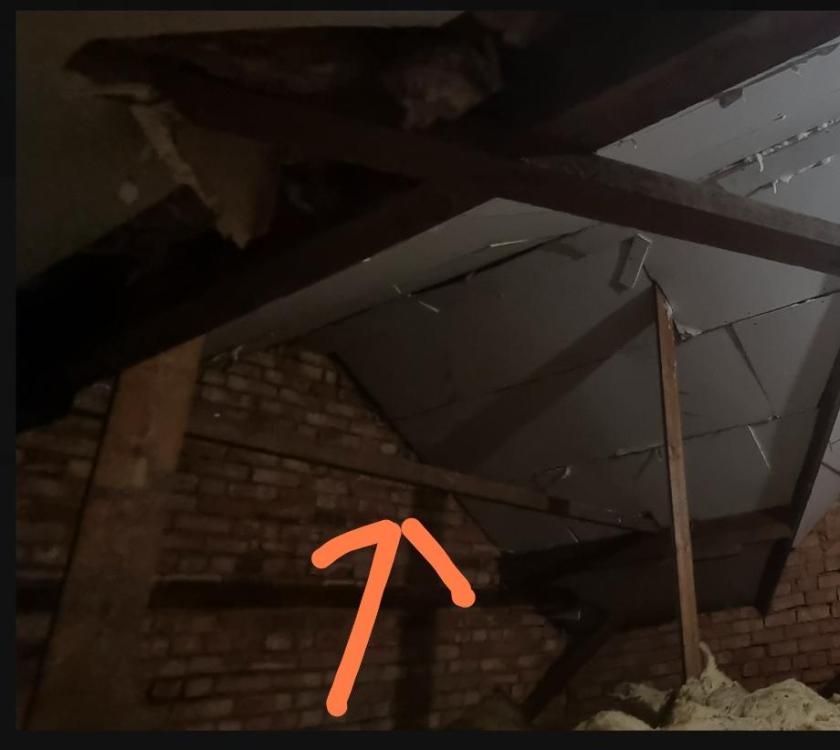
Ok correct me if I am wrong here. That brace connects the purlin at point A at the front of the house to point B at the back of the house which is to the left of the chimney through the party wall in your neighbours attic. It was probably added during construction to prevent the front of the roof from toppling down onto where the hedge is now and to prevent the roof spreading to the right also. There is another timber acting as a tie above the purlins as shown. This runs from point A horizontally behind the gable in the front of the house, again I imagine to prevent the roof from spreading or to keep the purlin stable during construction. In summary, the annoying timber crossing your attic lightly did serve a structural purpose during construction. Whether that is still the case or has been superseded by the rest of the house structure is impossible to tell. Without someone knowledgeable who can actually check it out in person I would leave well enough alone for now.
-
Congratulations on planning permission. Have you considered a poured concrete retaining wall tied into the foundations and doing away with the planter. It could form the outer leaf of a cavity wall for the sections near the neighbours and at the yellow line. A block wall may well suffice instead of a poured wall I'm not a SE I'm afraid. Ok my plan..... Wait for some dry weather, get a mini digger and dig out the site including the planter. Pour standard strip foundations with some rebar for the walls embedded. Build a leaf of hollow blocks filled with concrete and tied with rebar to the strip foundations for the outer leaf of what will later be a cavity wall. Apply a suitable tanking membrane to the outside of the blockwork, include a perimeter drain and backfill once all the walls are set and the roof is on. The variation in the width of the blocks could be accommodated with differing insulation widths.
-
Loft beam, can it be removed?
Iceverge replied to cloud91's topic in Lofts, Dormers & Loft Conversions
That's a funny one. If it's secured using a bolt ( unlightly) or some long nails its probably bracing and should be left well enough alone. Perhaps jiggle it up and down gently and see how it interacts with the brick wall. If it's loose in the brickwork and not attached to any timbers behind it it's almost certainly doing nothing. -
Welcome @Katie AG. You're starting in the right place. I would get a few requirements for your house together along your budget and post them here. People will let you know if it's realistic. Then maybe a few pics of the site and a general feel for the style of houses in the area. Nothing need be identifiable of course but that should allow you to get some ideas together for what is buildable and affordable. You could then take that to an architect or architect technician and get proper drawings done. Unfortunately starting with the architect has led many into a position where the house is unbuildable and unaffordable. While the idea of a kit house out of the box is nice butvery few of them actually exist and those that do are expensive. The kit normally amounts to the walls and roof without finishing, a relatively modest part of the final bill . A good builder using locally available materials can be a way to avoid the financial risk associated with shelling out a huge lump sum to one provider. good luck.
-
Meanwhile at @Radians house............

-
The difference between 'good' and 'average' windows
Iceverge replied to mxplut's topic in Windows & Glazing
Passivhaus Component Database is as good as anywhere to start. List of windows (passivehouse.com) It's not exhaustive but least you can compare like for like. As Craig says this is only the frame. The assembly and ironware are just as important. Look for good air sealing, Ours have 3 separate and continuous seals. I've seen many where they just don't bother the continuous seal at a hinge for instance. A vendor should have an idea about the frame Uf value and glazing G value on offer. There were a few I visited who hadn't even heard of it and just kept spitting the center pane Ug at me and "A rated mate" . -
Warm roof - which vapour control layer and which PIR?
Iceverge replied to BotusBuild's topic in Flat Roofs
When out house was built (cold loft) we got a few showers of rain before slating. It allowed me to spot a hole where the chippie had been playing Rambo with the Paslode and tried to get 50 nails into one spot in a 45mm rafter. A bit of tape and good as new. A sealed flat roof could have a drip internally for quite some time. Soaking into the ply whatever without ever having the opportunity to fix it during construction. -
Welcome welcome. You'll be short of blocks I'd imagine, hopefully you can find some matchers for the new build. What's your planned structure? Any particular reason for the concrete raft?
-
I have a windows copy of SketchUp. Better to use compared to the online version I find. I just draw any components like furnished windows etc.
-
Warm roof - which vapour control layer and which PIR?
Iceverge replied to BotusBuild's topic in Flat Roofs
How about the bonded rubber type? Isn't there normally some kind of timber product between the insulation and membrane anyhou? -
Get someone with narrow fingers to pull out the hair/soap scum fatberg that's always lodged in there. For some reason that always seems to be me, despite not having the slimmest fingers. One option to consider might be to put a finer screen earlier on in the drainage process that can be cleared of hair easily. Or shaving your Mrs head in her sleep.
-
Probably best to let the house settle into use before making any decisions. If you run a lower flow temp for longer periods rather than hot and short then the colder rooms should equalise as the hotter rooms will draw almost no energy due to the smaller delta T.
-
Insulated Concrete Slab Garden Office - Questions
Iceverge replied to Ticky's topic in Garages & Workshops
It depends on occupancy rates. If heated 24/7 like a house PHPP puts the ventilation losses closer to 300kWh. At 30p per unit with a direct electric heater it's about £90/year. Worst case I know. To get a feel for the annual energy use total I took a realistic high use case. Say is that it'll be heated intermittently and used for a 35hr work from home week. That's about 1/5th of the time. However that time will be all during daylight hours when all of the solar gains happen. Annual heat losses is 2MWh for the dMEV, Average U value of 0.29 and 0.5ACH case. So 1/5th of that is 400KWh. Similarly say 1/5 of the internal heat gains is 80KWh annually. Now assume 1/2 of the solar gain will available during occupied hours or about 380KWh. (All from PHPP sheets) The total is 400-80-380 or about 60KWh in positive balance. It's a funny quirk of a well insulated, airtight and orientated building, occupied only during daylight hours is that it will probably need more cooling than heating! Perhaps someone who has actually done this, ( south facing, well built and airtight home office) can confirm the absolute minimal heating needed. -
Insulated Concrete Slab Garden Office - Questions
Iceverge replied to Ticky's topic in Garages & Workshops
I would dig a to a minimum of below the layer of organic material. Then a layer of stone. I would steer away from anything with too many fines in it.(They may prevent drainage) Hardcore is good. Compact it well in layers. Then a layer of something that's more easily levelled before the EPS. Sand or limestone fines would work. I'm not sure about pea shingle as it wouldn't hold its "shape" very well under foot when laying the EPS. By just digging a perimeter trench to the excavations and filling it with stone you have a simple french drain. Think of it as thickening the stone at the edges. It'll ensure that the soil under the main foundation will be dry as the stone will allow water to pass to a lower plain easily. -
Vaulted ceiling joinery help
Iceverge replied to richo106's topic in Lofts, Dormers & Loft Conversions
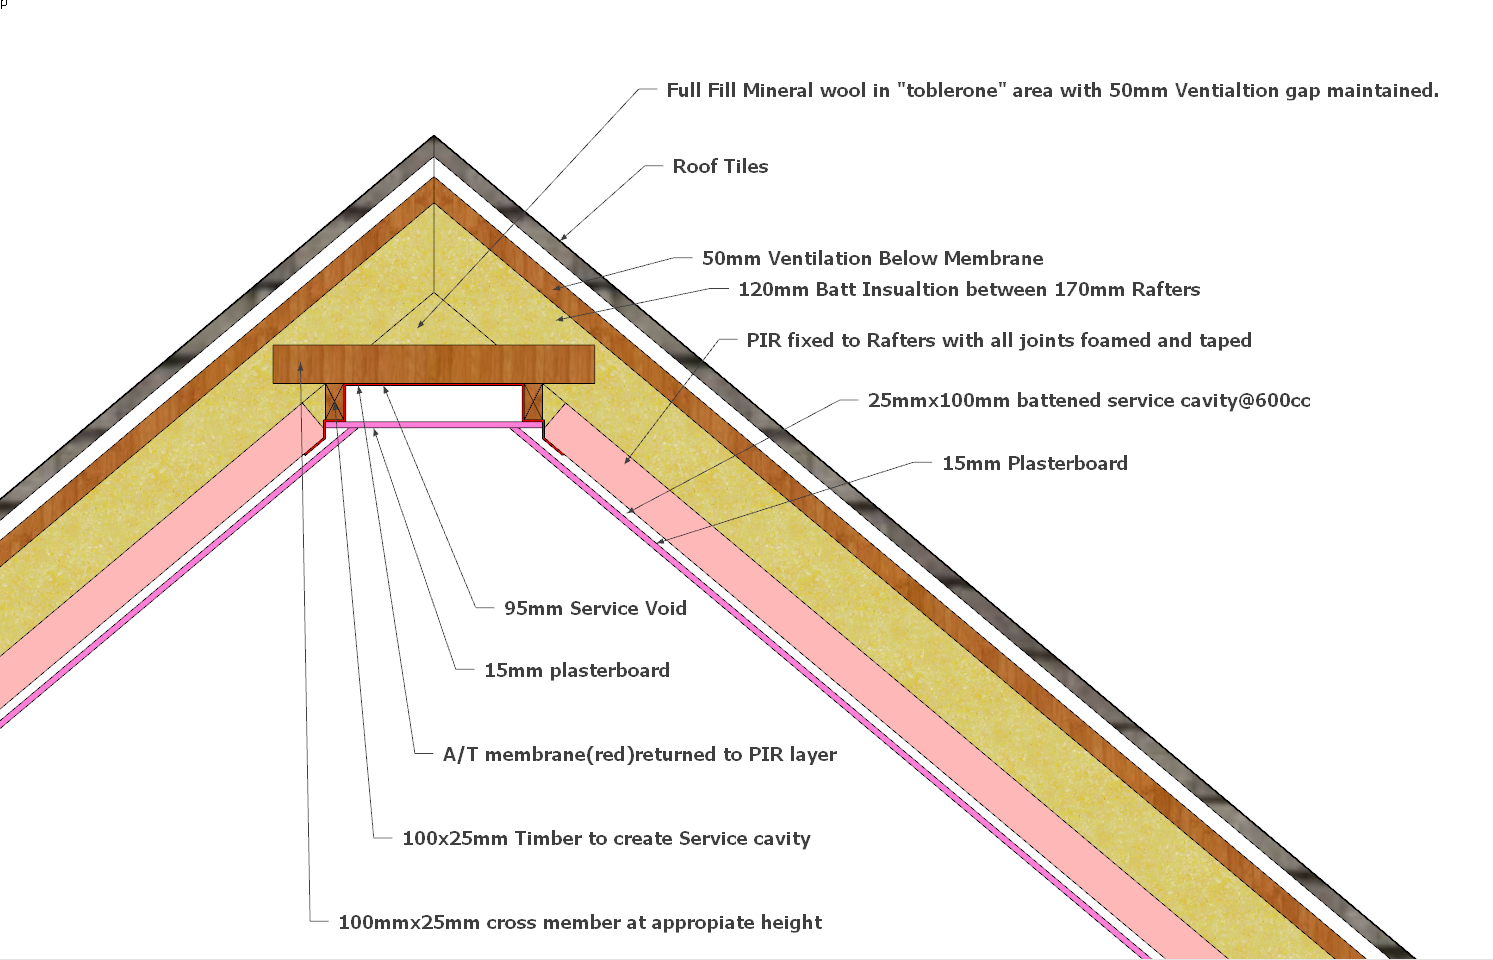
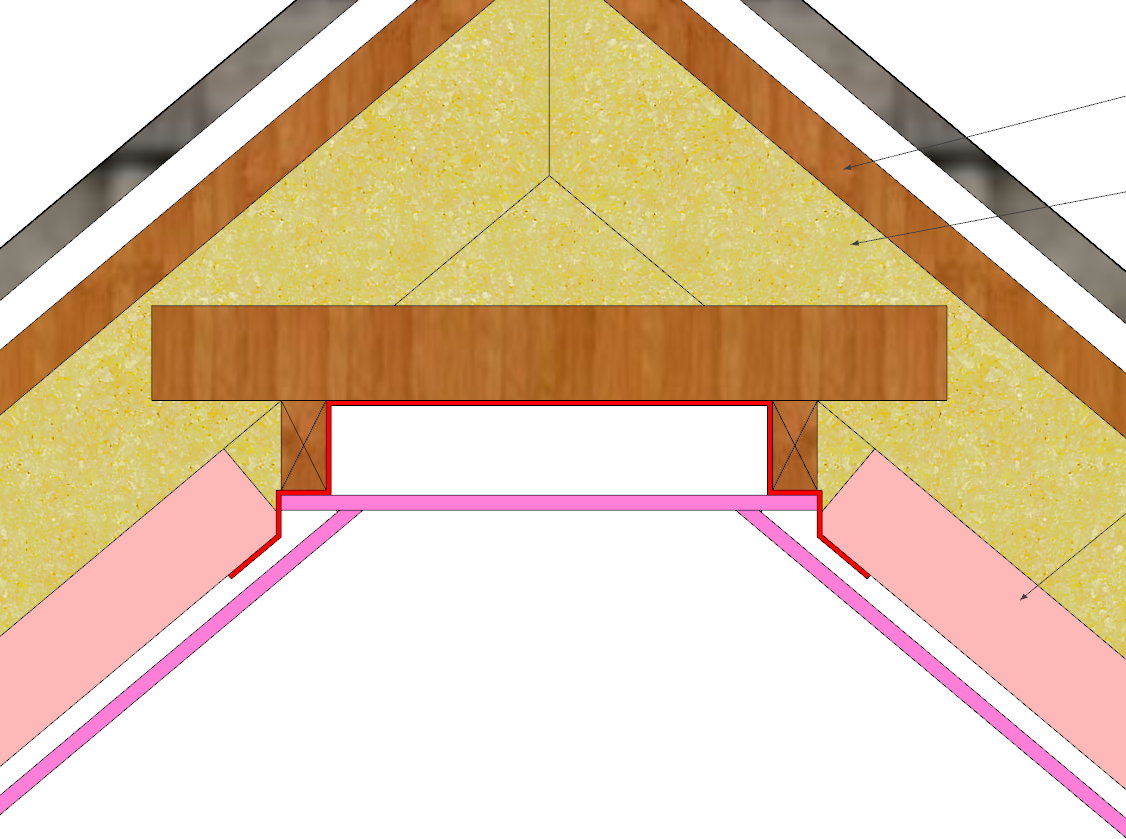
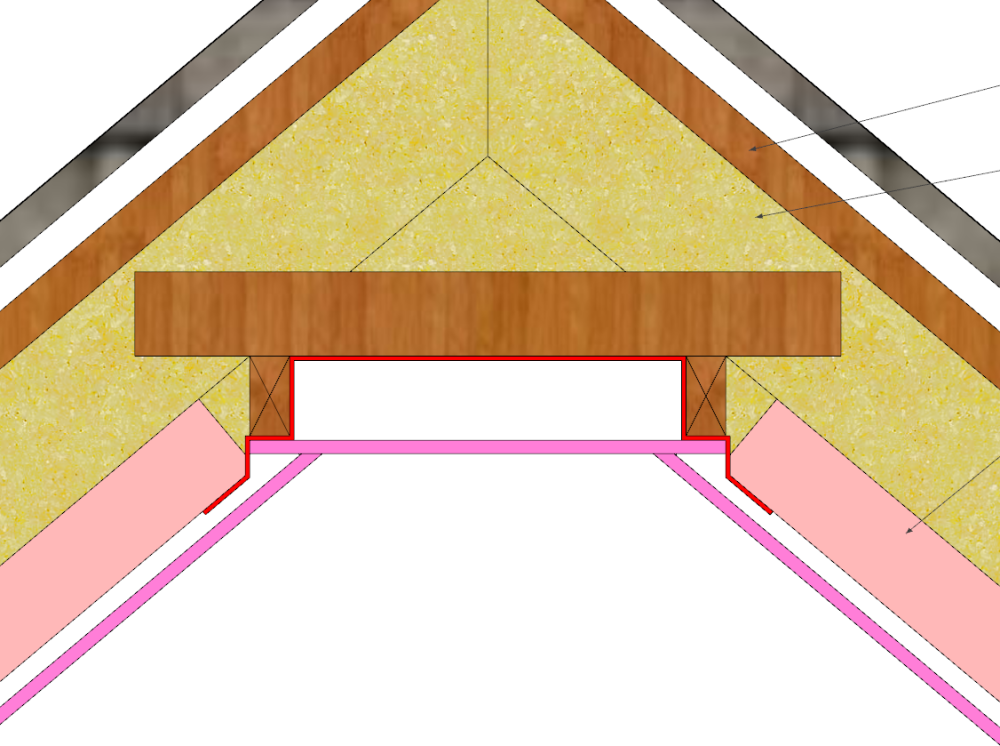
Have a look at this. Fit the cross member and fill above and between with batt insulation. Keep the 50mm clear for ventilation. Fix 2 x 95x25mm timber battens lengthwise below the cross member. Then put a strip of airtight membrane below it to be returned to the PIR later on. You could put it behind the battens too but I think it might tear easier there during install. Fill any spaces that are too tricky for PIR with mineral wool. This will leave enough space for MVHR ducting and keep everything inside a continuous A/T layer. 15mm plasterboard for better sound performance.
-
Insulated Concrete Slab Garden Office - Questions
Iceverge replied to Ticky's topic in Garages & Workshops
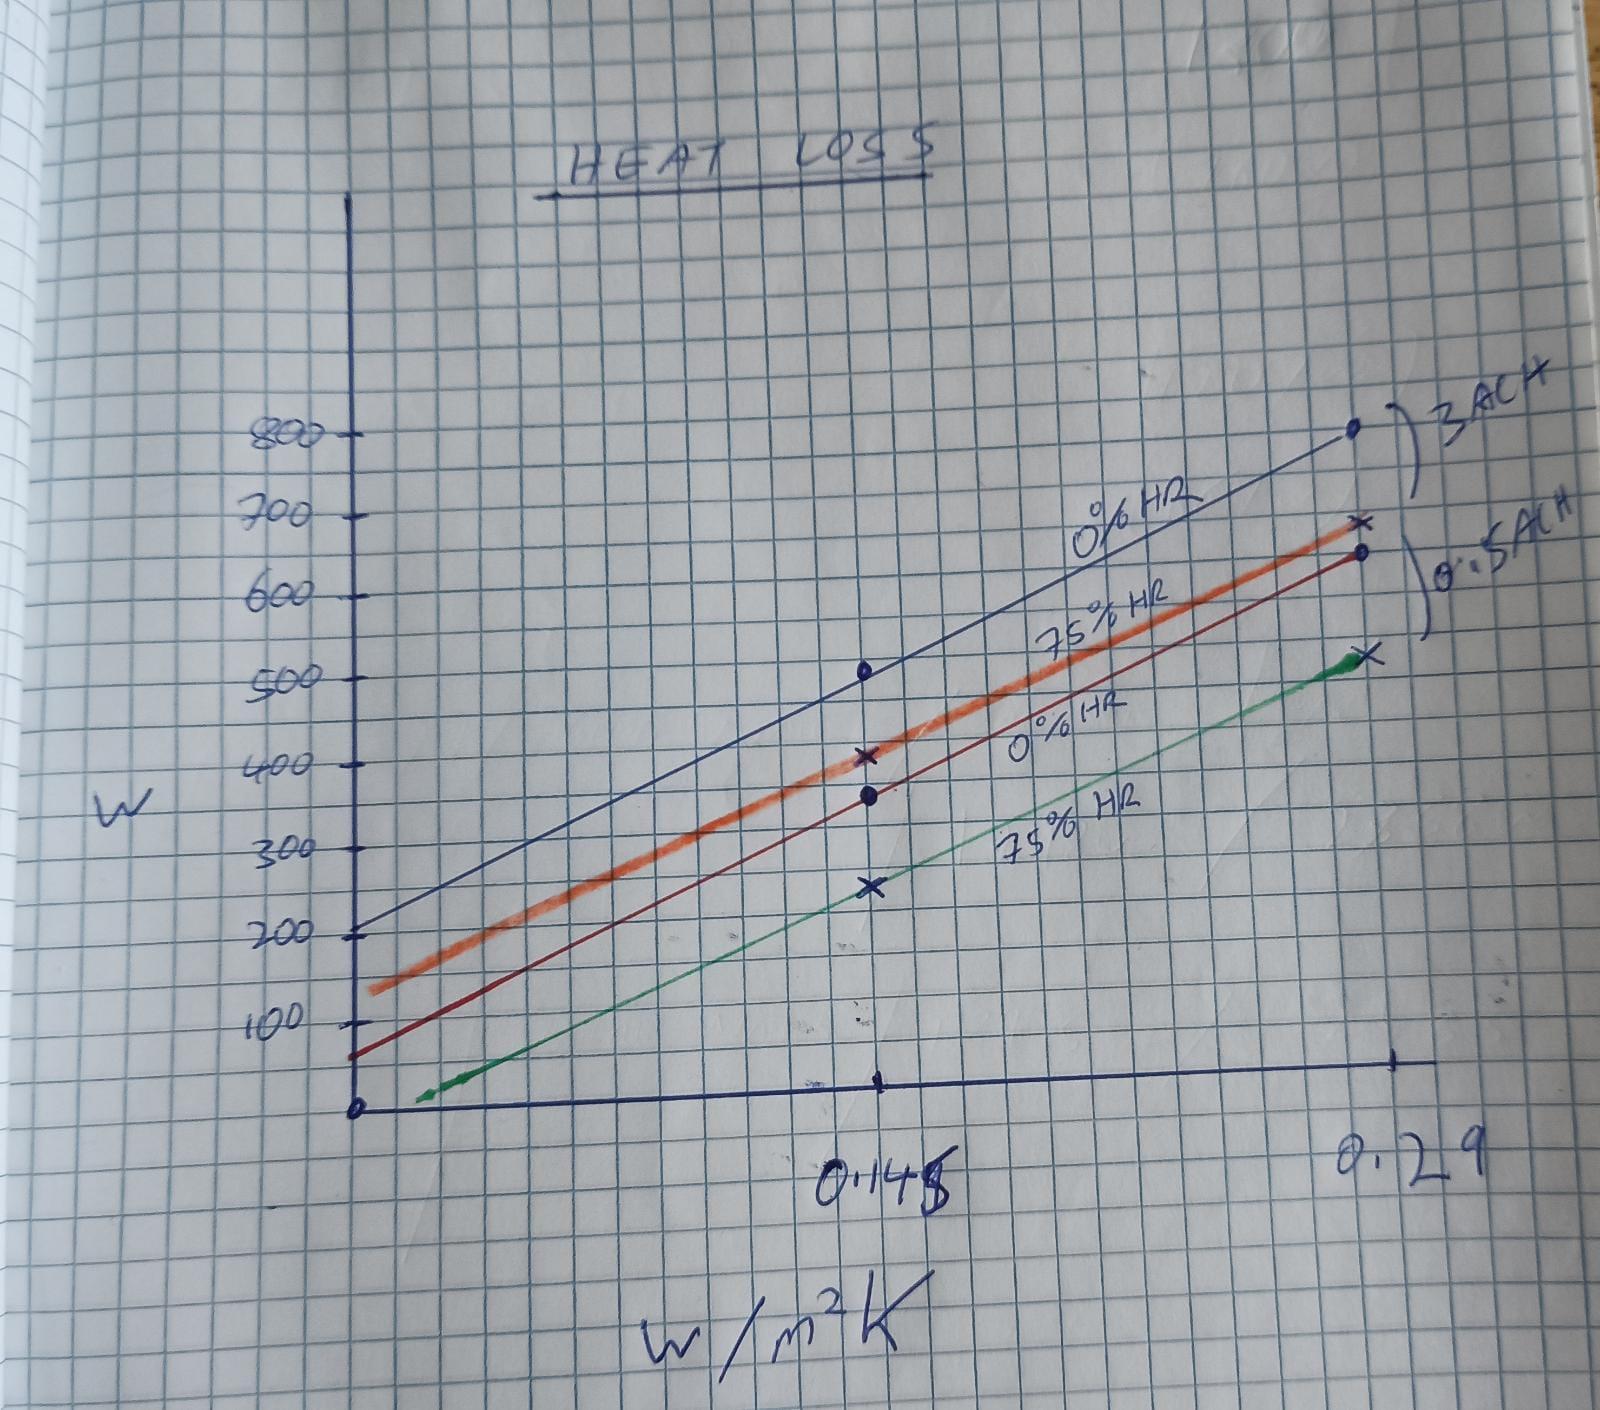
@Nickfromwales @JohnMo Excuse the scribbling but here's my findings from playing with PHPP. This is for a theoretical garden room 4m x 6m for it's peak heating load. It has a 2.4m X 2.4m 3g door/window facing south. 3 variables. Heat recovery at 75% and 0%, airtightness at 3ACH and 0.5ACH and average U values of 0.29 and 0.145. Bear in mind to get this lower average the floor walls and roof had to be close to 0.1w/m2k to balance the door. In summary the best bang for your buck was, as usual, airtightness. Then heat recovery and then improving the U values. Annual heating costs are a complete wild card as it's unknown how much anyone might use this space. These figures are for the very coldest day in the south of Ireland, no solar gain either. Your mileage may vary but a fair assumption is that on most normal winter/spring days you could just wear a jumper and bring the dog in with you and you'd need no heat at all. The only solid take away I can offer is to build really really airtight, do a good job on the U values and balance your need for MVHR with the lightly annual occupancy. Certainly don't spend much on the heating. Even a couple of ye olde incandescent lightbulbs would do.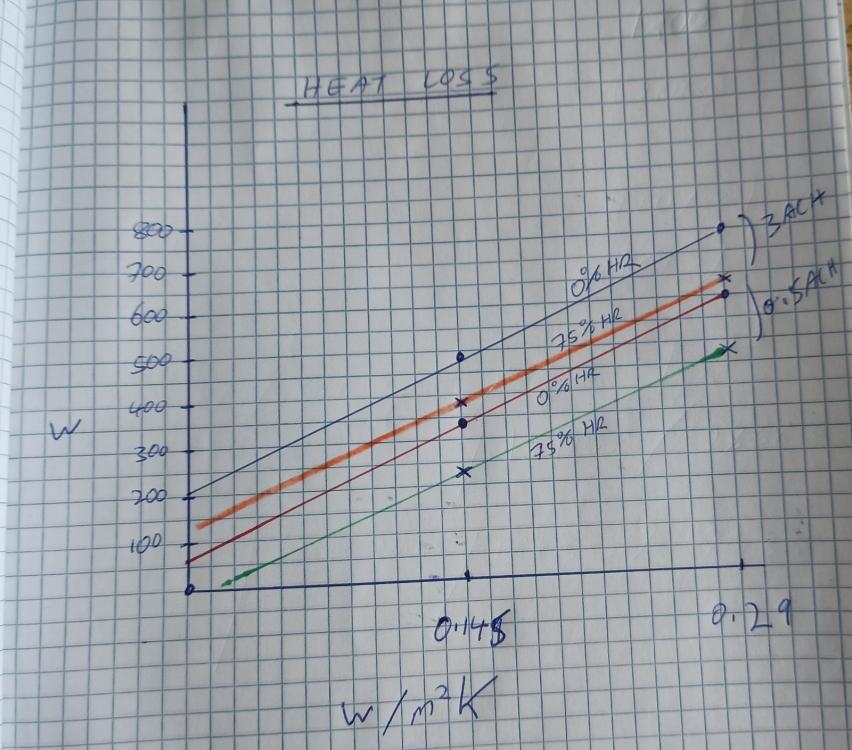
-
Insulated Concrete Slab Garden Office - Questions
Iceverge replied to Ticky's topic in Garages & Workshops
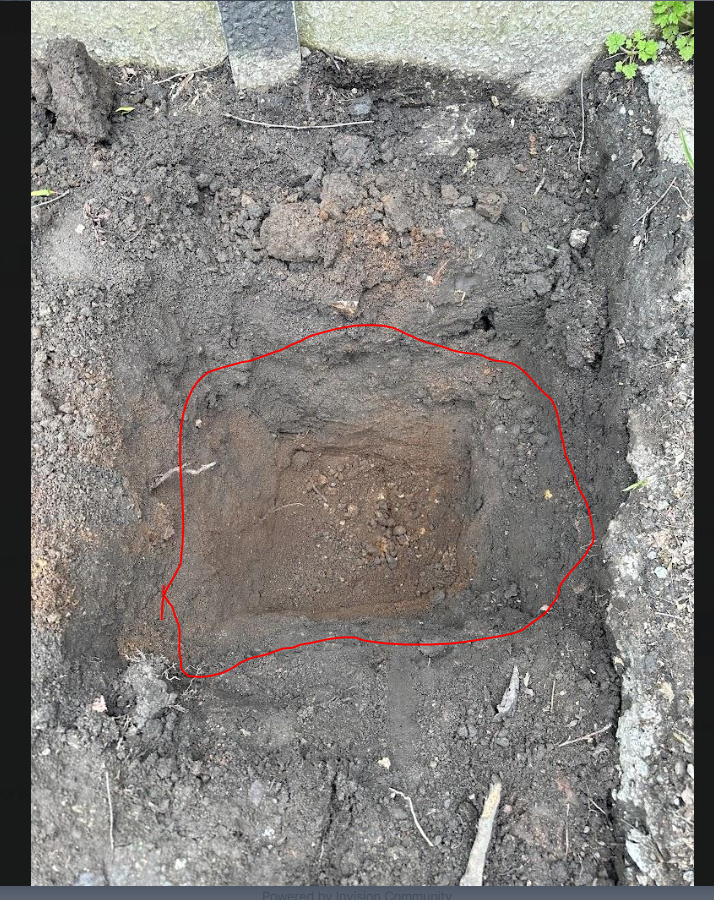
It's hard to tell really from that pic but I'll do my best. I'm unsure if it's virgin ground or made up. My best guess is to dig to slightly below the level of the red line I've drawn, below where the plant roots stop. Then add some free draining stone and you're good to go. It would be good to lower the excavations below the main level to below the height of the main dig and backfill with stone too. This will keep the area under you building drier.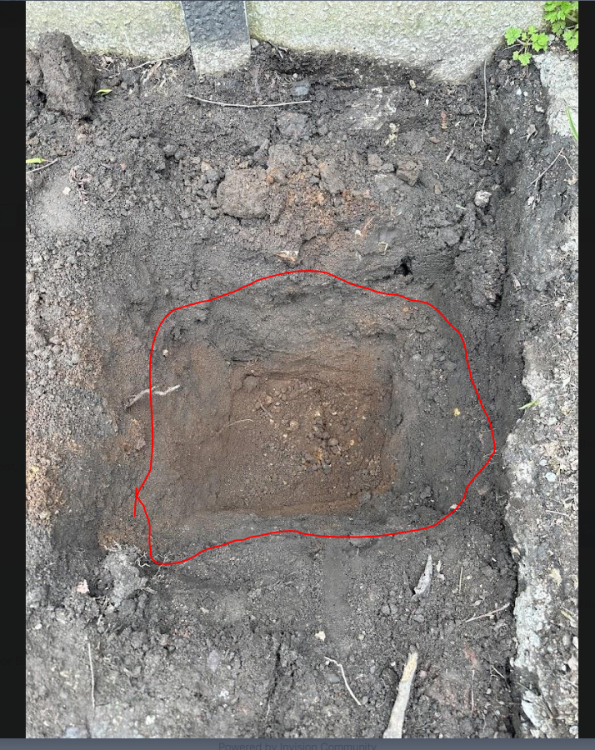
-
Insulated Concrete Slab Garden Office - Questions
Iceverge replied to Ticky's topic in Garages & Workshops
Yikes, super complex! How about a layer of EPS outside a taped layer of OSB on a 100mm stud with batt insulation. Zero bridging, especially around windows and doors. Robust airtight layer. Cheap as chips and fast. Same for the roof, although I have no idea what the requirement of MCS are. A degree of energy balancing needs to be done, although your 300mm is gold standard it only works if everything else is sorted. What size is the building you are making? I am about( any month now) to install a Daikin FTXM split unit in our house. A bit dearer than a nobrand but I was talked into it by a mate who does heat pumps. Parts, lifespan etc he convinced me. Time will tell. Might be overkill for a small office. I am half way through my own 4m2 office. I'm weighing up the best ventilation strategy. I probably have to do some sums to make my mind's up. Access sounds an issue for concrete etc. Would it be better to minimise it? -
I've never done this so I don't know but I'd say the 25 x 100mm strapping will take care of the load so all you need is a screw or two to hold it until it's taped. Joints on the rafters would be better but I wouldn't cut boards to achieve this. Keep us updated with pics.
-
https://www.scribd.com/document/447244443/THERM-01-Beginning-Users Heres one but its in ye olde units. http://passivehouse.nz/wp-content/uploads/2018/07/ThermInstructions.pdf This is the one I used.