Iceverge
-
Posts
4462 -
Joined
-
Last visited
-
Days Won
32
Everything posted by Iceverge
-

Insulated Concrete Slab Garden Office - Questions
Iceverge replied to Ticky's topic in Garages & Workshops
Looks fine. Mesh will be easier than Rebar I would say. -
Court Judgments like this make me happy
Iceverge replied to Adsibob's topic in Party Wall & Property Legal Issues
Out of interest what is the best way to build a new wall beside an old one in this situation. A gap and some insulation I would imagine but I don't know. Also how best to marry 2 x neighbours dissimilar roofs? A good job benefits everyone re leaks noise maintaince etc. -
I'm not 100% following this. Any chance of a sketch? A couple of strategically places pieces of EPS could really reduce any thermal bridging at the wall floor junction.
-
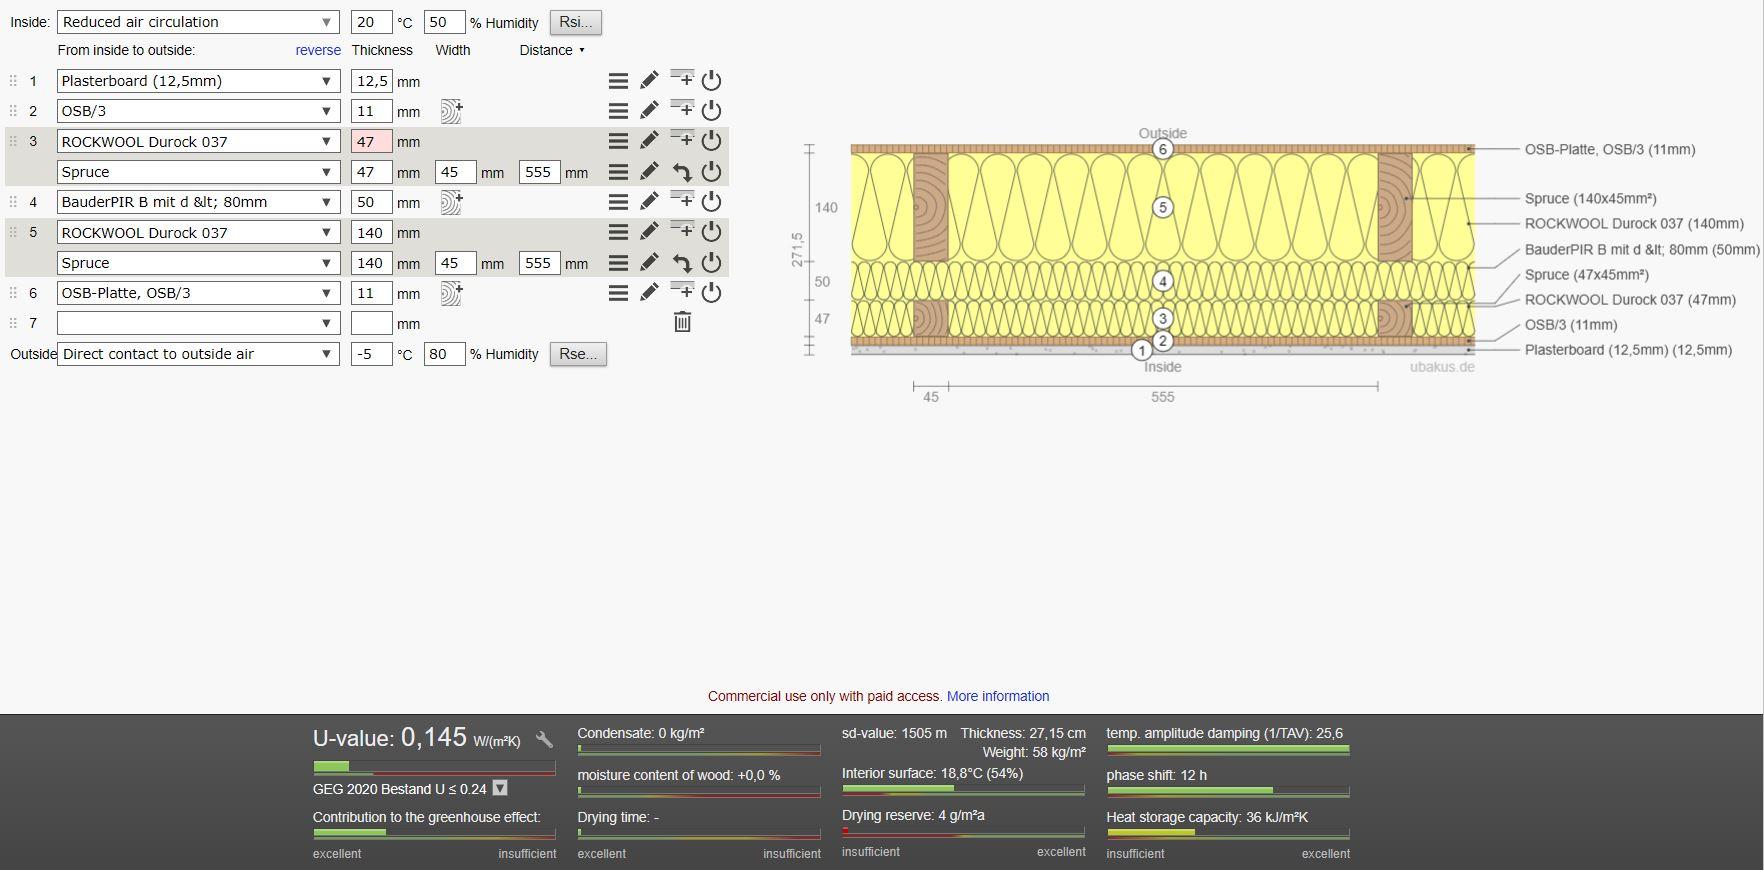
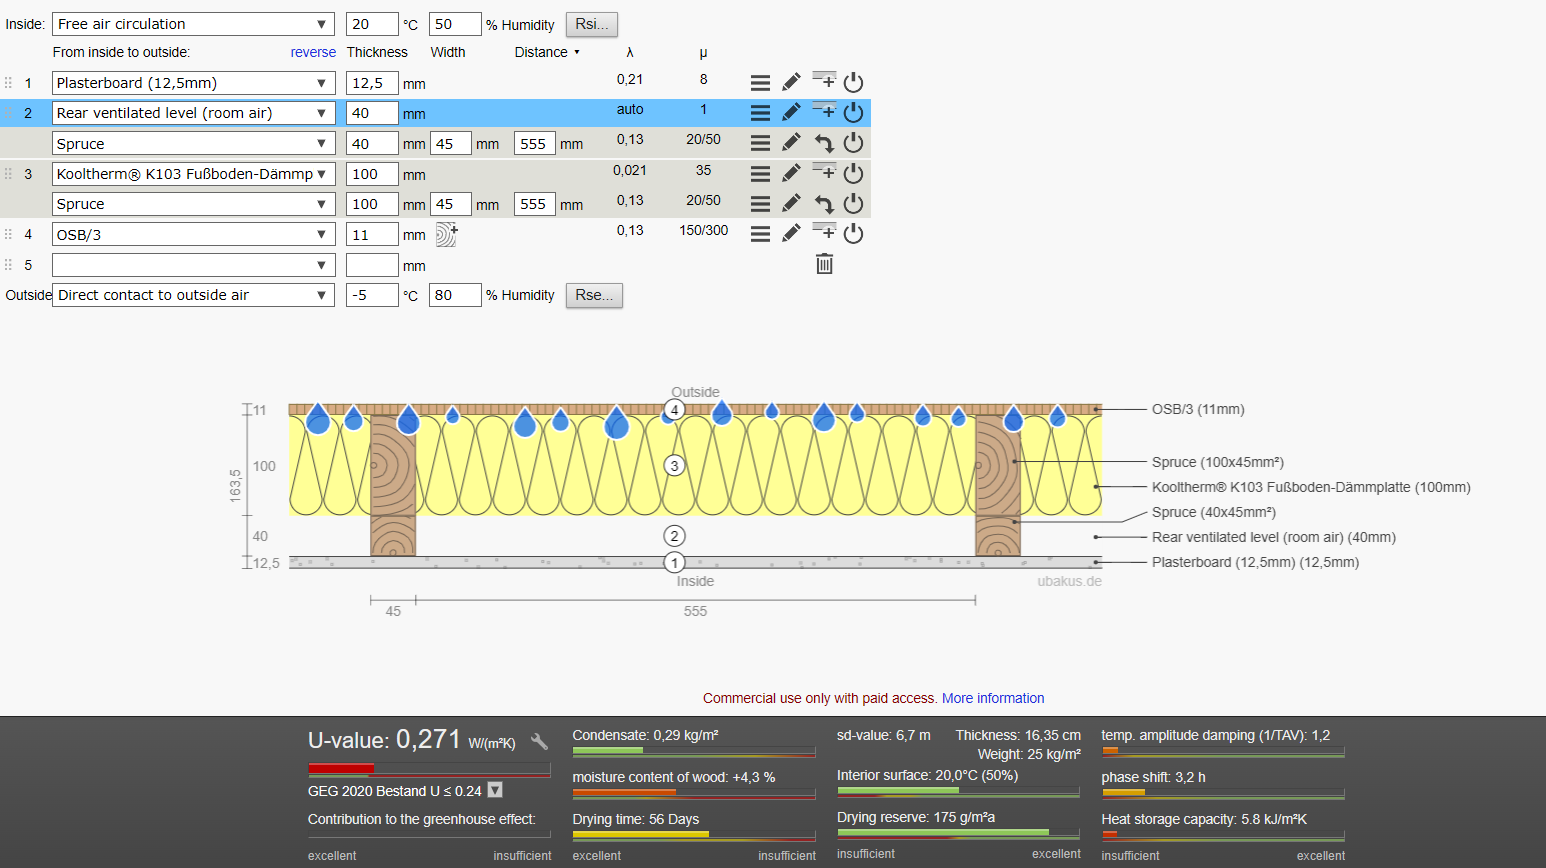
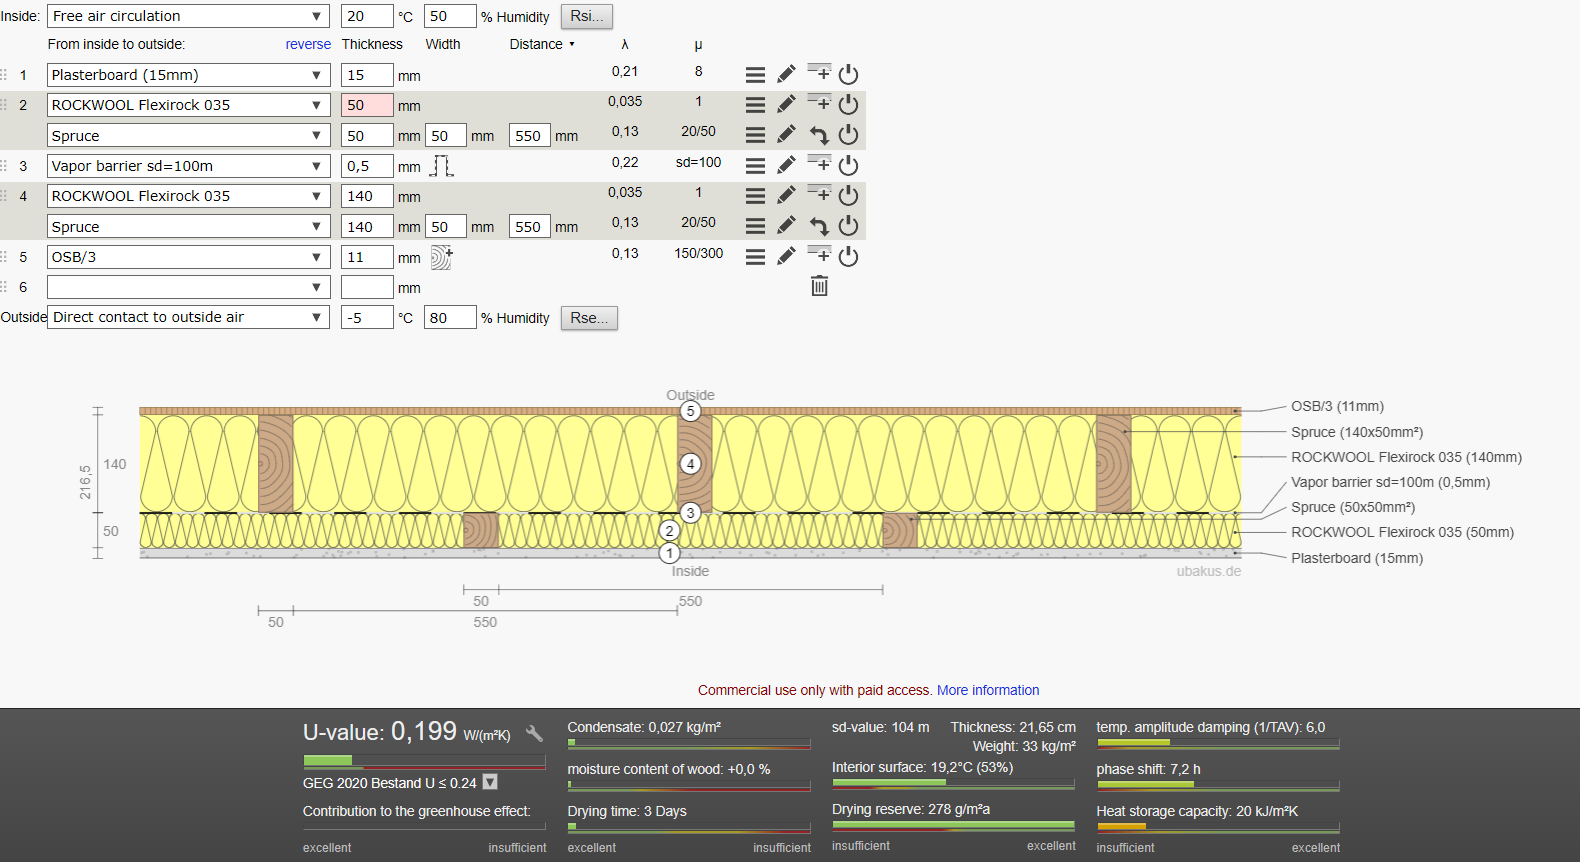
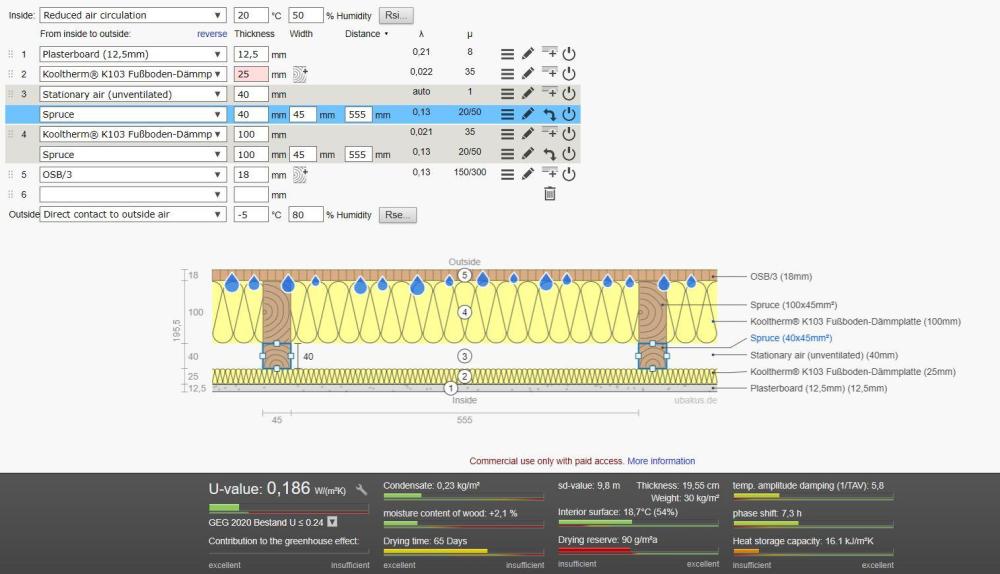
There's no reference to a sealed vapour control layer here. There's a danger that you will get interstitial condensation. That means that water vapour (like steam, exhaled moisture from your breathing/cooking etc) will be able to pass through small gaps in your wall. If it meets any cold solid surface ( which it will outside the insulation) the vapour will condensed into liquid water. Because it's now cold and a liquid it's stuck there, it can't evaporate. Rot and mould are the result. The Kooltherm would work fine if it was a continuous sheet inside the house but it's not. There'll be holes at every plug socket and gaps between the boards where they're butt jointed as insulated plasterboard. Given you have a U value target of 0.15 I'd do something like the following. Rocksilk 140mm £16.78/m2 50mm PIR with taped joints as VCL £9.05/m2 50mm Rocksilk £5.50/m2 With 50x50 battens £1/m2 15mm plasterboard £5.25 Total £37.58/m2 Or use a layer of 11mm OSB £4.71/m2 and 12.5mm plasterboard instead of 15mm plasterboard. Nice and solid to fix to vs PB alone. Total £40.76/m2 Compare that to the current buildup. 100mm Kooltherm k112 £58.40/m2 37.5mm Kooltherm Insulated plasterboard K118. £ 29.58 Total £87.98. Less labour but twice the price. The free german website Ubakus makes Kooltherma poorer K value of 0.021 than the UK kingspan declaration . I don't know why, but I trust them about as far as I could throw them. Even with a K value of 0.018 you'd be optimistic to hit 0.15 and that assumes perfectly still air in the cavity which would be almost impossible to achieve.


-
Your Architect has been taken out for lunch by the Kingspan salesman I think. To get a sense of what I mean lets look at some £/R Values or how much insulation costs for a given heat blocking ability. All prices from insulation4less. Please feel free to check my sums but I think it's accurate. Lets take the k112 and something like the Flexirock slabs. So what I hear...... its only £5. What s that between friends!? For your walls of a u value 0.15W/m2K or R 6.6. However that rises to an R value required of 8.25 by the time you account for 10% timber framing. Its a £5.46 hike from the Rocksilk to the Kooltherm per R per m2. So £5.46 X 8.25 x say 100m2 of wall area = £4005 more expensive. Now there are less costs with reduced thickness but nothing like this. We haven't even considered the substantial waste with fitting boards between studs. I think the salesman might have had a week in the Algarve too. Find out if you can return/exchange the K112 would be my first port of call.

-
Any further details please. Do you have a service cavity. Where is your air control layer? The kooltherm is an unusual choice as it is very very expensive. Normally it would only make sense where you had absolutely no extra space to work with and it was vital you hit a specific U value. In this case you have a U Value of about 0.27 w/m2K. I would take the Kooltherm back to the shop . Fit mineral wool batts between the studs. Then a vapour barrier. Then 50x50 battens perpendicularly with mineral wool infill as a service cavity and then some 15mm plasterboard.


-
What was the reason for removing the upstand? What harm was it doing?
-
If you can get some guidance about ridge height and any overlooking concerns they might have. It'll make your designers job easier.
-
Keep them! Anything newer will require Bletchley Park codebreaking skills to turn on and off. I have actually given up on some of these newer heaters. Impossible to decipher. If you're looking at anything cheaper to run you'll need a heat pump. This will use about 1/5 of the electricity but needs a professional install really and space for the outdoor unit. It something like this for about £700 and it'll use about 1/3 to 1/2 of the electricity but is easier to install.


-
Unauthorised deviation from extension plans
Iceverge replied to Jimbo123's topic in House Extensions & Conservatories
It's really not a fun place to be. I can only empathize. Don't worry you're getting a hold of the builder earlier rather than later. It'll come around if you keep at it. -
New build design - thoughts welcome!
Iceverge replied to AppleDown's topic in New House & Self Build Design
Here's where doctors ( even complete amateurs) differ and patients die! A couple of things. 1. Won't the best daylight be wasted on the utility and plant? 2. The only TV option would be in the living room. 3. The hallway feels a little pinched maybe and would it annoy whoever was cooking if the main thoroughfare ran though their work area? -
Unauthorised deviation from extension plans
Iceverge replied to Jimbo123's topic in House Extensions & Conservatories
Handy that. With an attitude like that I suspect they will walk as soon as you make an issue of it. Most lightly sequence of events. 1. You raise the point. 2. They deny. 3. You show them and they sulk and say "it's fine" happens all the time, everyone else it wrong, engineer, architect, planner etc etc etc. Nobody will notice and you should carry on. 4. You ask they put it right. 5. They eventually say they will after much hassling. 6. Nobody want's to undo work so it'll get shoved to the bottom of the list. 7. They get busy with other jobs and get harder to reach. 8. The stop answering the phone and you're left with a half built wonky extension, half their gear left in your garden. Dare I say it, did you pick the cheapest quote? -
Court Judgments like this make me happy
Iceverge replied to Adsibob's topic in Party Wall & Property Legal Issues
A fine example of "an education bought" and all that. Maybe someone could make a tv show. "The petty landgrabs of Suburbia" -
New build design - thoughts welcome!
Iceverge replied to AppleDown's topic in New House & Self Build Design
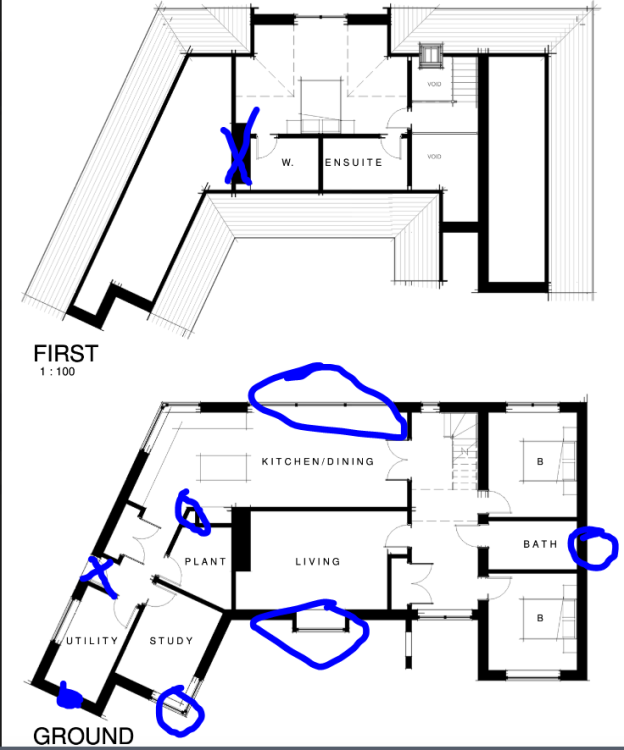
I'm assuming there is a healthy budget. I'm guessing the floor area is about 180m2 so £600k? Overall I really like the design. A couple of points. Most already mentioned. 1. Bin the chimney. Internal air quality for your son would be my big motivator. 2. Consider the corner windows and if they're worth the compromise. It'll need a lot of steel as you've made one of the strongest parts of the house quite weak. They're difficult to get right thermally. Lots of the wonderful thermal benefits of something like a twinwall timberframe get thrown out the window when you resort to covering a Square hollow steels with narrow finger of PIR. 3. The sticky out window is another expense that reduces thermal performance in my opinion. Also it's more lightly to leak. 4. Triangular windows aren't my thing, but that's a opinion. 5. I like the half hipped roof but check for headroom. 6. The huge south facing windows will be too hot in the summer, too cold in the winter and need lots of steel reinforcement. I would break it up into 2 x french doors or similar. 7. I like the lean-to porch with the hole in the wall gable. However the rendered area above the pitched roof will be an area I would worry about the weather long-term. If not weather then, lots of staining and algee with the trees. Why not just take the tiled roof to the apex (aesthetics allowing) ? 8. The chimney is taking up area of your wardrobe. I'd get rid. Also there's no natural light in the ensuite. 9. No window in the downstairs bath? 10. Kitchen/Dining overglazed. 11. Mystery corner of walls in the kitchen? 12. The study corner window would be better as 2 separate windows IMO. 13. Move the door from the hall to north end of the utility somewhere. It'll give you some more useable floor area and make the utility a "walk through" rather than "dead end". The "dead end aspect is a recipe for clutter. Overall I do like the building though. Lots of good stuff. Keep us updated.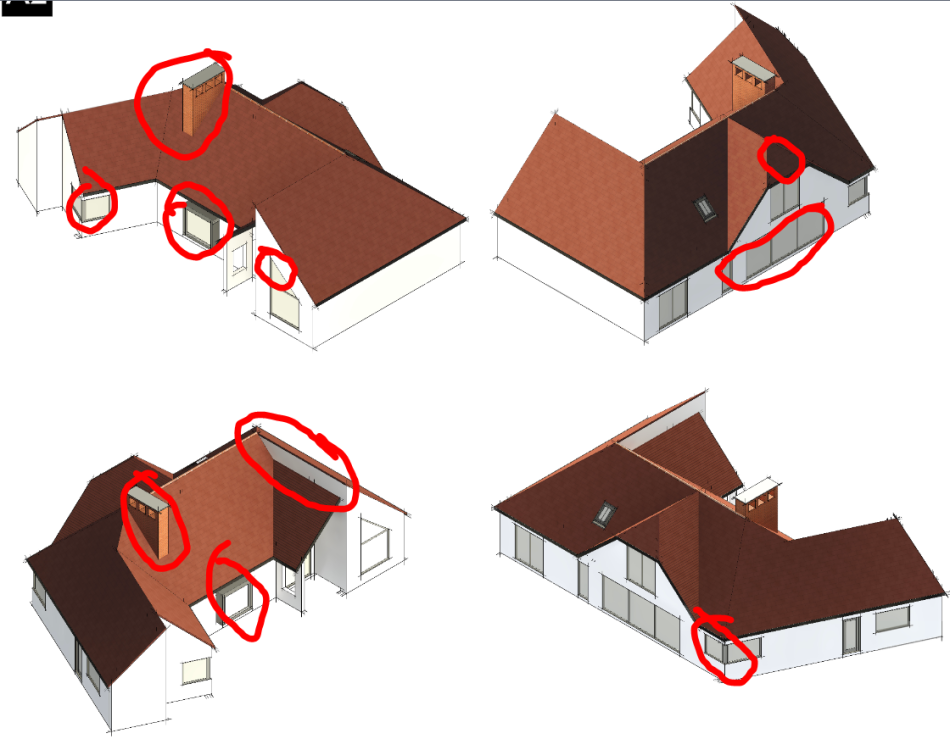
-
Underground workspace - how to shore up and waterproof?
Iceverge replied to BodgeBodge's topic in Garages & Workshops
You could take out 10 buckets a day, after work. For the next 10 years. Hose pipe a pick and a shovel. No reason it wouldn't work that I can see. -
Have the W/C as a separate internal room to the bathroom. Close both doors for sound privacy. In fact, I'd put a W/C and shower in there. Often all you need to do is brush your teeth in the basin but the whole room is occupied because someone is recreating the entire works of Michael Jackson under the shower head.
-
Underground workspace - how to shore up and waterproof?
Iceverge replied to BodgeBodge's topic in Garages & Workshops
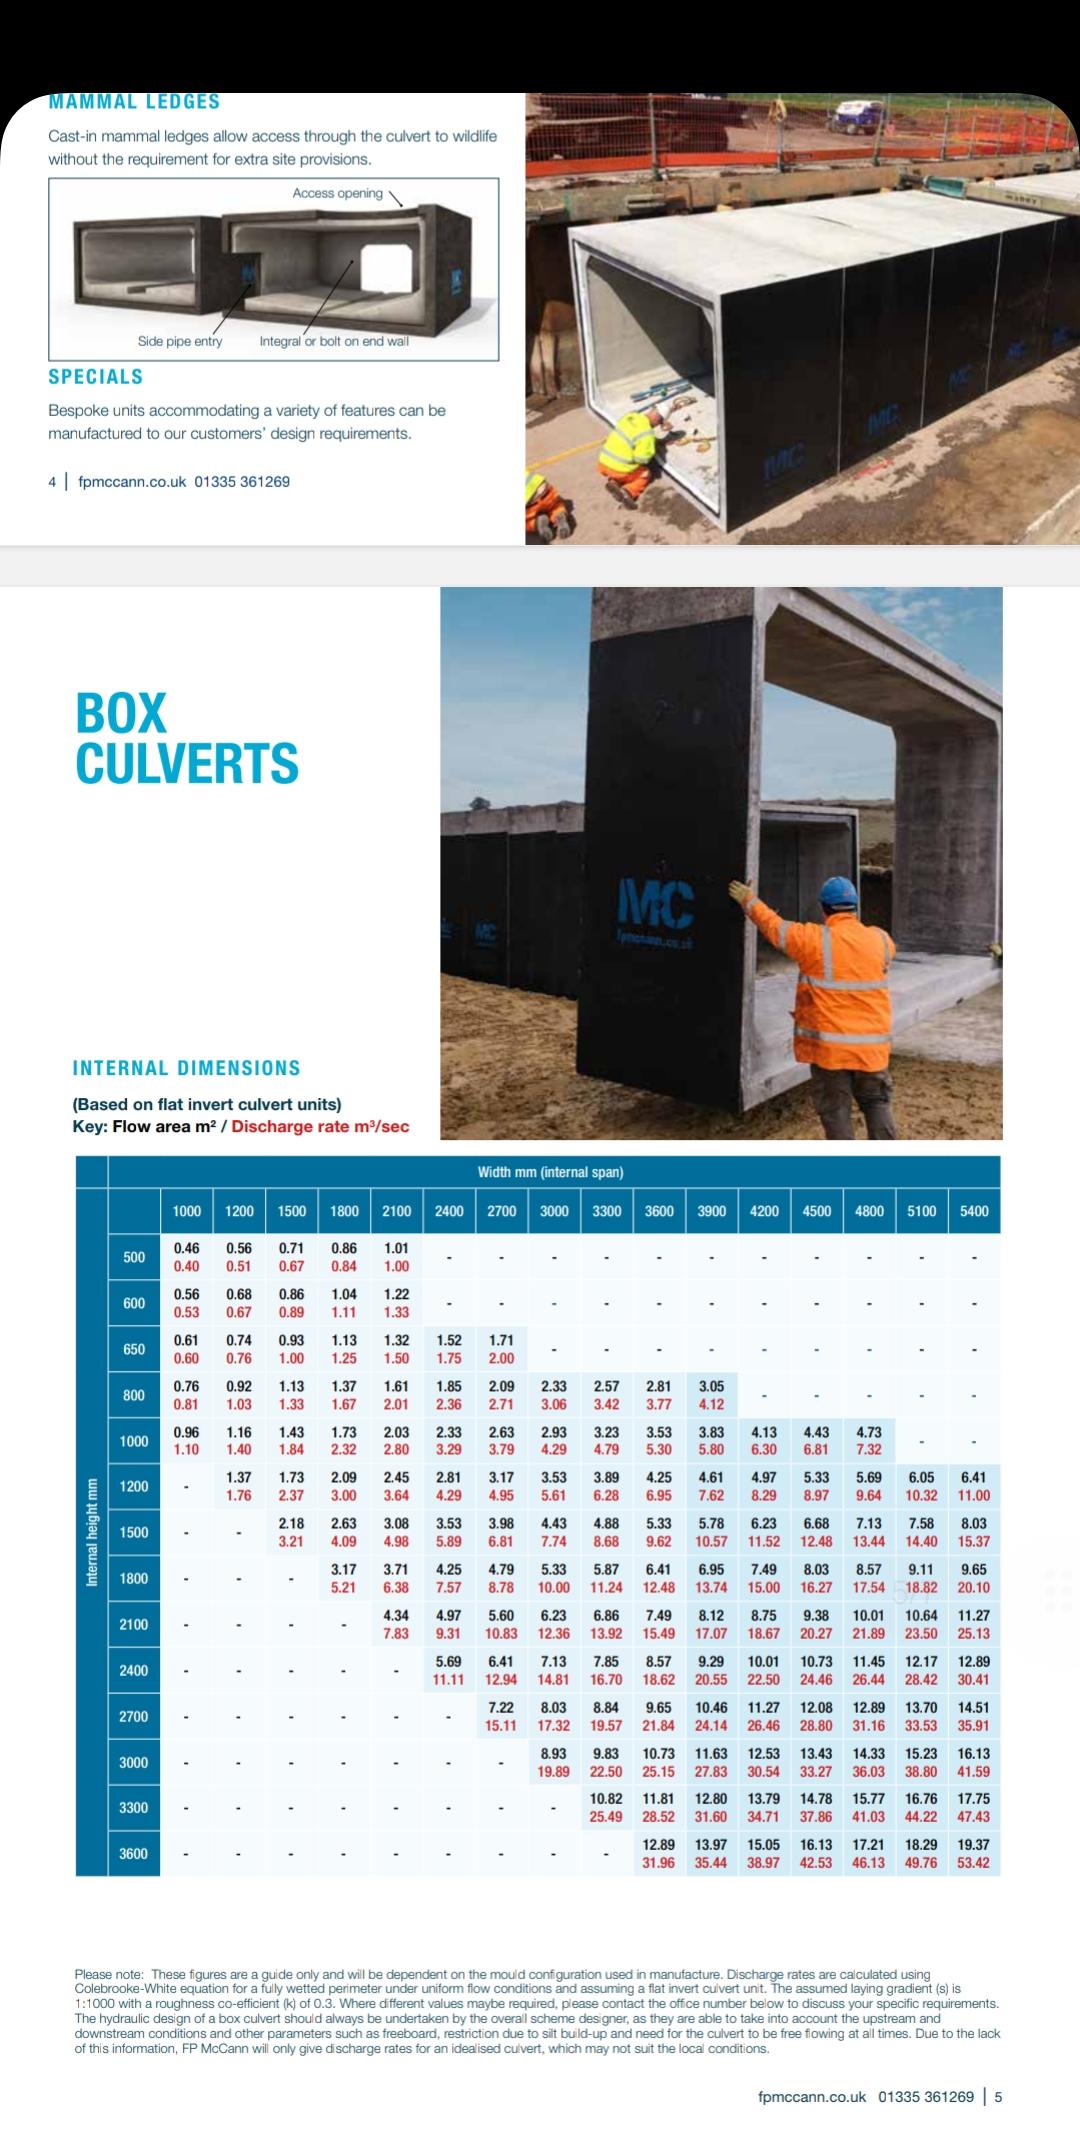
As an off the wall idea you could use a precast box culvert turned on its side. Either dig a hole and drop it into it or....... And I like this idea.... Lay it the ground and start digging the soil out from around it, gradually allowing it to sink into the earth until the desired level is reached. Using the culvert as a trench box shutter should be pretty safe too. Pour a concrete floor with a sump and pump and you're done.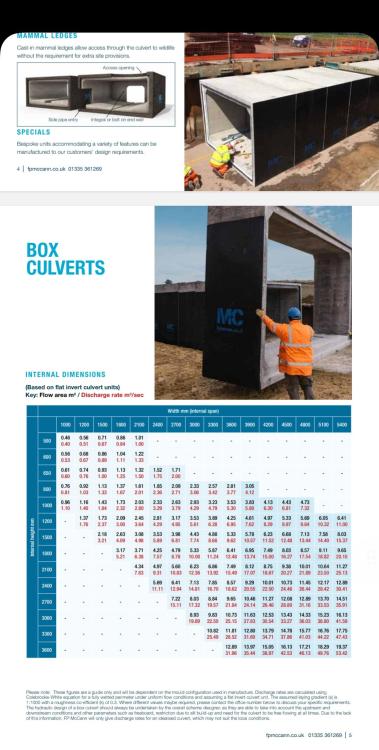
-
quote Roof replacement and insulation install
Iceverge replied to Matt89's topic in Roofing, Tiling & Slating
The decor in the room looks just fine ATM. It'd be a shame to loose much more space and have to redo it unnecessarily. You could strip off the roof from outside. Put 50mm of batt insulation between the rafters. Then add a layer of 18mm OSB. Tape all joints as an airtighess barrier. Important to seal this at the wall plate. Noggins and some sealant should do. 100mm PIR over the top, membrane, battens . 200mm screws through the lot. Counterbattens for new tiles. Should be no need to disturb the inside, no mess inside the hosue. No hauling materials up three flights of stairs. It'll need to be done in stages/or in good weather however. U value of about 0.18 which is quite respectable. -
I'd go for at least 100mm rather than 75mm boards in the floor. There's almost no difference in the price. 150mm while you're at it if you can. You never regret putting in too much insulation.
-
Softening the feel of a concrete slab floor
Iceverge replied to Sparrowhawk's topic in Floor Structures
At least 300mm EPS. More is more as they say!! Maybe 2x layers of floating OSB over the top. Or a suspended timber floor with I joists and blown cellulose. -
I assume from this graph that it's possible for some members to run at flow temps in the 20's. At say 10w/m2 and 150mm spacing then about 25-28deg flow temps look possible. That would result in a superb COP for an ASHP.
-
Global warming is in fact entirely natural and has already peaked
Iceverge replied to ProDave's topic in Boffin's Corner
To man the ships.
-
Global warming is in fact entirely natural and has already peaked
Iceverge replied to ProDave's topic in Boffin's Corner
We need more people, not less. We've got a universe to explore. -
Softening the feel of a concrete slab floor
Iceverge replied to Sparrowhawk's topic in Floor Structures
Gottya. Looking forward to hear how the UFH performs -
Softening the feel of a concrete slab floor
Iceverge replied to Sparrowhawk's topic in Floor Structures
The maths suggest the only way deal with this is insulating the walls. EWI- as much as you like. IWI- breathable and probably better with a limited amount. Box in a box with a ventilated gap. I don't know of any official figures about moisture regulation from natural materials, clay, lime, woodfiber, straw etc but those selling it do suggest so. I'd like to see some data. In its simplest form Adobe, is dug on site, screened and relaid. Very little embodied carbon vs concrete where almost all the CO2 is in the cement process. The passive house and Passivhaus brigade are a bit evangelical at times. "NO OPENING WINDOWS. 100% HERMITICALLY SEALED, SCI-FI AIRLOCKED EXTERNAL DOORS. NO AUXILIARY HEATING INPUT BEYOND THE MINIMUM AS DIRECTED BY THE COMPUTER PROGAMME" I can hear the chants, I can see the placards. However in the real world it means that you don't HAVE to install central heating, but you need something. We have an electric rad. You don't have to comply with the dictated 20deg, you can ( and we do) have 23 deg in the sitting room for evening TV. You don't have to open the windows and doors for fresh air, but yet if the weather is nice we do, as the small kids transport contents of the house to the garden and the contents of the garden to the house. The beast from the EAST is easily dealt with as the heating load rises to probably 2kw from 1.5kw. 500w is much easier to find than 20 or 30kw for leaky old pile. In a powercut last year in the snow the house was still at 20deg upstairs and 19deg downstairs after 24hrs without power. Passive beats active every time. Guests are the best heaters of all, any party of above about 10 leads to windows being opened despite 9deg and grey, windy and wet outside. The dog lives in the hayshed thank you very much. Bringing the mutt inside is only one step away from putting him in a tutu carrying him around in a handbag. Cruel emasculation of a noble beast. Why, why is nothing allowed to move and flex?! Airplane wings bounce around for 18hrs per day for 40 years so it can't be the engineering. Is it a rigid mindset? A super low flow temperature might solve this? Mind you, as you loose the warm floor feeling then i wonder what is the point of UFH at all then. This intrigues me. Is it a dear option? Was this necessary? Would it not have just floated ok?