Iceverge
-
Posts
4462 -
Joined
-
Last visited
-
Days Won
32
Everything posted by Iceverge
-

How to reduce thermal bridge / draughts with RSJ beam
Iceverge replied to WWilts's topic in Heat Insulation
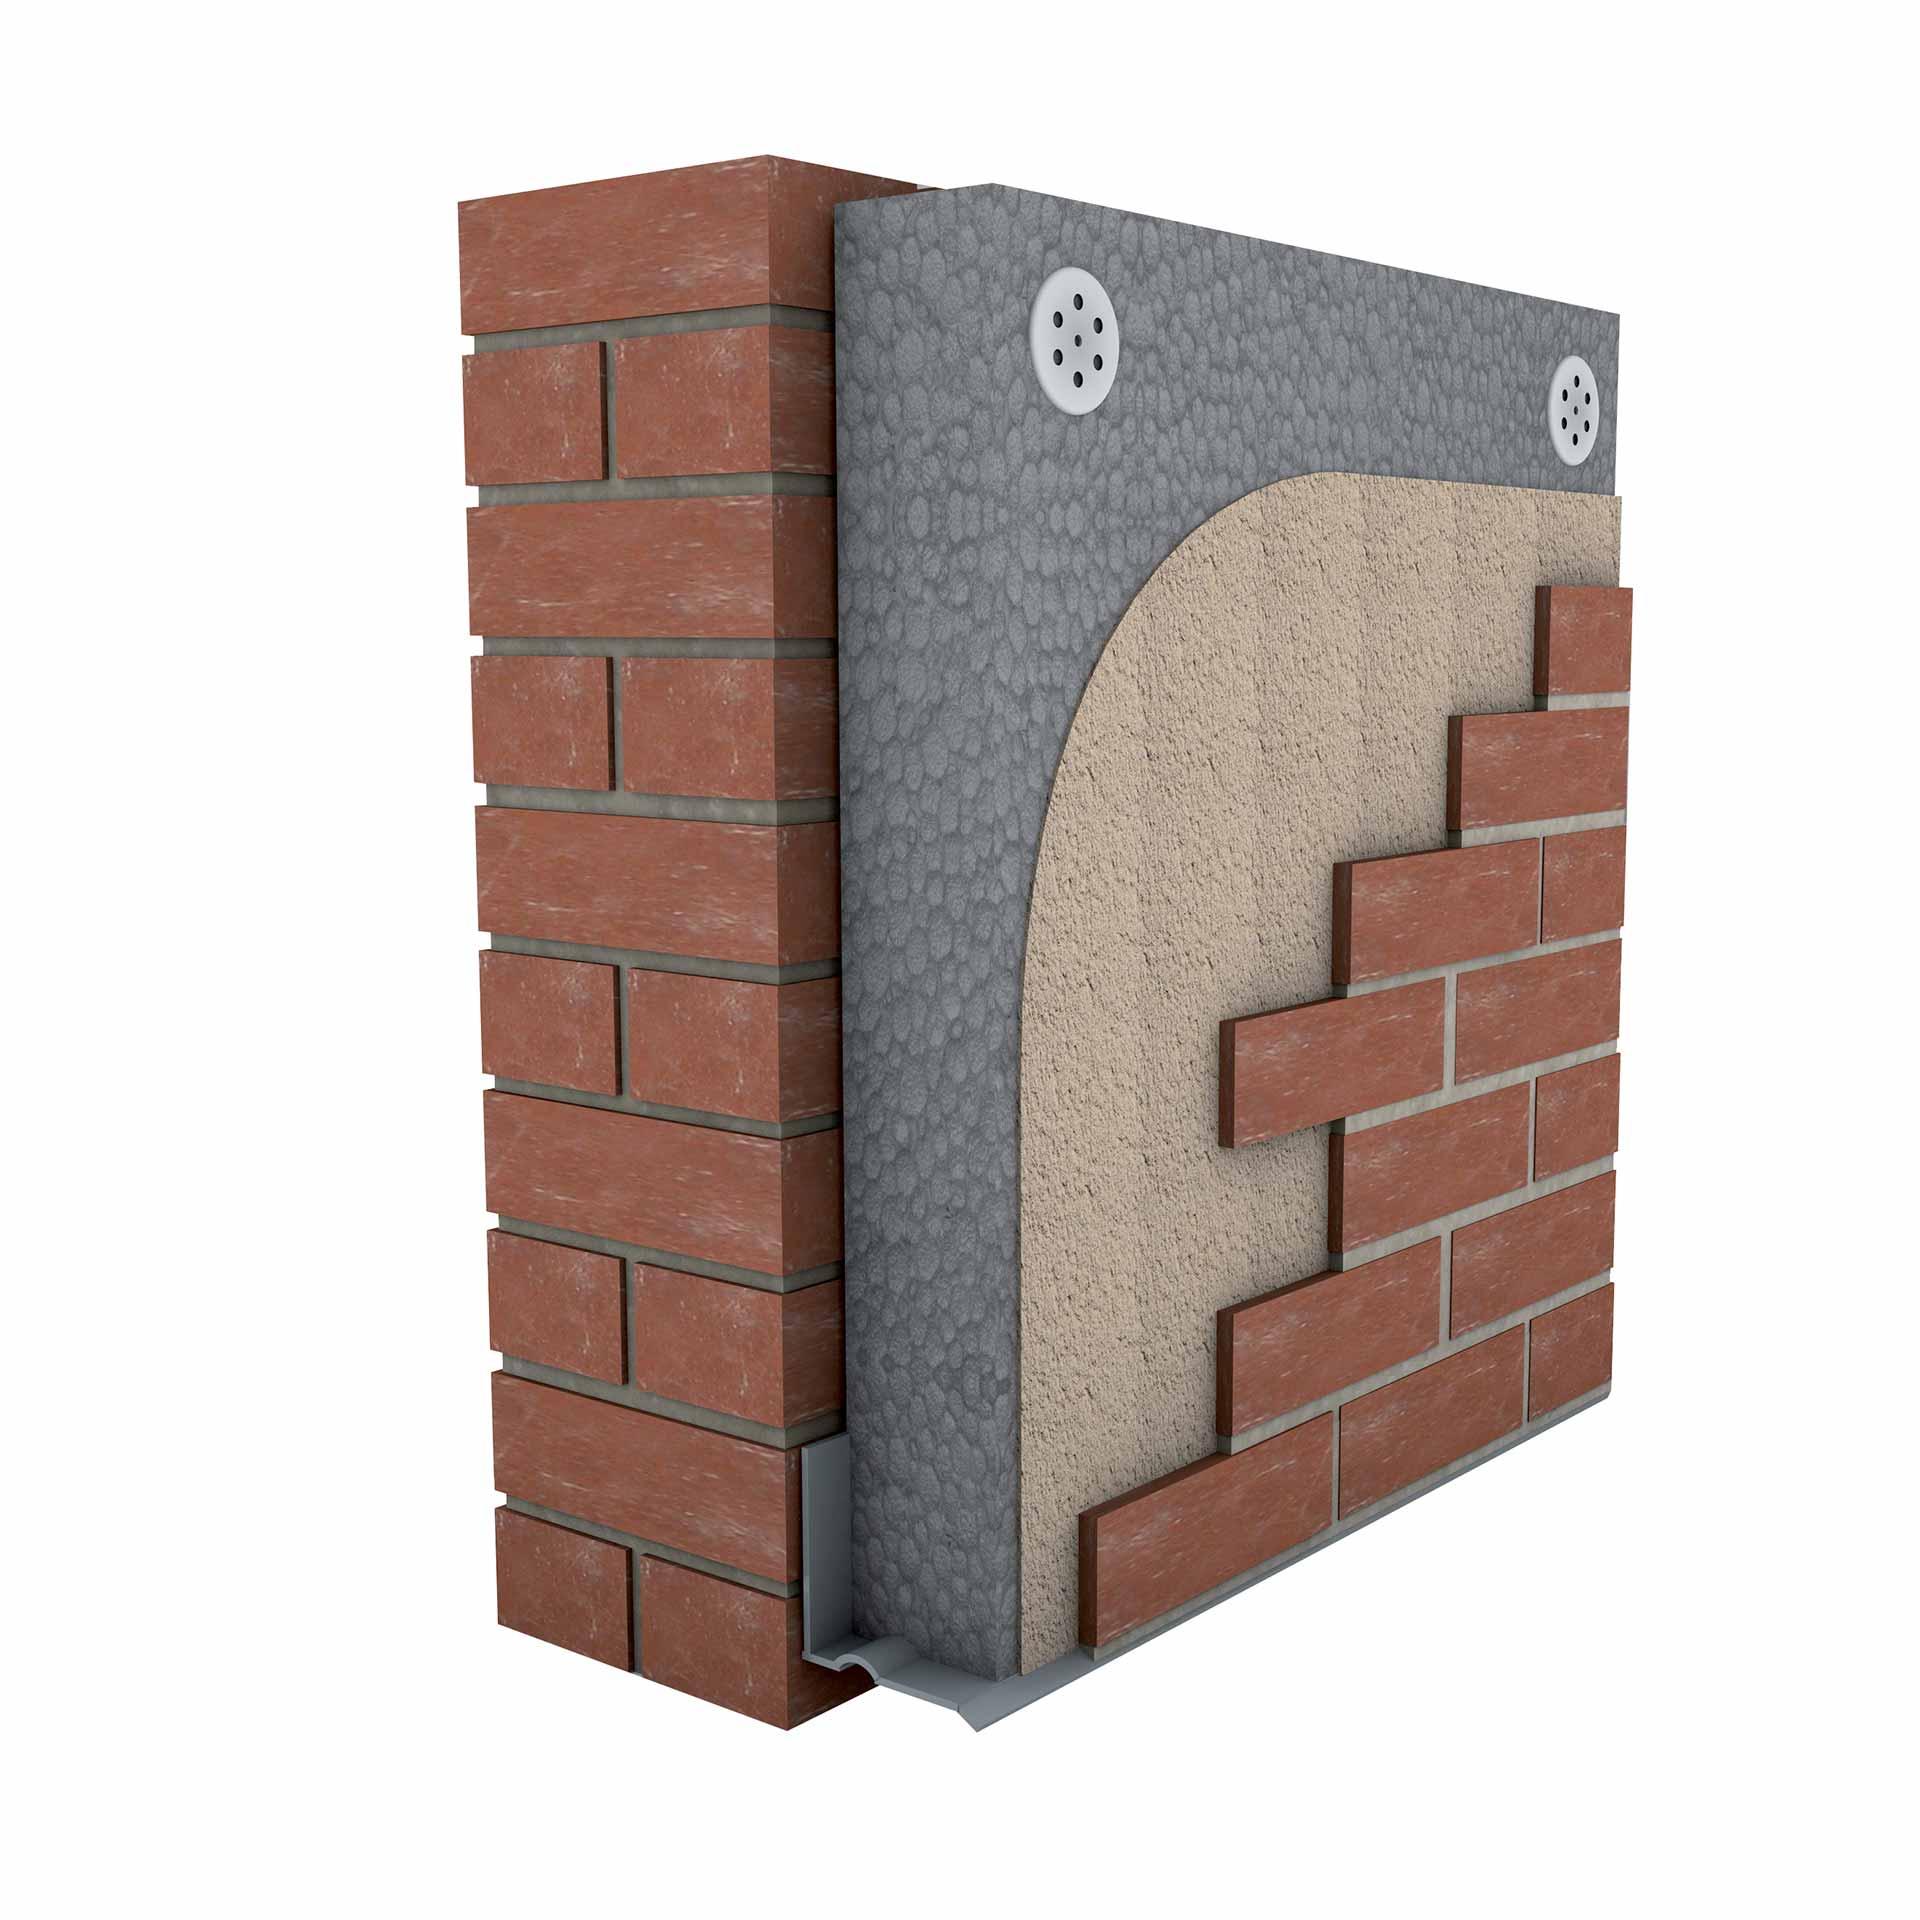
No big deal. This is a pic of the weber installation, others are available.
-
How to reduce thermal bridge / draughts with RSJ beam
Iceverge replied to WWilts's topic in Heat Insulation
Externally insulate this wall
-
Airtight/VCL ideas for cantilever posijoist roof
Iceverge replied to Adam2's topic in Heat Insulation
It doesn't look like it's beyond the point of changing your mind from the photos. Is there something else prohibiting it not in the pictures? I'm sorry but I don't understand what you mean here. Would you care to share a drawing of your PIR plan please? I can't figure out where you intend to put the earthwool. -
Airtight/VCL ideas for cantilever posijoist roof
Iceverge replied to Adam2's topic in Heat Insulation
You have your work cut out there. I would use the 18mm ply as my airtight layer. Tape all joints as it's installed. The tricky detail is joining it to the wall continuously and insulating between those joists. You can painstaking cut PIR and fit it between the joists with minimal gaps. Then use a closed cell spray foam inside to join the underside of the ply to the cut PIR infills to the wall. It should provide a continuous air barrier and insulating. It is expensive though. To present a different option entirely. I suspect cheaper too. Revise your buildup to. Waterproof Membrane. OSB Fitting strips to create ventilation gap. Breather membrane taped at joints. Wrapped around the cantilever and returned to the wall externally.(for windtightness) OSB. 225mm POSI joists filled with blown in cellulose or batt insulation. Airtightness membrane returned to interior wall. 45mm service cavity with batt insulation. Plasterboard.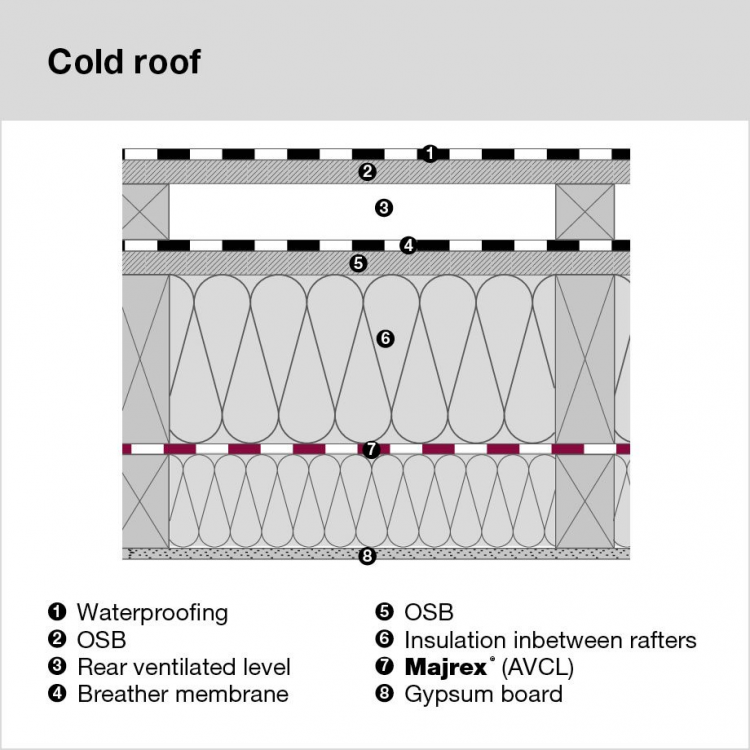
-
My neighbours are stupid AND completely mad
Iceverge replied to Adsibob's topic in Party Wall & Property Legal Issues
Unfortunately I suspect that unless you call them out on their nonsense that this will continue. Politely but firmly get your point across the next time they whine. Eyeball to eyeball these people back down more often than not. If they had any real power or influence you wouldn't have gotten planning. Otherwise enjoy your new house and your pleasant neighbour. -
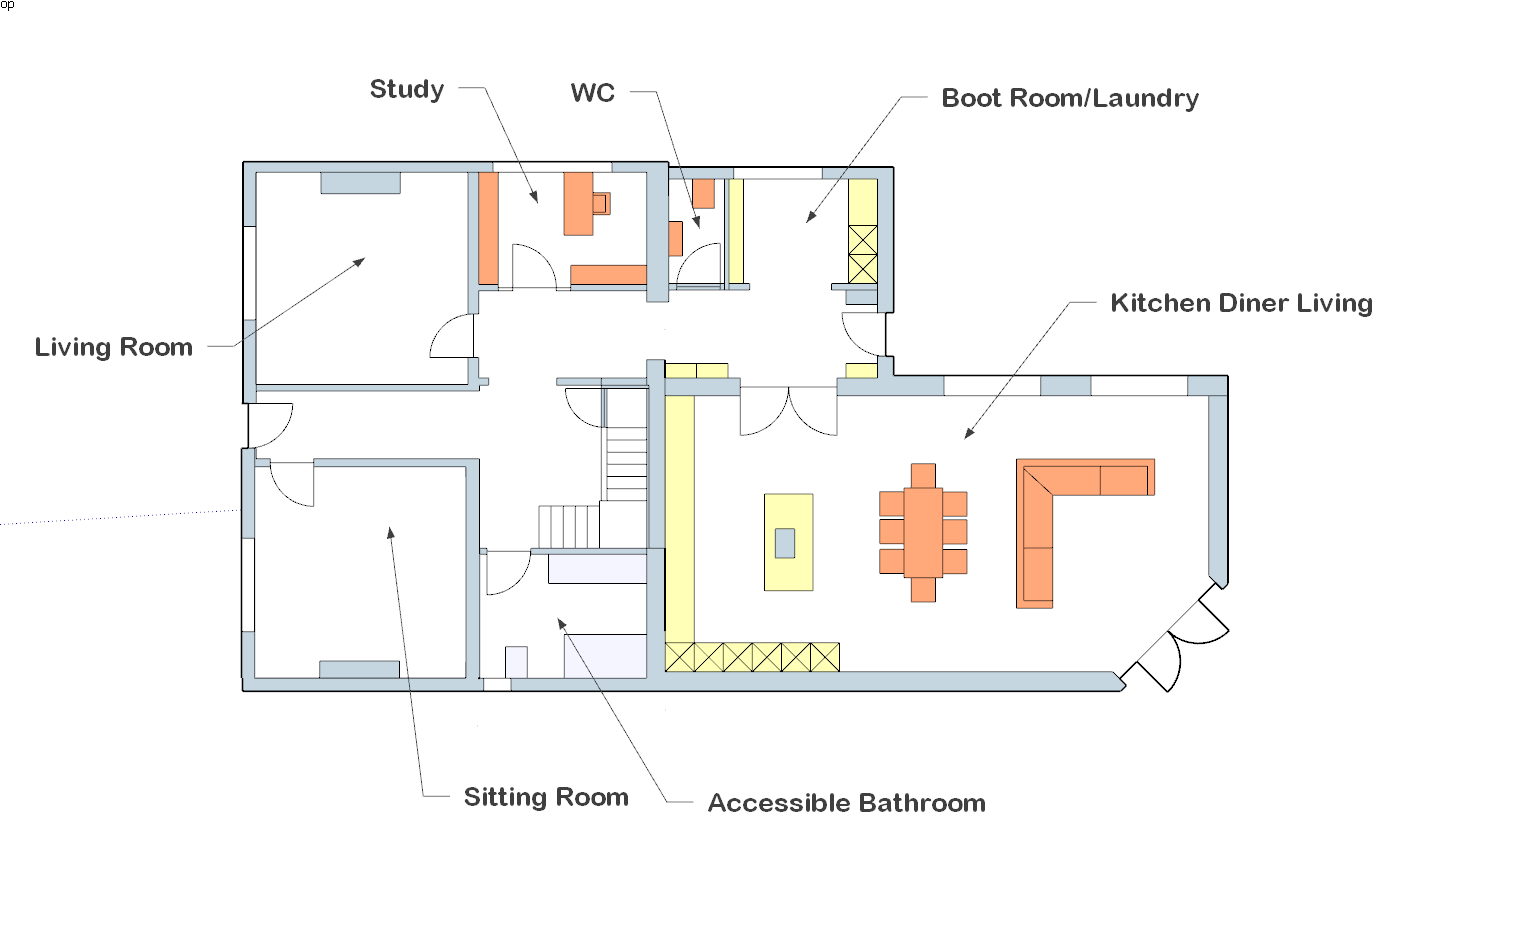
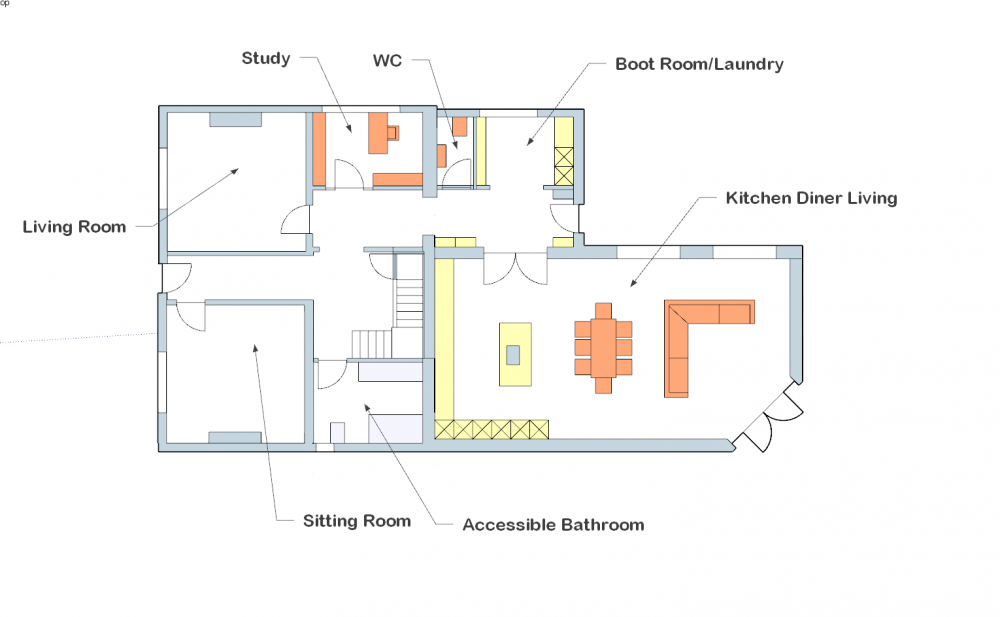
It's taken a few hours so I'm no architect either. See what you think. The door to the study has sidelights and is glazed/frosted to light the hall. as are the double doors to the kitchen. I would provision for an external porch too.
-
If my calculations are correct, even in the middle of December the sun will be shining directly in that Kitchen window, hedge or no hedge. I can see your architects point here with the larger entrance so. I would consider a dedicated hallway to celebrate the welcome to your home. Add an adjoining WC and utility/boot room/laundry. From the hall have access to the kitchen .In fact I would sacrifice a corner of the existing living room and drive a hallway right through between both doors. Front to Back. Possibly look into a new window in the south wall here too. You have a large house. No need to be too economical with the required circulation spaces. Like @ETC says bin the pantry. I would put a bathroom with an accessible shower in the area beside the stairs and take down the store outside to have a window. Your current design has 7 bedrooms and 4.5 bathrooms and not one of them can be used by someone less mobile. You could provision to change the sitting room to a bedroom in future. The old bathroom on the stairs trick was like a bad joke back in the day. Making the one room in the house every needed as inaccessible as possible for the most amount of people!
-
17k for air source, 25-35 for ground source?!?!
Iceverge replied to Danny42's topic in Ground Source Heat Pumps (GSHP)
I think you are jumping in at the wrong end here. The key to keeping a boat afloat is mending the hull, not buying an expensive bilge pump. A house with high heat loss will never be comfortable no matter how large you make the heating system. 1. Ensure that the house is properly ventilated. A damp house is automatically a cold feeling house. Ideally install some kind of continuous running mechanical ventilation. This can be a matter of a few £100. 2. DIY rig a depressurisation fan. Many examples on here. Methodically spends a day with caulk, expanding foam and tape sealing any and every draft you can get near. £100 will go an awful long way here. As you are mechanically minded use the opportunity to adjust the windows correctly. Many of them are never aligned and don't seal properly. Airtightness is the single cheapest and most effective trick in improving a houses comfort and efficiency ( must be done in conjunction with proper ventilation) 3. Live with the house for a while. What kind of heating system do you currently have? Buy a cheap inside and outside temperature logger and keep a track of the runtimes of the heating. This will show exactly your heating load. eg if a 20kw boiler needs to run 45 minutes out of 60 deg to keep a house at 20 deg when it is 5deg outside it is equivalent to a 15kw boiler. Extrapolate to the lowest expected temperature, say -5 deg in this instance your maximum heat load would be 25kw. Much more accurate than any guessing about what you might need. 4. Then you will have an excellent idea of what you need to do and spent very little. I expect you will come to the same conclusion most people do. If you have a very high heat demand and a high temperature heating system already installed you will stick to a gas or oil boiler. If you have a low heat demand and ideally a low temperature heating system (huge rads or UFH) an ASHP may be the best route. 5. One seldom considered option is an air to air heat pump. They can have double the COP of a ASHP and have a modest cost in comparison. -
It's tricky, fascinating and enormously time consuming coming up with house designs. I would be slow to loose too much of the precious southern windows to non living rooms. I imagine your current kitchen is lovely and bright. Don't take it for granted. Is the rear of the house the most commonly used entrance? Do guests normally come this way too?
-
Can you explain how water will track in along a downward sloping plastic duct and won't along a cavity tray? A cavity tray has the potential to prevent proper insulation around the duct (with blown in insulation) leading to condensation. A cavity tray has a much higher chance of catching mortar droppings bridging the cavity completely.
-
Beads or batts or closed cell foam. Rigid insulation has no place in a cavity wall. Blockwork is almost impossible to get to a perfect smooth finish with no mortar droppings.
-
If you install a plastic duct with a downward slope what are the odds of any water making its way to the inner leaf that a cavity tray would solve.
-
Been there got the t-shirt. I did it the most awkward way possible. 215mm inner leaf 250mm cavity 100mm outer. Waited until the wall was insulated with beads. Drilled a center hole and then stitch drilled a 150mm hole. Chiseled out the concrete blocks . Watched a large bucketful of "bonded" EPS beads fall out on the floor. Used a water drum to float seperate them from the concrete and rigged a vacuum cleaner in reverse to inject them into the wall again. Slotted through my 150mm pvc duct. Used a long nozzle of low expansion foam to fill the rest of the gaps in the cavity. Sealed the hole with a sand cement mortar. Cut off the pipe flush outside. Painted the duct to the blockwork 2-3 times with airtight paint both inside and out. Installed a double door magnetic anti backdraft damper in line with the middle of the insulation. All I needed to do was install a good recirculation fan or get the bricky to build in the duct first time round. As for cavity trays made from dpc membrane. A personal hate of mine. If I had my way again I would use a 120deg pvc profile built into the outer leaf only over penetrations. If the water reaches the internal leaf you're goosed anyway.
-
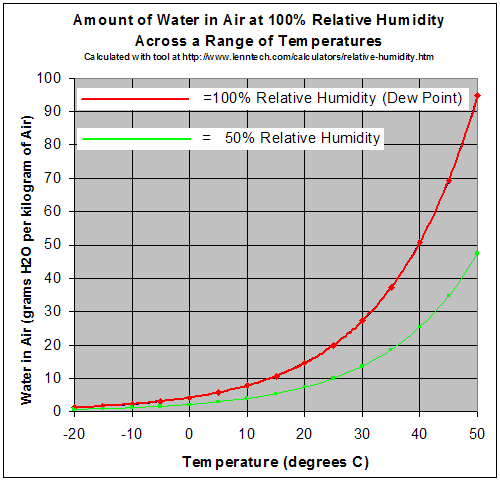
It depends on the temperature. From memory i think the most i saw was about 85% at 14 deg. That was a bit of an experiment though, the house was airtight and i closed all the windows overnight. If i had heated the same air to 20 degrees the relative humidity would probably have dropped to about 60% while the absolute humidity g/m3 water vapour would have stayed the same. When i opened all the windows and let air at 8 deg and 90% RH in the relative humidity dropped to about 65% once that air warmed up to 14 deg.
-
I don’t see how a leaking sink water would end up inside a wall? Best practice in a new build would be to have a floor drain + waterless trap in all wet rooms and under the hot water cylinder to account for this very possible scenario. ( I wish i had done it) If fixed promptly leaks will not do long term damage to TF. If you give them enough time they can ruin any house. Funny kid Btw!
-
Advice Needed - Cold Bridge Behind Full Fill PIR Insulation
Iceverge replied to Johnny Jekyll's topic in Heat Insulation
what a pity. you really have my sympathy. @ETC is unfortunately right about this, can you elaborate on why it is not an option? It can be psychologically extremely difficult to undo work to put it right but it’s the proper, and often the cheapest thing to do. Cold bridging is probably the wrong term here. “Thermal looping“ is a better one, A quick google turned this up. There are other sources of info. https://www.kore-system.com/blog_list/cavity-wall-insulation-the-devastating-effects-of-thermal-looping/ Simply put what has been done will probably half or worse the performance of your wall. My neighbour used Technitherm poured closed cell foam in conjunction with 100mm PIR in a 150mm cavity. It was successful as far as i know. However your remaining cavity sounds too thin for this to be an option. Other ideas that come to mind. 1. Can you drill holes in the mortar joints externally and push the boards tight to the inner leaf? Use closed cell spray foam then to pin them in place and hope it spreads enough to do the job? Walltite are one supplier. I think this is your best option. 2 . Remove all the boards via the top of the cavity and window and door jambs and use beads? 3. With extreme diligence air seal the cavity wall both externally and internally to prevent external air from entering the cavity. Difficult to do properly and not a 100% solution. -
IMO bad timber frame is the worst and good timber frame is the best. Block spans the mediocrity in the middle but rarely gets to the extremes. If you’re expecting leaks you will have serious issues whatever method you choose.
-
Glad to hear it. Passivhaus + renewables is the finishing line for construction. Build out of materials that were once plants and you've decarbonised an entire industry. Green building store are an excellent source of knowledge. I based many of the details of our house on Denby Dale. However remember it's a holistic concept. Taking one corner of your house to PH levels and leaving the other corner uninsulated isn't a recipie for success. If you have the time and interest get a copy of PHPP. It is a great costing tool if noting else as you can quicker see what difference extra insulation makes. Don't write off your old house. GBS did a retrofit in the Pennines. Well worth a read. https://passivehouseplus.ie/magazine/upgrade/radical-retrofit-transforms-pennines-historic-barn
-
Overall not a bad job. Couple of things I’d like to see. You have 3 en-suite bedrooms but no wheelchair accessible shower. Maybe put one on the ground floor and move a living room upstairs. We’ll all be old soon enough. I would mimic the glazing arrangement in the kitchen with the one in the master bedroom. Otherwise it will be difficult to heat. I’m in the bifolds are rubbish brigade. French doors or sliders or tilt and slide every time. I’d give a thought to large areas of westerly glazing causing overheating in summer too. you may need to provision for external blinds. Have you considered the thermal performance of the house? If you haven’t had a comprehensive look at this you could end up with an expensive energy bill or a drafty cold existence.
-
Siemens is no longer owned by Siemens
Iceverge replied to Adsibob's topic in Kitchen & Household Appliances
They are simple to clean however. My ideal would be a dial control on the wall behind the hob. Well out of harms way for cooking messes and out of reach of little hands whilst still being usable by oven gloved chefs. -
Steico Flex wood fibre in short supply - what's the alternative
Iceverge replied to Adsibob's topic in Heat Insulation
inlet/intake + exhaust are the cold side of the MVHR and duct to outside. the supply and extract are the warm side and duct to the house. -
The relative humidity (RH) of air changes drastically with temperature. If you bring "damp" air into a house with RH 80% at 10deg and heat it up to 20deg the RH drops to less than 50%. Likewise if you take "dry" interior air and cool it down you'll have very high relative humidity. It's very unlikely the total water content per m3 in the outdoor air is ever above the indoor water content per m3. ( Unless you are in the tropics) . Simply put, when outdoor air is heated to indoor temperatures, it is always dryer than indoor air. First sort any bulk water issues like leaks, blocked gutters, cracks in exterior render, external soil higher than the interior floors etc. Assuming you've done this you need to draw as much external air through the house as possible, heat it up to let it absorb moisture and then send it out again. There are many ways to achieve this. On our old rental cottage we used to leave the kitchen extractor running all day when we were out, light a stove every night and run a dehumidifier 24/7. We were careful to let the bathroom window wide open any time there was steam in the air. Same with the kitchen. Only closing it when any condensation had disappeared from the mirror. As to installing more stoves I probably wouldn't. Running one hard and leaving internal doors open will work better. Consider installing a constant extract fan to suck air from the dampest corner of the house constantly. Through the wall stove ducts, in my opinion, are only for houses with exceptional airtightness levels in conjunction with stoves manafactured to extremely tight tolerances.
-
Steico Flex wood fibre in short supply - what's the alternative
Iceverge replied to Adsibob's topic in Heat Insulation
No need as the air inside will be almost the same as room temp. You must insulate the inlet and exhaust from outside however. These will contain air at outside air temp. -
Siemens is no longer owned by Siemens
Iceverge replied to Adsibob's topic in Kitchen & Household Appliances
Cheapest Bosch for us too. Cooks well. The touch controls are a bit fiddly but I don't think this is a manufacturer specific issue. -
Perfect worktop doesn't exist - but how about optimal?
Iceverge replied to puntloos's topic in Kitchen Units & Worktops
For most people a good quality laminate is fine. Just be careful with pans.