Iceverge
-
Posts
4462 -
Joined
-
Last visited
-
Days Won
32
Everything posted by Iceverge
-

Internal stud at 600cc when the roof trusses are 400cc
Iceverge replied to saveasteading's topic in General Joinery
How come? I would be more anti PIR in a historic building. It's lack of breathability would be a worry. -
Wall Cladding Build-up Query - Flat Roof Detail
Iceverge replied to jamesmonk83's topic in Flat Roofs
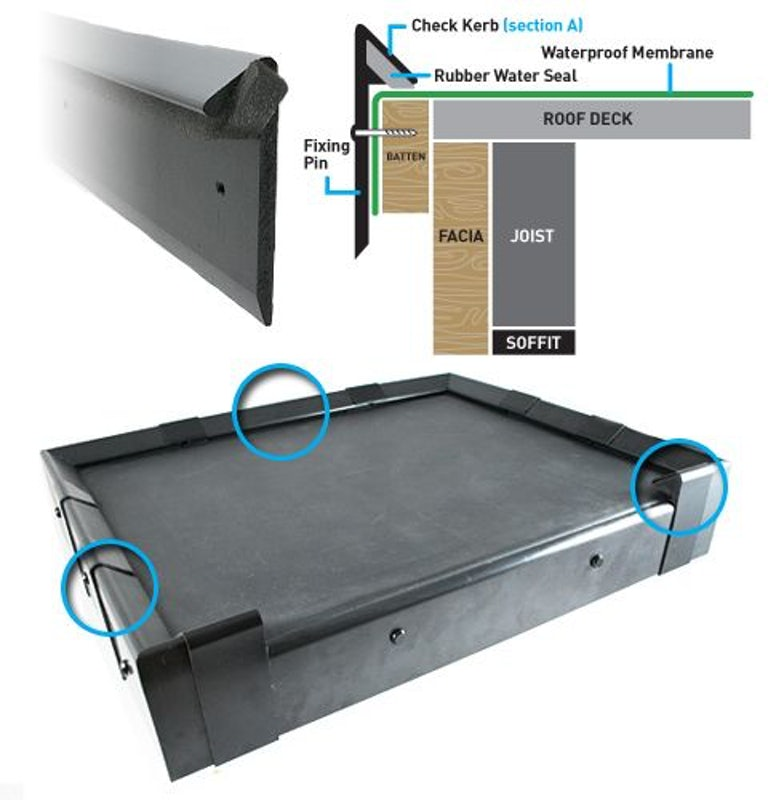
I would prefer to see the EDPM run continuously over the eave like here. That way water will have a lot of trouble making its way into you wall and roof.
-
Not great. MVHR is a good for ventilation, not much else. Shades only work on southern elevations really due to the low sun angle east/west.
-
Wall Cladding Build-up Query - Flat Roof Detail
Iceverge replied to jamesmonk83's topic in Flat Roofs
I'd be keen to run the Edpm roof out over the walls. -
Looks good. Any plans to share? Have you thought about provisioning for overheating, lots of westerly glazing. Maybe Aircon or external blinds.
-
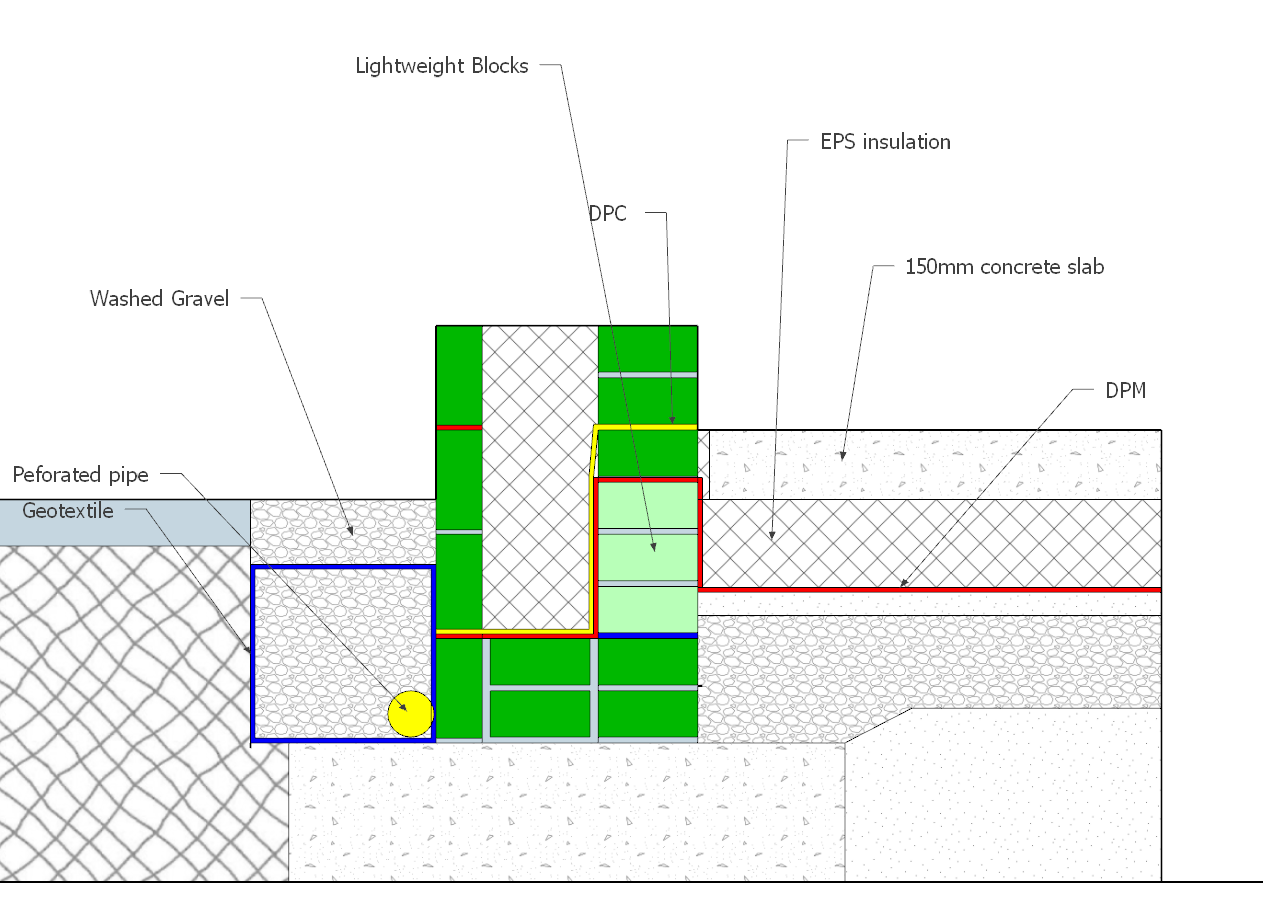
I'd have at least one course of full fill cavity at the bottom. It'll give the masons a good chance to get the first cavity row spot on. Foundations can be too rough to start from IMO. How are you going to deal with the DPC ( red vertical line ) at thresholds? How are you going to pour your floor level without any walls to screed from? I've included a link from the thread in which I discussed this 2 years ago. Below is what actually got built. There was a couple of issues. The block layer didn't look at my drawings and put the first row of lightweight aerated concrete blocks onto the "deadwork". I wanted them kept up a course to keep them out of any damp as they wick water like crazy and become ineffective. The DPM below the EPS created a complete swimming pool before laying the insulation and pouring the concrete. I'm dubious as to how well it was dried out before they poured it as it was all finished while I was away at work. The finish on the concrete wasn't great, I suspect because it was laid in the pouring rain. We had a single layer of 200mm EPS. I imagine the concrete juice went between the boards also. 2 x 100mm layers staggered with the DPC over would have been better. The blocklayer (who was excellent at laying blocks BTW) added a second DPC (yellow). I assume because of convention of having a DPC above ground level on the internal leaf. I didn't want this. I couldn't figure out how water would make its way across the 250mm cavity and up the wall. The only way I could imagine this happening was if flooding came within 100mm of the floor level. We'd all be done for then as we're on an elevated plinth 100m above sea level. 1.This extra Yellow DPC created a slip plane for the wall at a critical airtightness junction. 2.It trapped water for months and months between the yellow and red DPC's. I'm dead set against 2 layers of impermeable material in a structure build up. Water will get in but it can't then dry out. If it can't dry it's gonna die! 3.It got torn to shreds at the thresholds (6m out of 44m perimeter) from foot traffic. So bad I actually cut it out and threw it away. 4.There was so much damp between the 2 DPC's I began to wonder if it was creating a capability route for water to come up from the bottom of the cavity. Exactly what we wanted to avoid. One robust solution I've seen is to have a paint on DPC on the inner leaf. A consideration I didn't think about at the time is cavity ties below the DPC. You should clear this with your SE. Here's a thread about this from 2 years ago before we started.

-
A primer is the correct choice. Tapes need a dry and very importantly dust free surface to stick to. Masonry is rarely this without a primer.
-
On the side you can get to you could slot 25mm X 200 wide PIR above the membrane and between the slating battens. Then run a strip of membrane down over them. Otherwise parge coat taped to your airtightness layer inside and internally insulate with insulated plasterboard like @PeterW says. By the way full fill rafters with mineral wool would give the same u value. And be much easier and cheaper to do.
-
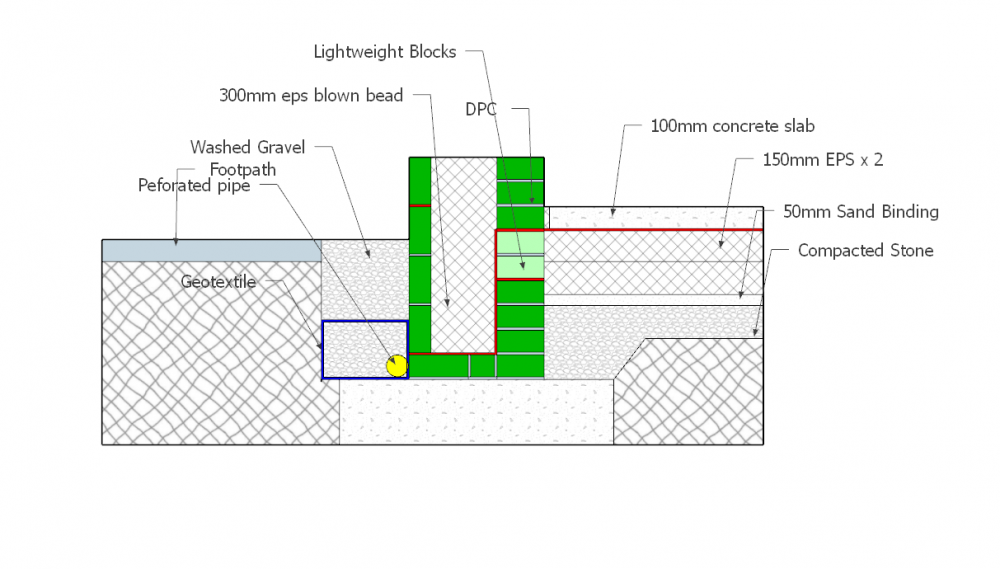
Personal preference. So the concrete doesn't seep into the insulation when it's poured and so the EPS isn't sitting in a swimming pool of water before the concrete is poured. I don't like the idea of 2 layers of impermeable material anywhere in a building as water can't escape from between. The EPS won't be wet underneath if you take care to ensure the water table never gets above its base. No, the main purpose here is to ensure water from outside doesn't get in. The blocks are somewhat porus anyway and any moisture will drain away through them over time. I did drill some larger holes to allow rain water escape during construction. I put many iterations through Therm to see what performed best. I did try a third block below but the gain was tiny. Ideally they would be directly in line with the insulation but in the real world blocks only come in certain sizes. It's vital the aerated concrete blocks are kept dry. Hence keeping them away from the bottom of the cavity. The one below is a strip of membrane and the one above is an extension of the whole DMP barrier extending over and down the cavity. The 100mm block above it is to give a level surface to screed the floor from. You don't want to screed on top of a DPC as it'll tear. Mislabeled This is not the detail we built but rather an improved one I would have preferred. Our actual foundation is stepped twice so various levels of fully filled wall were raised to give a level platform to work from. It's called deadwork in Ireland. Not sure about the UK. Also begining a cavity wall directly from the foundations will be difficult as it'll be too uneven and rough. I will direct you towards our as built design if I can find it. 100mm to save concrete. A production builder near us uses this with reinforcing fibers and no mesh. We used 150mm with mesh. Total overkill in my opinion but our builder wanted it and didn't charge extra so hey ho. One thing that is vital with no subfloor is to compact the substrate thoroughly. Otherwise it may sink and you will get cracked tiles etc.
-
The EPS beads are easier to install tight to the wall and cheaper. Like @cwr says mortar droppings are your enemy. I would prefer to have them at the bottom of the cavity rather than sitting on top of my XPS insulation. Golcar used mineral wool batts to avoid this but this also requires conscientious blocklayers to make sure batts are installed in the proper way. I did spend 2 days with a homemade brush and long shovel cleaning all the cavity ties and collecting all the mortar droppings. I had very skinned knuckles by the end. It may not be an option in a narrower cavity. Below would be my preferred arrangement should I do it again and I would insist the block layers used boards to catch any droppings.
-
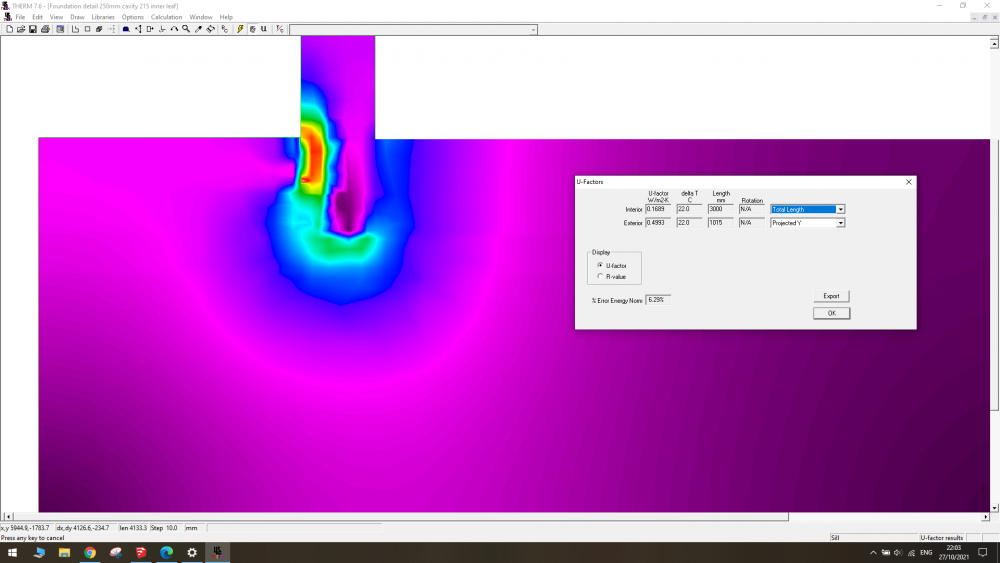
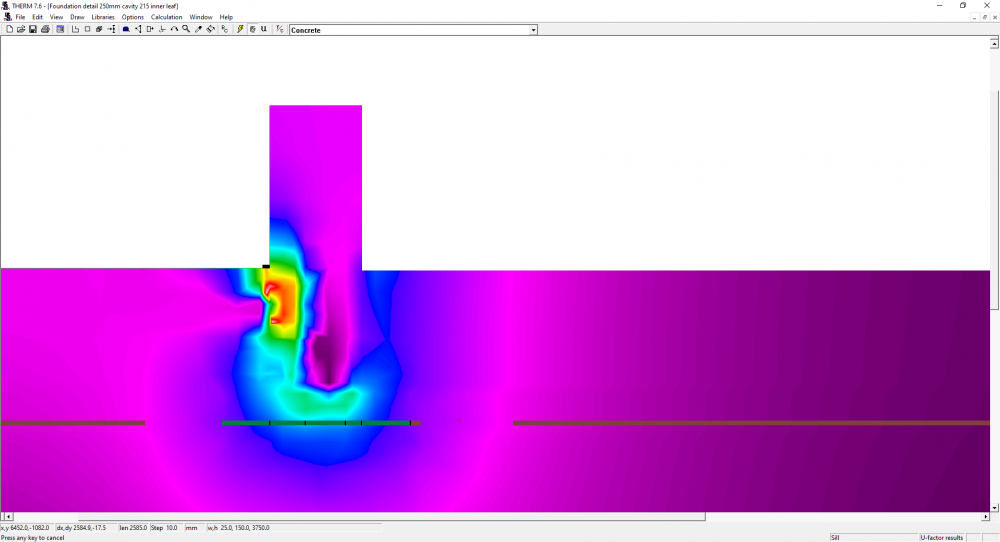
Our Foundation With perimeter insulation internal U value 0.1689 And without the PIR 25mm upstand. It's a small improvement but worth it I think.
-
Ditch the XPS and just put EPS beads right down to the foundation. French drain outside. We didn't have any cavity tray either. If you can't have any French drain I would consider a perforated pipe at the base of the cavity draining out and down to a soakaway. I would add perimeter insulation to the slab too.
-
@Adsibob What are you taping the windows to? Brick?
-
Internal stud at 600cc when the roof trusses are 400cc
Iceverge replied to saveasteading's topic in General Joinery
What U value do you need? How deep are your rafters? -
We have a 250mm cavity. 215/250/100 downstairs and 100/250/100 block cavity block upstairs. Structural engineer will have the final say on this.
-
Internal stud at 600cc when the roof trusses are 400cc
Iceverge replied to saveasteading's topic in General Joinery
Batt insulation, sprayfoam or blown up in. Followed by a membrane and insulated service cavity Life is too short. -
I think any plastic insulation will be just fine so long as it's not sitting in a pool of water. That sill looks A1 so long as it won't break from someone standing on it.
-
I'd be tempted to put an aluminium sill dripping into an channel drain to deal with this with insulation behind.
-
@Hanksy What thermal camera are you using. I am planning on asking Santa!
-
I did an experiment with PIR and Graphite EPS 70 by weighing them and submerging them both is water for a month. Towel drying them both and weighting them. I can't find the details now but the EPS had absorbed some water and the PIR almost nothing. I think this comes from the EPS being more porous . However this is an extreme case as if your insulation should never be saturated for long periods of time. I would always look at EPS first as it's the cheapest and "dumbest" material. However in this case I would consider PIR as you have very little thickness to play with to prevent quite a bad cold bridge. More important is how you'll deal with rain and possible pooling of water by the window. What level do you hope to put the paving slabs?
-
It was a suggestion but I imagine OP will want an outside ground level higher than the void.
-
Internal stud at 600cc when the roof trusses are 400cc
Iceverge replied to saveasteading's topic in General Joinery
What a lovely project. It's nice to see old buildings being looked after. I would probably stick at 400mm centers as it is much easier to fix. Just set your sole plate. Cut your verticals roughly to length. Tie a string in the right place, nail the top horizontally to the rafter, get a mate with a level to toe nail the bottom. Job done. To save cost, drop from 140*45 studs to 88*38 CLS. Doing anything too clever with 600mm centres will probably only increase labour I suspect. I have potentially a similar project somewhere in my distant future. I would like to set my stud wall at least 50mm back from the outside stone wall, put a an airtight layer inboard of the studs and blow eps beads between the studs and between the studs the wall. Then counterbatten 45*45 with 50mm batt insulation and plasterboard. Can anyone see any issue with this? -
I was suggesting installing the periscope vent through the wall below the level of the block and beam floor. Letting the riser come up the outside to be above ground level. It would need to be backfilled carefully to avoid damaging the riser.
-
Why is my house so cold?!
Iceverge replied to Cognis0's topic in Energy Efficient & Sustainable Design Concepts
Groan, I should have though you had quite enough holes in the house as is. "Thermal Mass" is promoted by the concrete industry. Can't think why ? https://www.irishconcrete.ie/concretes-multiple-benefits/thermal-mass/ -
Americans. https://www.jlconline.com/how-to/foundations/a-frost-protected-shallow-foundation_o Your builder needs to do more reading, it'll make him happier. EPS can be used in lieu of ballast in supporting railway lines.