Iceverge
-
Posts
4383 -
Joined
-
Last visited
-
Days Won
31
Everything posted by Iceverge
-

Alternatives to PIR for internal timber frame?
Iceverge replied to idontknowwhatiamdoing's topic in Heat Insulation
I wouldn't bend over backwards with thermal conductivity values. The actual quality of install is more important. To get PIR exactly correct is very tricky. It's only performs to its stated K value under lab conditions. Also it's very expensive compared to mineral wool and EPS. I would get the the existing mineral wool vacuumed out of the walls. Then blow in EPS beads. Put an airtight membrane inside your framing, seal it to all windows and the floor and ceiling. Blow EPS beads behind. Insulate the service cavity with mineral wool. Then plasterboard. Over all U value of about 0.25 at a guess. It would lightly perform much closer to this rather that PIR between studs. -
Our waste pipes were not finally installed by the time we did our test so I just taped up what ones there were.
-
It's tricky to say how the design will work without knowing your site. Looking at the window layout it hasn't been really designed with a modern take on thermal comfort. It's likely to overheat if the main windows are east west and you'll have cold rooms to the north of you have lots of glazing in that direction. Scottish company Heb Homes has some nice designs for room in roof buildings. Maybe they'd be worth a look, even just as inspiration.
-
1930s Bungalow part-reno / loft / extension in Twickenham!
Iceverge replied to -crashd's topic in Introduce Yourself
It's a tricky one. The interior has been renovated but it looks like no thermal upgrades took place. Is the house was £400k and you had £340k to spend I'd say it was an easy decision. Knock and rebuild. However we are where we are as the saying goes. The budget of £140k might be tight to both get what you want and do a really descent thermal upgrade. The importance of this is a bit lost on almost everyone involved in housing as the whole thing seems to be based on the merry-go-round of instagramable interiors, road presence and X more bedrooms to flip it on at a higher price. The truth is that a small comfortable economical to run house will be much more pleasurable to live in than a slightly bigger one that is drafty and impossible to heat and cool. You need to pick your battles. I would get a really sound strategy on insulation airtightness and mechanical ventilation. Then extend the house only with these in mind to what you can afford. Given a free hand I would extend the eaves to allow a 200mm + external insulation layer right down to the foundations. Install a French drain. New 3g windows set in the insulation layer. 300mm+ of attic insulation. Joining the wall insulation. Install mechanical ventilation of some sort. Pump EPS beads into the suspended floor void. (Installers won't be willing to this at their risk) Then for heating I'd use the existing gas boiler or a centrally places A2A heat pump and an ESHP for DHW. The loft conversion might be out of reach at this level of improvement but the extension would tie in nicely. -
1930s Bungalow part-reno / loft / extension in Twickenham!
Iceverge replied to -crashd's topic in Introduce Yourself
welcome welcome. Have you priced a knock and rebuild? It'll be very expensive/difficult to achieve a good standard of insulation and airtightness on a remodel. -
Cost effective way to soundproof cinema room blockwork wall?
Iceverge replied to ashthekid's topic in Sound Insulation
You can get 16mm resilient bars. Can you sound proof the other side of the walls. No reason this wouldn't be effective I can see. -
Timber frame vs ICF vs Traditional masonry for a new build
Iceverge replied to Indy's topic in General Construction Issues
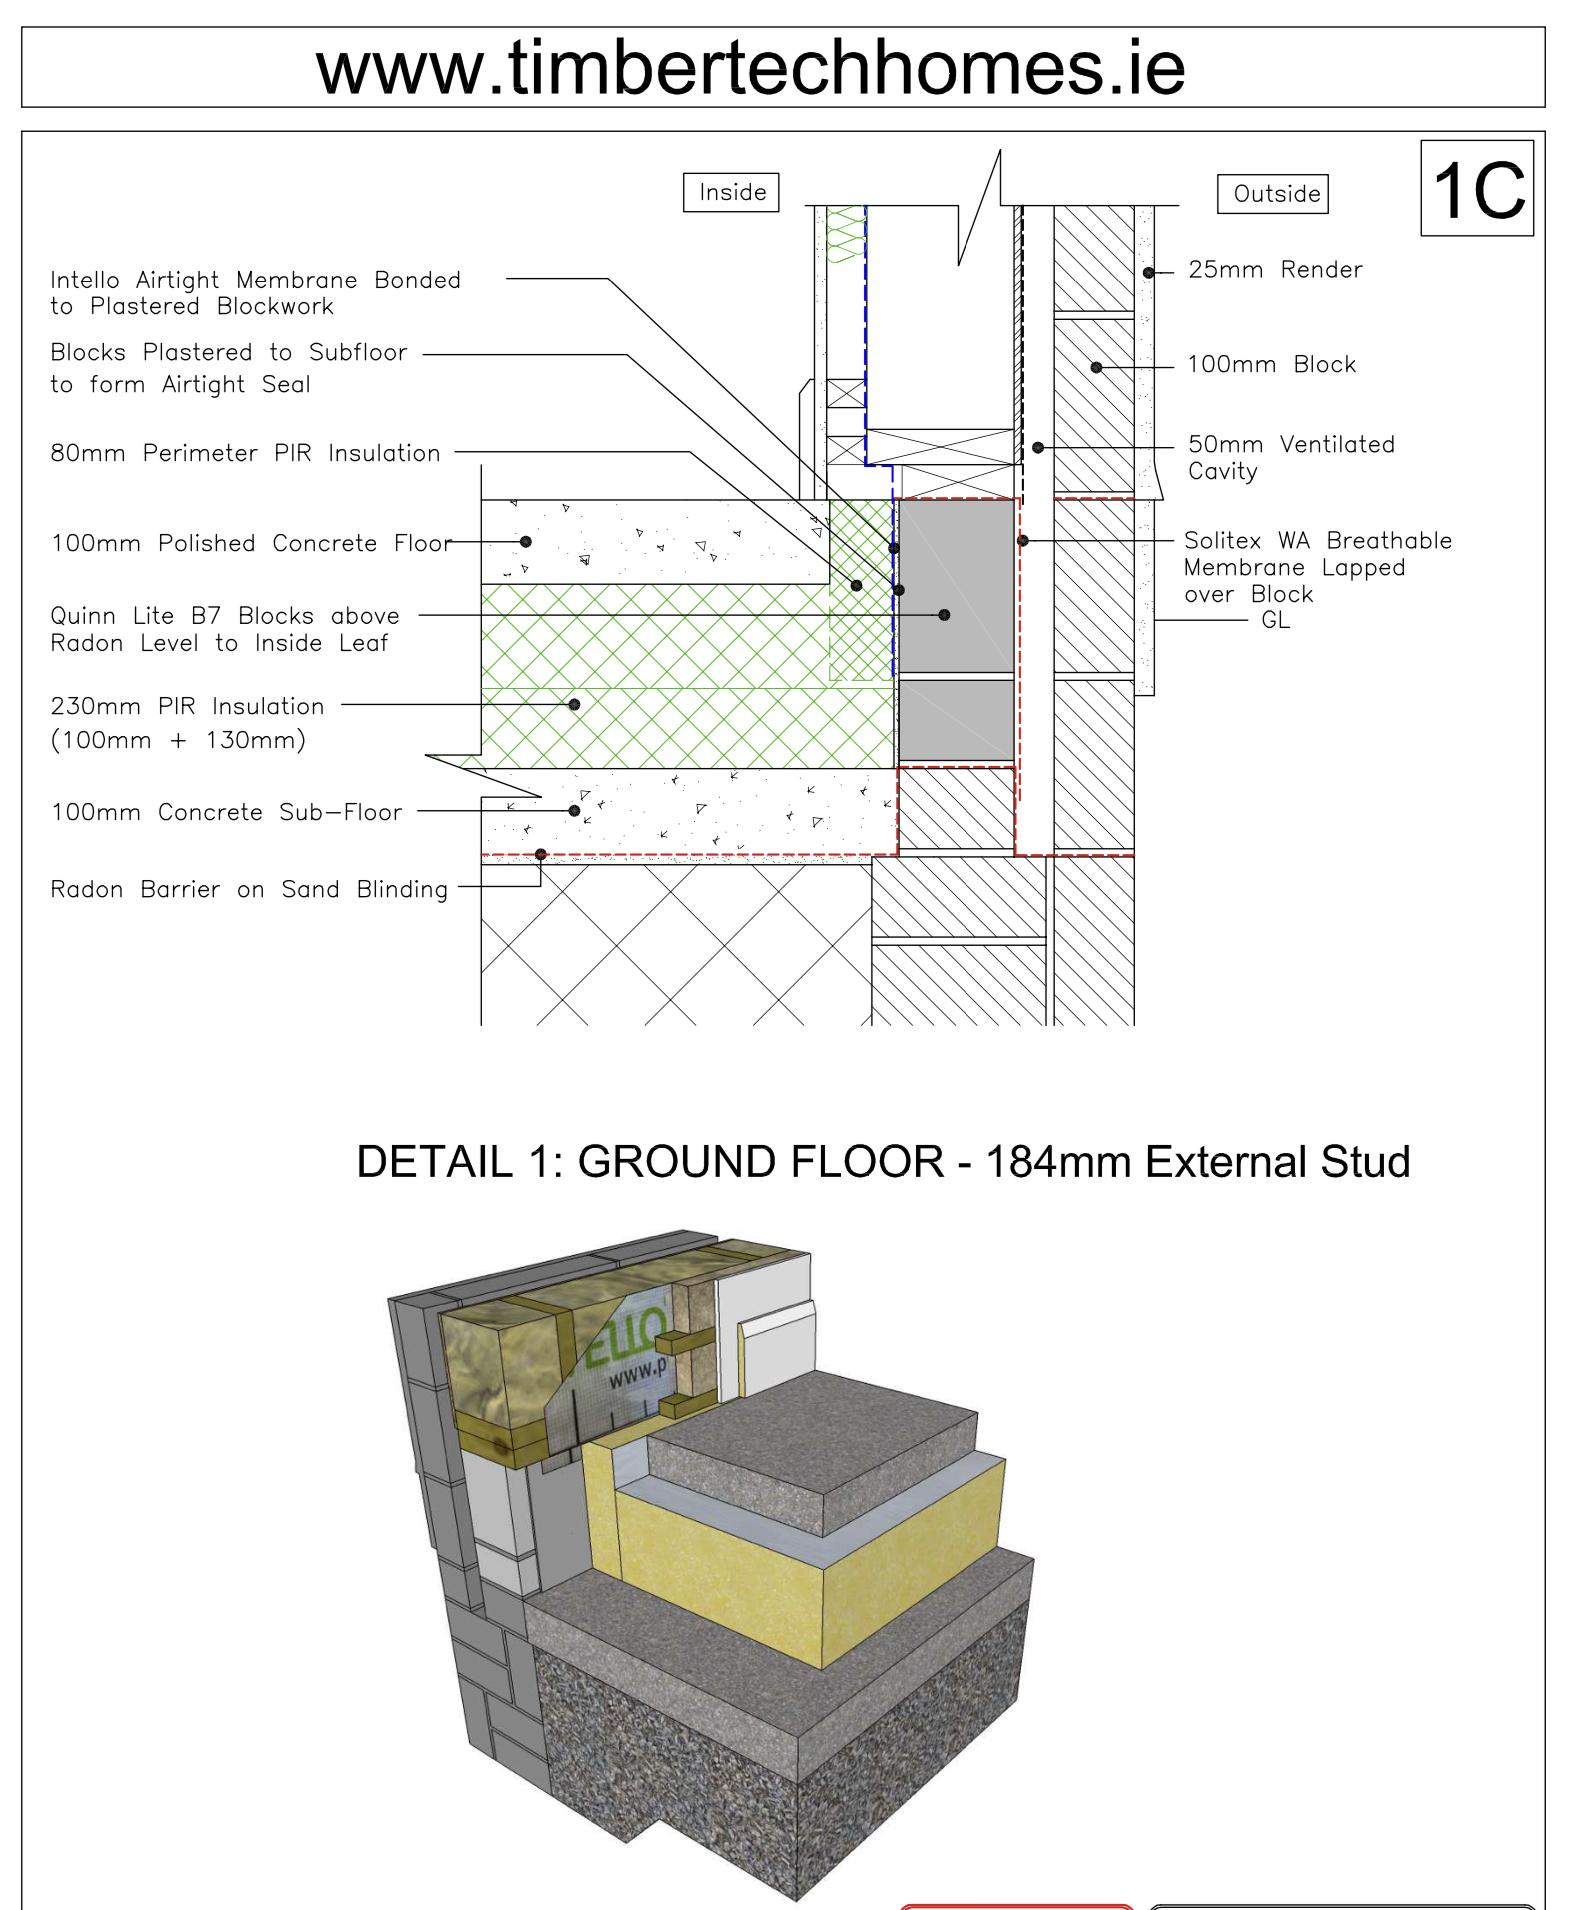
As @Nickfromwalessays it may be a structural requirement. It does make it easy to lay radon barriers/ DPM and makes the builders life easier during the build. In this case assuming the ground is ok it may have been done because of the polished concrete floor. This pour could have been left very late in the build, reducing the chance of damage and being able to tightly control the concrete curing to avoid cracks. Another possible cause is that's it's a hangover from the days of drafty fossil fueled houses that need an intermittent quick response heating system. There's still loads of people employing <100mm screed without giving a thought to this. -
Alternatives to PIR for internal timber frame?
Iceverge replied to idontknowwhatiamdoing's topic in Heat Insulation
Mineral wool. Eps beads. -
Timber frame vs ICF vs Traditional masonry for a new build
Iceverge replied to Indy's topic in General Construction Issues
Here's a nice one.
-
+1 for granny cable with the leaf, we used one for over a year. It wasn't an issue and used to get the 24kWh battery topped up on night rate leccy. For under 120km/day it was fine.
-
If you search for "stick build" there's a good few examples of timber frames made on site. No I-joist ones I can't think of off hand.
-
I used a morter mix and filed the baps between the beam and the wall then airtight painted over. I suspect you'll be fine though.
-
It can be done. Lumos units used in the below example. https://passivehouseplus.ie/magazine/upgrade/18th-century-ruin-becomes-stylish-low-energy-home However will likely be noiser, more expensive, provide poorer heat recovery than a ducted unit.
-
Cost effective way to soundproof cinema room blockwork wall?
Iceverge replied to ashthekid's topic in Sound Insulation
Speaking of doors has anyone installed an acoustic one. They're not mega expensive. I was in a commercial building yesterday and I was impressed by the sound supression of a normal fire door with fire seals. Light years difference from a timber one in our house.
-
Insulation Options For New Room With Vaulted Ceiling
Iceverge replied to Parmageddon's topic in Heat Insulation
Correct. I don't think slabs or rolls make much difference. Yes but should help further isolating the plasterboard and stopping it from acting like a "speaker". Also it will help with rain noise. You need to do everything you can to prevent the inner surface of the house from vibrating. The air gap created by the resilient bars makes sure that any vibrations aren't been taken through the insulation either. Unfortunately looking at the pics I think it's really neither here nor there. You could triple the insulation in this part of the roof but it would pale into insignificance beside the thermal bridge of the lintel as indicated below. PIR and phenolic insulation typically only perform to their stated U-Value under laboratory conditions. In reality their thermal performance will be much closer to mineral wool than producers would have you believe. Most of the noise is probably coming directly through the roof of the porch. It looks like at the moment all you have is 125mm of PIR and a sheet of plastic. Tiles will help but the big difference will be when the plasterboard is applied. I have no reason to suspect the Velux windows won't reach their stated performance in isolation. As ever the key is detailed installation. Any air paths must be sealed and you must have a continuous layer of plasterboard. It should be mounted with a medium that allows isolation of vibrations eg acoustic mastic, rubber strips or resilient bars. A cavity inthe structure can be good to prevent vibrations but should contain a dampening medium like Rockwool to reduce the drum effect. Hope this helps.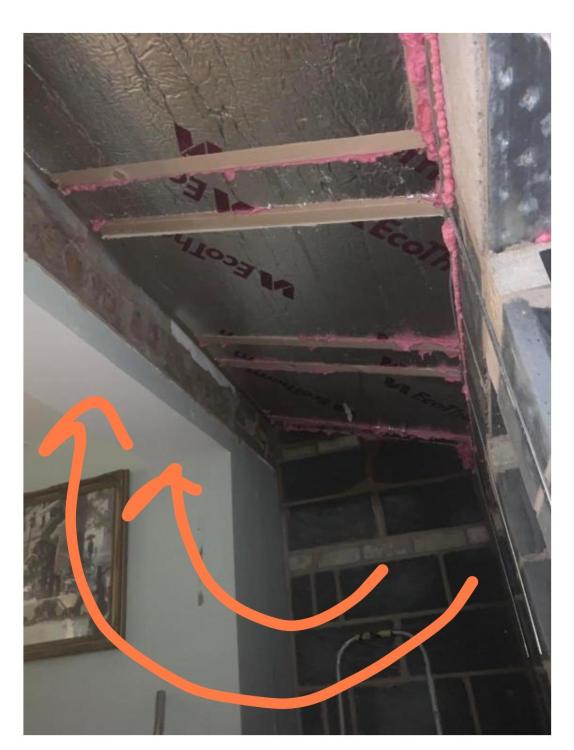
-
Is there a reason i cant build this DPM detail
Iceverge replied to Caversham Build's topic in New House & Self Build Design
Sorry for my abrupt post. Tone is unfortunatly often lost in narrow converstion channels like forums, it certainly wasn't my intention to dissuade you or knock your confidence. I hope you find a good solution. Good luck with your build. -
OSB is about 640kg/m3, similar to plasterboard. Sound block is 850kg/m3. 18mm OSB should significantly help. However it's an expensive improvement unless you have no other use for it. It would be awesome for hanging stuff on. Behind plasterboard mind you. Remember too, sound will take the path of least resistance. Going over the top soundproofing a wall with a door isn't much benefit for example. Also consider floor voids and service cavity voids that run above and below stud walls. As to the PIR. Flog it or add it somewhere else in the build. I have some PIR offcuts buried in the 400mm cellulose in the attic.
-
As I understand it you need to avoid packing it as it might create a bridge for sound to travel through. Maybe it was @nodsaid the thickness of mineral wool doesn't really matter, more that it acts as a sponge and an anti reflector for the sound. obviously more mass is better as it is harder to for sound to "move" but that's not it's primary function. If you could stagger the studs and create a mini twin stud wall it would help. Resilient bars would be good or acoustic strips on the studs. In terms of plasterboard, Kg/m2 is the only meaningful measurement. Soundblock at 12.5mm is probably similar to normal plasterboard at 15mm. It's just up to you what your trade off with cost Vs labour Vs space lost is. I think someone did an excellent table on here. Maybe @Ferdinand. @Nickfromwales mentioned soundblock is better than normal for mounting stuff on. I don't know . I've never used the stuff.
-
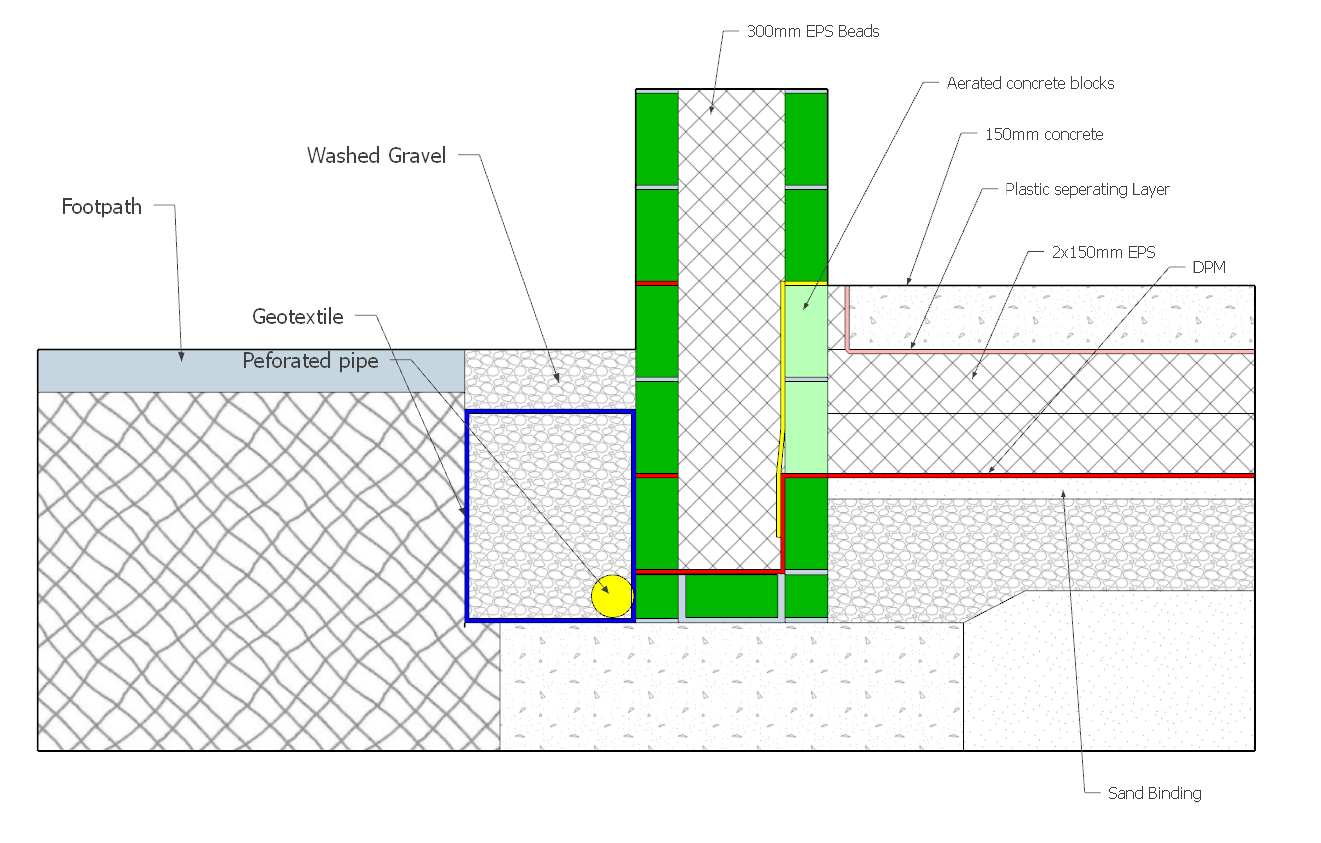
Is there a reason i cant build this DPM detail
Iceverge replied to Caversham Build's topic in New House & Self Build Design
The PIR encompasses the concrete slab. I don't understand why? A 25 mm land drainage pipe would be very narrow, We used 110mm, The pipe was below the lowest level of the DPM. -
Upgrading original crittall windows with vacuum glazing??
Iceverge replied to selfbuildrookie's topic in Windows & Glazing
Crittall windows are gorgeous looking but I fear the performance of the frames would be so poor any upgrade to the glazing would be almost meaningless. -
Insulation Options For New Room With Vaulted Ceiling
Iceverge replied to Parmageddon's topic in Heat Insulation
Hi Parma, Welcome to the forum. I'm not an expert but i'll have a punt anyway. Q1. Yes but don't trap moisture in the timbers. I would probably opt for an airtight membrane joined to your wall airtight layer at the edges, Follow this with a layer of 50mm rockwool between battens, resilent bars and 2 layers of soundblock. The the trouble is all your openings will need to be detailed correctly. Tape the airtight layer to the frame and seal the plasterboard up tight to the frames with acoustic sealent. No gaps. With tiles on the roof it will improve a fair bit I imagine too. Again the windows and skylights are really the weak points. Q2. Don't know. Q3. Not for sound insulation. You need something heavy ( plasterboard) and something to absorb the sound ( rockwool) and something to decouple to reduce structurally transferred noise ( resileint bars) -
Save some cash and dispence with ufh upstairs IMO. Maybe a just couple of small loops in the bathrooms for comfort. Espically if you're well insulated and airtight. Fix to the slab and cover all with a thin screed. Enjoy the extra room height. It sounds like your builder is thinking like 2002 not 2022. The insulation is only for very leaky houses that intermittent heating was the only option.
-
Yup. It would make a minimal difference but rockwool would be better. Your aim with sound transmission is to. 1. Have no direct airbourne path for it to travel. EG sealing the backs of sockets in stud walls, drop down acoustic seals in doors etc. 2. By taking care of this sound is forced to travel directly through a structure. In this process you want the sound waves to loose as much energy as possible. Thus can be done in a couple of ways. Have a very heavy structure like a concrete wall . This is also the main difference with sound block plasterboard vs normal. its weight. Ths sound waves struggle to transmit vibrations through the heavy substance. the decoupling a structure at both sides so the sound is forced to transfer its energy to one plasterboard, then back to the air , then back to the air, then to the plasterboard amd finally the air in the other room. This is why a twin stud wall or a wall with resilient bars will be better than a plain one with plasterboard on both sides, effectively the sound could pass straight through the studs. Finally you can have a layer of absorbent material in the cavity of the wall to deaden the sound further like acousitc foam or rockwool. It will stop the sound bouncing around inside the wall like a drum and make things quiter at the other side. The PIR would be of little use here as it's not very heavy and it has a smooth surface so would just reflect the sound around inside the wall not deaden it. Someone please correct me if I'm mistaken.
-
Stick frame on site in that case, cut out the cost of the timber frame factory. Outside to inside. Brick or cement board. Ventilated Cavity. Breather membrane. T&G woodfiber sheathing board. Cellulose filled structural stud. OSB racking board taped as airtightness. Battened insulated service cavity. 15mm Soundblock plasterboard. Skim. BELLISIMO!!! It's a very robust way of building. No membranes for airtightness to get punctured. Excellent windtightness (Often gets forgotten). Woodfiber deals with bridging. Importantly around windows and doors. It a very tricky junction with block. Fully breathable so very low chance of rot. Negative embodied energy. Minimal wet trades. Service cavity to make follow on trades a doddle. Excellent decrement decay. Able to test and rectify airtightness as you go leading to really top ACH scores. ( almost impossible with block) Pumped insulation guarantees full fill. Permits a really chunky upstand to the floor slab. Performance of passive slab with the cost of a strip foundation. This junction is a really tough one with block. Don't underestimate the time and cost of detailing a block house to passive levels. It took me almost a week to make and fit OSB boxes around the window. Airtightness was probably another week, very sloppy and really a hope for the best affair. Cleaning the cavity ties took 2 days and mega skinned knuckles. Chasing and coring for electrics and ducts was insufferable.
-
Is there a reason i cant build this DPM detail
Iceverge replied to Caversham Build's topic in New House & Self Build Design
Just have it in such a way that the water can go down and out. Relying on DPC only for keeping water out of your floor is foolhardy in my book It will get punctured during the build. . A french drain lower than the bottom of the cavity with a drainage pipe would be best. I would make your brickies life really easy and get rid of the rockwool entirely and use EPS blown beads. Above and below ground. Take the cavity as low down as your SE will allow. It will help with thermal bridging and any water will really struggle to cross the EPS beads. Here's what I think we should have done. To be honest I can't see what the overlapping yellow DPM is achieving in the real world if the french drain is operating correctly but people will get angsty if I don't draw it! EDIT the DPC in the outer leaf low down is a mistake!