Iceverge
-
Posts
4383 -
Joined
-
Last visited
-
Days Won
31
Everything posted by Iceverge
-

Cold bridging at cavity reveals and floor slab detail
Iceverge replied to ruggers's topic in Brick & Block
Yikes its €175!!! I'll ask santa.... -
Cold bridging at cavity reveals and floor slab detail
Iceverge replied to ruggers's topic in Brick & Block
Glad to hear any tips. I'm self taught! Anywhere to read up on it? What I was doing was taking the theoretical U value of the buildup with a perfect interface between the two and then seeing what THERM pushed out for a horizontal cut. I was being lazy here. I have done them separately for all the junctions of our house. Even if my calcs for the exact PSI number were incorrect I've found it very useful for just visually adjusting the junction's to minimise heat loss. -
I had a look but didn't see anything glaringly obvious. It looks pretty good. I'd include a cupboard for towels etc and consider where the towel rail needs to go. When it comes to showers we have 2 x 900 x1400. 800x1200 is more than adequate but I'd make sure that your back was to the long side when showering. More elbow room is much more comfortable. For a more robust waterproofing situation I would use shower trays with upstands. Also I much prefer a sliding door to a fixed pane. Splash away to your hearts content!
-
Steel beam bearing on 100mm blockwork
Iceverge replied to Bemak's topic in RSJs, Lintels & Steelwork
Sounds sensible. It'll probably/maybe be fine.......... however in good conscience leaving it like that isn't ideal. That looks like about a 100mm off cut of a 7N block. Normally I thought steels had spreader plates to make sure the load was well distributed over full blocks, not to mind spindly off cuts. I wouldn't be surprised if your SE recommended taking a steel down to the foundations, if the subfloor isn't reinforced. -
Cold bridging at cavity reveals and floor slab detail
Iceverge replied to ruggers's topic in Brick & Block
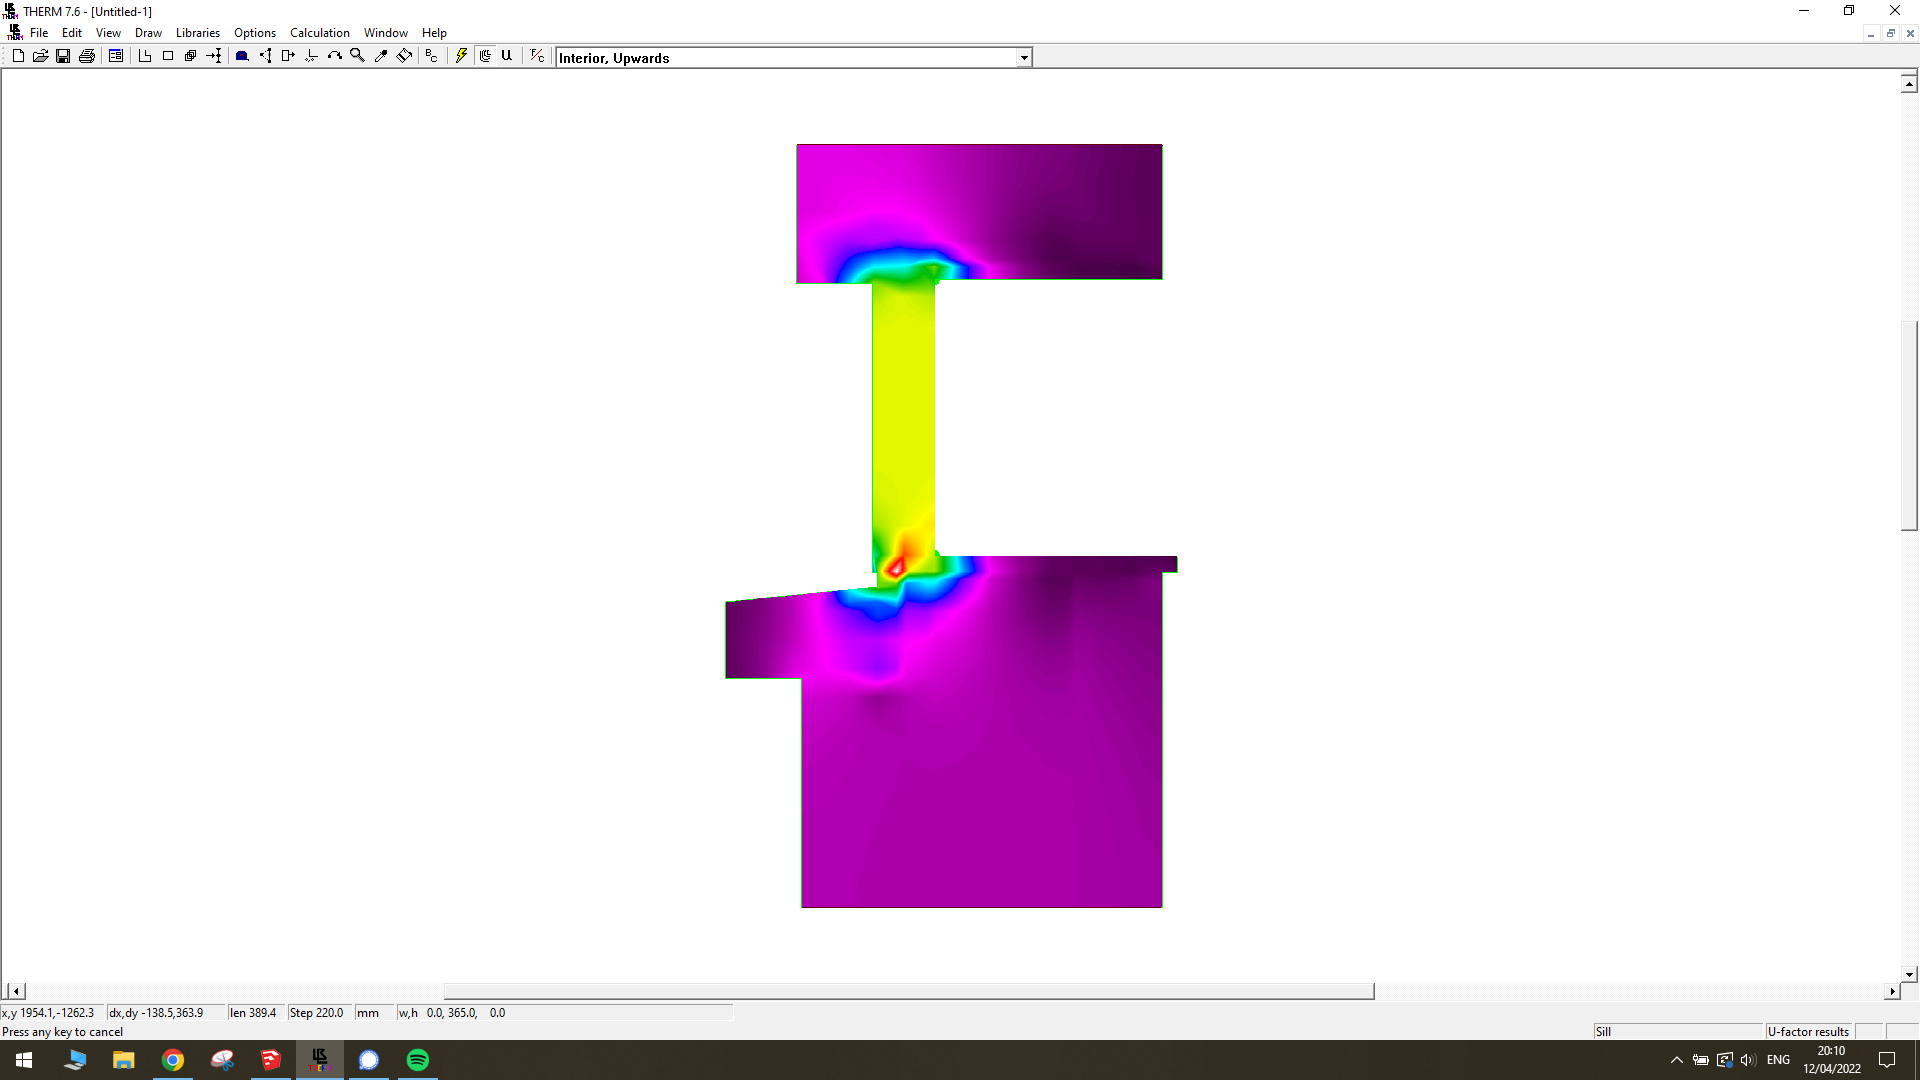
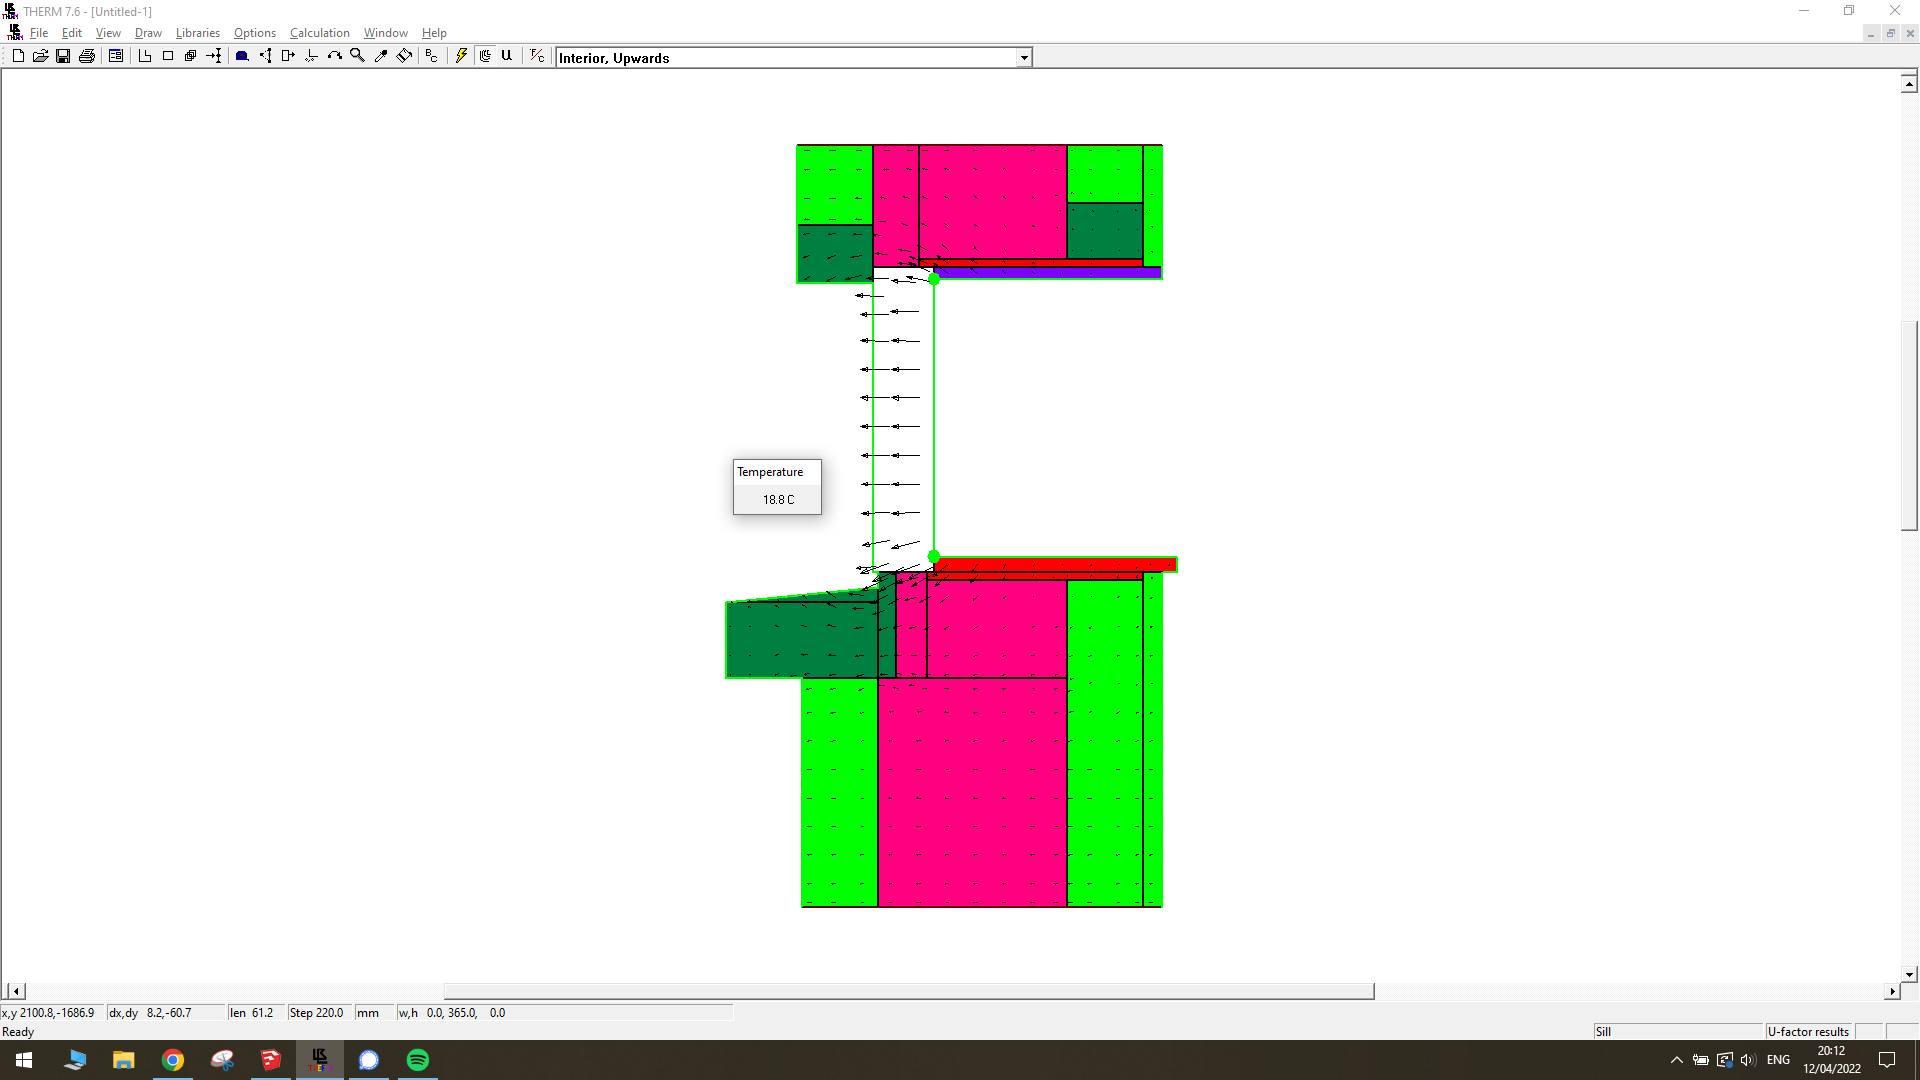
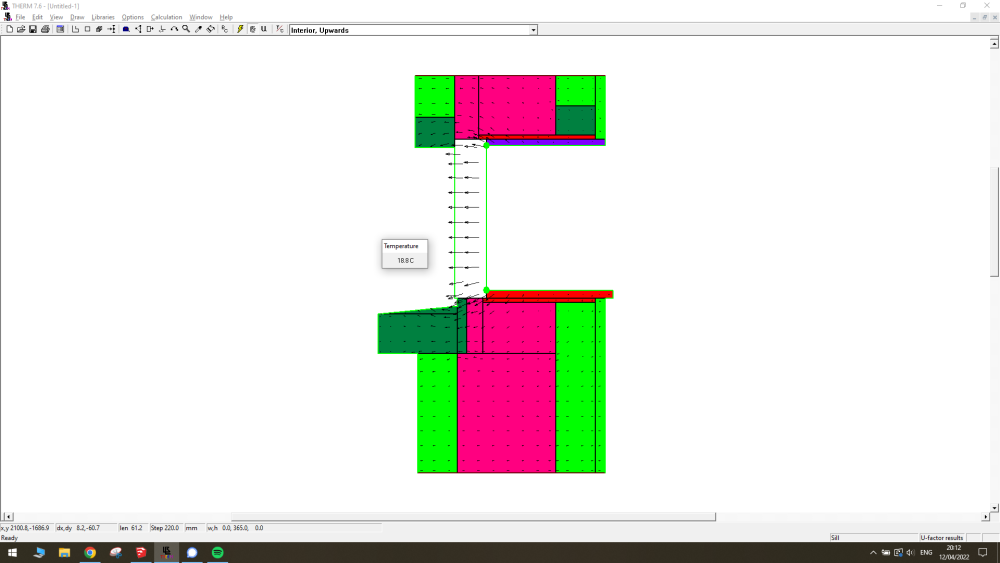
To finish this off. I modelled my revised detail in THERM. Overall a negative external thermal bridge so satisfies the passivhaus criteria AFAIK. This only applies for insulated frames/ UPVC. For simplicity I just used a window that was all "frame". U value of 1.2W/m2K

-
New build floorplans - opinions welcome
Iceverge replied to Indy's topic in New House & Self Build Design
Sounds like a good compromise. I'd keep the MVHR in the plant room for noise and serviceability. Run the ducts through the first floor posi joists for the ground floor and up through the attic and into the bedrooms etc for the first floor. Make it all a warm roof with a glulam ridge beam and cellulose filled I joists. It'll make it easy to route services and deal with airtightness. -
My effort. It's tricky to make it look ok with the ends of the main roof pitch clipped into gables. The main roof pitch is 40deg into a 20 deg catslide over the porch, Similar at the rear. Trying to keep the number of roof surfaces to a minimum.
-
Bugger. You've been let down here I feel. However it is what it is. I don't know your supplier but Walltite have a video of foam+ stone. Maybe worth a call.
-
New build floorplans - opinions welcome
Iceverge replied to Indy's topic in New House & Self Build Design
How would a wheelchair/pushchair get in? -
Cold bridging at cavity reveals and floor slab detail
Iceverge replied to ruggers's topic in Brick & Block
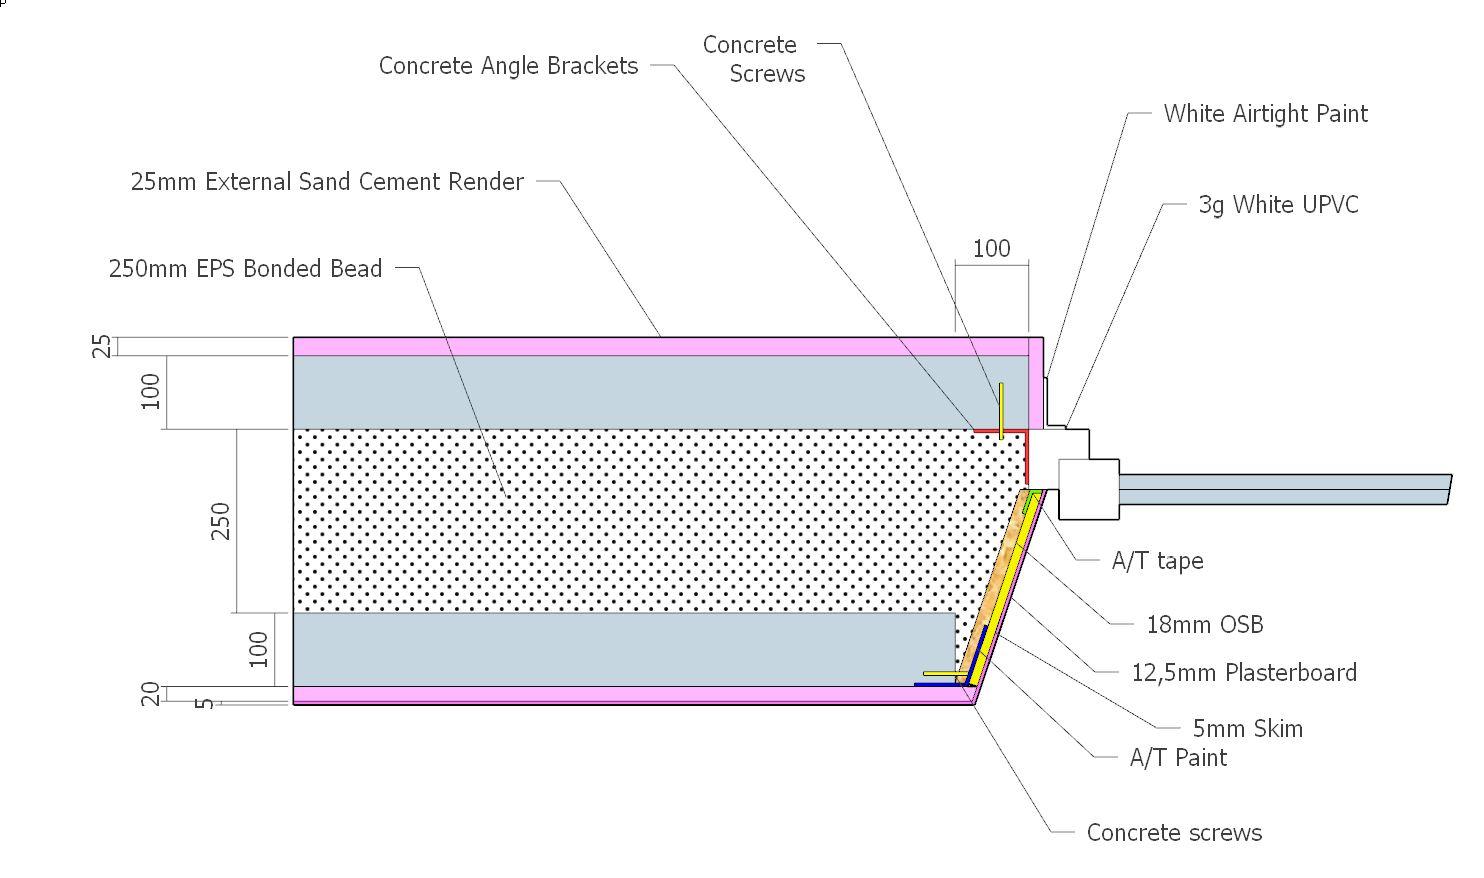
Improved UPVC window installation. I didn't bother drawing the horizontal section as most of the changes are the same. Points to Note 1. The useless cavity tray is gone. A small UPVC profile pre screwed to the frame will now direct any drips/condensation that run down the inside of the outer leaf sideways and harmlessly away. 2. Compriband is pre installed to the frames allowing tidy and quick expansion to seal the window to the outer blockwork at all sides. 3. 12.5mm J beads are screwed to all 4 sides of the window. This will allow an airtight 12.5mm OSB to be slotted in and then shot nailed to the inner leaf for speed. The block layer should leave the upper lintel maybe 30-50 mm higher than the outer one and packers can make up the difference. Similar story with the sill. 4. Pre install the A/T tape to the windows to all for very speedy taping later to the OSB. 5. The OSB to Block junction may be better dealt with with fleece A/T tape and plastered over. You would need a little time with the window frames before the fitters returned to pre install all the bits and bobs. Also cowboy window installers would be no good. The J beads should be screwed securely into the window frames, especially at the base. Some accuracy would be needed from the mason but not enormous. The windows would need to be accurately measured. No rocket science but everyone would need to understand. Its a no mess install, no expanding foam or A/T paint or silicone. Very quick to windtight and airtight. All materials readily available and pretty cheap. If only we could all build 100 houses. We'd get it right eventually! Next task, Incorporate external foam filled PVC electric roller shutters which I would very much like.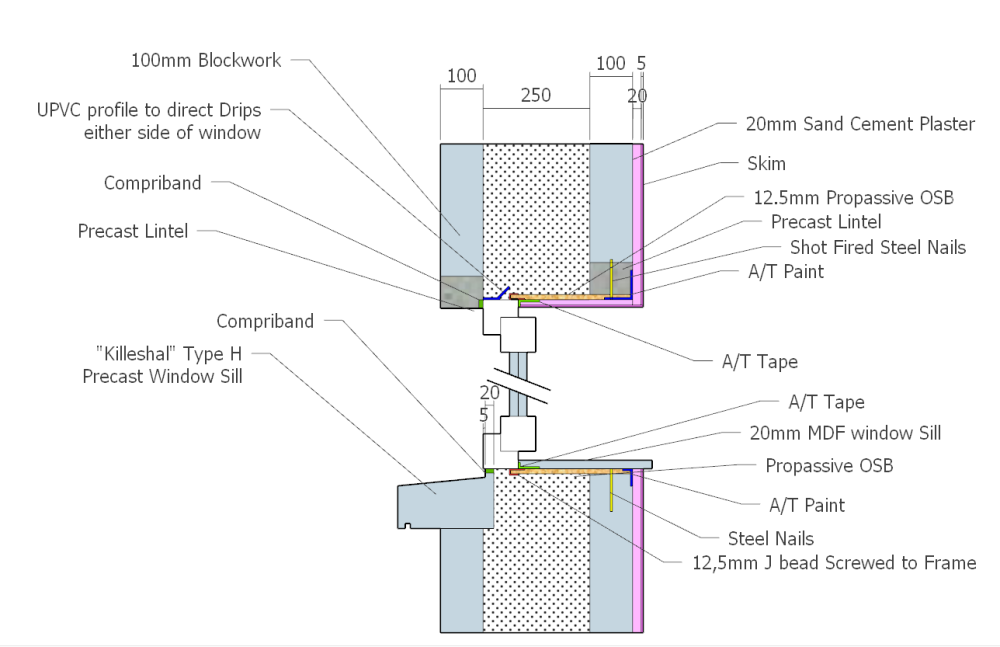
-
Cold bridging at cavity reveals and floor slab detail
Iceverge replied to ruggers's topic in Brick & Block
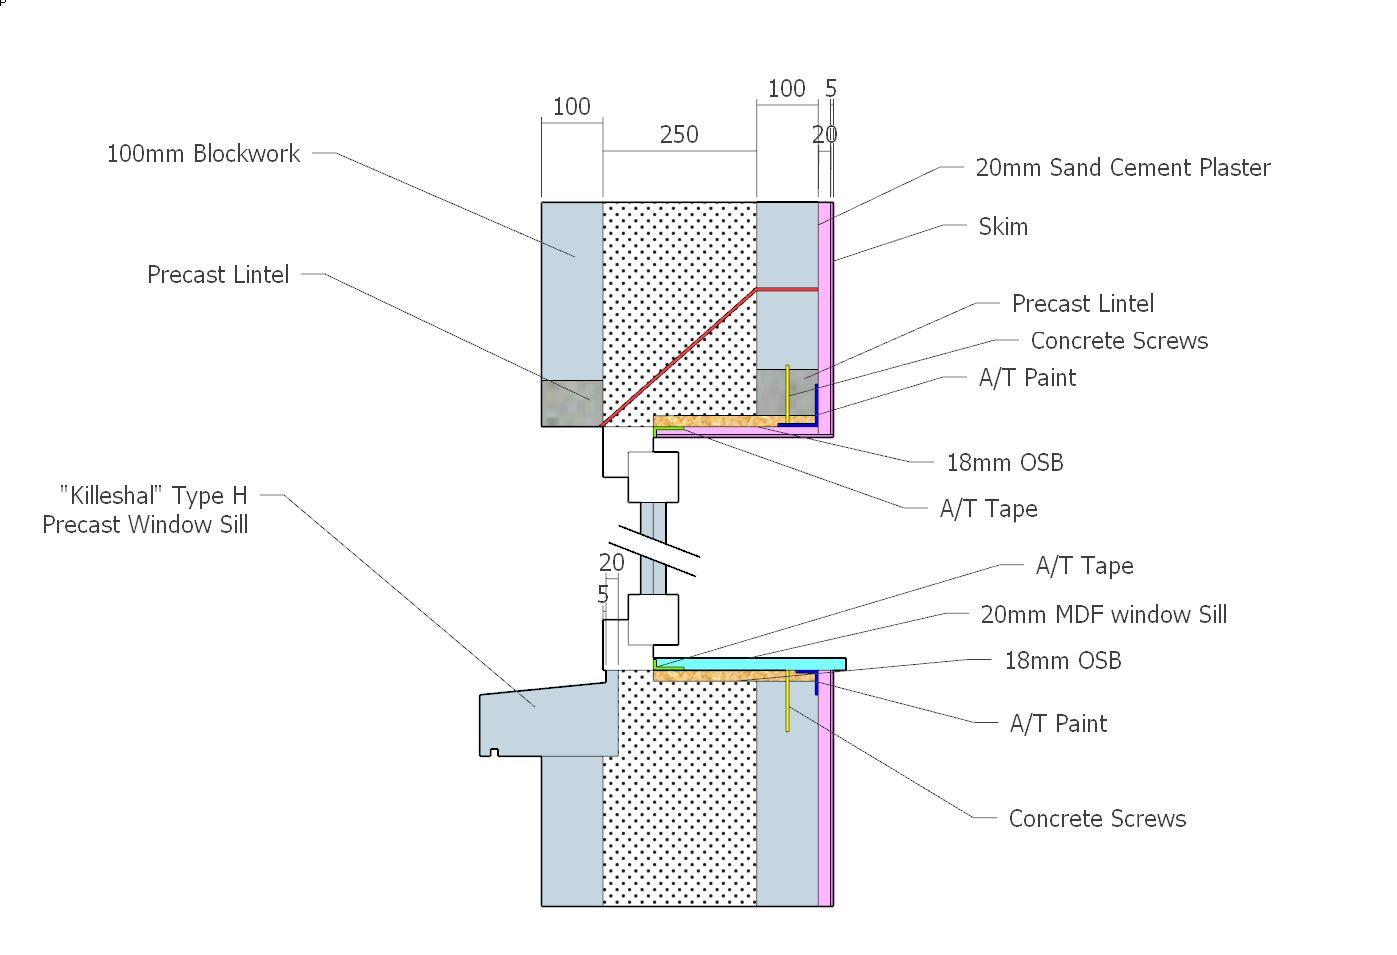
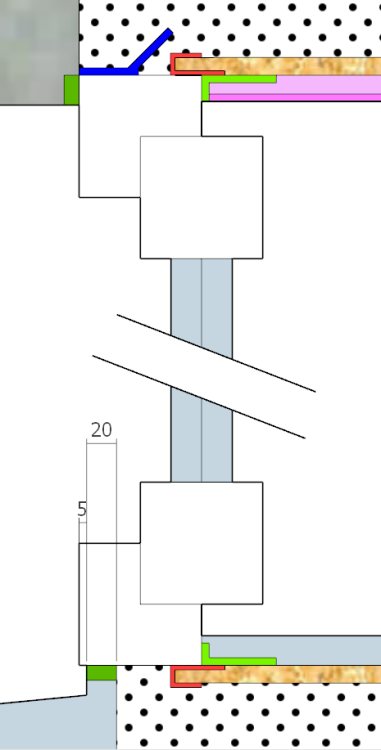
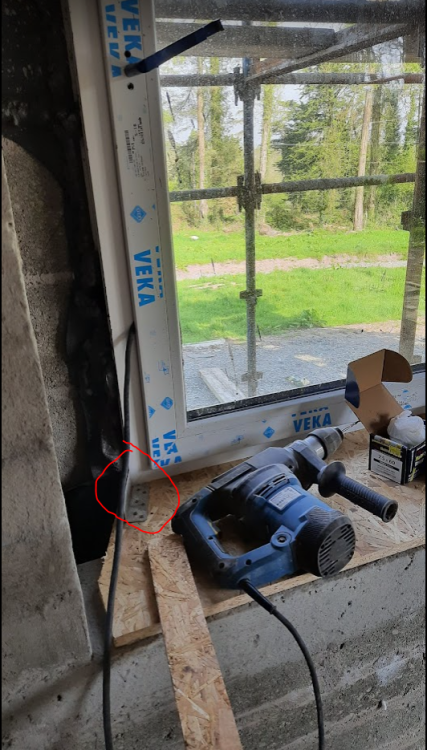
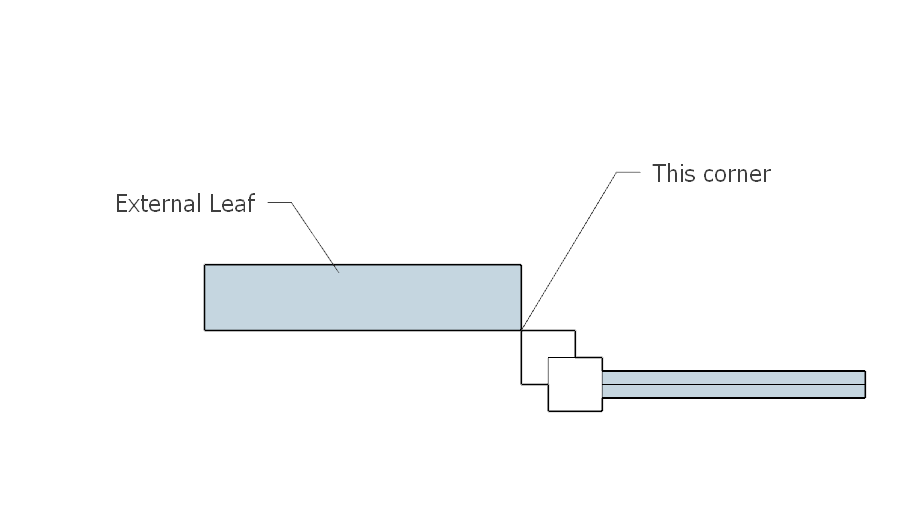
Here is the plan view of what we actually built Here is the section. I've omitted the external render and external airtight paint here to show the overlap of the window bottom on the sill. The windows were installed bolted to the outer leaf first. No connection to the internal leaf. I later cut out and threw away the vertical DPM as I have no idea what purpose it serves in a wide full fill cavity To make the OSB window boxes we first made the base and the top. and bolted them with concrete screws to the lintel and blockwork. Note the angled brackets used to fix the side panels afterwards. The sides were fixed using galvanised angle brackets afterwards. In doing do the whole OSB box became quite rigid despite only being connected to the inner leaf. It was simply floating against the window. As we have quite deep windows I wanted to make sure that a child (or adult!!) jumping on the interior window sill would not collapse it. This was a fear if it was only cantilevered from the inner leaf. Sha Delete From there the Airtightness process was straightforward. A/T tape from the window to the OSB. A/T paint from the OSB to the blocks. Wet plaster over the A/T paint. Plasterboard to the OSB and skim. I used A/T paint to seal the external to the external render for wind tightness. White paint on white windows is a bit of a mess but nobody notices unless they're fussy. Overall we had an excellent blowerdoor (0.31ACH) and the splayed windows are nice. The Sills are solid and perform thermally very well. I had a THERM model somewhere but I can't find it. A 25mm hole drilled in the OSB head and sill allowed EPS blown beads to completely pack out below and above the window. I drilled test holes to check in what I considered the hardest to get to locations and I was impressed. PROBLEMS encountered. 1. The window fitters measured the windows when I wasn't there. I wanted them to get the outer blocks to overlap the frame by 10-20 mm. It would have made the frames appeared slimmer and we'd have had more glass. Moreover we'd have been able to use compriband or similar to seal the outer blocks to the frames. As it was the blocks and the frames met with two opposing 90deg corners ( angle to angle) whick meant that gap was very annoying to fill. In the end a mixture of expanding foam(yuck), plaster and silicone got it done but it was very tedious. I had to seal the frames to the outer leaf for our wind tight layer with airtight paint which was a bodge. It would be awful on coloured frames. 2. Plastic DPC/DPM used as cavity trays and vertical DPM's. What a terrible way of building in the 21st century. They catch all the mortar droppings (sometimes bridging the cavity), often get torn. Prevent a good seal from the window frames to the outer blocks. Generally blow about and slap you in the face in the wind. Total RUBBISH. If I had my way again I'd put an angled PVC profile just over the window head and leave it at that. I cannot see how vertical DPM's prevent water making its way inside in a wide cavity with the inner totally isolated from the outer. 3. The OSB window boxes were very time consuming to make. Maybe premaking them and building them into the blocks would be better. A solution to prevent them degrading in the weather would need to be found. 4. A few hours spent pretaping the windows before install would have saved many hours later on. 5. When screwing the angled OSB reveals to the blocks I was a little over zealous and put a bend into a couple of them. 6. As the OSB was only "floating" against the window some of the gaps around different windows are inconsistent. I don't think anyone else has noticed but me however. I'll add another post about what I'd do differently the next time as this one is getting a little long.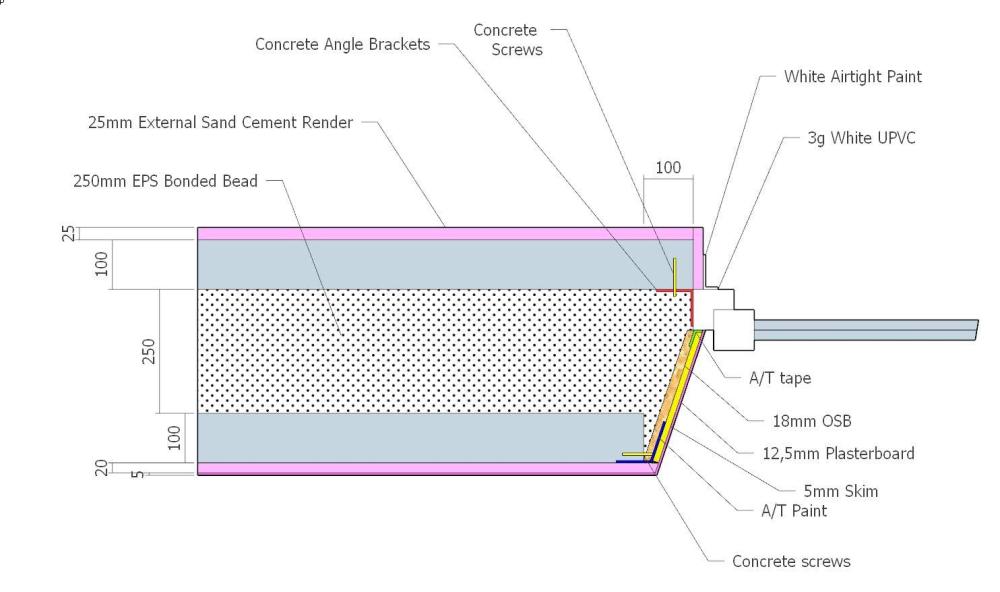

-
Cold bridging at cavity reveals and floor slab detail
Iceverge replied to ruggers's topic in Brick & Block
https://www.nhbcfoundation.org/wp-content/uploads/2016/05/RR10-Full-fill-cavity-wall-insulation.pdf Worth a read. Kore is a reputable manufacturer. They make the MBC insulated raft. We bought our floor EPS from them. Install is very straightforward with a wide cavity. Problems more likely with narrow cavities. Make sure the installer uses enough PVA glue. I'll have a look for drawings/pics of our window install. -
Can you pre purchase from the builders merchant and delay delivery?
-
Airtight paint does the trick. I used a dilute solution first to prime the blocks as it really sucked paint otherwise and didn't stick as well. My diy blower door test rig showed some leaks afterwards where my chasing had gone a bit deep. Flexible sealant plugged these holes.
- 3 replies
-
- 1
-

-
- blowerproof
- sealing sockets
- (and 2 more)
-
Cold bridging at cavity reveals and floor slab detail
Iceverge replied to ruggers's topic in Brick & Block
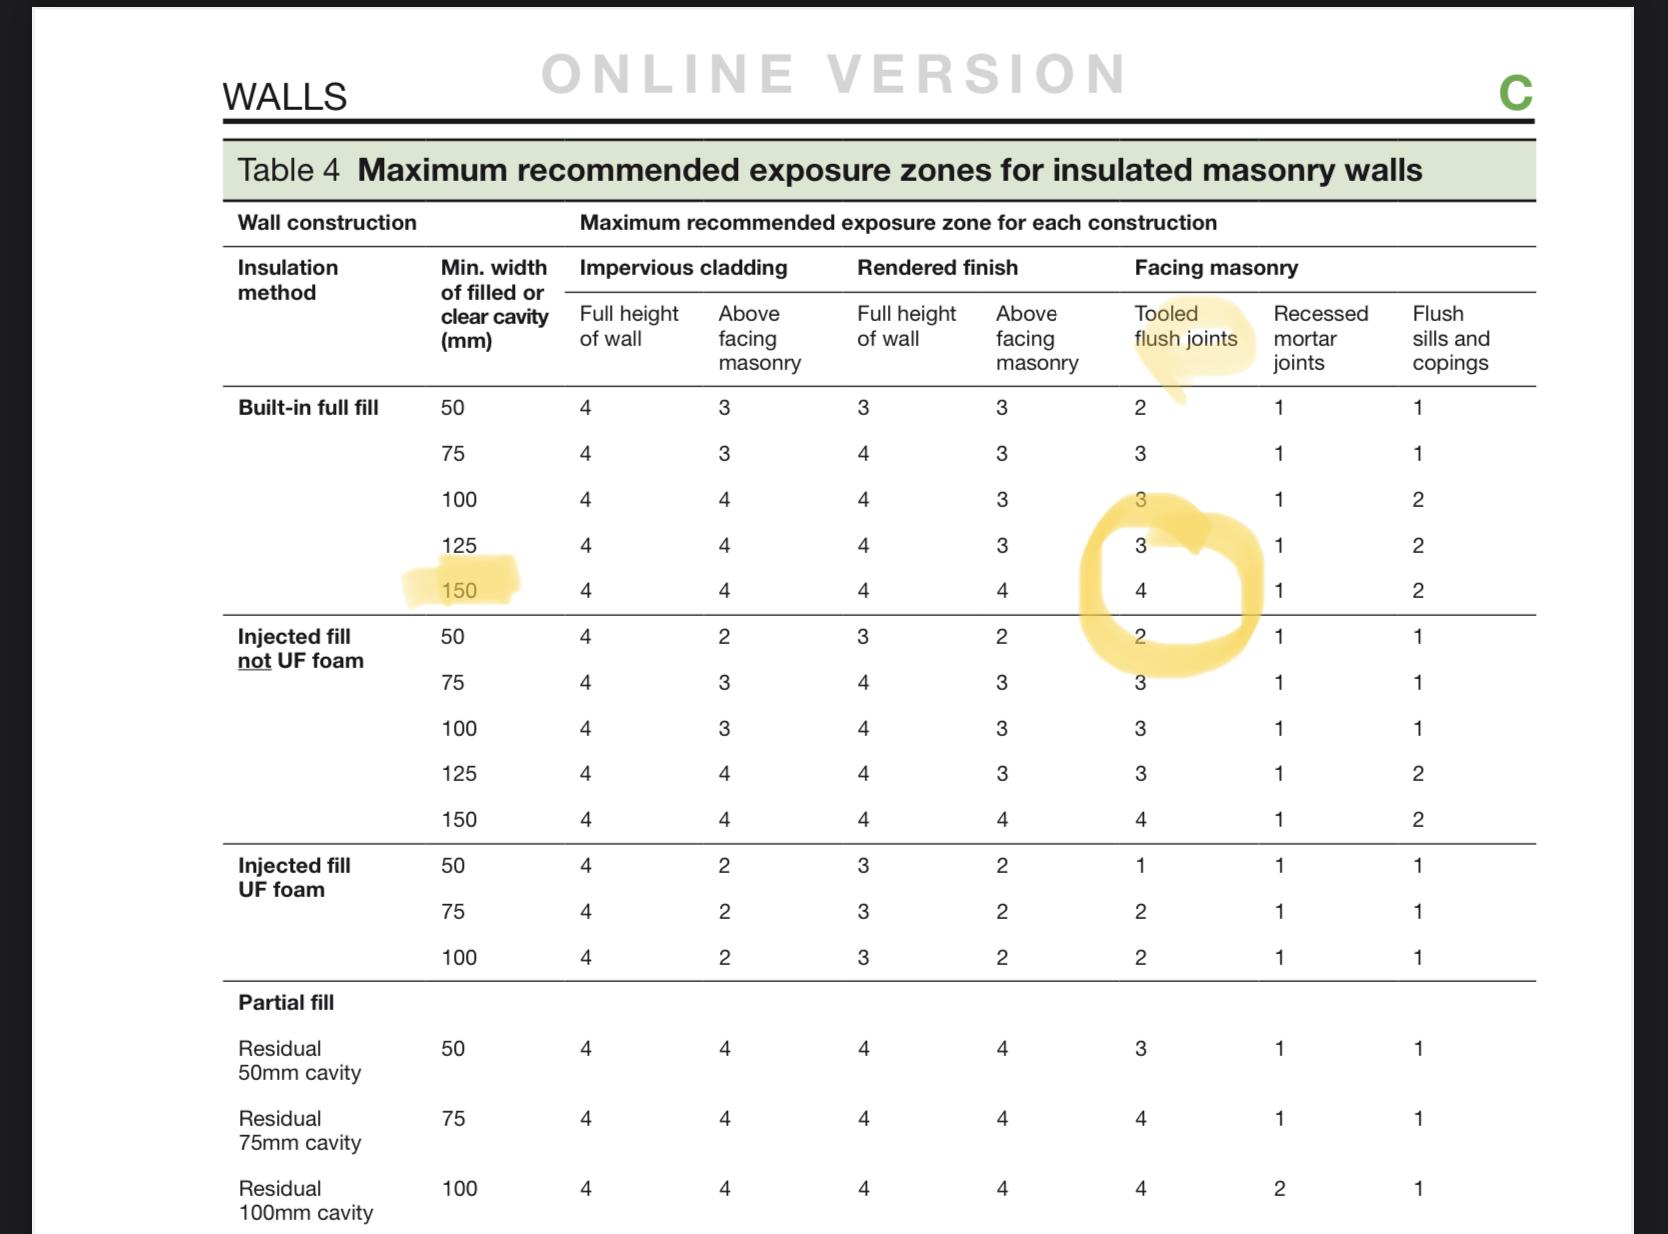
You can fill your cavity according to Bregs.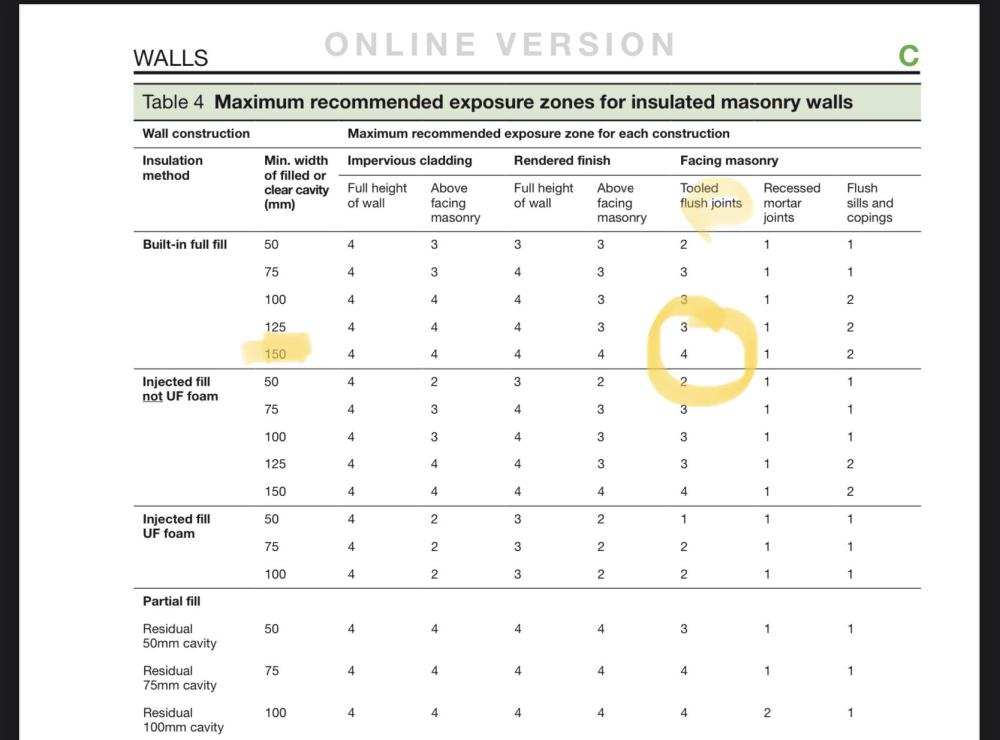
-
Cold bridging at cavity reveals and floor slab detail
Iceverge replied to ruggers's topic in Brick & Block
@IcevergeThanks for the image, It looks a good method as you say for taping the reveal to window frame, I presume you had to close this way when using blown bead. Were your inner & outer reveals flush or did you have to set the inside leaf back by the thickness of the OSB? Where does your window sit and fix to? I want to avoid fixing into the outer brick as they can be brittle. With your method i'm thinking the window straps would fix over the ply not behind so the finished reveals don't need ripped off to change window frames in the future Didn't have to, mostly people just put some pir as a cavity closer. I'll link a good method with plasterboard and membrane. https://www.edmondodonoghue.com/build-it-better-window-door-detailing/ We set the inner leaf back 100-150mm for splayed reveals. Window rests on the external concrete sill and is bolted with L brackets to the external leaf. Not planning on ever changing the windows but if we did we would need to re do the window boxes. They're just butting up against the inner frame of the window and are entirely self supporting. The window is pinched between them and the outer leaf. -
It is a little as the external leaf would never have been warm in the first place. Also I reckon that cavity walls were after lime morter by and large. Much less critical to allow cement to breath. If you're injecting foam into cavities it'll be closed cell type forming a very effective vapour barrier too.
-
Cold bridging at cavity reveals and floor slab detail
Iceverge replied to ruggers's topic in Brick & Block
Sorry this didn't post for some reason. Wet plaster and skim over the airtight paint.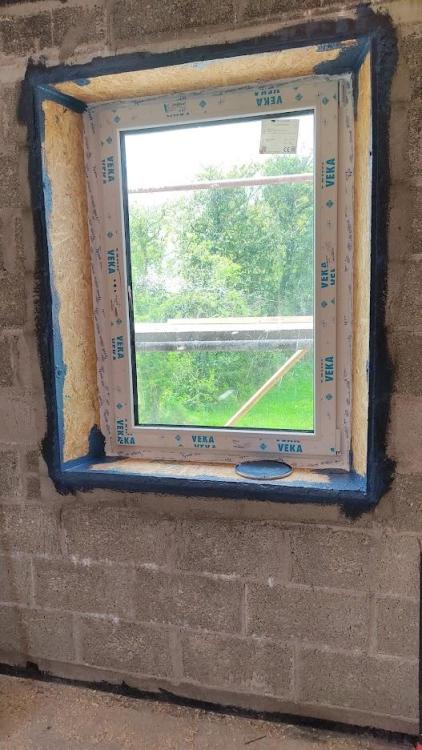
-
Not exactly. Old walls internal humidity can vary significantly season to season, related directly to the RH of the ambient air, internally and externally. Invariably, in any house in a damp climate without air conditioning, the internal humidity will map the outside, even a passive house. An old wall ( brick lime stone etc) , as long as it can stay dry, can have a good contribution to the overall insulative value of the total build-up as long as there isn't any cavities or thermal bypass. https://www.historicenvironment.scot/archives-and-research/publications/publication/?publicationId=7fc3d5f6-5992-4106-92bf-a59400bf430c However if the wall becomes damp (kept cold and cannot dry) the internal moisture builds up leading to degradation of the structure and a much poorer overall U-Value. http://www.tara.tcd.ie/bitstream/handle/2262/79420/CERI draft RW SP final.pdf?sequence=1&isAllowed=y @nod Suggesting gypliner I'd be concerned about how to deal with the breach of the continuous thermal and vapour envelope at floor joists and abutting walls. These would be very tricky to seal 100% and most of your buildup would be still gypsum. With low vapour permeability my fear is that you could end up restricting any moisture movements in the house out through the joist ends and abutting walls leading to rot. Nice explanation from Tomás here.
-
You have proper 2 choices really. 1. Use a very breathable (vapour open) internal wall buildup tight to the existing wall. 2. Make a complete box within a box and a ventilated cavity all around the internal shell. (Very difficult unless you knock all internal walls and take our the ground floor ceiling) 1. is your only realistic option here. A couple of options are: Gypliner with mineral wool or other breathable insulation. With a vapour open board over the top and lime plaster. Wood fiber boards and lime render. A thick layer of insulating lime cork plaster.
-
Internal insulation is risky. You will have a permanently colder brick structure which in turn will result in higher moisture levels within the wall, heightening your chances of decay and frost damage. You need to take every precaution to ensure that moisture can make its way out of the wall as easily as possible. Choosing a vapour closed internal insulant like PIR risks entirely sealing one side of the wall, halving your potential drying routes. Furthermore the vapour barrier cannot be continuous (unless you cut back the floor joists and internal walls). With vapour barrier penetrations at the end of every joist, the timbers ends sitting outside the heated envelope right at the most lightly point to receive damp air from inside, you're asking for trouble. A safer approach would be to use a very vapour open internal insulant and wall finish.
-
Do you have any diagram? Perhaps your BC will accept manafacturers instructions?
-
Could you insulate externally ? Presumably you'd have more space .
-
What exactly product are you considering using? A quick Google shows it's very dear, about £100/m2
-
We paid €28 +VAT for 400mm for a cold roof in 2020 per m2. That's €70/m3 +VAT /m3. It's probably increased a bit and I can imagine the labour for dense packing between rafters might be a bit more.