


Iceverge
-
Posts
4383 -
Joined
-
Last visited
-
Days Won
31
Everything posted by Iceverge
-
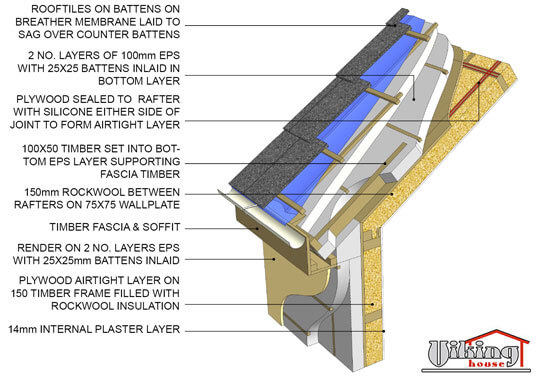
I think it was @SimonDand @Patricksuggested/used 4x1 timbers closely spaced in preference to plywood. I prefer this idea as the risk of moisture that condenses on the back of the metal roof can much more easily dry to the ventilated cavity.
-
You may run into splashback issues if you have any timber exposed like the picture if the bottom is not at least 150mm above ground level. This might mean digging your garden to 450mm below the floor level to get the appropriate clearance. Not ideal. Another's option would be to use rendered EWI on the extension to match the existing house. The structure of the extension could be timber or blockwork. You could get away with less of a drop to the garden and better thermal bridging characteristics. Say, 15mm plasterboard and skim 95mm studs at 400cc with rockwool 35. 11mm OSB taped externally as air barrier. 120mm EPS 33 taken down to below the foundations. Render. A U value of about 0.18 at 250mm thick.
-
 A bit of silicon spray or Vaseline can help the seals slide home too.
 -
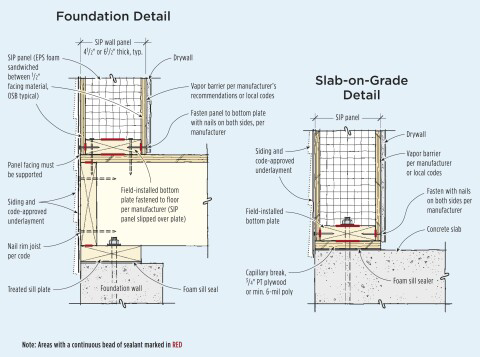
This details would do. Any particular reason for the SIPs and the suspended timber floor? You can just put ducting in the insulation layer under a concrete slab for pipes etc. Mind you I like suspended floors, more forgiving underfoot. You'll need to cut through the existing insulation to fix to the masonry beneath where the walls meet.
-
How to retrofit insulation at intersection of cavity and ceiling
Iceverge replied to sam's topic in Heat Insulation
You could just fill up the fascia and soffit with EPs beads, right up to join the attic insulation. Then put some slate vents up higher in the roof to ensure the cold loft space remains ventilated. -
Air will leak through the blocks themselves. If you're careful you can pour an entire bottle of water into a concrete block. They're far from 100% solid. The aggregate is large and leaves lots of voids. A parge coat will seal all the small holes with sand and cement as the particles are much smaller and the cement dries to fill all the gaps.
-
How about woodfiber or phenolic board fixed direct on to the reveal. Then taped to the window and membrane and render or plasterboard over the top.
-
Like anything you'll have to live with for decades, bathroom suites etc, the answer is white.
-
No idea, just Google! It's a cheap experiment however. You could try a small wall and report back.
-
Log Cabin Damp Proof Membrane - Building Regs Advice Please
Iceverge replied to Gribble's topic in Building Regulations
A few questions 1.Do you have any cross section sketches of the building? Showing the DPC etc. as built. Maybe some pics of the wall where it meets the base inside and outside. 2.Where does the ground level sit in relation to the rest of the building? 3.Is this going to be inspected be a building control inspector? 4.Have you any insulation in the slab? 5.How much head room have you allowed for internally? 6. Are you limited by the ridge height? -
I don't know much about ASHP sizing, need to do more reading on here. Could there be a case for the 8Kw unit and a couple of supplementary resistance heaters for those exceptionally cold days. Maybe there's a benefit of oversizing the unit too, I don't really know? If you have PV you may not need to run the ASHP in summer.
-
Why not use this for the DHW so?
-
How are you providing space heating again?
-
Thermal bridge of vertical metalwork
Iceverge replied to MattMiller's topic in House Extensions & Conservatories
Plus one for that. It is a lovely house otherwise. Over the 40 plus years you may spend there it'll be well worth it. Get it as good as you can now. -
Unfortunately the electrician, at best, has been unbriefed and did not understand and hence scuppered your airtightness layer. I would let them know, kindly, just for education purposes but not expect anything more. I'm guessing the airtightness layer and service cavity continues down the walls in a similar fashion to the flat part of the roof? Not to worry all is not lost. I have 4 options. 1. Take down the plasterboard and repair the layer. Very small cost as the screws and boards will be reused and the tape required will be cheap. Done in conjunction with a DIY blower door fan it will be a cheap solution. 2. How big is the service cavity and is it empty currently? 50mm? You could possible get a spray foam company to fill it. @Gone West got a sub 0.6 ACH with just a thick layer of open cell foam between I joists. Advantage also of an improved U value. 3. Put another vapour control layer over the current layer of plasterboard and then a new layer of plasterboard. You would have the advantage of better sound proofing from the extra plasterboard. 4. Use the skim coat as an airtight layer. This will involve sealing all penetrations with appropriate tape, mastic and foam before the skim coat. You will need to foam behind the board around the holes. It may take a few try's to get every penetration sealed with the foam. I would lean towards option 4. Make a DIY blower fan for £30. Get plenty of IL330 foam and a good gun. I mean plenty. Like 24 cans/2 boxes. It isn't cheap but it's the best I've used. Different league to over the counter stuff. Best online price I found is here. Get every trade out of the house for a weekend when the first fixes are complete. Tidy it up so you can access every junction, wall to roof, wall to floor, wall to window etc. Then using the back of your hand to detect leaks go room by room and seal every hole and crack that you can. It is tedious and will require diligence. There's no point in just throwing a few quid at a labourer, they won't do it properly. It's not heavy work so anyone careful will be a real asset. If you have kids give them 50p for each hole they find! The better sealed you get, it the more small leaks will be detectable so you may need to do the house 3 times. A lit candle shoved in a length of conduit is the best I have found to find really small holes. Much better than smoke. We got 0.31 ACH50 with this approach although the airtight ceiling was intact. It might have taken 50+ man hours. Very satisfying work however. Impossible without a DIY blower door fan.

-
Can you describe the plinths you're proposing, is it a conventional strip foundation? Sketches would help. If its continuous, you could put down a sole plate and then just angle nail the band joist around the edge. You could save a small bit here by avoiding joist hangers too. How do you plan to insulate? I'm in the middle of a tiny trial project at the moment myself. Might make a thread. A 2.4*2.4 pump house and tiny drying room.
-
What is your build up as is? Can you access the top of the insulation? A sketch might help. Nail/screw holes are normally not an issue. We must have put 600 screws through battens through the membrane to create a service blood for the ceiling and still beat passive airtightness. I wouldn't let you electrician near the airtight layer, they'll only make it worse. You probably need to do this yourself.
-
You can paint on a parge coat, it's just a sloppy mix of sand and cement. Where I am €10 will buy you enough to make up at least 50l in sand and cement. We used Soudal I think for the junctions, wall to floor etc as parge coat/wet plaster wouldn't have the flexibility needed. Painting it on neat meant it used loads and loads of paint and tended to peal off if the substrate wasn't perfect. Putting down a dilute coat first maybe at 5:1 water/paint served as a primer, saving loads of paint and sticking much better too.
-
The stand alone water heater with an inbuilt heat pump makes sense where you have heat to spare, like a freely fueled wood burning stove or summer time. They're harder to justify if you use them in winter because as you've noted they steal heat from inside the property. Unless this heat is being replaced cheaply like with another heat pump they'll be inefficient to run. If you had switchable ducting they could be used to cool the inside of the house in summer like you note. I've not seen it done however. My mate who installs heat pumps reckons Daikin and Hitachi are the berries by the way.
-
Might be better for wood.

-
Service penetrations
Iceverge replied to eandg's topic in Energy Efficient & Sustainable Design Concepts
Block build here. Airtight paint and wet plaster for all penetrations. Build in the ducting day 1 if you can. Drilling large holes in concrete is a pain . -
A parge coat of sand and cement would be much cheaper. Normal paint would not have the crack filling ability I would say.
-
Trench block or cavity with infill below DPC advice required?
Iceverge replied to ruggers's topic in Brick & Block
Ah sorry, I thought I recognised the username, I remember your situation now. It'll perform as well as it can do in that case, there's a small benefit from taking the insulation lower down but it's only marginal in your case. It makes a bigger difference when the wall has a much lower U value. I wouldn't worry in the slightest about the drawing as is. A couple of neighbours used closed cell injection foam after the PIR boards near me as a belt and braces if it all goes peat tong. They seem happy with it as far as i know. Good luck and keep us updated with pics. -
Trench block or cavity with infill below DPC advice required?
Iceverge replied to ruggers's topic in Brick & Block
If I was you I would bin the lean mix (With SE's approval) and the PIR boards in the cavity. Just use EPS bonded beads and fill the 150mm cavity right down to the foundation or as low as the engineer will let you. The masons will thank you for not having to fiddle with the boards too. EPS beads are about the same price as concrete (£100/m3) and far far cheaper than PIR boards. You'll be at about £15/m2 for beads installed vs £23.50+fitting for the boards with PIR. You'll have a vastly better performing wall too. The boards CANNOT be installed properly. I've never seen it happen. -
Welcome @Beechgate Passive house here. Concrete built. It was about €35k cheaper than MBCs timber frame which swung it. I had about 4 years of research done, did the design and specification myself. In hindsight a good architect would have been worth employing. But one who will really understand passivhaus, match your aesthetic preferences and really respect your budget will be very hard to find. We used a main contractor and did some work myself during covid. Passive house is tricky and some of the details need to be different from the norm. Expecting a contractor to change their system and learn on the job is not going to be without a time or effort cost. Luckily ours just left me get on with any of the strange details myself. I would start with what your realistic budget is. That will determine everything.


