

Jeremy Harris
-
Posts
26430 -
Joined
-
Last visited
-
Days Won
360
Everything posted by Jeremy Harris
-
Just as a practical observation, this is broadly what we have, where I encountered minor problems and how things ended up. - Virtually all the restrictions to flow end up being in the DHW side, rather than the cold side - I ran 25mm MDPE into the house, then 22mm for all the cold feeds as far as the manifold, and all the cold feeds to the water heating, as far as the Sunamp PV. where possible I tried to step up from 15mm to 22mm for any pipe over a metre long on the hot side, but frankly I'm not sure it made a jot of difference given the restriction imposed by the Sunamp PV and the instant water heater. - I ran 15mm plastic from the manifolds to each room with water, with the exception that the utility room and downstairs WC share the same radial feed as they are next to each other. 15mm plastic is more restrictive that 15mm copper, but in practice that seems to be an advantage, as there's less standing pipe loss and the response time of the hot outlets is quicker. - Our incoming pressure is regulated to between 2.5 bar and 3.5 bar, and we can easily flow 25 litres/minute from a 15mm plastic pipe on the cold side, with no restriction, and no significant flow noise in the pipe work. The flow rates originally were such that we were massively non-compliant with the water usage requirements, and were told to fit flow restrictors to all those outlets that didn't have them, then submit a new report showing we were compliant with part G. - I've left the flow restrictors in place on some taps, like all the washbasins and the kitchen and utility room sinks, as they stop excessive splashing and make the taps easier to control - The water softener was a pain to plumb in, because it was delivered with pipes and fittings that were pretty restrictive. I ended up replacing them with bigger bore pipes and fittings, and now the loss through it is pretty small (it's plumbed with the equivalent of 22mm pipe now). - The shower and bath taps were to two items that were pretty poor performers with regs-compliant flow restrictors fitted, so I removed them after completion. Nothing wrong with this as we're not on mains water and so the water usage rules should never have been applied to us in the first place. The shower flow rate was around 11 litres/minute with no restrictors fitted, and, (worth checking!) the hidden flow restrictor washers in the thermostatic shower mixer valve removed. I fitted a 9 litres/minute restrictor to the shower head feed pipe that had no noticeable effect on effectiveness, but failed the test for water usage, so swapped it out for an 8 litres/minute one that did noticeably reduce the effectiveness, just to get a pass. I think I could easily live with the 9 litres/minute restrictor and may re-fit it, really just to give a useful reduction in DHW consumption. - Pipe noise in rooms away from the outlets is non-existent. The plastic pipe itself is, I think, pretty good at suppressing flow noise, and with all the pipes insulated there's no noise at all in the habitable rooms of the house. The only places you can just hear flow noise is the water meter on top of the water softener in the services room and a very gentle sound from the Sunamp PV , but even then it's not audible with the door to that room closed.
-
I agree wholeheartedly. I learned the basics of how to cook myself a decent meal, and that was then invaluable when I was a student and trying to live on next to sod all! I lived on my own for around 10 years altogether (before and between wives.................) and probably ate better than most on a lost less money. I encountered my first computer in about 1973, at work. It was programmed via punched cards, in machine code, and each card had a single instruction. To run a programme you first had to manually key in every single instruction for the boot loader, using a row of switches and a load button, in octal. Once you'd got all the boot loader instructions loaded you could then make sure all your punched cards were in order and feed them in. There was no permanent storage, apart from the punched cards - it made things pretty time consuming! When we got our first DEC PDP-11, with 8" floppy discs that stored an amazing 250kb AND ran a VT100 VDU terminal, we were just gobsmacked at what we could then do!
-

Excessive Cost of Sewage Treatment Plants
Jeremy Harris replied to Ferdinand's topic in Waste & Sewerage
Capital cost, including installation, for our treatment plant was around £4,500, roughly split half installation, half the cost of the unit. Running costs (assuming a pump out every two years) should be around £145/year, reducing to around £125/year once I get the new timed pump fitted. The alternative for us was £14k for the main drainage connection, plus another £2k'ish for the pump station and installation, so around £16k for capital cost. Not sure what the yearly cost would be, probably a bit more than the running cost of the treatment plant I expect. -
O level Maths, Additional Maths, English Language, Geography, Technical Drawing, Metalwork, Biology. Physics, Chemistry, Domestic Science. For those sniggering about Domestic Science, it was because I failed English Language first time around (seeing my typos here you can perhaps understand that!) and I did a one year accelerated sixth form to get A level Maths, Physics, Chemistry, Biology and Craftwork (Metal), and, together with the English Language O level re-take that wasn't enough for a curriculum, so I (and two other boys in the same accelerated 6th) opted to do Domestic Science (basically a mix of cookery and nutritional science back then, and exclusively a girls subject!).
-
There's no requirement that I can see for a commissioning certificate, and no process for generating one that I can find, either. Our building inspector only wanted to see that it was installed according to the MIs, and there was no bit of paper, he just came over to see the drain pressure test, which we did before fully burying the treatment plant.
-
That's a damned good result! Ours came in at 0.43 ACH at 50 Pa, without adjusting the doors, and no temporary taping around the doors either. We had leaks at the French doors and the front door, but there was no time during the test for me to adjust them, as we'd met the required PassivHaus spec and the air test chap needed to get a move on to the next job. I later did a very rough test, with my home made blower in the same window that was used for the proper air test, and set what I thought was about the right pressure (I didn't then have a calibrated low pressure sensor). I adjusted the doors and sealed up the keyholes deep inside with some firm-setting grease, and, based on the change in flow rate, I reckon I dropped the leakage by around 40% to 50%. As supplied the French doors were the biggest leaks by far, just because the two leaves weren't properly aligned, so the seal at the bottom centre wasn't really seating properly. If I'd been around all the doors before the air test, and fixed the slight misalignment, I'm sure the result would be better. I just didn't think about it at the time, though, and to be honest, once you get below the PH limit I think any real gain is going to be pretty small. I was surprised at how big a leakage difference there was between a door being closed, and a door being closed and latched. Ours don't seal at all well until they are latched into the locked position, I found.
-
Our initial experience with a combi wasn't good; it was at a holiday let and the flow rate wasn't great. By complete contrast, the Vaillant combi we have now at our "old" house delivers masses of hot water, and easily runs a decent shower at a temperature higher than I feel comfortable with, if need be. I have a feeling that the DHW performance of combi boilers has been gradually improving over the years, so the newer models are now pretty good. They are also a heck of a lot more efficient - we saved a fair chunk from our gas bill when we had the new one installed a few years ago, as a replacement for an old gas system boiler. Both of us are "morning shower people" and we very rarely have a bath. There's just the two of us, and if there had been mains gas where our new house is I'd have just fitted another combi without a thought, if only because a decent sized UVC takes up so much space.
-
The sample board is well worth doing for any LEDs, I think. I made up a test board with several different LED lights (that could be swapped out as required and a rotary switch to select which light was on. I also added a power meter to it so I could see how the supposed rated power matched the real power (few were even close!). Using this to compare lights in-situ gave us a really good insight as to how they would look when fitted, especially given the wide variation in colour, brightness, beam angle and evenness of illumination between different LED types. I think it's great that the suppliers are seeing the value in offering this; when we were choosing LEDs it was pretty much build yourself a sample board or just take pot luck! IIRC, I posted something on LED comparisons, with the board I made up, back on Ebuild a fair time ago.
-
Funny how you remember these things, years later. Our Tech Drawing master was a chap called "Stolly" Stevens, who also used to take us for Metalwork and was the Assistant Headmaster as well. Bit of a bastard as I recall, and very fond of the slipper................. When our Drawing Office at work got rid of most of the old A0 drawing boards around 1990, I acquired one, complete with cast iron floor stand and drawing machine, plus all the add-on rules, pencil holders etc, and used it at home for a few years, until I managed to get a copy of AutoCad from work (officially) for home use. I still have a box of those chrome clips for holding a bit of paper to a proper drawing board, although I gave the drawing board away to a former colleague when we living up in Scotland. I never really trusted those clips and used to always add two strips of masking tape over the top corners, just as reassurance that the paper wouldn't slip.
-
Piling. Nervous? What me? Terrified, actually
Jeremy Harris replied to ToughButterCup's topic in Foundations
Snap! I even blogged about EXACTLY the same experience. The very narrow lanes either side of our plot (narrow single track) are near-impassable for anything larger than a small box van. If drivers follow their sat nav then it invariably leads them down from the top of the hill and down Mill Lane, the lane heading East from our plot in that photo above, as the road above that is a continuation of the "main road" through the village, from the A30. On every single delivery I requested that an instruction be added directing the driver to turn left at the fork by the village hall, ignore his sat nav and then take the first right into the wider road with the Y junction in the photo above. More than 50% of drivers ignored this. The worst was a delivery of drive pavers. I had the contractor on site and was expecting delivery late morning. By 16:00 the delivery hadn't turned up and I was paying a chap to sit doing nothing. I rang the company, who rang the driver. He said he'd not been able to deliver because of the narrow access lane and so had turned around and was half way back to Coventry................ Sharp words were exchanged, where I reminded the company of the delivery instructions and asked if they'd put them on the delivery note; they confirmed they had, phoned the driver and told him to turn around and make the delivery according to the instructions he had. The driver ran out of hours, so spent the night in the cab, with the company calling me to apologise and say that he'd be on site at 07:30 the next morning. I was on site when he arrived, and it's fair to say he was not at all a happy bunny, and seemed intent on having a row with me. I let him rant for a minute, then in a break asked to see the delivery note. He handed me his clipboard, and the delivery instructions were clear, and even circled with a highlighter pen. I handed it back and asked if he could read, and if so had he actually read his delivery instructions. He then calmed down and said he didn't usually bother, but just put the post code in his sat nav. The first sentence on the delivery instructions was "Please ignore your sat nav directions once you enter the village, and follow the directions below".................... -
Piling. Nervous? What me? Terrified, actually
Jeremy Harris replied to ToughButterCup's topic in Foundations
Our second borehole rig was about that size, and similarly the low loader driver had a bit of an issue with getting to our site. Funny old thing but we also had two hydraulic failures on the rig during the job! I left all the transport to the drilling company, and stayed well out of it, having seen some of the issues our ground works people had getting heavy kit on to the site. To illustrate the problem, this is a Google Earth snapshot of the centre of our plot, which is near the bottom of a steep valley. The wider road in to the South West is a bridge over the stream, with a width and weight restriction: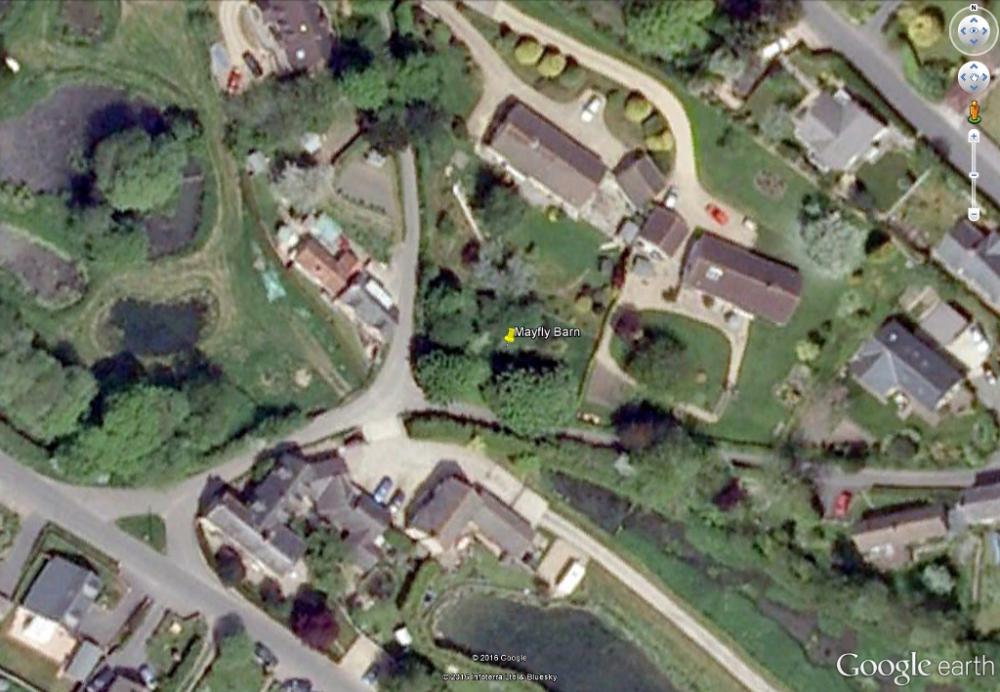
-
That looks good! I'm coming around to the idea that with more than one machine, having portable apps like this really makes a great deal of sense.
-
I have a superb video here of the "product" in action, based purely on the CATIA model. It's really, really impressive. I'd post it but it's far too big a file to upload here; I may see if I can just stick it up on my server somewhere with an FTP link. The product is now flying, and is based near me, with my other half helping to look after the health of the aircrew that fly it. It was Future Lynx when I was running the programme, but is Lynx Wildcat now it's in service. All the manuals were produced using CATIA too, and the maintenance training tools. The idea was that maintainer would wear a partial VR headset, with the virtual images overlaid on what they were seeing, together with maintenance instructions, very impressive.
-
I had to chuckle at this, as the only time I used Solidworks in anger, I did very much the same. I drew it up as standard projections in AutoCad and then imported the .dwg file into Solidworks, just to get a pretty 3D model!
-
I have a Solidworks licence and spent a week on holiday, with a printed copy of the manual, learning how to drive it (it was OK, we were staying at a friends place in the South of France and all my other half wanted to do was laze around by the pool............). After a week I was pretty competent with it, but the concepts were a bit strange, coming from a conventional technical drawing tool like AutoCad to Solidworks. I think if you've never used CAD, and have no conventional drawing board experience (and back when I was at school in the 60's we still had Technical Drawing as an O level, which I took) then learning Solidworks, or the pretty similar Rhinoceros, is fairly easy. As always, it's the change from engrained ways of working to something very different that I found challenging. What did really impress me was CATIA. I managed a programme where the product was entirely modelled in CATIA and it's incredibly impressive. What was even more impressive was finding out that the thing could spit out data to allow animations and videos of the final product. I hate to think what CATIA must cost, but then the programme cost at the time was just under £1.4bn..............
-
You can either go for an £6 UBLOX GPS from China , like this: http://www.ebay.co.uk/itm/Ublox-NEO-6M-GPS-Module-Aircraft-Flight-Controller-For-Arduino-MWC-IMU-APM2-UK-/401215045349?hash=item5d6a47bee5:g:CcUAAOSwB09YEire , which is the same as the module I'm using, I think, or go for a slightly more expensive all-in-one module from the UK for just under a tenner, like this one: http://www.ebay.co.uk/itm/Ublox-NEO-6M-GPS-Module-Aircraft-Flight-Controller-For-Arduino-MWC-IMU-APM2-New-/281957215228?hash=item41a5f5abfc:g:5tkAAOSwYlJW3VYf Both use the same UBLOX U Center utility to set them up, available to download here:https://www.u-blox.com/en/product/u-center-windows You also need a USB to serial converter, like an FTDI board, to connect the GPS module to a PC to use that set up utility. You can actually set the GPS up from the RPi, if you connect both the Rx and Tx UART connections, set the RPi to 9600 baud and then just send the commands directly to the GPS module to set it up. It's a bit of a faff, and nowhere near as useful as the U Center software, as that gives graphical feedback on a whole load of stuff, including how many SVs are being received, what the signal strength looks like etc, which give confidence that it will work OK where you have it positioned.
-
Electric UFH recommendations ( under tile UTH )
Jeremy Harris replied to a topic in Underfloor Heating
As above. I'd go with the modified silicone polymer adhesive, like Sikabond or the cheaper Everbuild Lumberjack stuff. That will easily take the temperature and mean you can do the job in one go, rather than two. -
ST, not sure if this helps or not, but I have chopped down a version of the "full fat" Jessie and loaded it to a Pi Zero, with a home brew (read cheap and chopped about) USB wifi module soldered to the Pi Zero. To cut down Jessie I just took out Libre Office, Wolfram all the games etc, and got the image down to not a lot bigger than Jessie Lite. I found that with Jessie Lite I couldn't get it to run with a fixed IP or get the wifi to work very reliably; with the cut-down "full fat" version the PIXEL GUI and wifi config menu is still there, so once the thing has connected via DHCP you can just VNC in and make the change to a static IP. I've not enough experience with the RPi to say why this is - I only bought my first one just before Christmas, and then only to use as a backup device for a website, nothing more. I need to sit down and do some serious work with the Pi Zero, as for virtually everything I want to do it's better. BTW, I'm now using a cheap GPS module as a RTC. The tiny UBLOX 6 modules work fine indoors (one is sat a foot away from me on my desk reliably squirting out the time). They also only need three wires, 0V, +5V and a UART Rx port that is set to 9600 baud. UBLOX have a utility that allows you to connect the GPS module to a FTDI USB to serial port converter (powering the GPS from it) and set what data you want transmitted. I have mine set to only transmit the $GPZDA string once a second, which is just ASCII UTC time and easy to parse into whatever you want. There is also a battery-backed RTC on the module, so if it loses the signal it still carries on spitting out pretty accurate time data whilst powered up, and will re-sync itself as soon as it acquires just a single SV.
-
I have a few loggers, all home built, a couple log to µSD cards, one logs to a standard SD card and the one in front of me right now, as I'm trying to get the code to work, stores data to a USB stick. I've never bothered with networking them, as it's easy enough to just pull the card and stick the data in a spreadsheet (the data files are all comma separated value, .csv, that any spreadsheet programme should open OK). Easy enough to get even the £4 Raspberry Pi Zero to chuck the same data on to the local network, as I've found a cheap way to get them to work with a bare board wifi module and connect to any wifi network. I may get around to trying this one day, but right now have to get back to seeing why my "write data to a USB stick" code isn't behaving as it should!
-
Pretty much what I have. There are two tundishes draining into 1 1/2" waste pipes that then drops vertically down to the ground floor and across to the foul drain, via a U bend trap fitted at the ground floor level. The condensate drain from the MVHR and the 10mm waste pipe from the water softener also connect to this, so the trap is always kept full of water, negating the need for the HepVO. You can't get a high temperature discharge from this system, anyway, so it's fine to run it into a big enough waste pipe, unlike something like a UVC with an immersion or solid fuel appliance, where you could have very hot water discharging.
-
Vented systems are usually specced for 1.5 bar max working pressure, to allow for say, a three storey house with the cold tank in the loft and the cylinder on the ground floor, or even in a basement, so it'll be fine at 1 bar. Edited to add: Just checked, Terry, vented cylinders are either rated at 1 bar, 1.5 bar or 2.5 bar working pressure. Gledhill have info here: http://www.gledhill.net/pdf/Spec 115 Vented Cylinders.pdf I know for sure that the Willis is good for over 1 bar, as I've seen one fitted to a cylinder in a hot press on the ground floor of a three storey Victorian house, where the head must have been way over 10m. Our buffer is just a vented cylinder from Newark, and came with a 1.5 bar max working pressure sticker on the side. I run it at around 0.5 bar, but with a 1.5 bar PRV, in a sealed system and the BI was fine with it. Edited again: I've found the spec for the Willis heater, it's rated at 10 bar TP! Here's the spec:
-
The RPi makes using one-wire sensors pretty easy, I think, as the port and code for them already exists AFAIK. Each DS18B20 has a unique serial number, which it responds to when interrogated, so you can daisy-chain them up on the same cable. The term one-wire is a bit of a misnomer, as they really need either two or three wires depending on the mode you choose to use them in. I use them in three wire mode, because I don't bother using the one-wire code. Speeds things up slightly too, as they take 750ms anyway to take a temperature reading on command and spit out 12 bit data. ST has more experience than me of using one-wire devices in one-wire mode, so is the better person to answer RPi related one-wire stuff I think. My data logger stuff all uses PICs. Edited to add: Just found this pdf tutorial from the inimitable LadyAda. She's good at explaining stuff, IMHO, and has given some sample code (Python) for the RPi and DS18B20 sensors. The tutorial download is here: https://cdn-learn.adafruit.com/downloads/pdf/adafruits-raspberry-pi-lesson-11-ds18b20-temperature-sensing.pdf
-
Insatiable curiosity, Terry, and like the cat, it invariably gets me into trouble from time to time...................... PS: it helps being part-Irish, and having a load of Irish relatives who have all manner of bodged-up systems in their houses, some of which are really ingenious.
-
Back when Willis invented them, decades ago, insulation was unknown................. They were originally invented to allow an immersion to be fitted without changing the cylinder, back in the days when not all cylinders had an immersion port. As Peter S says, they have some advantages over a conventional immersion as they only feed hot water to the top of the tank, so the tank stratifies well and they allow you to heat just a part of the tank if you only want a small amount of hot water. Should be easy enough to insulate with some PIR and expanding foam, as long as the immersion head is left free from insulation.
-
What you want as a water heater is a 3kW immersion in a tube. They are an Irish thing, invented by a chap years ago over there, to go on the side of a conventional tank that doesn't have an immersion heater port. They are known as Willis heaters, see here: https://www.stevensonplumbing.co.uk/willis-complete-3kw.html

