Jump to content
  • entries
    26
  • comments
    247
  • views
    68757

Part 19 - MVHR


Stones

7970 views

One of the final significant jobs I had to do before we moved in was connect up and commission the MVHR.  All the radial ductwork and individual plenums had been fitted at first fix, however I had left installing and connecting the actual unit until the loft has been insulated, as I didn't want to risk pipe connections being damaged.


The day before we were due to move in, the insulation contractor having laid all the loft insulation, I spent a couple of hours in the loft space above our vestibule connecting ducts for the air intake, air exhaust, and the supply and extract ducts to the distribution boxes.


I decided to locate the MVHR in our (cold) loft space, primarily to free up space in my service cupboard which houses our DHW cylinder, UFH manifold and CU.  The installation manual advises that where the MVHR unit is located in a cold rather than warm part of the envelope it should be insulated.  I initially considered lining the whole of the relevant loft area with insulation, but having worked out the cost, and then being able to salvage a number of sheet insulation offcuts from the skip, I ended up forming an insulated box around the MVHR unit.


P2020064.thumb.JPG.bce8bb567caf841e1e8b0cb90f9541fd.JPG


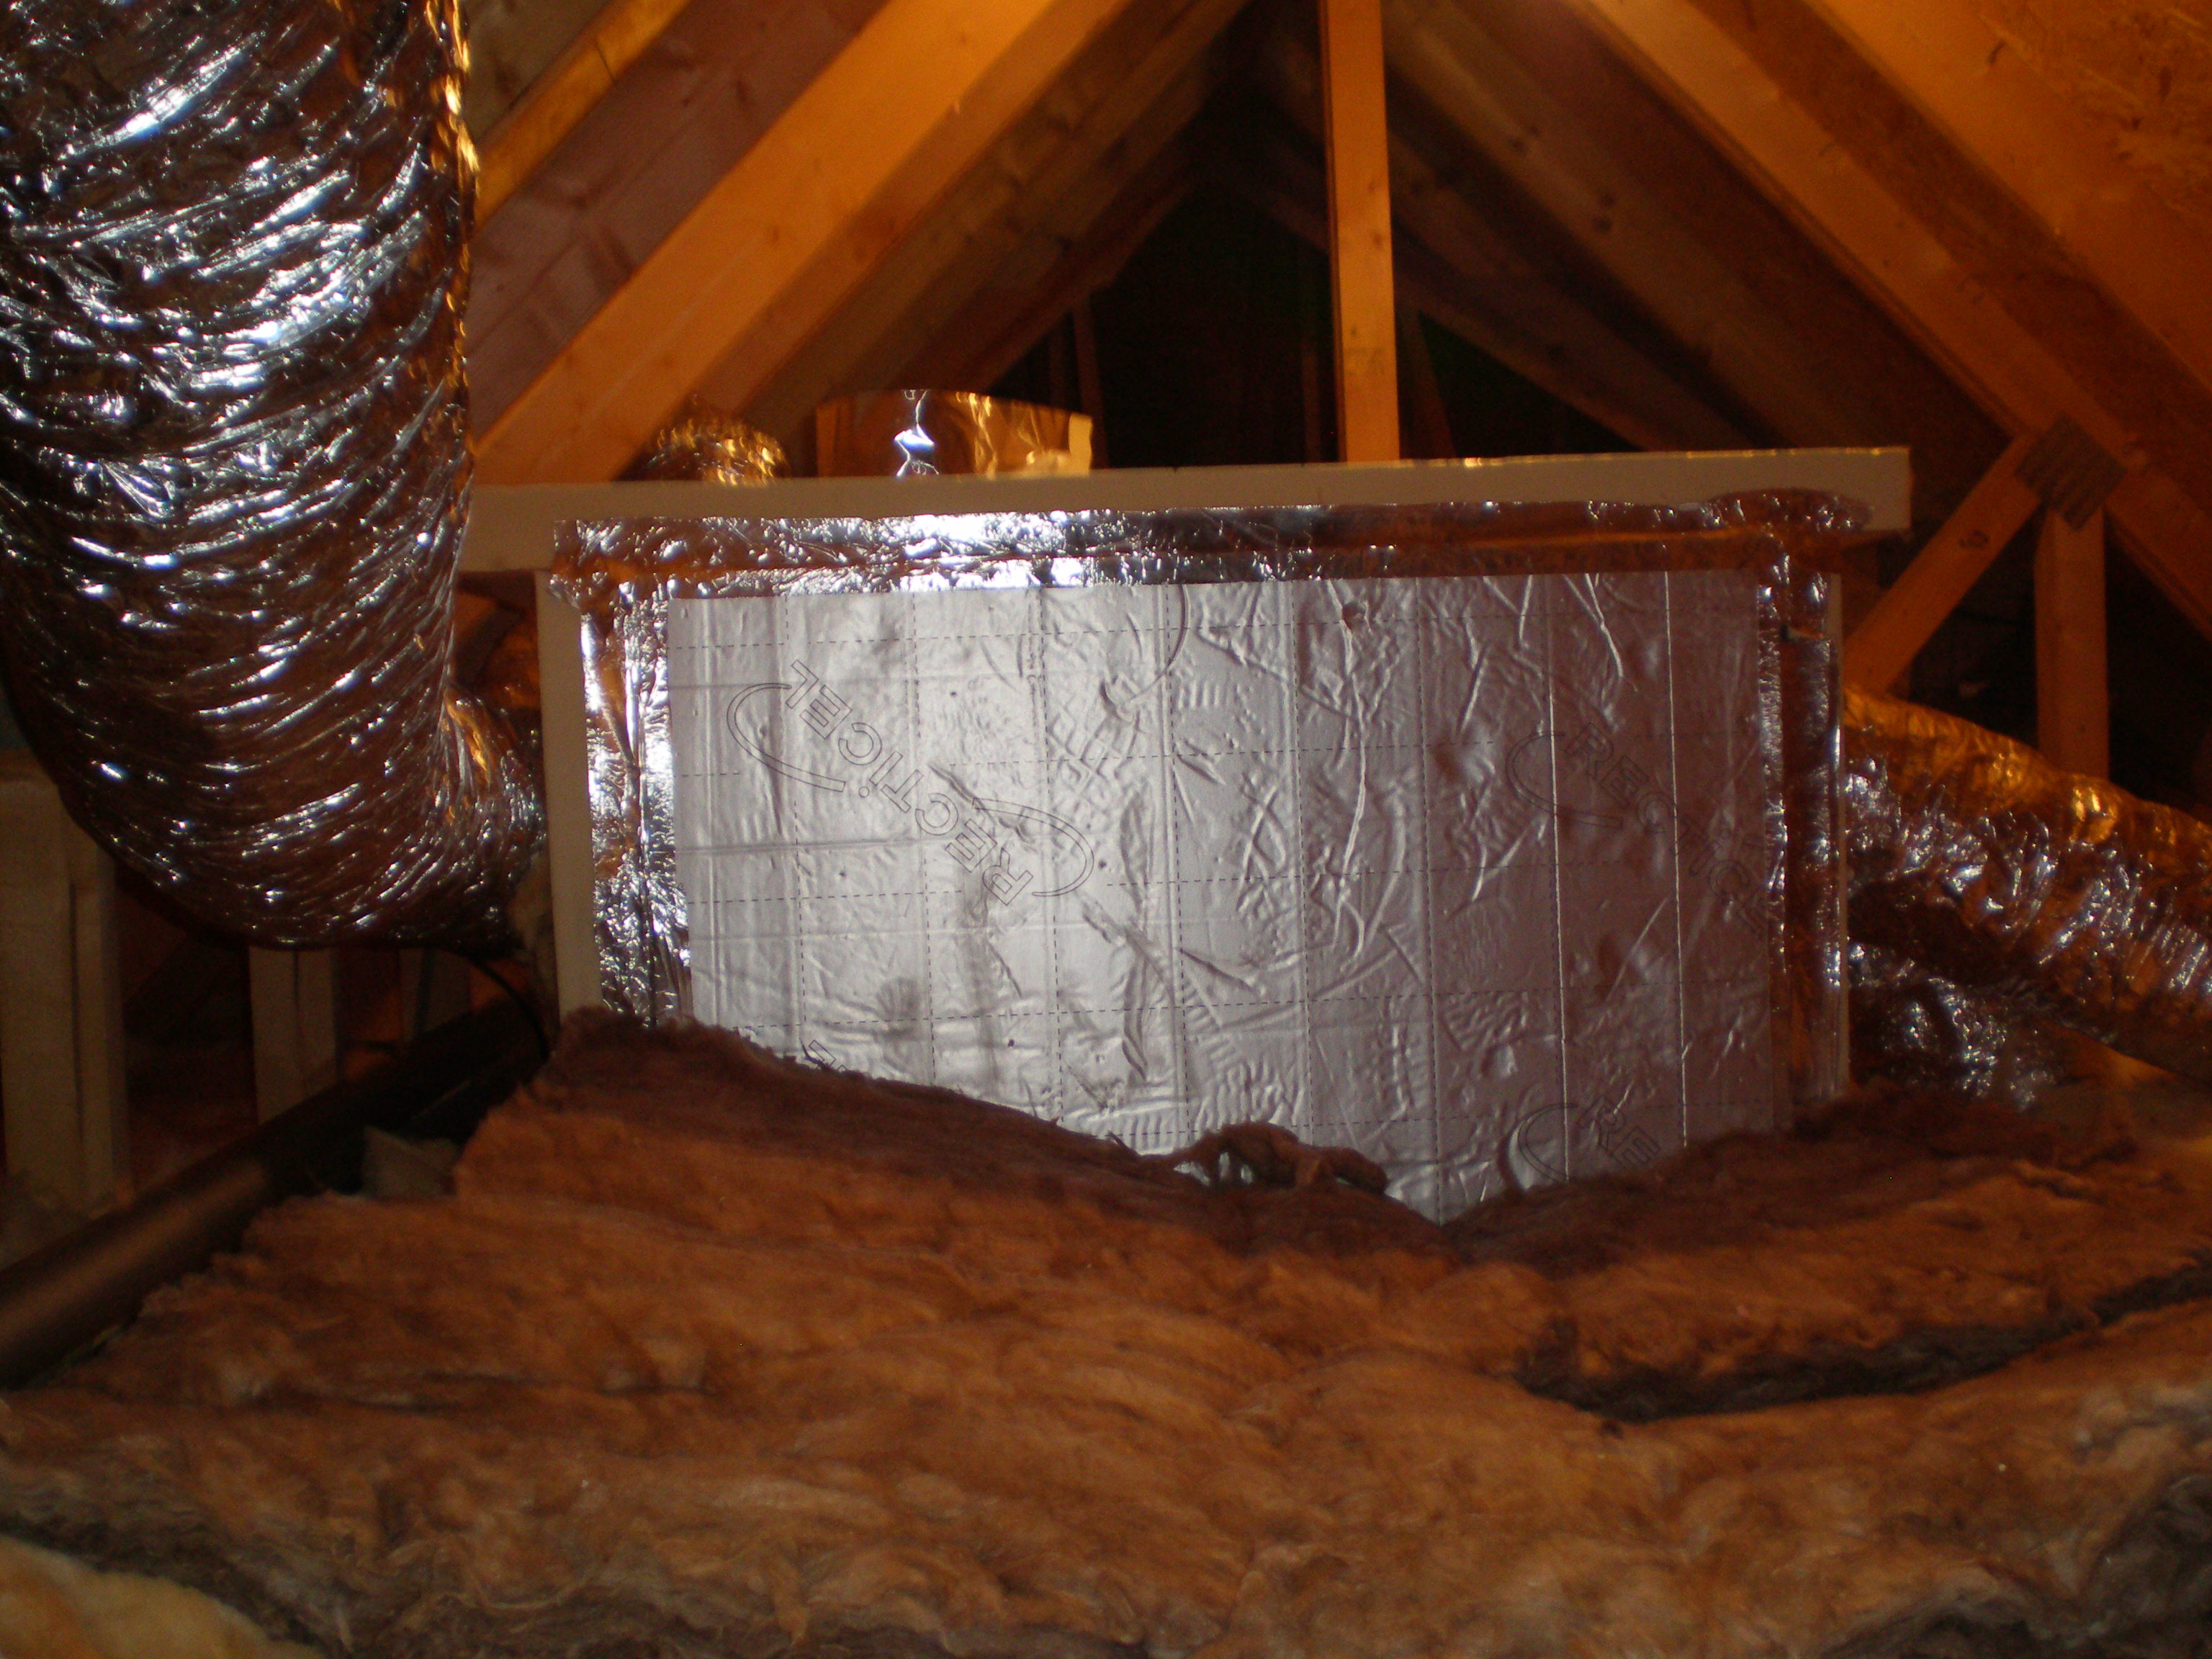
As you can see in the picture, it's a very simple box, the relevant supply and extract ducts simply cored through the insulation.


Our MVHR unit is a Vent-Axia Kinetic Sentinel Plus.  These can be supplied in either left hand or right hand format to suit your installation.  My plans had originally shown the air intake and exhaust on the Southeast roof of the house, but as the house was being built it became clear it would be more convenient for those vents to be located on the northwest side of the house.  Making that change left me with a problem of having an MVHR unit with the duct spigots for the internal supply and extract on the wrong side of the unit.  Fortunately the Vent Axia units can be reconfigured by taking off the front and back of the unit, disconnecting and removing the control panel, rotating the unit chassis through 180 degrees, then reassembling so that the back is now the front.


Having connected all the ductwork, the final thing to do was connect the condensate pipe I had fitted during first fix (which discharges to a rainwater trap outside) to the flexible condensate pipe on the base of the MVHR unit.


Having switched the MVHR on, I then went about balancing the system using an Air Flow meter borrowed from my builder.  This was a relatively straightforward process and just required minor adjustments to individual diffusers in each room.  


Our system is currently operating at a normal supply rate of 32% which equates to 150m3/hr. Having measured efficiency during cold and windy weather, it operates at 90% efficiency in terms of temperature differential (room temperature to supply air temperature).


In warmer weather, the Summer Bypass, which I have set to come on when internal air temperatures exceed 22C and ambient air is above 10C, automatically activates.  If ambient air temperature exceeds internal house temperatures, as was the case last week, the summer bypass remains inactive so that outgoing stale air can cool incoming fresh air (albeit the effect is negligible).  As others have found, whilst summer bypass does provide limited cooling of incoming air, it is not on its own enough to cool the house. Cross ventilation by opening windows remains the most effective way of providing such cooling (in the absence of any active or UFH cooling).


The final feature worth mentioning is the humidity sensor, which variably boosts the ventilation rate to ensure RH does not exceed the level set in the controller.  This also seems to be working well, auto boosting ventilation when showers are used.  When cooking, if we deem it necessary, we can manually boost ventilation to assist in the extraction of cooking odours.


Overall I pleased with how the system is operating. The one thing I have noticed compared to other MVHR systems we have lived with is the noise of the fans which you can hear through the ductwork.  This is the first house where we have used a radial system rather than 150mm main ducts with branches off, so it may be the duct choice, as I can't recall hearing fan noise on previous installations.  To combat this issue, I've ordered some self adhesive acoustic foam sheet, and plan to construct a silencer out of scrap MDF and timber, line with foam and externally insulate, to fit between the MVHR unit and distribution boxes.  I'll report back in due course how effective this is.


The final tweak to the system that I'm considering is fitting a CO2 sensor so that the unit can auto boost ventilation rates as required. Vent Axia want £350 for their sensor which is a non starter, but looking around, the following may be an option as it seems suited to the parameters of the Vent Axia:


https://www.digikey.co.uk/products/en?keywords=235-1413-ND


Again I'll report back when I've looked into this some more.


Next entry - 2nd fix plumbing


  • Like 1

30 Comments


Recommended Comments


Some workings on how you worked out the flow rates to each room would be useful. I have read the BC documents and I need to do some sums to work out the volumes of each room and hence the required flow rates. Then when I measure the flow rates, I will me measuring linear aie speed with an anenometer, which has to be converted to volume of air knowing the area through with the measured linear air flow was measured.


When the time comes I was going to put this all into a spreadsheet so I just end up with a target linear airflow per inlet or outlet vent.  If someone has already done such a spreadsheet that would save me repeating a lot of work.

Link to comment

Great write up. Do you have a silencer at present? The pack I have just purchased from BPC has come with a large silencer that goes between the mvhr and input manifold. 

Link to comment

BPC sent me a large silicener when I asked them about minimising noise. Still not powered my unit up yet (same as yours) so can't report if the silicener kills the noise or not. Though I jolly hope so as can't stand buzzy noises

Link to comment
20 hours ago, ProDave said:

Some workings on how you worked out the flow rates to each room would be useful. I have read the BC documents and I need to do some sums to work out the volumes of each room and hence the required flow rates. Then when I measure the flow rates, I will me measuring linear aie speed with an anenometer, which has to be converted to volume of air knowing the area through with the measured linear air flow was measured.


When the time comes I was going to put this all into a spreadsheet so I just end up with a target linear airflow per inlet or outlet vent.  If someone has already done such a spreadsheet that would save me repeating a lot of work.


BPC, who supplied my unit and ducting, provided the flow rates for me. I've attached an extract of my MVHR plans showing this information.


MVHR flow rates.pdf


Link to comment
19 hours ago, Jimbouk said:

Great write up. Do you have a silencer at present? The pack I have just purchased from BPC has come with a large silencer that goes between the mvhr and input manifold. 


No silencer at present.  BPC didn't offer one, and never having required one before, I didn't think to ask. Perhaps feedback has encouraged them to include silencers in their kits?


3 hours ago, readiescards said:

BPC sent me a large silicener when I asked them about minimising noise. Still not powered my unit up yet (same as yours) so can't report if the silicener kills the noise or not. Though I jolly hope so as can't stand buzzy noises


Was this part of your initial order or something extra they sent you at a later date?

Link to comment
4 hours ago, readiescards said:

BPC sent me a large silicener when I asked them about minimising noise. Still not powered my unit up yet (same as yours) so can't report if the silicener kills the noise or not. Though I jolly hope so as can't stand buzzy noises

Get your missus to shout at you through it and see if that takes the edge off ? 

Theres a 'real world' test for you :D


  • Like 1
Link to comment
Just now, Nickfromwales said:

Get your missus to shout at you through it and see if that takes the edge off ? 

Theres a 'real world' test for you :D


With mine it's more the look than the noise. It could freeze molten glass!

Im often saying "don't look at me in that tone of voice"!! :D 

  • Like 2
Link to comment

@Nickfromwales It's a dead of night issue - audible noise when the house is otherwise quiet / no daytime general activity. You don't hear anything to speak of during the day unless you boost the ventilation rate (ours set at 55% or circa 250 m3/hr).


It doesn't prevent sleep, just something I'm aware of and would like to reduce. 

Link to comment

Hopefully the DIY attenuator will be enough then, or are you tempted to just buy the BPC / similar off the shelf one?


Link to comment

I've already ordered the acoustic foam! I'll maybe drop Gary at BPC an email and ask the question if I should have got a silencer, or if as I suspect, they now include one where they didn't before. 


I had considered buying one ready made but for the same money I can make one significantly bigger (which should provide more sound absorption) plus I'll have enough material to make a smaller silencer for the extract ductwork.


  • Like 1
Link to comment
On 2017-6-4 at 10:05, Stones said:
On 2017-6-4 at 06:38, readiescards said:

BPC sent me a large silicener when I asked them about minimising noise. Still not powered my unit up yet (same as yours) so can't report if the silicener kills the noise or not. Though I jolly hope so as can't stand buzzy noises


Was this part of your initial order or something extra they sent you at a later date?


Just checked it was not on the original order (placed August 2016), they just sent it FOC when I asked

Link to comment

Well, I emailed Gary and he responded very promptly.  He advised that although they haven't had any sound transmission issues reported, he is going to send me a silencer :).  He also suggested that the noise may be due to an air imbalance within the MVHR unit.  I'll start a topic to discuss this. 


My acoustic foam has also arrived so my plan is to knock up my own silencer and when I receive the silencer from BPC, test run both to see which is most effective on the supply, and use the other for the extract.

  • Like 1
Link to comment

Hi, do you have the product literature sheet for the MVHR (attached is an example), from which you can get an idea of what noise levels the unit is meant to produce (the supply db is the key one this is what get transmitted down to the rooms), we typically convert this into an NR level with the aim to get near 30NR (your ears hear things differently at different bands NR method takes this into account). Once you have this, you can understand better what silencer you need or if you system is working correctly. ie if your unit is making too much noise compared to the data sheets you might have too much resistance (fans working to hard) or something else wrong.


ryan


mvhr_-_lo-carbon_sentinel_kinetic_plus.pdf

Link to comment
3 hours ago, Ryan4Healthy Home Movement said:

Hi, do you have the product literature sheet for the MVHR (attached is an example), from which you can get an idea of what noise levels the unit is meant to produce (the supply db is the key one this is what get transmitted down to the rooms), we typically convert this into an NR level with the aim to get near 30NR (your ears hear things differently at different bands NR method takes this into account). Once you have this, you can understand better what silencer you need or if you system is working correctly. ie if you unit is making to much noise compared to the data sheets you might have to much resistance (fans working to hard) or something else wrong.


ryan


mvhr_-_lo-carbon_sentinel_kinetic_plus.pdf

Hi Ryan. Welcome to the forum.

Good comment and maybe you can post an introduction and give us some background ;)


Link to comment

@Ryan4Healthy Home Movement  That appears to be the product sheet for the unit I have.


I have actually now made my own silencer, currently testing and it has made a big difference.  Waiting for the silencer from BPC as referenced earlier to compare.  Will be writing a blog entry on this shortly.

Link to comment

Any pics of the silencer? Got to buy or make one myself before long.  How did you seal the duct in?


Cheers


Cc

Link to comment

@CC45


I'll be doing a full post on this shortly, but here's a preview...


594bdb1fb71a5_IMG_20170615_1332031.thumb.jpg.57e2879355685046de598e4e417b058a.jpg


Fairly simple MDF box lined with acoustic foam.  Duct holes cut out and pieces of duct sealed to box with fix all, inside and out.  


Picture shows it before it was wrapped in insulation.

Link to comment

Looks similar to one of the two I made up.  Nice to hear (or rather not hear) that it works OK.  I was impressed with the difference in noise that fitting the two DIY silencers made.

Link to comment
50 minutes ago, Stones said:

@CC45


I'll be doing a full post on this shortly, but here's a preview...


594bdb1fb71a5_IMG_20170615_1332031.thumb.jpg.57e2879355685046de598e4e417b058a.jpg


Fairly simple MDF box lined with acoustic foam.  Duct holes cut out and pieces of duct sealed to box with fix all, inside and out.  


Picture shows it before it was wrapped in insulation.


Hmmm ... plastic duct ..?? 


I've considered that as I find it easier than metal to work with. 


May make it easier to insert a heat / cool matrix in the end too ..!

Link to comment
2 minutes ago, PeterW said:


Hmmm ... plastic duct ..?? 


I've considered that as I find it easier than metal to work with. 


May make it easier to insert a heat / cool matrix in the end too ..!

I would echo that.  I did the "large" pipes in my system using some insulated semi flexible aluminium duct that my plumber friend had left over from his job.It turned out to be a pig of a job as I soon found what I thought was a solid aluminium duct was in fact a spiral wrap of a thin strip of duct, and unless you were very careful it started unwrapping the spiral. I would not use that by choice.

Link to comment

I used 150mm plastic duct and elbow, with just very short lengths of flexible duct to the MVHR unit, to absorb vibration.  The rigid plastic duct was relatively easy to work with, it just needs a bit of care when cutting it.

Link to comment

I used plastic as this is what had been supplied as part of the kit from BPC, so I was really just using up odds and ends that I had.  For the connections to the MVHR unit I used insulated flexi ducting. 

Link to comment

Create an account or sign in to comment

You need to be a member in order to leave a comment

Create an account

Sign up for a new account in our community. It's easy!

Register a new account

Sign in

Already have an account? Sign in here.

Sign In Now
×
×
  • Create New...