Jenki
-
Posts
836 -
Joined
-
Last visited
-
Days Won
7
Everything posted by Jenki
-
The timer is variable. So could do 5mins on and off. Good to hear this is already a thing...
-
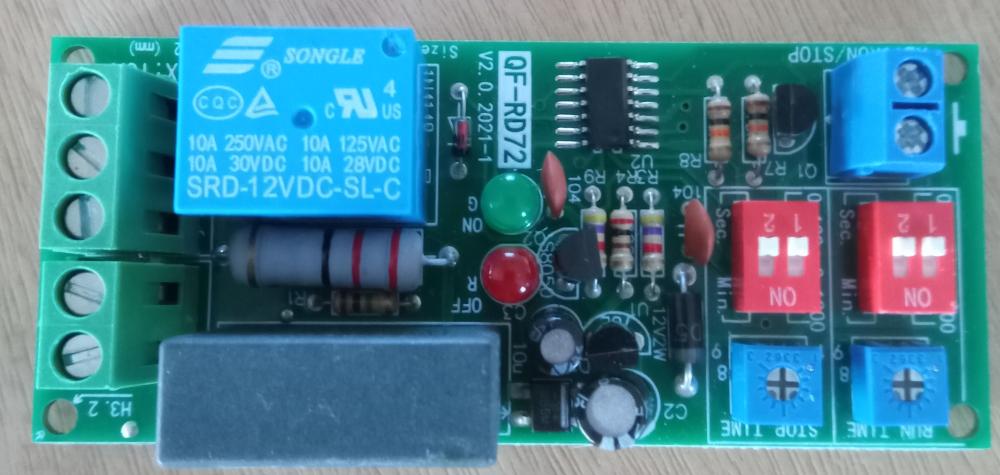
This has been discussed on here before. My treatment plant runs 24/7. That is the Compressor runs 24/7. I have read that switching it off there is a chance that water can syphon up the air tubes. SO I was wondering if I was to turn it on and off hourly I would reduce the risk of any damage by syphoning and reduce the running costs by 50% We have a large plant 12P and currently only 2 people using it. when the cabins are fully occupied then this may jump but the reality I only ever see 6/8 people max every day. (it was sized by SEPA- I had no choice) I have found this little board that does what I need, turn on for x time, turn off for x time repeat. any thought on this as a plan would be appreciated. The setup would be temp, until the house is built then I may come up with a better solution but for now the treatment plant is plugged in, so was going to put this in line just after the plug.
-

Flexible Drainage Couplings...
Jenki replied to Mulberry View's topic in General Self Build & DIY Discussion
In my dealings with BC they like the main flow to be on the bottom so that it cleans any incoming from the branches. I don't see any issues with your suggestion, if anything it's removed some 45's so a good thing. It doesn't stop the s**t getting clogged in the joint though. I tend to think when using the rubber couplers it's better to have a bigger gap between the two pipes i.e. don't try to butt them up. The space will afford some self cleaning. -
Flexible Drainage Couplings...
Jenki replied to Mulberry View's topic in General Self Build & DIY Discussion
@Mulberry ViewThey call this a rocker joint, the idea being that there is some flex as the pipe passes through the concrete to allow for settlement etc. I agree it doesn't make for a smooth drain. However I was watching a film on YouTube by Wavin, ( it actually had Tony Cottee as a presenter) Anyway they used a standard joint either side of the footing, which seems a better solution. Maybe ask BC if this would be acceptable to them? Found it. 2min 39 -
Trend do a nice hinge jig, coupled with a 1/4" router and you can do the door and frame hinges. I've also got Souber DBB 5 Minute Morticer JIG1 Door Lock Mortiser Kit 19mm 22mm 25mm https://amzn.eu/d/d5kd3BB That is good for door locks both tubular latches and 5 lever locks/bathroom locks. I've never found anything good for the latch plate on the frame though. So that's spade bits and sharp chisels. I tend to buy latches that have the large catch plate as these tend to be the depth of the rebate, so it looks cleaner.
-
Opps - yep TerryE
-
As an installer, bring it on😉
-
Just protect the roof from any sharp edges and no worries.
-
I can't help direct..but suggest you look up @Terry H blogs he modelled his Slab and there may well be some helpful information in there.
-
For me, having done GRP and rubber. Without a doubt it would be EPDM. A decent installer will have no issues detailing the lantern and box gutters ( I'm assuming that's what you were describing) EPDM can sit in water with no detriment and can easily be patched if it gets damaged.
-
You'll have to expand on this. Is it similar to the folds when doing rubber roofing?
-
You need to think about cold bridging. In the above picture that block work will suck the heat out of the build. Post some plans of what your thinking and you will get loads of good advice. It doesn't have to be expensive.
-
🙈🤣
-
In Scotland, my BC stated the two shall not meet. I.e 50m rubble drain for treatment plant. Separate soakaway for top water.
-
so, maybe a scratch coat on the reveal before window install, then I know its stuck and seal from here. more to think about. Does the EPS need priming before base coat? if so any recommendations for a product
-
Thanks for the input @Nickfromwales, only issue is 'no render' as its being timber clad. I could peel and stick the whole reveal, but this wont improve fire rating. I could add cement board and then clad?
-
The drainage of the window should be at the front of the window, the cill / Sill sits slightly back allowing it to drain. The gap you see, as you suspect is not correct, I would seal with silicon. Use a narrow blade to 'tool' the sealant to maintain the drainage path. not ideal, but better than water egress As @Onoff has said, if the install is this poor on what you can see, I would expect far worse on the inside reveals. I would ensure you get some algicide on the render / frame to clean it before attempting to seal.
-
Me neither. I'm not out of the ground, but I want the details sorted now. So the day to day issues don't get in the way of the details and missed
-
If you fix EWI then it's usually glued and the fixings go into the webs of the ICF either plastic or metal not into the core
-
I can't believe my detailing is perfect, so maybe my post needs a little bump as it may have been lost in the other forum activity.😬 There are a few ICF builders and I would appreciate thier hard earned knowledge. If by some fluke of nature it is perfect a little like 💙 from 1 or 2 of you would put my ever racing mind at ease, until the next question arrises, which to be fair there's loads rattling around. Thanks
-
Hi, @Martin S I Can't remember seeing anyone use this during my research. I've settled on PolySteel. I like the steel mesh inside the blocks, and they gave me free structural calcs / reinforcement schedule as part of the cost.
-
I think you've hit the nail on the head. There are a few people on here who have built and used Ecocent and had good results. I was tempted to look at these, but still need heat for the house, so I've settled for ASHP.
-
Building regs drawings needed - Any reccomendations?
Jenki replied to NickK's topic in Building Regulations
@NickK you say too much 30k is that 30k over budget or 30k is too much? I've built many an extension and the problem you will run into is that small extensions and large extensions don't conform to £x /sq M. Builders need to be there and bring all the gear etc. Footings and digger small extension day to dig, larger ex to extension a day to dig. So some costs are the same. Obviously materials are more. With regards to drawings, I drew all mine for planning and BC. Look on planning portals and copy. -
Looked at this, and opted for the AIR Heat pump, and I'm still happy with this. biggest mistake was single glazing 😥.. The stove had too many negatives, no free wood, cost, dogs etc.. just concentrates the mind to not be in here too long.
-
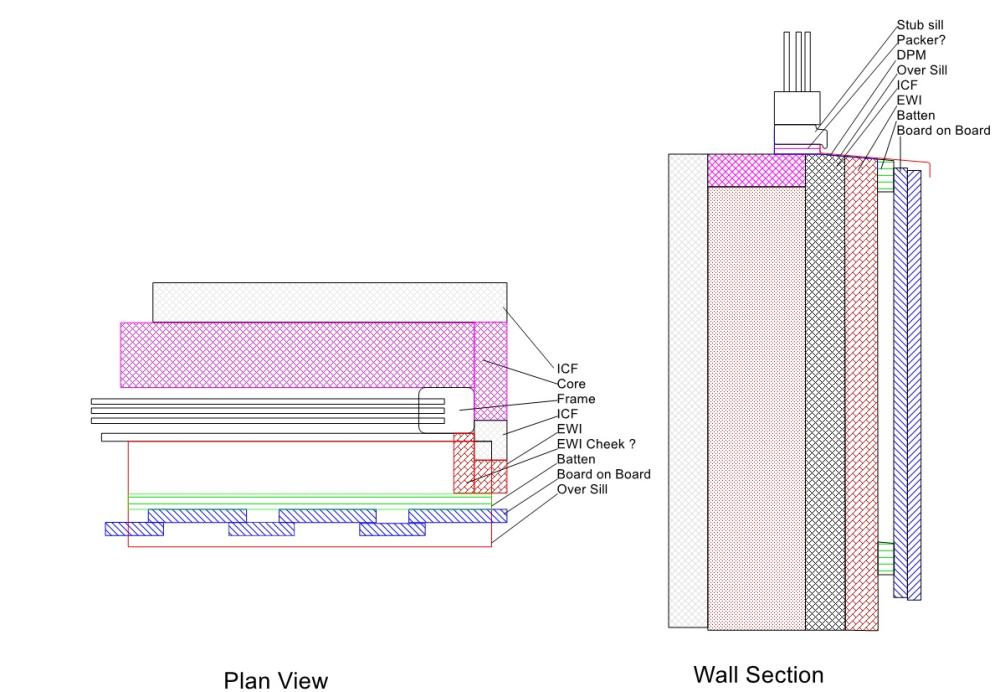
Following on from my Foundation post, I want to get the detailing correct on the windows, this is spurred on further by reading this post My build will be with PolySteel ICF, 50mm EWI, Board on Board vertical cladding. UPVC windows. I'm thinking of using a stub sill on the UPVC window and then an Aluminium over sill. Using the sketch by @Babak in the above post, I have come up with the following Questions: 1: I'm thinking I need to add a packer (compact foam?) under the stub sill to allow for the over sill to be sealed - is this correct? 2: I'm thinking of adding 20mm EWI on the reveal to form a cheek, so the window can be sealed to this? 3: DPM, this need to be under the sill, over the outer wall and sealed, also out past the side of the reveals with an upstand. This detail would be very difficulty with Std DPM, so was thinking of using strips of peel and stick EPDM? or would Triton Liquid Membrane be better? To finish the reveals I'm looking at possibly using Black Soffit board as this will give a neat easy to seal finish against the frame.