
ProDave
-
Posts
30861 -
Joined
-
Last visited
-
Days Won
427
Everything posted by ProDave
-

Open plan conversion - load bearing wall?
ProDave replied to Jduncan's topic in General Structural Issues
I have never seen a stud wall built at 900mm spacing. That is extreme penny pinching and makes life awkward for the trades as already mentioned. What plasterboard was on that wall? Standard 12.5mm is surely not intended for a 900mm span is it? -
Is this the SAME chimney already being talked about in your damp patch in the ceiling thread or a different one?
-
Open plan conversion - load bearing wall?
ProDave replied to Jduncan's topic in General Structural Issues
Another thought. Joist directions (and this is speculation) I would expect the joists above the living room to span side to side of the house as that is the shorter span. But the joists above the kitchen / diner would be a long span doing that, so could that wall you are wanting to alter be supporting those joists and they are running front to back? I would start by dropping the downlighters in the kitchen and having a look to see if you can determine joist direction in the kitchen / diner area. -
Open plan conversion - load bearing wall?
ProDave replied to Jduncan's topic in General Structural Issues
Is the house detached or joined? The OSB cladding could be because the wall is rated as a racking wall, to resist wind pressure on the side wall (assuming it is detached) -
How can the bubble on a Megaglow disintegrate? It is just a dome in the top of the cylinder above the waterline so as you fill the cylinder with water air is trapped in that bubble and compresses to take up expansion. It can lose the air bubble over time, in which case you follow the procedure to drain the cylinder and re fill it. No need to fit a separate EV. Since you have not regenerated the internal bubble have you checked your external EV has not failed? is still retaining air pressure in the bladder etc?
-
Check the tundish to see if there is any discharge. It sounds like one of the relief valves opening or closing. The megaflow tanks have an internal "bubble" for expansion and there is a procedure to regenerate the expansion bubble which would be my first thing to try.
-
As above. I would not have even mentioned previous animal waste. I would just have mentioned previous rainwater drainage that has proved satisfactory.
-
Are you suggesting to lay MOT in the trench, then pour concrete then build the wall? That is not normal. Normal is concrete in the trench blocks straight onto that. It would be cheaper to buy a few more wheelbarrows and get some mates or paid labourers to barrow it round. Preparation of the rout is important to avoid steps or other obstructions.
-
Oh dear. Why on earth would they cut continuous long beams? As others have said. Halt any more work and any more payments and get BCO and if necessary a SE to look at what has been done. In an ideal world it would all be re done, but now it has been built up on top of those joists the easiest solution is likely to be to get a SE to specify exactly what to do to make the present work safe and stable, and then watch them like a hawk to ensure they do that exactly, even things like using the screws or nails that the SE specifies, not what happens to be in the back of the van. P.S our joists also have more sections of I beam at mid span acting as noggins as well as those in my photograph above the bearing points.
-
I would be very surprised if the tanks are plastic. Most likely brick or concrete. Lift the lids and see.
-
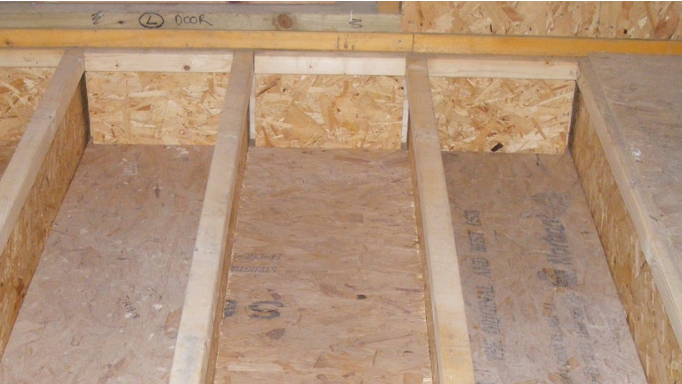
This is how ours were done Short sections of I beam came with the kit to go in between the main ibeams where they rested on a supporting wall. They did not fill in the web, but that might be because our beams came made up as 11 metre long beams to span the entire length of the house resting on supporting walls on the way, so no joint between separate ibeams as you have in your case.
-
I did the same with our airing cupboard for a similar reason, but it was a pair of sliding doors so a sliding door closing up onto a wall with no door frame. It looks fine. If you are not happy with the look, an alternative is make that side of the door liner separate to the rest and retained with just a few screws so you could easily remove that side door liner.
-
Looking for advice and help for a shed/workshop
ProDave replied to jobe1972's topic in Planning Permission
Check the planning history. You might find the existing shed has PP -
So basically they have not fitted the door and door liner?
-
There is something more fundamentally wrong here. That does NOT look like a load bearing wall, there should be a double header. Anyone else care to confirm that or tell me it is okay?
-
What does your building control inspector say? If (s)he says it is wrong, the builder might stand up and take notice.
-
Static Caravan in Back Garden in Scotland
ProDave replied to tacali's topic in General Self Build & DIY Discussion
What a static caravan brings to the party is a way to get over the permitted development eaves and ridge height limit. They have a different limit of internal ceiling no more than 3M high. And they are exempt from building regs where some large outbuildings might require that. They can also be very cheap in terms of £ per square metre. So there is merit in buying one and improving it. -
Ditto for me. Except it was me with my rods that found the water main, not where it was mapped as being, when the Scottish Water subcontractors were about to give up and go home because they could not find it. someone that can do divining (that might even be you, go on try it) could follow the water pipe out of the garage to the well.
-
It's an optimistic name for the master bedroom.
-
This site is worthy of a look not necessarily to buy from them, but because they show a lot of different options. https://www.continal.co.uk/systems/suspended-floor We used the pug mix system, very cheap and easy, but make sure the joist are rated for the extra dead load.
-
Static Caravan in Back Garden in Scotland
ProDave replied to tacali's topic in General Self Build & DIY Discussion
You can have a static caravan as a garden outbuilding without planning permission. If you connect it to a drainage system that part will need a building warrant but still not planning permission. Expect to get someone from the council snooping. If you are just using it as a general purpose garden building as for instance storage and a work place, or a summerhouse then you will be fine. What the council wants to check is you are not using it for self contained habitation. That is where you will need planning permission. So if they suspect you are using it for that, they have a right to come and check. -
It will be interesting to see how much difference it makes, but it is like permanently having a very large loft hatch left open. It is also disappointing that the surveyor did not mention it might be a good idea to close off that gaping great hole and insulate above it.
-
I would frame and board over that hatch. Then insulate that new ceiling from the eaves loft access. At the moment warm air from the house can get up that great big hole, meet the cold air in the loft and it is no surprise condensation can drip down the old chimneys. In the short term stuff some rockwool down the old chimneys from above and lay a sheet of it over the top of them. You will find your house warmer and heating bills lower when you do that.
-
If you can get into the eaves space you should be able to see the top of these old chimneys. Start by insulating the eaves space with normal rockwool type insulation making sure the tops of the old chimneys are covered. for good measure stuff some down from above. Once all nicely insulated replace the plasterboard with foil backed which is more resilient to moisture.
-
Those look like the remains of 2 chimneys, hence the black, that is years of soot. It looks like the chimney stack above has been taken down and roofed over? (more external pictures might confirm) and the lower internal chimney breast removed.