ruggers
-
Posts
335 -
Joined
-
Last visited
Everything posted by ruggers
-
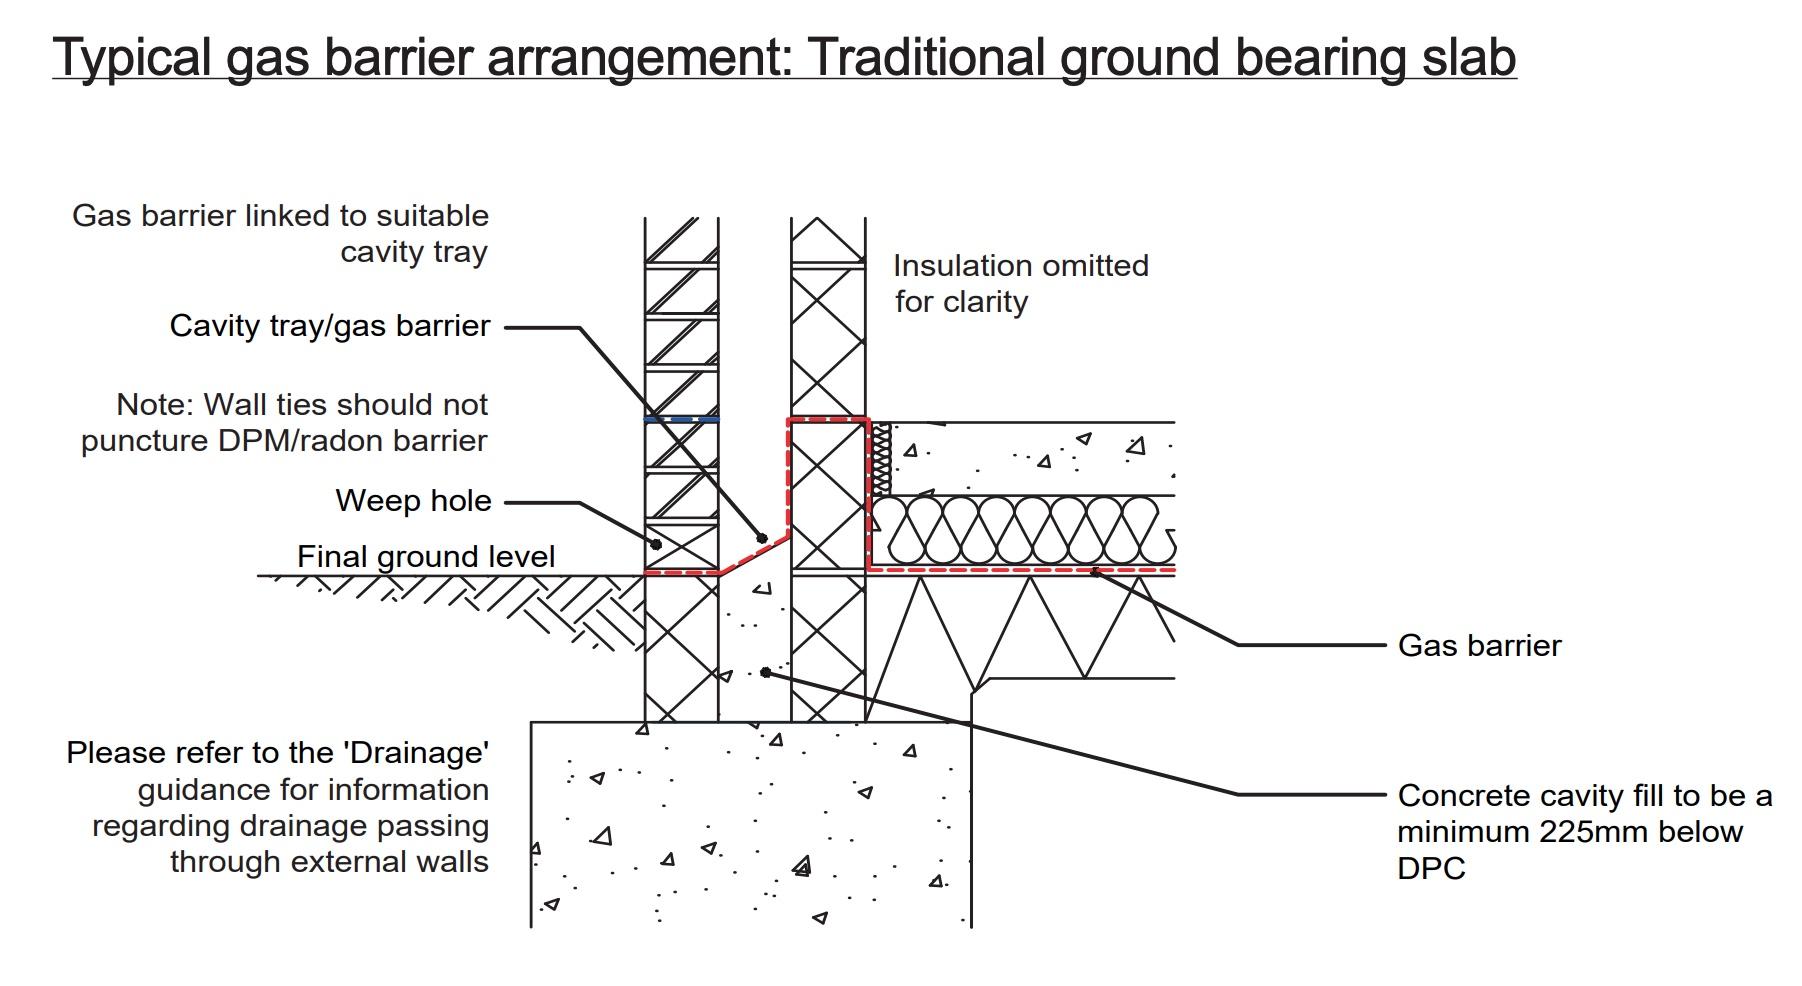
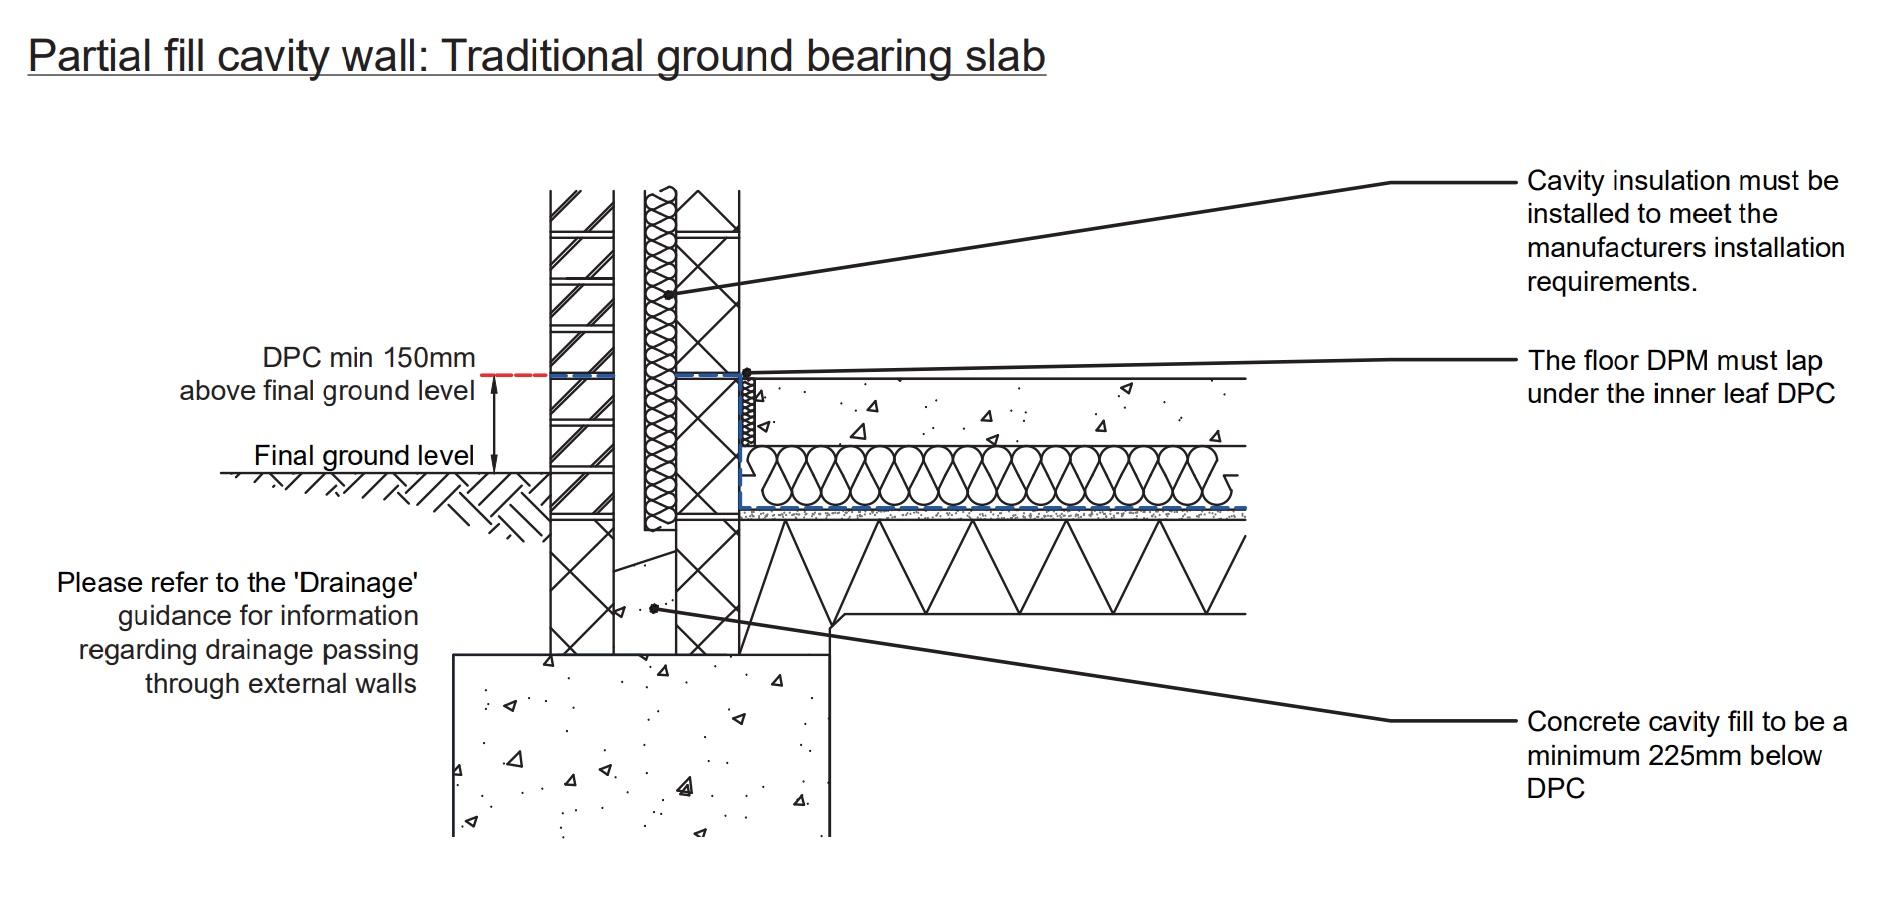
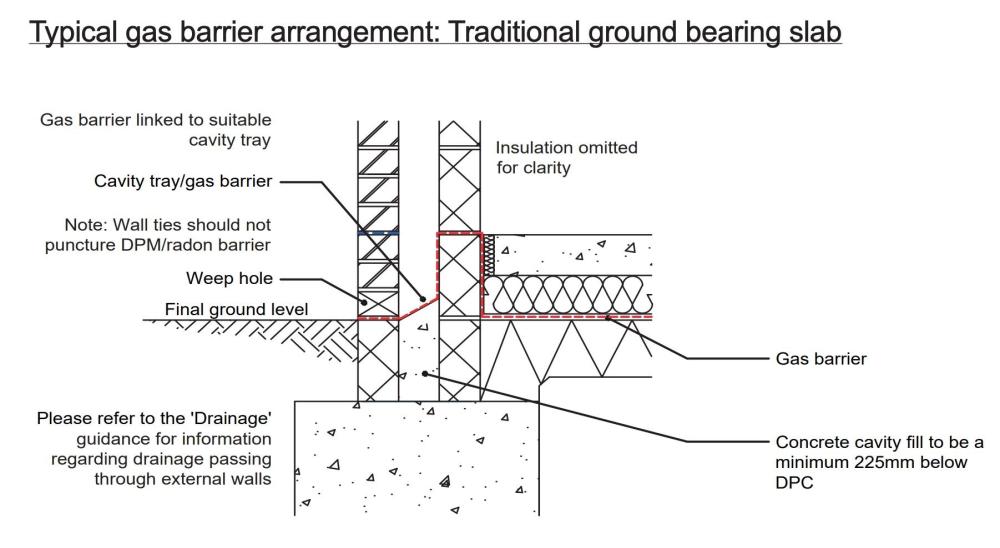
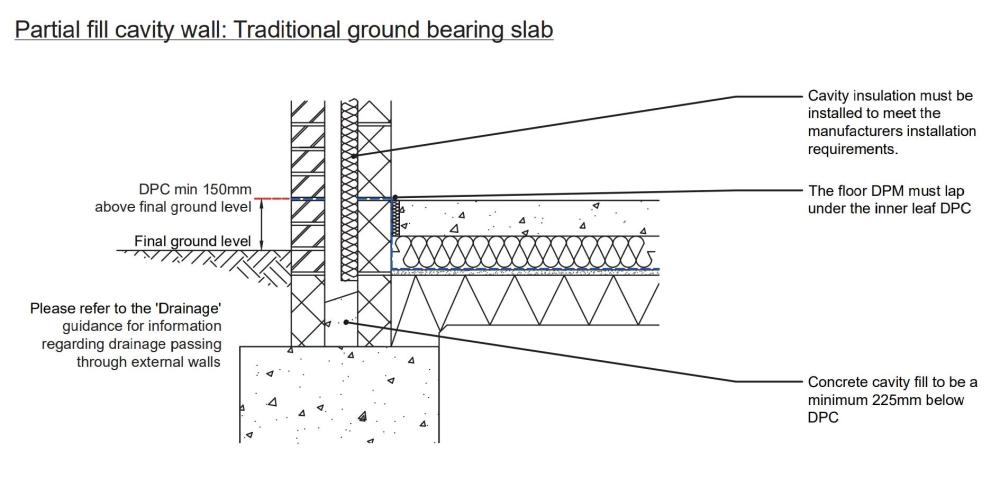
After a review of my plans and discussion with the person completing them, I wanted to check a couple of areas that I think will cause cold bridging. The construction is cavity wall, 100mm dense block inner leaf, 150mm partial fill cavity with 100mm PIR, and a mixture of face brick outer leaf and dense block with composite cladding screening. Weather zone is severe 4 for NW England so blown bead isn't an option. House will be parged, internal insulation and MVHR. 1. The architect has detailed for a a returning block on any opening reveals with a DPC separating the outer from the inner. Would this not be a huge cold bridging area, if so how do i get around it and where would the UPVC windows be positioned for a solid fixing? What are my best options to minimise cold bridging but to not over complicate the window fixing. I've seen someone suggest only a partial 75mm block/brick return of the 150mm cavity then use a push 75mm closer for the remaining part. This adds a thermal break and means the return blocks work out for 175 block & a standard brick above course. or just go full 150mm closer? 2. How do you extend the cavity wall insulation down to the bottom of the floor slab level when using a radon barrier which bridges the cavity. See image detail.
-
It's always good to do things correctly, thats why often on here its good to hear other peoples opinions and how they go about it. Sometimes you can take all of the idea or even just parts of it. Theres often little tips or items you can buy that you didn't know existed if not in the trade. I've got a good idea now what to do so I'll take some photos when i get there and come back to these posts because someones always looking further down the line, so i appreciate the replies from all, cheers.
-
@Temp thanks. Can solvent weld pipe be used encased in the floor where you can't replace it? I was thinking if the pipe gets damaged where it comes out the wall or through UV damage over the years as they do, you can't add a new section to the part in the floor. Options would be to sleeve the pipe within another but the tray would still need lifted to join to the new trap. I also found this image from a 2019 post that someone added on this forum which i thought was really good. Could have the tray FFL mounted and a smaller cut out of the screed under the tray to take the trap and connect to the 110/50 inlet. But not too large that it has no support under it. Maybe even infill part of the void with timber again once all connected up.

-
Thanks @Nickfromwales I'll definitely be using sweeping bends where i can, Is 50mm recommended so much just because it flows better than 40mm only? I've had no issues with 40mm on my current shower on a first floor but don't mind stepping it up. Do you use 50mm on the first floor also and 32 for the basin pipe work? I thought a 50mm pipe entering horizontally into a vertical soil stack at a lower point than the 110mm toilet enters could cause blockages on the 50mm waste entry point. I might have to use a radon barrier as precaution so the cuts over pipes will need sleeved and taped if thats the case.
-
@temp a picture speaks 1000 words as they say, exactly this thanks. The coloured image will be my floor make up, but the tray is in the back corner of the room not on the outside wall. So from the centre of the tray to the outside will be 2100mm. The nearest stack will be 2.2m further along the gable wall (Downstream) from where the pipe breaks out, so I'm thinking it might have to terminate into a gully which will tee into the main 110mm foul which runs down parallel to the gable wall. The ground floor toilet in the same room will exit via the floor slab with a sweeping bend into the mains too. How do waste pipes normally connect to the mains if the stack is't near. My only concern now is referring to the coloured sketch you added which is how I'd have to do it to keep under the screed. With the top of the screed being level with DPC, the outside is 150mm 2 brick courses down to the ground path height. So deduct 50mm screed, then deduct 40mm for the 2.2m waste length at 18mm/m fall, then the diameter of the pipe 45mm = 15mm from pipe to path finished level. I'd have to make a hole in the DPC too. Can a 40/50mm waste tee into a 110mm vertical foul pipe without getting blocked with crap? I always thought basins/baths/showers had to join into SVP higher than where the toilet does.
-
@NickfromwalesThanks for the detailed reply. Whats the flexible hose your referring to that's compatible with the drain components? I'm going to read over this a few more times to get my head around it, at least i know theres options for this, yours and @Temp are probably most suited to this room. Whatever I choose, I'll come back to update it at a later stage for anyone elses benefit. My floor make up is now, 100mm slab, 150mm rigid sheet insulation, then 50mm liquid screed with 16mm pipes encased. I'm not overly fussed about 40mm shallow trays or the walk in look, but by placing a tray on top of the finished screed floor whatever depth, due to the traps I've seen, the crown of the pipe coming from the trap will be then sitting within the floor screed for the first 1m of fall If I position the tray closest to the exit wall to outside. My options to avoid this seem to be, 1. turn the 1200x900mm tray 180 degrees so that the waste is a little further away from the exit wall and instal a timber support frame screeded up to and around the frame as Temp suggested, this will provide me 1m at 18mm/m fall so that when the pipe reaches the screeded floor area, the top of the pipe is then sitting under the screed within the insulation. downside to this would be, tray timber support having to rest on the concrete slab so no insulation underneath and cold bridging between screed and slab. 2. Buy a deeper tray around 90mm and have it set down 50mm into the floor so only 40mm is showing above FFL, this would then lower the trap height resulting in the top of the waste pipe being below the underside of the finish screed and wouldn't interfere with my UFH layout. I'm just unsure how to have a solid insulated base underneath the shower tray because sitting the tray or timber frame direct onto sheet insulation wouldn't adhere or be stable. It might just have to be an area thats a weak point, infill a timber frame with some insulation.
-
Looks a really tidy job, did you have to add a U bend of some sort into this system or what was in place to prevent any smells coming back from the 110mm foul drain your connecting too since you opted not to use the shower trap onto the linear drain? @Onoff thanks, I think the geberit looks another good idea but with it being a small bathroom i need to keep the drain within a tray rather than a wet room style.
-
Thanks temp, all good advice and should be doable, a little more technical than id of liked at that stage in the build but workable. Unlike a 110mm floor installed toilet soil pipe, you can generally adapt new toilets to always fit. Locking a shower waste into the floor screed, thats then fixed and any new shower tray replacement will require the exact same hole position in the tray. Im not sure they always match up between brands? It shouldn't be a problem for a long time if looked after and using stone resin tray, i just dont like the idea of having to destruct a good floor at a later date if i had to change it. Does a solvent weld hold up as many yrs as the screw fit? Pipe run will be 2.2 to 2.5m.
-
Which heating system to use on our new build?
ruggers replied to Johnny Jekyll's topic in Underfloor Heating
Make sure adding the insulation into the eaves doesn't prevent airflow from soffit or facia vent flow, it can sometimes cause mould issues on breather membrane but having your ceiling vapour control and air airtight loft hatch will at least prevent anything from leaving your living space. -
Thanks Temp, I've just used one of them traps for a mates bathroom, I installed a 40mm tray onto 6mm ply which was on top of 22 Weyrock. I cut out a circle into the weyrock to fit the trap but the only problem I found was the top of the nut securing the waste pipe to the trap was fouling the underside of the weyrock leaving a gap between the trap and the underside of the tray, so i needed to cut more out of the floor. It would be nice to find trap where the outlet sits lower down the trap body. So with the method you describe above, you mention installing the pipe then the insulation, membranes and screed. Do you split the insulation either side of the pipe, lay some under and over or cut a channel out of the PIR that sits above the waste pipe? I suppose I'll need to purchase the tray early on if installing pre screed, i was hoping to install stud walls after the screed for this room but might have to revise this.
-
Which heating system to use on our new build?
ruggers replied to Johnny Jekyll's topic in Underfloor Heating
Valliant got some of the best system boiler reviews in my research. Combi's I've found baxi platinums to be excellent, now with 10 year warranty. Insulation in the liquid screed will work the best and 50mm will give a good reaction time. You won't get better than the porcelain tiles for heat conductivity, nice and cool in summer too, LVT will still be great though due to it being so thin. I've just been told to also use 400mm loft insulation, is this the new standard, it was 270-300mm? @JohnMo What's the reason for this, in an unvented cylinder would doing this not mean that the CH is constantly drawing temperature away from the stored DHW, using gas only, how do you heat the DHW tank if the CH is lower? -
Not sure if this one is for the plumbing, bathrooms or the design section. For my self build, I was planning on having a beam & block ground floor construction and having a small bathroom or shower room with toilet and sink. The architect has changed the bath to a shower and also now using a concrete slab floor. The make up from top down will now be. 50mm screed with wet UFH inside, membrane, 150mm insulation, 100mm concrete slab, membrane, sand blinding, stone. With a P shaped bath I was planning to keep the waste pipe above the finished screed tight against the wall with some boxing in as it leaves through the wall to an outside drain. How if possible can I fit a shower trap into a screed floor along with the 40mm waste pipe and not clash with the UFH pipe which was planned to cross its path? Normally you'd bed the stone resin tray down onto a finished surface and ensure the trap fits correctly but the pipe would already be encased at this point with no play in it. I could possibly replan the ufh pipe route so it wasn't in the way but I'm not sure how to install a shower waste pipe and trap so that it's in a finished position before the floor screed. Once set if wrong it's a disaster. Any advice from plumbers or designers would be appreciated.
-
Interesting to read the pro's and cons of fitting insulation before or after MVHR, plumbing and electrics. I've been thinking about the same. I see nods point of people having to or not wanting to work around pre installed rockwool but also the pro's of pre fitting it so that full slabs can be installed and not having to later cut around plenums and down lights etc. I will be the one installing 85% of the plumbing and MVHR but not the wiring. If I'm passing semi rigid ducting down from upstairs to the ground floor plenums, the ducting will have a nice sweeping bend on it into the 253mm posi joist void, so I'm thinking the ducting will naturally sit better in the lower half of the joist with insulation above? For maximum acoustic performance, is there any best position for the rockwool to be placed. Eg does having is hard up against the underside of the 22mm flooring work differently with no air gap either side?
-
All of them are good examples but I'd expect the genie clip with tech sound 50 to work very well as theres less contact patches. Sound struggles to travel through different layered materials with varying thicknesses. So on double glazed windows, if you can have the inner and outer panes of glass at different thicknesses it stops the frequency travelling through so easy. The same applies to the walls when your decoupling the plasterboard with the rubber sheet or using two different types of plasterboard. You might want to also decouple the stud work from the floor walls and ceiling but it depends how far you want to go. Staggered twin stud walls work best with rockwool in both.
-
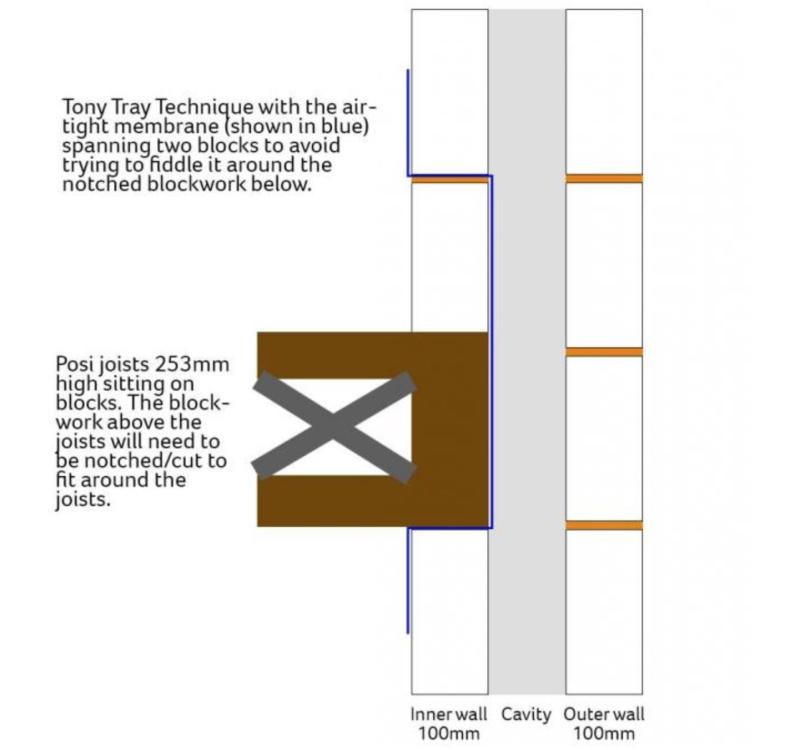
I'll make enquiries about top hun joists. Would the TT still be used for this? My thoughts with both chords sat on the wall using the TT method and 253mm joists, with the wall ties being every 2 courses of block at 450mm, the spacing won't work out. The membrane would have to go up an extra course higher to avoid feeding it back in through & around notched blocks. It is possible as per a previous diagram someone posted on here which you replied to, but it would mean having the wall ties on the same course as the joists are sat on as well as the membrane under them, there would be no mortar to secure the wall ties down if they're slipped under the membrane. Having them a course above or below would pierce the membrane. Unless I misunderstanding it, I can't see how to work it around wall ties.
-
I didn't think top hung was possible, I suppose with a bearer under the bottom chord as well, then it has good support, but top hung with bearer over the bottom chord, what benefit would that have? Are you still suggesting to use the membrane wrapped around the joists?
-
Tony Tray Airtightness
ruggers replied to Johnny Jekyll's topic in Energy Efficient & Sustainable Design Concepts
Are you meaning that using a grey concrete common brick for a course or two combined with solid dense blocks it will form cracks? -
Thanks for the photo, appreciated. It certainly helps with that gap behind to run services as that was the only draw back I could think of. I need to discuss the 3 options with my architect, I've been back & forth between wall bearing using tony tray, masonry hangers or ledger board. The joiner I'll be working with & the Architect are most familiar with wall bearing joists but not so familiar with airtightness to a high level. The three options seem to be similar in cost. TT requires the membrane which I need to check which type is used & further info on installing end & corner detail. Ledger board requires cheaper hangers and resin fixings and masonry hangers are a little bit more expensive but probably the easiest install method. There doesn't seem to be a lot
-
Didn't realise you can add spacers behind a ledger board because it would affect the structural dynamics and add more stress to the wall anchor bolts. the most I'd need to add behind would be 15mm water pipes and cable access between floors and where the returns drop back down to the fuse board located in the attached garage. A wall chase would be too deep and wide and not help air tightness really.
-
Some good info. there Rishard. I've used a ledger board on one side before and the other end build into the inner leaf but it was over a decade ago using solid joists and I'd never heard of airtightness back then. What are the restraint straps you refer to, are they part of the hanger or an additional brace? How have you seen services like cables and pipes pass the ledger board between ground floor and first floor? I've noticed they do a green glue 3mm joist tape now that you can apply to each joist top and screw down through the 22mm board into the joist. It's supposed to offer some acoustic seal and prevent squeaks the same as glue. Looks good but not seen any reviews yet.
-
Thanks Joe, The only way I can think that masonry hangers could let in in would be at a later date after the floors been walked on jumped on etc and over time little cracks appear. Adding some soundproof paint around each hanger might help with this if it has some flexibility in it.
-
At this stage I'm able to discuss these options and they can take it to the SE if required. Somethings require one others don't. I think the ledger plate would require some SE input. Adding the membrane around the outers of the joists Tony tray method seems a good way to it when using 253mm joists. Pending how the block work is fitted around that size of joist ends it could end up with notched blocks and more potential for air leakage. Using hangers hung from 2.7m down would leave 2447mm ceiling height, then ceiling board and wall board would leave around 30mm between bottom of plasterboard and ground floor. Slight extra cost for the masonry hangers. The joist company said 253 is standard, they'd have to look to see if 225 or 300mm can work for my spans and the cost. The two things I keep reading but getting no solid answer on are: 1.Masonry hangers can cause a lot of potential air leakage issues in future with partial fill cavity. I thought they'd be a great seal? 2.Masonry hangers can induce a lot more floor spring than wall bedded method.
-
Were you on standard joists to match your brick work. No issues with springing or squeeks? The 253mm high makes a lot of labour for a brickie, notching around 50 joist ends sounds messy and costly. Manthorpe do a nice joist seal but it's wasted if the notched blocks around it aren't airtight. I liked the idea of no.3 for air tightness & being able to level the floors easily for any block work irregularities, but it requires all of the ledger plates to be nice & straight and it makes it hard to pass services/cables between floors close to the outside walls having to work around the ledger board.
-
I was unsure if this post should fall under airtightness or build construction. Looking for advice from anyone who's used this depth of joist and considered good airtightness. The joist companies have recommended 253mm deep posi joists for my masonry self build with cavity wall which is an odd size for block work courses being 225mm. How do builders get around this? After speaking to people on here regarding air tightness around joists for a build that will have MVHR, I'm looking for advice on the best way to fix the first floor joists to the inner leaf so I can discuss this with the person doing my building regs plans. There seems to be 3 different methods but I'm not sure which is the best and the pro's and cons. Cost vs labour and airtightness. 1.Joists supported sat on the inner leaf. (Optional Tony tray method) 2.Joists hung off masonry hangers that fit over the wall. 3. A timber ledger board fixed to the face of the inner leaf and secured to the wall by mechanical fixings, then the joists attached via timber joist hangers. Would this method be best for airtightness and make levelling floors easier between inner leaf and inner supporting walls?
-
As per previous two comments the staggered stud wall thats decoupled from each other offers the best gains from my research but unless your washer shakes around a lot on the floor or pressed back against the wall, most of it will be airbourne sound so the doors a weakness. Look at adding something like rockwool rw45 between studs and then soundblock board. You could decouple the board to stud using green glue tape or adhesive sealant. Drop seal on the door if you dont have mvhr. Sound cant travel through a vacuum but we cant live that way so its minimising impact and airbourne