markharro
-
Posts
624 -
Joined
-
Last visited
Everything posted by markharro
-
Looking for leftover Tescon/ air tightness tape
markharro replied to Omnibuswoman's topic in Environmental Products
I could offer you some but its Partel tape but it looks like @moonshine has you sorted. Separately, I could do with maybe around 10m or so of plain black airtightness tape - ideally Tescon Invis but any black would do. Also looking to avoid the delivery ££ on a full roll -
I am planning to use clear CT1
-
How are you getting on with @sean1933 I really need to work out what I am doing with our doors etc. You mentioned teh Ezyjamb was £500 - did that include a door blank?
-
To renew this thread we are shortly to have our HW cylinder installed and connected up to the flow and return pipes which will then be getting insulated - question: is there a standard thickness/type of foam insulation to use around the pipes internally? thanks
-
We've gone for "nice" ply (great BandQ find) and fermacell for ours.....

-
We went for Uniwin - pretty pleased with them so far and price pretty good and they installed too. Front door however is from Inotherm. Very impressive build quality but a major hassle getting passive house data on it from UK supplier.
-
I am thinking of https://www.smart-secure.co.uk/product/eve-motionblinds-upgrade-kit-for-roller-blinds/ to automate a roller blind. Has anyone used this? Also anyone recommend an online shop for blinds where I could buy a standard roller to retrofit with this motorised kit? A google search throws up all sort of naff websites.
-
All of £1.50 a year @Dan F! Ok if thats the case then it would seem that there would be no point at all. It seems to me then that the easiest way to deal with the reveals would simply be to pack between the metal window fasteners with some scrap 12mm Ply of OSB to take out the bumps and then glue or screw the final finish board to this. That would completely remove the need to buy more material to rout or cut out or spray foam or any of that hassle?
-
Ah I see where you are coming from now - Jackoboard has a polystyrene core! The only problem with this is that I hate polystyrene almost as much as I hate PIR and I can see potential for lots of horrible waste getting everywhere when routing the back to go over the window brackets.
-
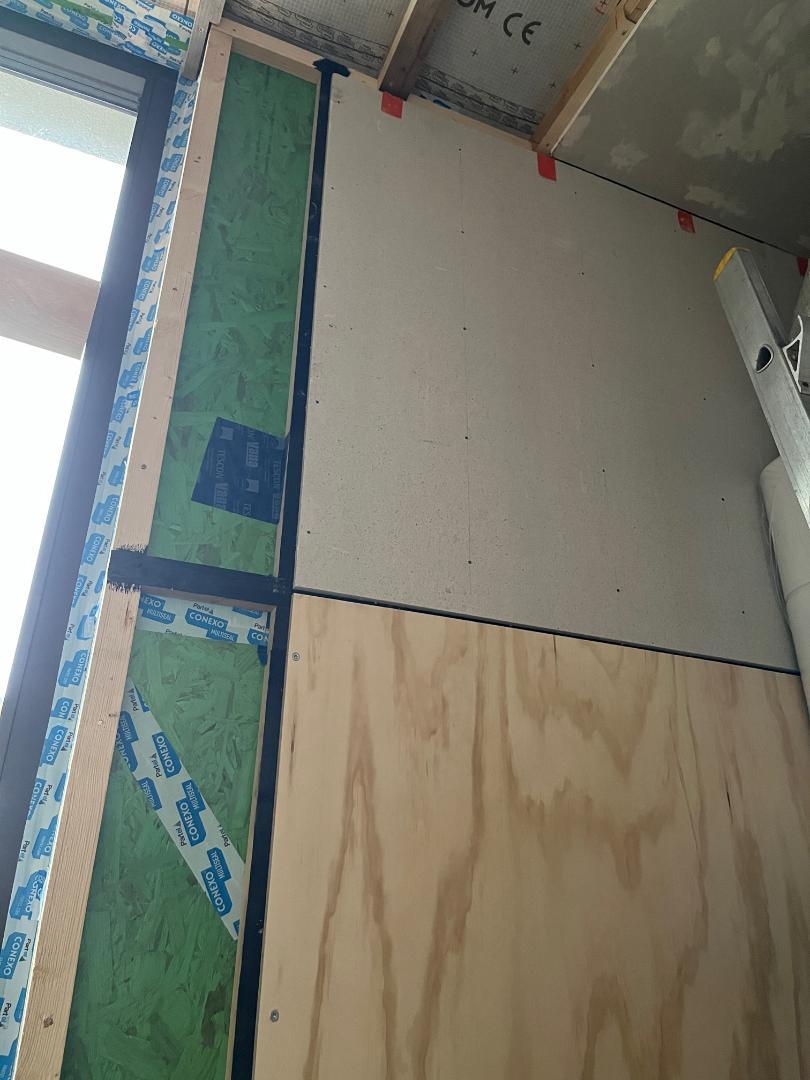
Thanks @Nickfromwales yes you will see from the photo what I am doing. Ply below and fermacell above and I want to bring both into the reveal. You mention tile backerboard. I wouldnt have thought that this would have much insulative value!? Thats why I wondered about something like wood fibre?

-
budget flexible dust hose for Mirka sanders - V-Tuf mini vacuum
markharro replied to markharro's topic in Tools & Equipment
I have a 3m hose with the V tuf but it too heavy to stretch to the ceiling when sanding that - need a smaller bore. -
Thanks for the various ideas - plaster over wood fibre may work in some locations but in one room I am fitting ply to match the ply on the wall so need a solution on how to fix that. Be good if any other MBC customers could comment. Where are you sourcing your cork from @Mike ?
-
As the heading enquires do I need to bother with this? The architect has raised it with me and there would be room to put in maybe 20mm or 30mm of insulation board but a few questions.... 1 I hate PIR and would much prefer to use something like this - https://www.ecomerchant.co.uk/interior/insulation/wood-fibre-rigid/steico-therm-wood-fibre-insulation-board.html I guess the downside is inferior thermal performance but its breathable (not sure if relevant) and as I say I hate PIR. 2 fitting I guess we would glue it to the reveal? What type of glue? 3 Then how would we put the final board finish over it? This for some windows will be 12mm ply, others 12mm fermacell; others 12mm plasterboard? the latter two would probably be flat enough to glue but the ply would need screwing I think to keep it flat. Is there any issue screwing into the airtight ply around the window? thanks
-
I have a Deros sander and also this hand sander with extraction - https://www.axminstertools.com/sanding-block-70-x-125mm-953287?queryID=1fc4da3c70ec555af16ef021538f9eae Is there a single dust hose that will fit to both that I can easily change between them? The hand sander appears to use this hose - https://www.axminstertools.com/mirka-vacuum-hose-for-hand-sanding-blocks-953289 The Deros however shows a different hose if this kit picture is anything to go by - https://www.axminstertools.com/mirka-deros-5650cv-random-sander-solution-kit-with-abranet-ace-hose-506749 Both need to plug into my vacuum which is an earlier version of this - https://www.v-tuf.co.uk/industrial-vacuum-cleaners-dust-extractors/dry-health-rated-vacuums/m-class-dust-extractor/v-tuf-mini-hsv-m-class-dust-extraction-vacuum-cleaner-240v-health-safety-version So I am confused - these hoses seem crazy expensive and I am not even sure if they would fit with my vacuum. Anyone got the same products who can advise? thanks
-
I'm a complete punter with this networking stuff but I have managed to get the following Ubiquiti stuff up and running recently - Dreamrouter > 48 POE port switch (bought 2nd hand) > doorbell/camera/AP with a lot more to be added. Now its working its great but getting the router to work directly linked to the BT ONT took, shall we say, some patience. The Ubiquiti support for consumers is disappointly poor esp when you consider I will end up laying out a 4 figure sum on all this kit. You can't call and speak to anyone. You have to post a support ticket and then about 3 days afterwards you get a reply. To be fair the support ultimately got me sorted with the two major issues I have had to date but I'd expect a lot more for the money I am throwing at this stuff. One thing to note - the older switch I bought is good in that it has enough wattage to power lots of POE kit but the fans make it pretty noisy - not really an issue for us as its in the utility room.
-
A few basics to start. I am planning to use 12mm Hardie backer board to support heavy 12mm 600v1200mm marble tiles. For most of the area the backer board will be screwed straight into the wall studwork. Actually I do have an initial question on that......from what I can see from Hardie's own install instructions you don't need to use any washers like this for example - https://www.protilertools.co.uk/categories/tile-backer-boards/backer-board-washers They indicate you just use their screws which I have. Is this right as other manufacturer's of board appear to promote the use of these washers!? Anyway back to the main issue - the back wall of our shower enclosure is part concrete with stud above - see the photo - the concrete retains our upper floor slab. Its obviously not completely straight so the first issue is how to attach the board to it perfectly level in all planes. The good news is that its not out that much anywhere - maybe a max of 10mm across the span. Hardie make their own product Hardiefoam which I think is used for this sort of purpose - https://www.protilertools.co.uk/userfiles/files/ef495d2518836cc0409a919912f75d60_HardieFoam-Adhesive-Data-Sheet.pdf - so my next question is would be suitable for adhering the board to the concrete and where any board overlaps onto the stud then presumably I need to pack out the stud so its level with the board to support it and then screw that section? The final thing is that the foam product only supports 50kg/m2 so Hardie say to use 9 masonry wall fittings per board to support up to 200kg. I suspect I am better to do this for these heavy tiles so the final question is what fittings to use and what to fix them? Do I wait for the foam adhesive to fully cure and then drill holes through and into the concrete with the SDS drill I have? Then the final question is what sort of fixings to use? I assume stainless steel but would something like this do - https://www.screwfix.com/p/friulsider-a2-stainless-steel-hammer-fixings-6mm-x-60mm-100-pack/720jy - or any better suggestions? thanks

-
Thanks @Temp this is exactly what I had been imagining. It seemed to me that this would get the first row level without the tiles dropping and then once the adhesive cures you have the support for the second row. I was also thinking about this wedge system - Ive never used it so will need to find out more about the best type to use. And thanks @nod this confirms my instinct. Any other tips on any particular tips on tools for this size of tile?
-
When I say large I mean 600 x 1200mm. This is for the wall; not floor. To be applied in portrait so two tiles to make up the full wall height. Also if it matters the tiles are marble and 12mm thick. I have had conflicting info on this. Also what would be the best tile levelling/wedge system to use to get these flush? thanks
-
The reason I ask is that my partner would prefer to have a niche in the same wall as the shower controls and that would mean that the shower controls would need to be above or below it. It wouldn't be my preference and certainly not if building control then condemn the whole thing because the controls are either too high or low! thanks
-
I'm in Edinburgh! We are looking to have an EV charger put in. I was going to get the Zappi installed but what I would really like would be to install a two-way charger to future proof things just in case we do get a car in the future that is capable of essentially being used as a home battery. Interestingly, myenergi are hinting that they may release such a charger at some point in the future - https://support.myenergi.com/hc/en-gb/articles/15196766224273-What-is-Vehicle-To-Grid-V2G-Can-we-do-it Your car has a battery with about twice the capacity of for example a Tesla powerwall but for about half the price. Is it worth buying just to station permanently in the drive as a battery for the house? What I don't understand however is whether it would be compatible with our three-phase connection and whether we would need any further kit other than the specialist charger which seems to be currently unavailable and quite expensive?
-
It is alive! Its just not working as it should and showing up in the App to allow adoption. My hunch is that I corrupted it somehow by pulling out the power during a restart but why it should be so so hard to fix is beyond me
-
This stuff is driving me crazy. I am trying to instal the doorbell pro. I got it set up using over PoE using a spare cable for the connection. Then something went wrong. I was making up the permanent CAT6 lead for it and I suspect I have interrupted it during powering up or something. Anyway I have now lost connection completely. So I removed it from the Protect App (I think) and then tried to press the reset button at the back of the unit. This in itself is very difficult as you have to press it insanely hard to get it to work. Anyway it then showed a 5 second countdown on the screen and I held in the button for the 5 seconds and it then said it was resetting then restarting and I thought all was good. But after waiting now about 40 mins it still says restarting on its screen and I can't find it to adopt it using the Protect App on my phone. I then read online that you should try powering off your "console" and then powering on again. I also my console will be the Dream Router I use so I powered it off for a few minutes then powered back on. I then powered the doorbell back up and again pressed the reset button and no joy. It restarts and stays stuck on the restart screen with nothing showing in the App. So at the moment over £200 of useless junk with no ability to call anyone at Ubiquiti to be guided on what the hell I am meant to do in such a situation. Their online information is next to useless. Yet again I am wasting hours of time on what should be a simple process. Can you please explain how I get this thing working again? thanks
-
Yes planning requirement but it should also be a good feature
-
I researched this about a year ago but wondered if anyone had bought the various components needed and installed themselves and could recommend a good supply option? thanks
-
My understanding is that Orcan is not designed to be used as a sealer in this way. For our front door I used this - https://www.ecomerchant.co.uk/interior/airtightness-products/blowerproof-liquid-airtightness-system/non-shrink-gap-filling-mortar-5kg.html - with a home made thin spatula to push it in. Then taped over but you can also use the blowerproof paint. A complete pain but got the job done I think.