MortarThePoint
-
Posts
2198 -
Joined
-
Last visited
Everything posted by MortarThePoint
-
Is UFH for bathrooms worth it?
MortarThePoint replied to MortarThePoint's topic in Underfloor Heating
I think I'm sold on UHF for the bathrooms, but inclined to go electric so that it is more immediate heat. I can have it heating up something like 15mm of material with a higher power than a water system would achieve. It does mean better planning is required in terms of when it comes on however. -
Is UFH for bathrooms worth it?
MortarThePoint replied to MortarThePoint's topic in Underfloor Heating
It's a good name from the bill payer's perspective, but sets the tone with the family. Is there a KindDad range instead -
Is UFH for bathrooms worth it?
MortarThePoint replied to MortarThePoint's topic in Underfloor Heating
If you have a link or picture that would be cool as I'm considering options. The most likely approach will be linking it to the home automation system that I am cooking up. I can then use a simple analogue thermostat that has its power turned on/off by a smart switch relay (e.g. something like Sonoff TH16). I'd be embarrassed to admit how many of these I have already as that's part of the day job ? -
Trusses against brick wall
MortarThePoint replied to MortarThePoint's topic in Roofing, Tiling & Slating
I asked them to include a 5.4m length of 47x222 with that in mind. I'm also getting some 47x147 and 35x147 as I had paid before then dropping an exterior area that I want to do in treated timber that they don't do. Do you think 47mm is too thick for the ledger board, do you think 35 would be better? -
Is UFH for bathrooms worth it?
MortarThePoint replied to MortarThePoint's topic in Underfloor Heating
Is this the sort of thing: https://www.ebay.co.uk/itm/321589962068 Very low price (e.g. £40/£53 for 1.5m2 with a manual/digital thermostat, £57/£71 for 3m2). Did you use that digital thermostat?

-
Trusses against brick wall
MortarThePoint replied to MortarThePoint's topic in Roofing, Tiling & Slating
Thanks @Gus Potter You're right I've only included a subset of the loads so it needs to have more consideration. I will ask the designer for the loads which he has been happy to provide before for some other trusses. In the meantime all I have is the hangers he has specified for use with a timber mounting, KH-75 and KH-38 rated to SWL of 12.48kN which is way over anything likely. For masonry hangers the area is a bit complicated by a transition from blockwork (7.3N I think, definitely no weaker) to brickwork. The bricks are thankfully frogged and not perforated and have strength of >=25N/mm2. The transition is a horizontal one at 2700mm above DPC and the top of wallplate is 2610mm which will also be bottom of bottom chord. A 225mm high masonry hanger would therefore go above the second course of bricks. That is all at odds some what with the sketchy guidance from the warranty documents. I could probably get the thumbs up from the likes of Simpson StringTie though. I also think a ledger board is an easier install for my set of skills. I don't fancy fitting a restrained masonry hanger as that would require removing the brick it sits on so as to get the strap hooked over. A 200mm ledger board could be mounted to have bolts ~50mm below the top of the highest block course (2650) and ~middle of the first brick course (2740). With the strap tucked behind the ledger board it should be capable of a far load.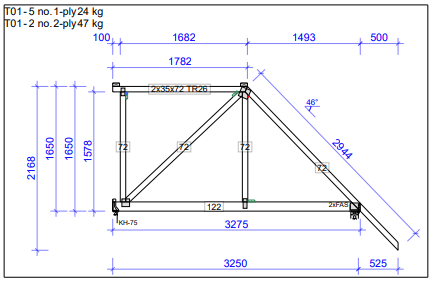
-
Trusses against brick wall
MortarThePoint replied to MortarThePoint's topic in Roofing, Tiling & Slating
I discussed it all with the truss designer and he has shifted the left hand vertical to allow the truss bottom chord to be trimmed to suit a ledger board. -
Is UFH for bathrooms worth it?
MortarThePoint replied to MortarThePoint's topic in Underfloor Heating
What did you do by way of thermostats? Do you have them both on timers? -
Is UFH for bathrooms worth it?
MortarThePoint replied to MortarThePoint's topic in Underfloor Heating
Would be painful to have to install the electric panel heater and not have then benefit of the heat pump COP as well as hidden heating provided by UFH -
Is UFH for bathrooms worth it?
MortarThePoint replied to MortarThePoint's topic in Underfloor Heating
Is that a wet system or electric heat mat in the bathrooms? -
Is UFH for bathrooms worth it?
MortarThePoint replied to MortarThePoint's topic in Underfloor Heating
Interesting, so the opposite of my thought process. You are obviously braver than me but it makes sense since cooler bedrooms are nicer anyway. -
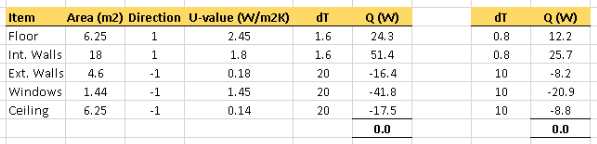
It's interesting to calculate how well coupled different areas within the insulated envelope are connected. In the extreme, I think I have worked out that if we had no first floor heating, it would only sit lower in temperature than the ground floor by 20% of the difference between the inside and outside temperatures. So that's an unheated first floor temperature of 16C when the ground floor is 20C and outside is 0C. It's a lot of effort to go to really for the benefit since all our living space is downstairs. It feels too brave to omit it completely though. Considering just the bathrooms however. Each has only 25% of its walls as external and the ceiling u-value is obviously massively better than that of the floor. If the bathroom was unheated, it would be less than 1C below the rest of the house when the outside temperature is 8C or higher. Below is the calculation where I have considered the heat flow* based on each surface of the bathroom 'cube': This begs the question of whether it's worth the effort. I estimate the cost of adding UFH to each bathroom to cost around £300. If you want the warm feet feeling, a 1.5m2 electric UFH mat just in front of the bath/shower could cost around £35. It could come one when the light turns on and draw 225W whilst running and cost £12/year based on 1hour per day which is a lot of bathroom time. That's a 22 year payback time which is pretty rubbish and the electric solution would be more immediate. Alternatively, just a heated towel rail adds some room warmth and warm towels. Is this the sort of thing that ends up a "Specification point" in that without it the perceived value is lower even if the reality isn't the case. It being hard to add later we add it now to satisfy the possible future purchaser. * Note: Q = Direction * U-value * Area * dT
-
Trusses against brick wall
MortarThePoint replied to MortarThePoint's topic in Roofing, Tiling & Slating
Yes, I can appreciate it needs something. I expect it will be: Left wall --> ledger board --> truss bottom chord --> right wall So I'd need to add straps at both ends of that chain -
Trusses against brick wall
MortarThePoint replied to MortarThePoint's topic in Roofing, Tiling & Slating
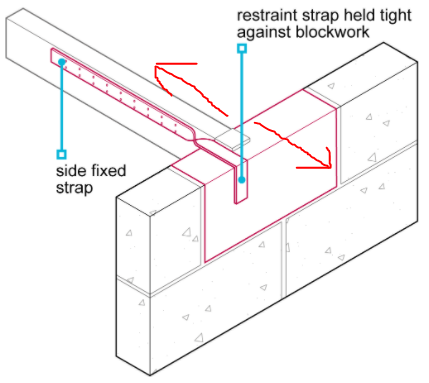
Unless I can face fix the restraint straps or use a ledger board and notch it to accept the strap between it and the masonry I'm in for a world of pain. The modern straps are quite thin so perhaps I can just pinch it between the ledger and the masonry. I can't spy any restraint straps on this setup: http://www.fourwalls-uk.com/blog/category/extension/page/3/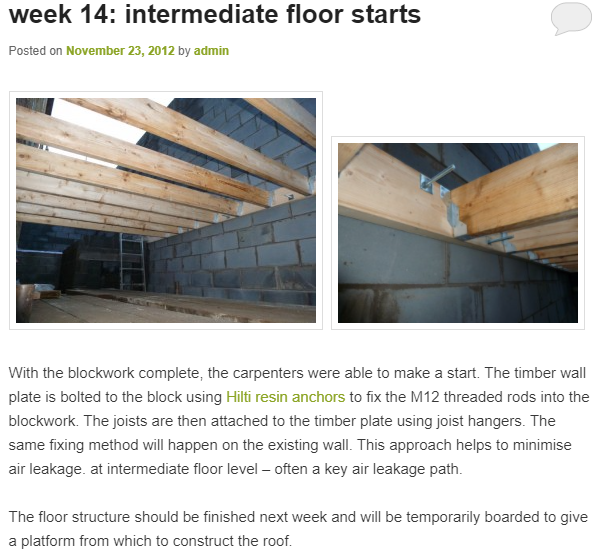
-
Trusses against brick wall
MortarThePoint replied to MortarThePoint's topic in Roofing, Tiling & Slating
OK, thanks because I do want to get it right -
Trusses against brick wall
MortarThePoint replied to MortarThePoint's topic in Roofing, Tiling & Slating

-
Trusses against brick wall
MortarThePoint replied to MortarThePoint's topic in Roofing, Tiling & Slating
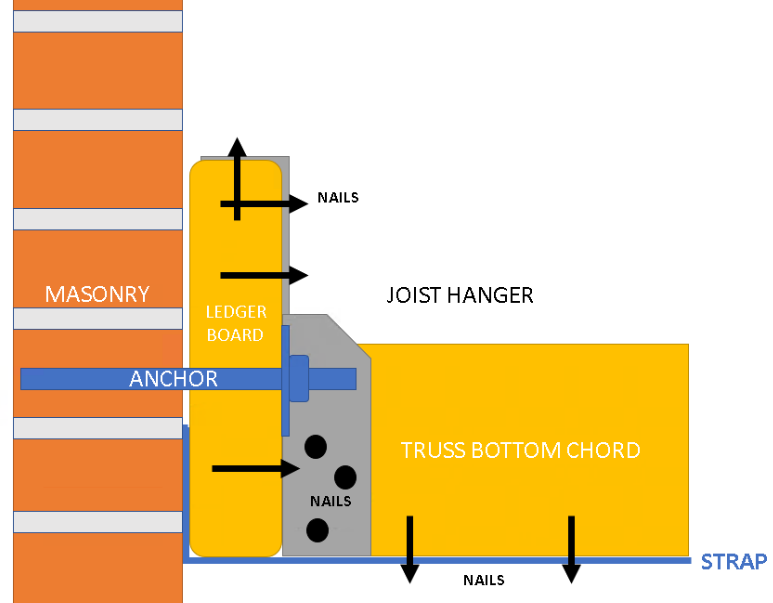
Yes the bottom chord forms the ceiling for below. I calculated the load on the left hand mount (490N = 49kgf) by balancing the moments about the right hand mount. Balancing the overall forces gives the load on the right hand mount (wallplate) as 314N + 689N + 515N - 490N = 1028N = 103kgf (or about 1400N if I add a tank). Intuitively this makes sense as the largest force involved is that of the tiled roof part. I have only involved the truss designer on this, not the SEng. The wall is 4.8m long cavity wall and continues up a storey. As far as I can tell, such a restraint straps serves to limit the possibility of the of the joist and the wall separating as shown by my red arrows on the image at the very bottom of this post. The lag bolts would resist a ledger board pulling away from the wall and then the joist would have to be strapped to the ledger board. https://www.labc.co.uk/news/how-get-it-right-supporting-joists-external-walls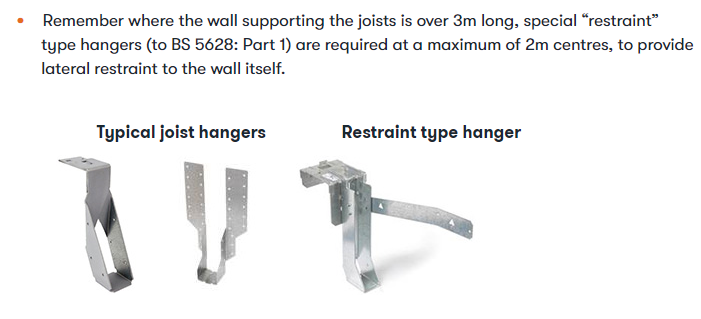
-
Trusses against brick wall
MortarThePoint replied to MortarThePoint's topic in Roofing, Tiling & Slating
Thank, prettier drawings by hand than my computer ones, but my hand drawing skills are bettered by my 5yo. The left hand mounting load of each truss is around 490N (49kgf). There are 7 trusses so that totals 3.5kN (350kgf). If I add a tank (dotted red) to this roof space as I am considering, it would up the total load by about 65% to 5.8kN (580kgf). If using a ledger board and lag bolts at average 300mm centres that would equate to around 16 bolts so 360N (36kgf) per lag bolt. Does that sound scary? Truss mount load on left calc: Flat roof part: Fo = 1.719m*0.6m*13kg/m2*10N/kg = 134N Mo = (1.481m+0.5*1.719m)*134N = 314Nm Tiled roof part: Fb = 2.854m*0.6m*78kg/m2*10N/kg = 1336N Mb = 0.5*(1.481m - 0.450m)-1336N = 689Nm Truss selfweight: Fp = 22Kg*10N/kg = 220N Mp = (1.481m+0.5*1.719m)*220N = 515Nm (over estimate) Left hand mount: Mr = -(Mo+Mb+Mp) = -1518Nm Fr = Mr/3.1m = 490N (49kgf)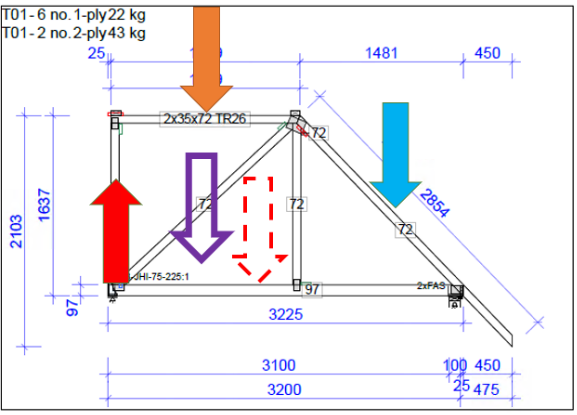
-
Trusses against brick wall
MortarThePoint replied to MortarThePoint's topic in Roofing, Tiling & Slating
Thank you for the consideration and the diagram! I think it will only try to pull laterally if the top vertical left hand member in the diagram contacts the wall, which it doesn't. That vertical member is 25mm nominal from the wall so the only member contacting static points is the bottom chord at the wallplate (R) and at the hanger (L). -
Trusses against brick wall
MortarThePoint replied to MortarThePoint's topic in Roofing, Tiling & Slating
I don't see what you mean. tipping of the hanger side to side? There isn't a top mounting just bracing. -
Trusses against brick wall
MortarThePoint replied to MortarThePoint's topic in Roofing, Tiling & Slating
All that said, and here is a retrofit specifically for thin joint. Not relevant to me but thought I would add it for completeness: -
Trusses against brick wall
MortarThePoint replied to MortarThePoint's topic in Roofing, Tiling & Slating
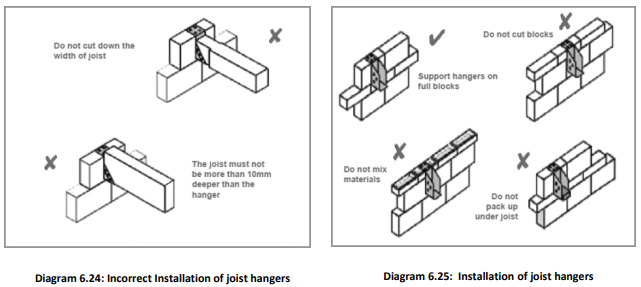
Yes I'm going to go that way. I also saw that he NHBC says that masonry hangers shouldn't be cut "into the walling" I presume that means shouldn't be retro fit rather than saying it shouldn't be cut in to the block itself. Also, some other warranty providers stipulate that materials shouldn't be mixed in the area and I have a transition from blockwork to brickwork at this level. Just need to decide my ledger board size. At one end of it I am going to rest it on the wallplate of a perpendicular wall as well. If I had thought about t more, I could have built it in to the wall at the other end as well but that's not a big issue. https://nhbc-standards.co.uk/6-superstructure-excluding-roofs/6-4-timber-and-concrete-upper-floors/6-4-13-joists-into-hangers/ https://9329f7a9-f105-4a46-b2bc-a658e29c21db.filesusr.com/ugd/981144_d12f36e2d1bb4fe78f9179e65dd7981f.pdf
-
Trusses against brick wall
MortarThePoint replied to MortarThePoint's topic in Roofing, Tiling & Slating
Saberfix are a bit more optimistic about the SWL with their product. Seem hard to find for 38mm trusses/joists (Screwfix only sell the 50mm ones annoyingly).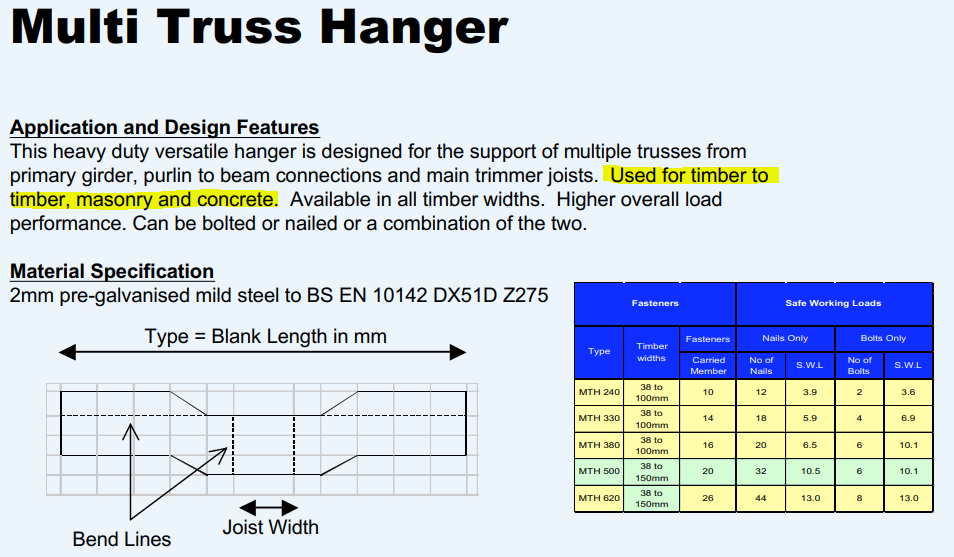
-
Chimney DPCs and damp handling
MortarThePoint replied to MortarThePoint's topic in Stoves, Fires & Fireplaces
Other than the cost and minimal effort involved I can't see a downside -
Chimney DPCs and damp handling
MortarThePoint replied to MortarThePoint's topic in Stoves, Fires & Fireplaces
Well stacks are pretty much finished now, 4 courses left on the smaller one. I think we have followed good practice in terms of chimney damp handling, but I like belt and braces so was wondering about applying StormDry since the scaffold is there and it will never be easier. For the main stack the area is 30 courses x 4.6m round + 1.2m2 flaunch = 11.6m2 Smaller stack ~4m2 It's not cheap stuff running at about £4/m2 (5m2/l and £20/l) but feels worth it the £60 to me. Has anyone used StormDry and has any comments? Does it affect the appearance of the masonry? Looks a bit strange when the rest of the wall is wet below, but that's just showing it's doing its job. Here are some interesting likes: General StormDry promo video: StormDry vapour test: StormDry watering can test: StormDry flood test: not really relevant but interesting: