MortarThePoint
-
Posts
2198 -
Joined
-
Last visited
Everything posted by MortarThePoint
-
Opinions on best way to drop a ceiling
MortarThePoint replied to Thorfun's topic in General Construction Issues
I'd recommend the Gyplyner system. It would be very easy to install. You could use the GL6 brackets to create up to 120mm void link. Longer brackets are available too. PB screws to GL1 track, lengthened using GL3 connectors. GL8 around the perimeter. GL12 is another option for the brackets. Also worth Googling "Gyplyner ceiling" for more info and videos. I compared suppliers and BG are more expensive but their dimpled finish makes it much easier. I'm using this system with AH185 (GL2) brackets. Travis Perkins carry all the BG bits but brackets were expensive so I got those ones from Minster. I'm screwing to concrete soffit (HCF). Plasterer wasn't familiar with this system so was a little nervous of whether it would be level. I've screwed (TechFast) each bracket in place on a 3mm packer to allow adjustment, but only a couple of brackets need tweaking thanks to using a laser level during installation. I've gone a bit OTT with GL1 @ 400mm centres and brackets around 900mm centres. I think the limit is 600mm X 1200mm, so I've made a lot of extra work for myself. -
Are all metal stud wall systems created equally?
MortarThePoint replied to Tony K's topic in General Joinery
I don't think it's commonly talked about, but C-studs have a direction you should assemble in. You should screw the side with the web first as it is stiffer than the other open side. If you're on your own and struggling, you could always drill a pilot hole for the first screw. I use self drilling buggle head screws. Screws must be fine pitch for MF. -
Part B does allow it to be at an angle:

-
The first picture shows the window opened to a right angle. The second picture looks there is enough width. The square is going onto the bottom of the sash frame, but: looks like it only goes on by 10mm and the 460mm mark looks to be fairly inside of the mullion -> at least 450mm Why not have a path that uses the extra width of the glass recess as long as that is of suitable height and you can reach an angle that clears the sash's style
-
thermally broken or not - lintels
MortarThePoint replied to LSB's topic in RSJs, Lintels & Steelwork
I went thermally broken because, if I recall correctly, it makes as big a difference as upgrading from double to triple glazing but significantly less extra cost. I went with Keystone which need cavity trays either way. I believe some Catnic lintels don't need cavity trays. Also, I heard windows under eaves often don't get fitted with cavity trays. I have cavity trays all round. It's also worth remembering how much harder the inner leaf part works than the outer. The outer leaf may only be carrying a small triangle of bricks whereas the inner leaf could have to support floor loads or roof loads. -
I think I'm with you on this one. I've had a look around and found one done with a plastered return and it looks good.
-
Wow, that's going to be a door lining that's over 300mm deep. Everywhere else I'm using softwood door linings.
-
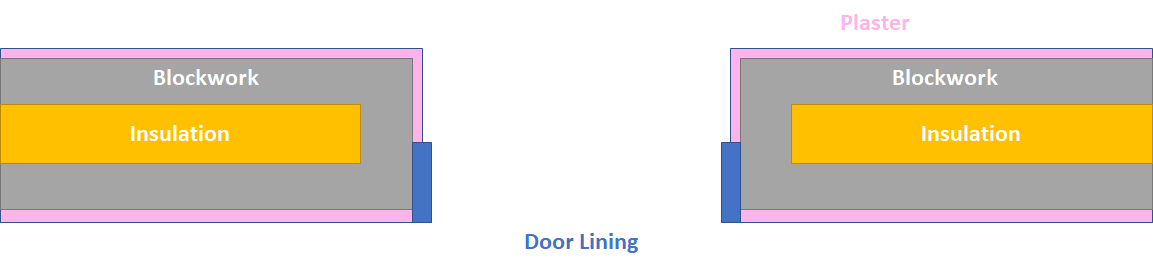
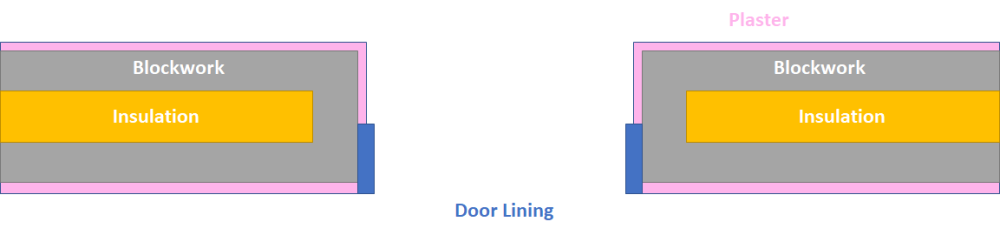
Door linings are progressing nicely and I am staying a week ahead of the plasterer there. I only have three more to do in blockwork now. One of them is a bit odd though. It's an interior section of a cavity wall. The Utility is a single storey bit on the side of a two storey wall so the lower part of the cavity wall is warm on both sides and has no cavity closer, just a full blockwork reveal. What's the normal ay of doing a door lining in this situation? fit it to one side and plaster up to the back face of the door lining? Not sure how the plasterer would get a good edge on the back face of the door lining.

-
Some of the guns seem more susceptible than others, although that may just be a coincidence. Has anyone tried this gun as its cheap: https://www.sealantsandtoolsdirect.co.uk/bond-it-professional-ag1-pu-expanding-foam-applicator-gun-bdag1?language=en-gb¤cy=GBP

-
If you are counter battening at 400mm spacings the 1200mm joint is already sorted. You could then repeat the following pattern: 1800 1200 + 600 1800 1200 + 600 Numbers coloured to indicate which boards the sections come from. That way you don't need any extra counter battens and you don't have any neighbouring joints in a line either.
-
I have an 1800mm section at 45 degrees and wondered about 1800mm boards for it, but decided against because I was worried it could need to be just over 1800mm. That's not a problem for you if you're coming down to skirting level. I decided 600mm bits wouldn't be too bad. You end up with - 1800 - 600 + 1200 - 1200 + 600 - 1800 If counter battened at 600mm spacing then the butt joint is supported. The above list covers 4.8m length with 2.4m of butt joint and 7.2m of taper to taper joint (if continuing). 1800x900 would have no but joints, but 9.6m of taper to taper joint per 4.8m length. Same total length of joint, but arguably a better type of joint. Laid horizontally, 2400x1200 sheets would give you 3.6m of butt joints and 4.8m of taper to taper joint per 4.8m length. That's actually more butt joint and they wouldn't be batten supported. What's wrong with a 600mm bit of plasterboard? You've consigned that to waste.
-
You could consider 1800x900 boards. Saw them in the BM the other day and they look so tiny. Easy to handle though.
-
200mm working length is a bit tough. Otherwise, Bosch CYL-3 from FFX are good. I have a good 6mm DeWalt for the combi that's quite long. It has three flats on the chuck end as well. SDS for the more grown up stuff
-
You've assumed 50% gas turbine and grid transfer efficiency which is a bit too high I think (link). It's more likely to be around a third. A third would give a required COP of 2.7 for break even. 500gCO2/kWh is quite commonly used figure for gas generated electricity. Gas central heating inc boiler efficiency is around 200gCO2/kWh. Hence need for COP above 2.5 for ASHP to be creating less CO2 than gas central heating.
-
That's unkind and unhelpful. It's the sort of reaction that pushes these discussions out of mainstream consciousness and keeps people from making sensible and informed decisions. I evidenced the COP figure of 2.5 based on 60C flow temp. We're trying to achieve the same goal, less CO2 output. But sometimes burn gas locally results in less CO2. I've never claimed not to be a fool.
-
I'm pointing out that poorly installed ASHP accelerate climate change. It's better for those houses to stay on gas. Investment and leadership means that capacity could grow faster than demand. There's lots of scope for greening the grid before the need to add extra demand to it
-
You are adding *extra* demand to the grid, not average demand. The CO2 output of extra demand is that of the 'last generator' turned on. It wouldn't have been turned on if it wasn't for the extra demand. In many cases that 'last generator' will be coal. It will never be zero carbon, as that's the 'first generator' to be turned on So that Electricity figure when considering extra demand should be either 0.500 best case or 0.800 if coal
-
1.4M retrofit installations with flow temperatures of 60C or higher would be a climate disaster! That would potentially emit an extra 120gCO2/kWh *12,000kWh/yr * 1.4M = 2,0000,000 tons of CO2 per year compared to gas central heating. {Based on coal and COP=2.5 which are fair based on increased demand and flow temp} That's 2 million tons of extra CO2 per year from one year's 1.4M installations. Even if only 50% of the extra demand came from coal it's an additional million tons of CO2 per year. {120 = (800/2.5) - 200 12,000kWh/yr Link}
-
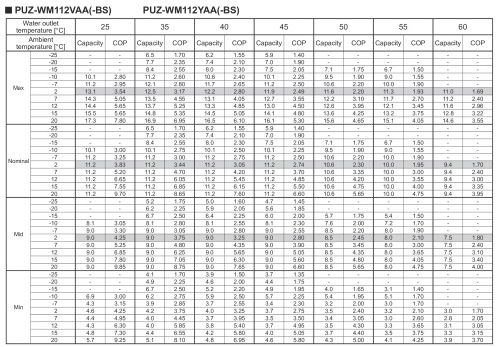
The table below is for an Ecodan ASHP. At a follow temp of 60C, the outside temperature needs to be above +7C for the COP to be above 2.5 and for the ASHP to be more environmentally friendly than gas central heating. Considering all the heat demand that will occur below +7C outside temperature, a 60C flow temp is worse for the environment that gas central heating. That's even before you consider coal!
-
I think this requires more careful consideration. There are a lot of Marketing forces at play and lack of system thinking. Encouraging people to change to electric powered heating creates extra demand, so you have to consider the CO2 output of that extra electricity. You can't use average generation figures as that is slight of hand. Gas heating is 185gCO2/kWh rising to around 200gCO2/kWh if you include grid losses etc. If the extra electricity is gas generated, then it's about 500gCO2/kWh. So you need a COP over 2.5 for an ASHP to *start* being more efficient, and that ignores the carbon footprint of the ASHP manufacture and installation. The UK is still using coal powered electricity to address high demand. That is about 800gCO2/kWh, so would require a COP over 4.0. ASHPs will serve to increase the likelihood of coal being used. I am a fan of the technology and am fitting an ASHP, but it is important to consider the complete picture. If you controlled the whole system (grid & boilers) you would roll out ASHPs at a rate that keeps the coal burning power stations idle. The problem is, ASHPs (and EVs for that matter) are ahead of the grid changes. The government etc can claim to be doing something about climate change by pointing at all the ASHPs and EVs and making absurd claims like they're zero carbon, when in fact they are keeping the worst of the electricity being generated.
-
Screwfix periodically have 50% off some of there trade packs. I have bought each of 1000no. 5.0*100mm GoldScrew, 1000no. assorted GoldScrew Plus (now discontinued), and 1000no. assorted TurboGold for £19.99. Separately, I have found large packs of Timco non-woodscrews online. For example their buggle head self drilling plasterboard screws. I wonder if Timco make some of the SF screws. ForgeFix frame fixings are good and I've found those cheap online, but always by brand. Really cheap screws are a false economy. If you rate your time @ £10/HR, it costs about 5p to put a screw in and that's more than most woodscrews, except Spax. Personally, I don't know how Spax can be 3 times the price of other good woodscrews. Screw-Tite are a bit more pricey that the SF regulars, but I find them excellent.
-
These are Soundbloc F and DuraLine. I'm not sure I have SBR on site. Is SBR better than PVA?
-
I wondered that too Yes, and it's patchy with more suction between studs I think, though TE plasterboard will have more depth of plaster every other stud. Is there any downside to PVAing them?
-
The plasterer is having a bit of a time with the plasterboards being really dry. They have been up for a while (12 months?) so haven't laid in a stack. He's wondered about PVAing them, but I thought a pump spray bottle could be a good way to go. As we are quite a slow and steady lot, I thought others would have experience to share here.
-
Door Linings: Fixing placement
MortarThePoint replied to MortarThePoint's topic in Doors & Door Frames
Went route 1, making average plaster depth 18.5mm. that means two coats of HardWall on about 40m2 of wall. Based on 3m2 per bag at 11mm, that's an extra 9 bags. Backboxes on those walls will be quite recessed.