Onoff
-
Posts
21052 -
Joined
-
Last visited
-
Days Won
206
Everything posted by Onoff
-
If those blocks were to "accidentally" fall on the walk on glazing that would at least solve one problem.
-
Get a bucket of plastic shims maybe? https://www.screwfix.com/p/broadfix-assorted-plastic-shims-medium-200-pcs/80408?
-

Drilling Through 11mm Thickness Steel Beam
Onoff replied to NewToAllOfThis's topic in RSJs, Lintels & Steelwork
Not if you've made some adapters up! A Porta-Punch hydraulic hole punch is a cracking bit of kit. A lad I worked with had a 110V one. We were punching I beam flanges in a bank and set the basement vault vibration alarms off where it reverberated down through the steel. (We were I add, supposed to be in the bank).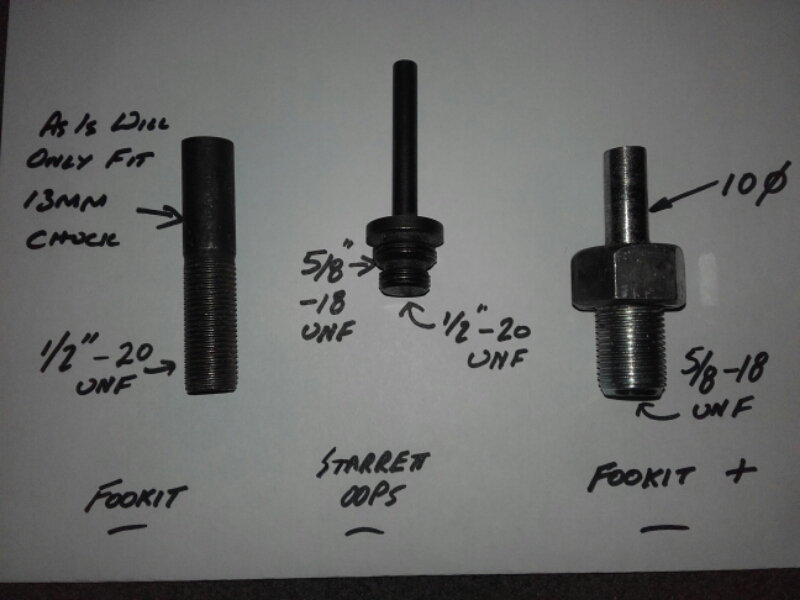
-
Don't forget that the shed makers can possibly get 10'x5' sheets for a start. Was the roof osb originally? It's timber slats on my hand me down shed and they run up slope. You'll have to graft a strip of OSB on either at the bottom or move the whole sheet down slope (to overhang) and graft on a strip at the top. Wherever, the "graft" will need a full length supporting strip underneath.
-
Did this with a neighbour mate circa 1991: Concrete with red dye in it and loads of waterproof PVA. I then made a board up with strips to effect the mortar lines. Put slight tapers on the strips. Once "pressed" I dipped a plastic broom head in black dye and "splattered" the whole area by holding the broom head upside down and pulling back on the bristles. Then a half inch paint brush in all the mortar lines turned them very dark due to the black dye. It still looks like this to this day. Retained its colour etc.
-
They literally trowelled the stuff on and pressed it with a mould to get the pattern. Batted on about special resins. I remember trying to warn him off at the time. Mug! ?
-
Mate had it done. I was amazed as he always DIYs everything himself. Sadly he's a magnet for con merchant. He was told the imprinting wouldn't crack, could be applied down to 2mm thick, came with a 25 year guarantee etc. It cracked, company disappeared. In his new place the block paving he did himself has been down 20 years and it's pristine.
-
Drilling Through 11mm Thickness Steel Beam
Onoff replied to NewToAllOfThis's topic in RSJs, Lintels & Steelwork
Less swarf too. You do of course have the diddy roundel that comes out when you're finished. Hopefully it'll pop out and fall to the floor rather than down the leg of your rigger boot! The best hole saws in my ever so humble opinion are Morse brand. Dark red in colour. Used to get them from Wholesale Fittings. They're are cobalt. Knock the Bosch ones into a cocked hat. A genuine Starrett pilot drill is a great thing to have as a general purpose drill bit for most metals including stainless and they are HsCo so cobalt. I agree that they are good. The ones with the points on the end? I've been impressed. (I wouldn't use them in this case though). The most impressive (stupid?) thing I've ever seen is a 7' South African labourer drilling an I section column. I couldn't figure why so much smoke. He was drilling the beam with 10mm Dormer HSS drills in a 110V pistol drill. No pilot, no lube, just muscle...and plenty of drills! However do not skimp on the cutting compound. It does what it says on the tin and makes drilling easier and prolongs the tool life. It's that important imo. However do not skimp on the cutting compound. It does what it says on the tin and makes drilling easier and prolongs the tool life. It's that important imo. ? -
Drilling Through 11mm Thickness Steel Beam
Onoff replied to NewToAllOfThis's topic in RSJs, Lintels & Steelwork
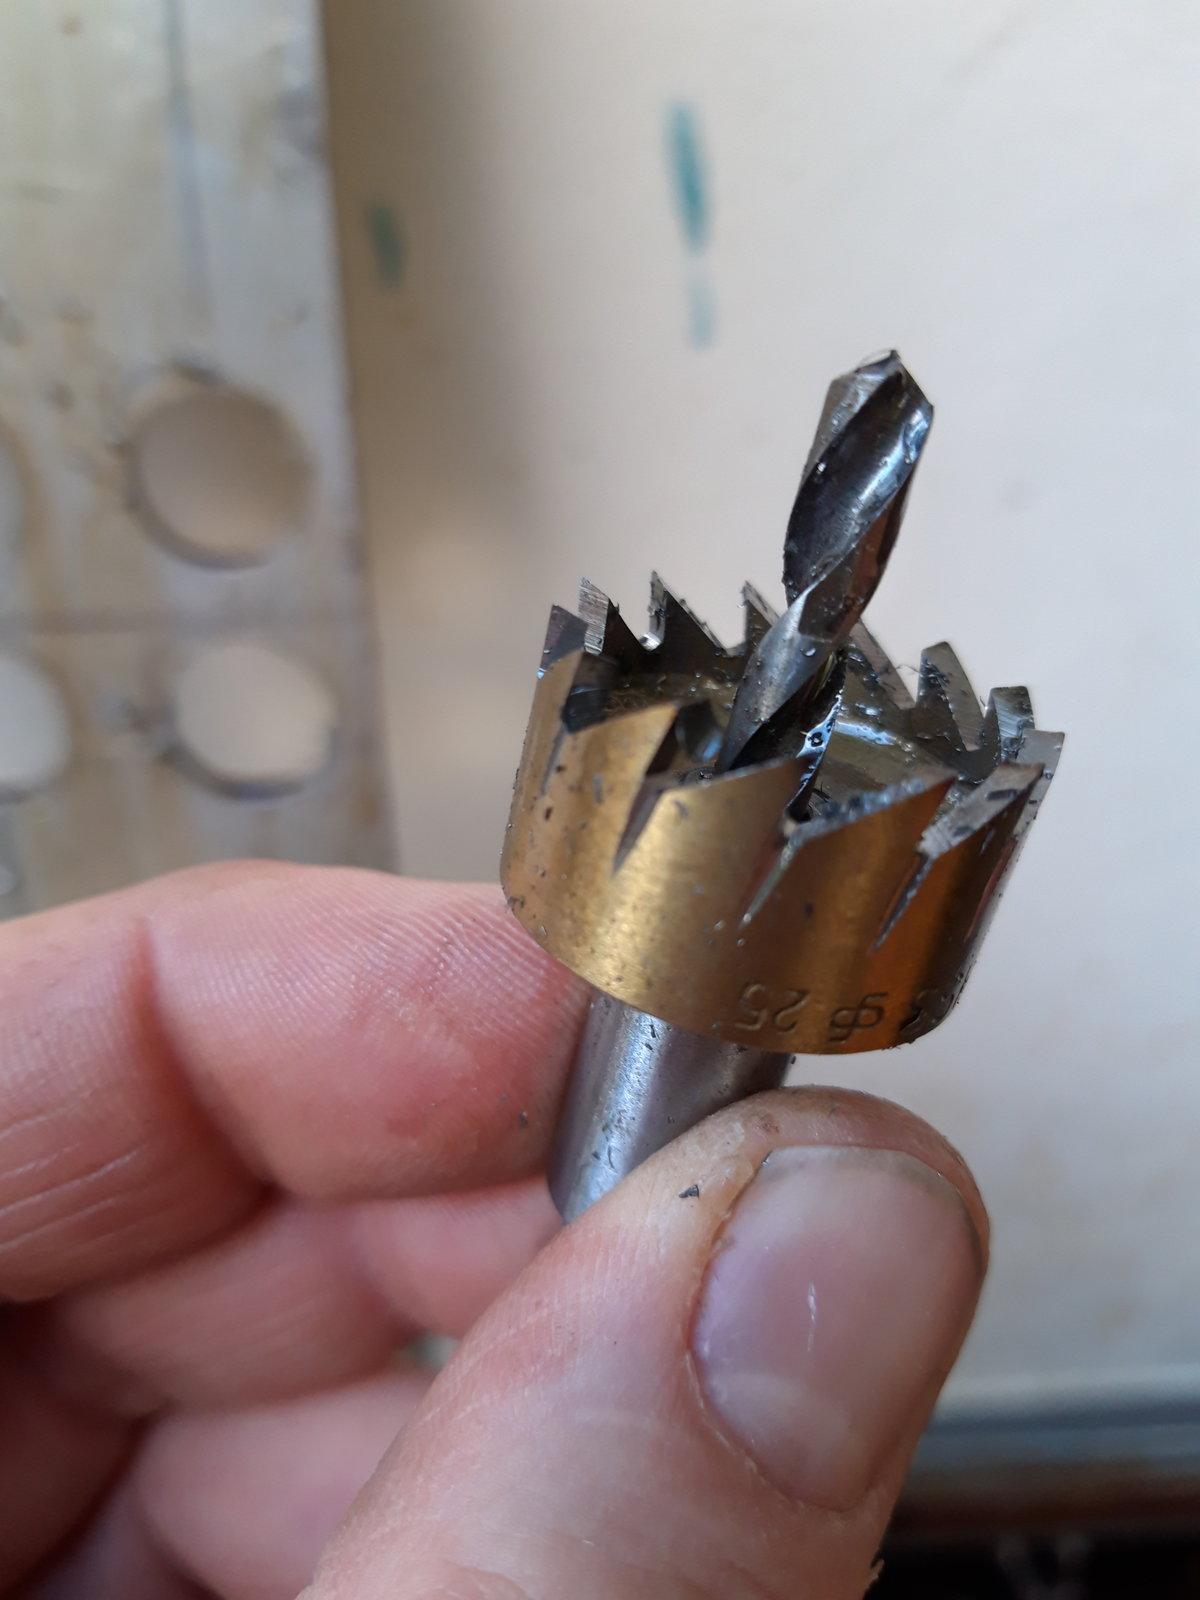
20mm Starter cutter and keep dipping it it Trefolex, Temaxol, Rocol RTD etc. A new 1/4" Starrett pilot drill will go straight through 11mm steel no messing. How many holes? I did 42 25mm holes in 5mm stainless: With ONE of these Chinesium bits and this was it at the end. In the pillar drill admittedly:
-
My brother had his drive paved a few years ago. He also needed a new supply to the garage (to replace the original 1mm micc laid in scaffold poles). The paving contractor was dead against digging a trench when the old drive came up saying "Nah, just lay it directly under the blocks, I can supply you some cable if you want!" The trench was dug but they didn't use a trench whacker to compact the backfill. Drive looked superb except for the sunken line where the trench was!
-
No! Depending on the "free" felt you want proper felt adhesive imho even more so if your just laying it on. Is it just one layer of felt supplied? Got a spec for the felt, photo maybe? Traditionally a decent felt roof would have 3 layers on a domestic say extension and a decent shed roof two layers. I did two layers on my shed roof. 1st layer of just sand felt bonded and nailed. Second layer green mineral bonded to the first. I took particular care bonding the joints. I kept some clean sand/green mineral sweepings that come of the felt and sprinkled these over any dribbles at the laps. I've no lathes or anything holding it down, Hell I've not even finished the fascia boards or gutters! ? I used Wickes felt adhesive. Roof still looks like new pics from 2017 apparently. I might knock this down soon / extend it.
-
A mate has offered me a truck load of 25x25x2 steel box section. It's old server racking in around 4m lengths. Any merit in making a steel frame greenhouse? I've also got a stack of old greenhouse glass. Was thinking stick it to the steel frame with CT1... Mad?

-
Exposed vs concealed shower valves/pipework
Onoff replied to Adsibob's topic in Bathrooms, Ensuites & Wetrooms
I sloped the bottom shelf of the niches a few degrees. The silicone is Forever White. It's stayed white as far as I'm aware. The magic fairy occasionally cleans the bathroom afaik. We do have some limescale issues on the wall tiles in the wet room corner. My crap tiling probably didn't help. Idiot that I am, having never really tiled before, I started with that angled wall. The niches are constructed in Aqua Panel then tanked and tiled. Good ventilation helps guard against mould of course. -
Exposed vs concealed shower valves/pipework
Onoff replied to Adsibob's topic in Bathrooms, Ensuites & Wetrooms
Think about it, when you're old, the carer / those same two youngsters will be able to sit you in a garden chair and hose you down! Tbh the nominal fall area is 4x4 tiles so circa 1320x1320mm. The reality is the splash zone IF careful is one tile beyond. However...No1 son uses the rainfall exclusively so it's a bit more. No.2 daughter uses the handset and somehow manages to get the bog roll wet on occasion! We put up with it as it's so easy tbh. Use a small sqeegee on the floor afterwards then kick your towel around. There's strong points in the wall where the vertical mosaics are should we ever decide to fit doors or folding screens. -
Exposed vs concealed shower valves/pipework
Onoff replied to Adsibob's topic in Bathrooms, Ensuites & Wetrooms
I have concealed with a riser rail/handset hose and then a rainfall head. I'm not looking forward to it going wrong. At best it's prise off the cover plate that's been "lightly" siliconed (in a horseshoe): I've made provision that I can get tools (box spanners and large sockets in there). At worst it's tile off, cut through the board to get to the compression fittings on the mixer valve. I've no pipe joints in the wall "other than" at the mixer and outlet (soldered), it's all bent copper: (Testing ?): Then there's the loft plumbing. I'm OK for access at the moment: Imho concealed looks better (from a distance ?): If I'd have fitted the water softener by now it would have likely held off "problem" day which with the hard water here I'm fully expecting. -
Aka she doesn't trust you with a paint brush! ?
-
Mrs daiking not help? I know if SWMBO and I work together I invariably end up wanting to bury her in the over site... Edit: It's mutual btw.
-
Imo if you struggle laying blocks you'll really struggle with bricks. You'll just multiply the faff factor. Why not ditch the brick / block idea altogether and just buy some scaffold boards then shutter it up like I have a few times now. Where the blocks were will just be thicker concrete at the edge, like a ring beam. Thinking you might fair better getting shuttering square and level. Saying that, with your inexperience, you might struggle keeping it square when you pour your concrete and see the edges bowing. You need to stake it and backfill the edges to prevent this.
-
concrete slab Help Please - Abysmal slab pour
Onoff replied to bradders3109's topic in Floor Structures
You'll be more aware / better prepared next time! -
concrete slab Help Please - Abysmal slab pour
Onoff replied to bradders3109's topic in Floor Structures
Red or white? -
concrete slab Help Please - Abysmal slab pour
Onoff replied to bradders3109's topic in Floor Structures
I'd leave it loose. Not much difference to what I did blinding my hardcore. Looks great when it's done! You doing any more rooms? I screwed screed rails to the stud walls and used a drag board to get the concrete dead level. No screed, I just tiled on top. Pity my tiling's crap! -
concrete slab Help Please - Abysmal slab pour
Onoff replied to bradders3109's topic in Floor Structures
It'll be fine. If really worried put a thin bed of sharp sand down and level that. Where is your dpm going or is that already in? -
I found blue grit a pita to use. I tried on some green mrpb here despite everyone telling me not to bother! I skimmed straight on the board.
-
I was joking ref the 3D printed bits! ? Can you get 100mm chairs?
-
You could commission some snazzy, double ended, 3D printed stand offs to keep the two meshes 50mm apart... ? Tbh I'd just cut some Celcon blocks into 50mm strips and CT1 lumps between the meshes here and there.