SuperJohnG
-
Posts
1260 -
Joined
-
Last visited
-
Days Won
5
Everything posted by SuperJohnG
-
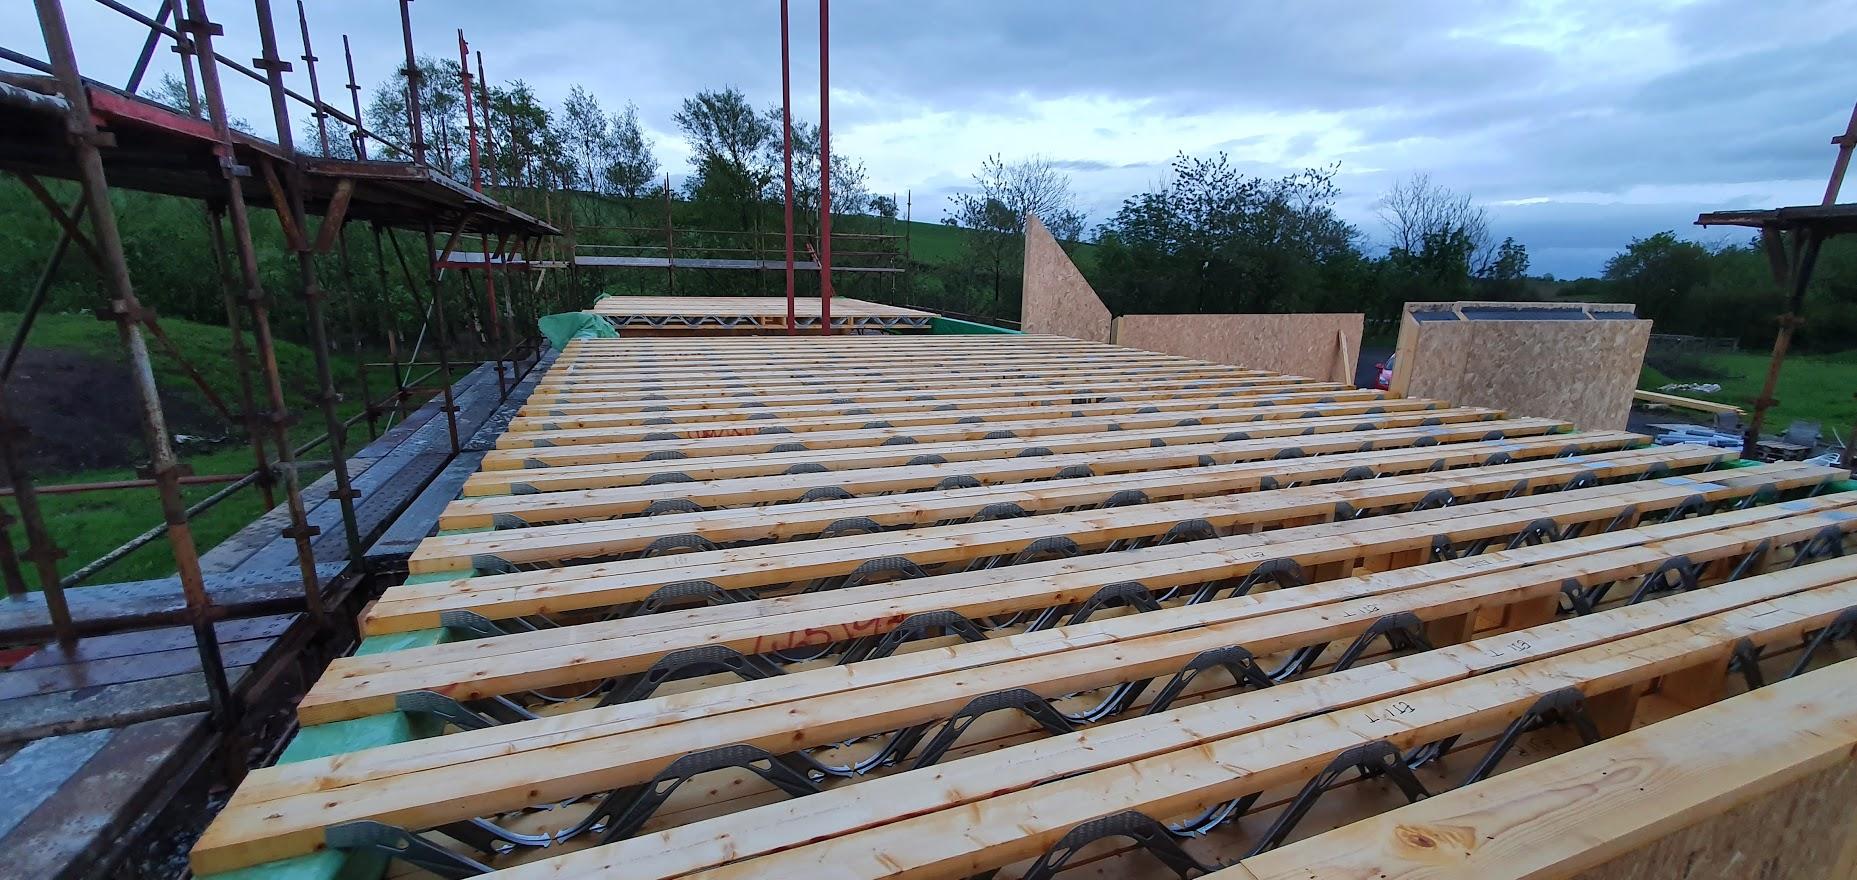
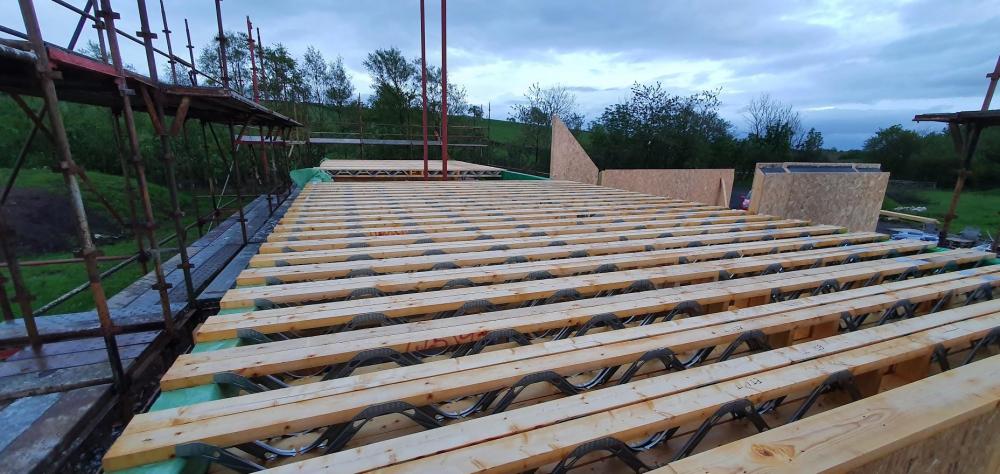
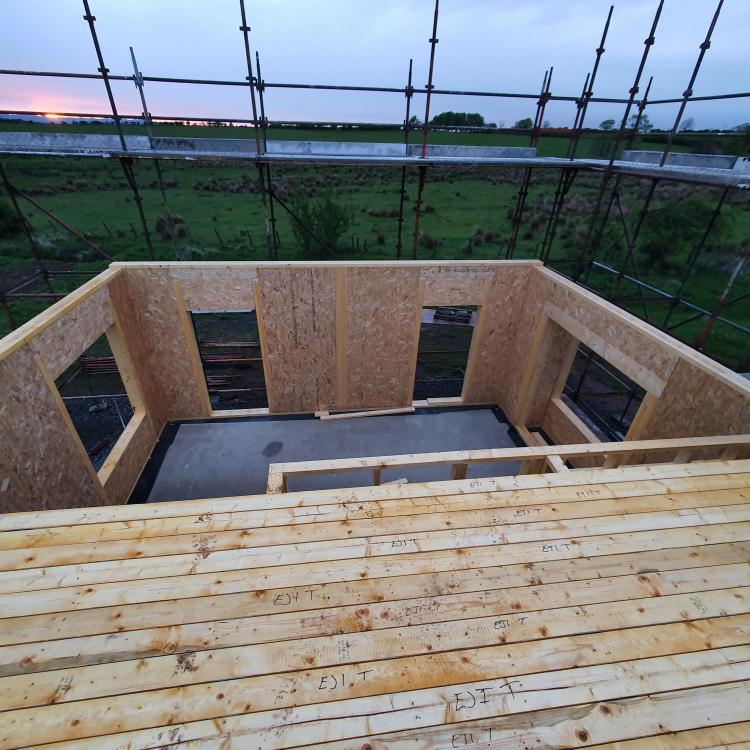
My SIPS kit is going up. I hadn't bothered too much about joists before other than to check they were sufficient to stop any bounce. But now as the kit is going up I'm noticing there seems to be A LOT. They have doubled up joists and 400mm centres. so roughly 200mm spacing between the them, they are 254mm Joists. The designer said that was what the programme spat out...which is fine. It would seem the floor should be solid which was my main query initially which it definitely will be I assume, but I hadn't thought of any downsides. But now seeing it, looks like it will be a PITA to get insulation between the joists, then I'll have big areas with no insulation due to the joists. So a few questions: 1) Does this seem like a lot of Joists? (Note no load bearing walls on any joists) 2) How best to insulate between them? and will it be effective considering I cannot do where the joists are. I have rooms above the garage (which are outside the thermal envelope) so that would be my concern there. I have my master bedroom above the lounge and whilst heat loss isn't a concern there, noise transmission would be. I was planning on using resilient bars for the PB there anyways. 3) I assume now running services will be a pisser also?
-
Looks great. That basement height will be mega.
-
Agreed. One thing to note fro that article is about plaster, which they say is fine. Last year....you just couldn't get it at all. But that's fine as it's had it's dip and production was then scaled up. Everyone hang tight and it'll be fine. I'm currently having my SIPS kit erected so ina few weeks I'll be put on my lonesome again buying materials so I can only hope that's what happens.
-
I was more thinking of the areas that it can access. I done the Tony tray today mostly (thanks @LA3222) but started thinking about well od you have the ceiling cavity sealed off after plasterboard but it is in the thermal envelope but has no MVHR then does that present an issue?
-
Thanks chief. I guess you don't VCL the GF ceiling. So how does moisture get out of there once you plasterboard? Or is it OK since it's in the envelope once you add the Tony tray?
-
Typical hadn't really planned it. Is it just a VCL? I thought I seen somewhere it was a permeable membrane which wouldnt make sense. Guess it should hang lower than the joists internally so it can be taped to internal vcl? Edit - I have two rolls of Capital plastics moisture barrier in the container which seems might be the job. So just lay it over the wall hanging below joists inside. Lay joists on top. Then flip it over onto the caberdeck before they fit the upstairs soleplate? (Hate rushing to do shit...and not knowing hownits to be done. ?)
-
I think this is what I will have to do. Need to get some tape quickly and I can do it quickly before the guys wrap. Few 100mm wide rolls should do it?
-
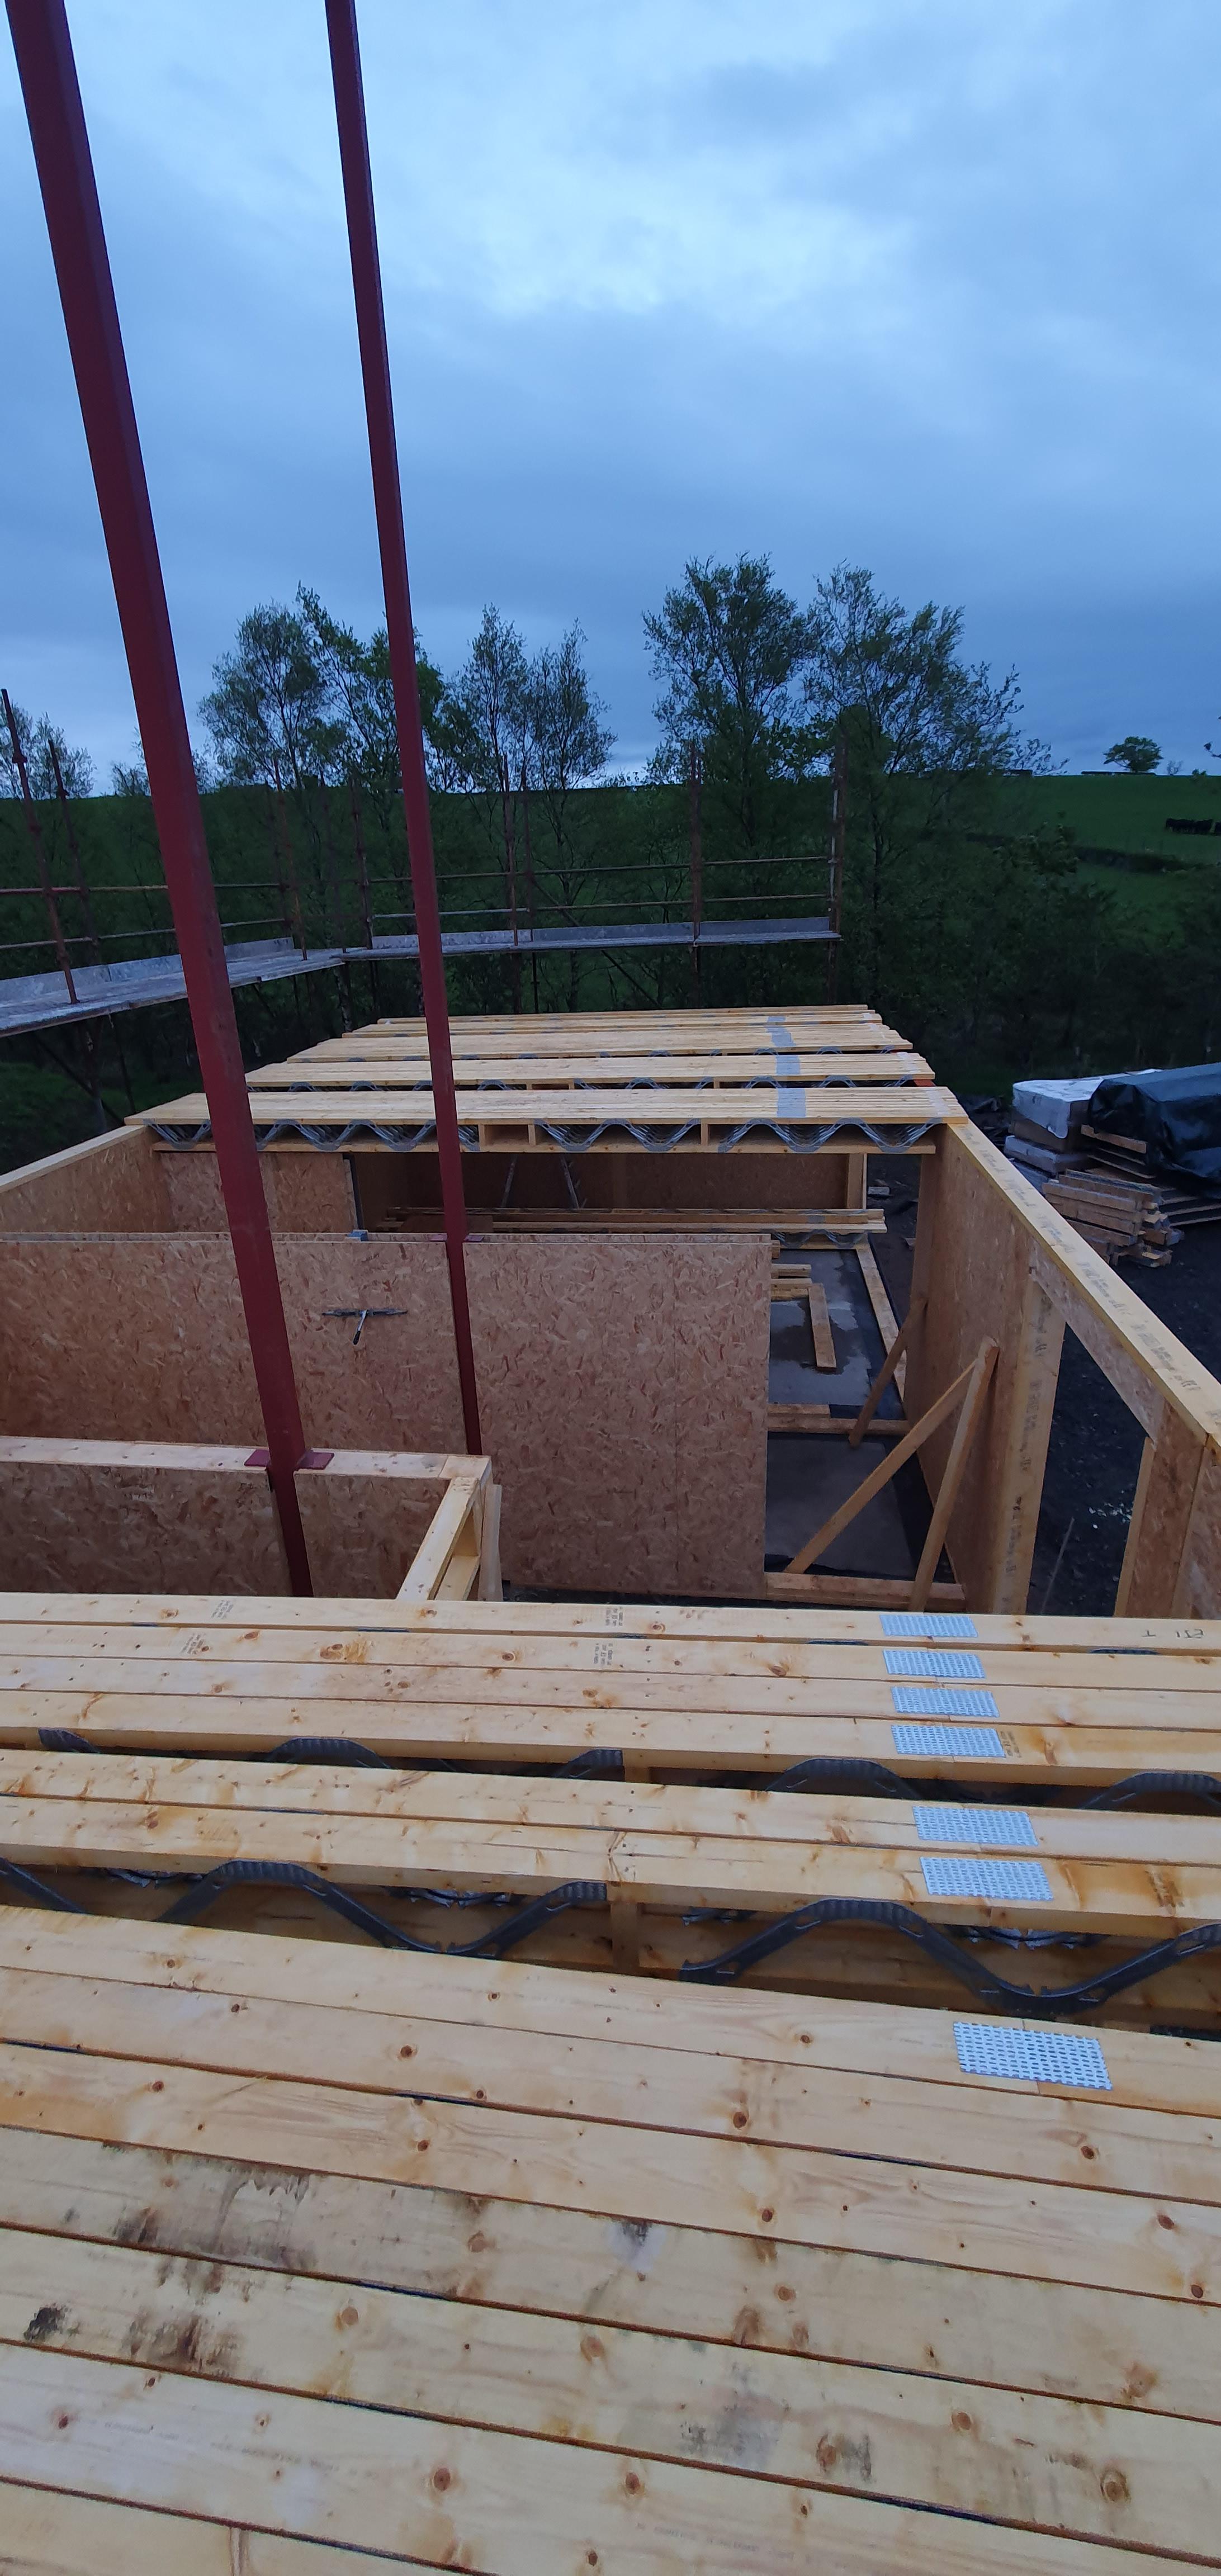
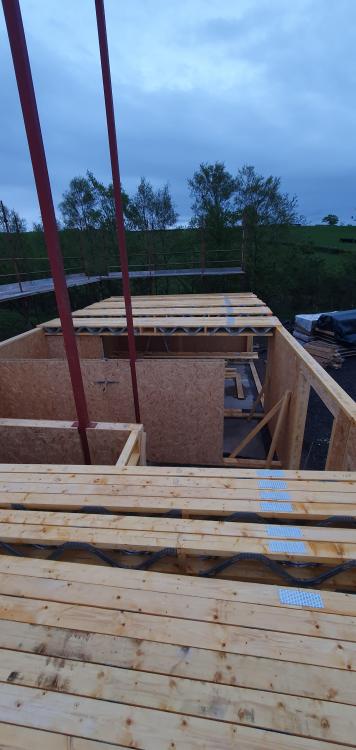
I possibly could but I'd need to be quick. What kind of membrane do I need? Do you just cut thick strips? Then just get it down below the joists inside, then put over where the joists are supported? Wrap around the ends the back up under the FF soleplate? Currently sitting like this...
-
ha @eandgI'd already commented on the thread for answers on. I think my solution might be to tape the GF/FF join as that's the biggest unsealable area internally then allow them to put the membrane on and just tape all internal joins.
-
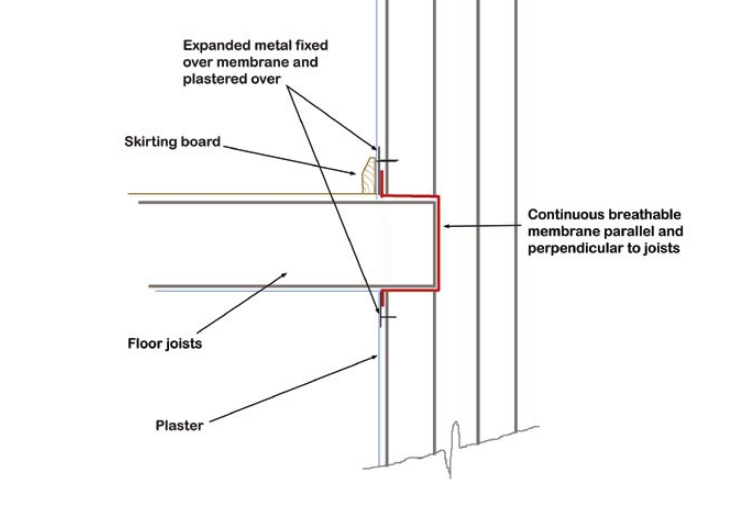
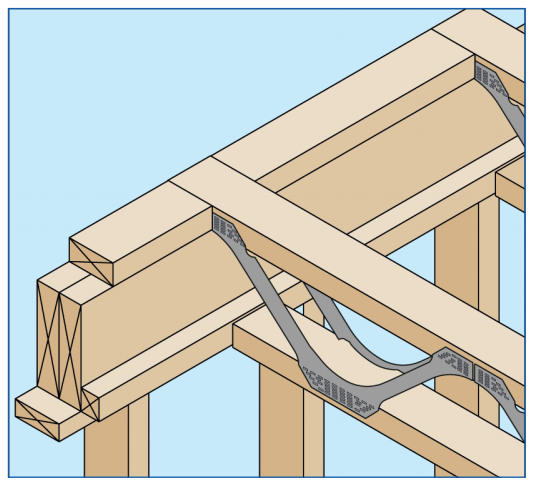
My kit is currently going up and I've now started thinking about sealing the GF/FF junction where the posi-joists sit. I've considered the tony tray approach (see below) - but might be a little late as the Joists are sitting up on the wall plates. already to be spread out and nailed down. But is a better approach just to tape the outside of this joint with air tightness tape once they have fitted FF walls and prior to them wrapping the building? Also should I be taping all joints externally prior to them wrapping the building or is this overkill? As a third question - if you have a fully sealed area between the ceiling and floor above. Is there a possibility this could get condensation or mould growing with no air circulation? The junction is like this (but with SIPS below not TF): @LA3222 I'm hoping you'll be along soon with the answer....
-
Also @curlewhouse did you use counterbattens then battens?
-
Suppose I should feel blessed I have 4 acres to hide soil. I have masses of top and subsoil on site but we have loads of space which we will end up using it to backfill around the house and level and landscape. I did have a guy uo the road (were rural) swing by and say if I needed to get rid of a it all I could dump over his field for free. I find it crazy much away costs so much.
-
15 minutes seems OK. Defo pretty big at 300 litres but not huge. I think at standard Bath is around 200?
-
I think I had planning conditions to discharge...but albeitni am sure I done the task. Never notified anyone I done them.
-
UFH pipes protection/testing/fluid in slab.
SuperJohnG replied to SuperJohnG's topic in Underfloor Heating
Took me probably 3 all in. Maybe could have done in 2 if I procrastinated less. I'd say 1 was a stretch for 680m pipe. Is it stapled down onto insulated foundation or fitted to mesh? Also do you have a decoiler? Make sure you check all the pipe lengths before laying if you have different loop lengths supplied! (See my blog post). -
Just watched last week's. The finish (when they do finish ?) was fantastic really nicely finished and all looked high quality.
-
Cold roof - ventilation void size
SuperJohnG replied to SuperJohnG's topic in Roofing, Tiling & Slating
I was planning on a membrane over sarking too. -
Cold roof - ventilation void size
SuperJohnG replied to SuperJohnG's topic in Roofing, Tiling & Slating
Thats what I had assumed. I'm just having a wobble as the STA guide says 50mm void and that's what other seems to spec. My architect also thinks its fine. He also mentioned OSB too as it will be cheaper and easier to fit. But I'm slightly nervous at that not lasting as battens or sarking are obviously treated. -
Cold roof - ventilation void size
SuperJohnG replied to SuperJohnG's topic in Roofing, Tiling & Slating
Thanks. The sarking is a preference of the roofers. They aren't in to fitting slates to battens (a few said this) hence seemed straightforward to add sarking on top of counterbattens. But not so much now if I need a 50mm batten then sarking makes the build quite substantial. I need to track down others who have done a SIPS roof with slates. -
Standing Seamed Roof
SuperJohnG replied to Ryan Bazeley's topic in Structural Insulated Panels (SIPs)
Thanks - I was more checking as I have slates but there aren't many threads on the actual size of the ventialtion gap. I have a 25mm batten planned, then 22mm sarking. But as the sarking is not spaced as such, does it mean that my ventilation gap is only 25mm? -
Standing Seamed Roof
SuperJohnG replied to Ryan Bazeley's topic in Structural Insulated Panels (SIPs)
How big are you guys making the ventilation gap? -
@Tin Soldier what did you end up with here? I'm looking at the same build uo you have but concerned the ventilation void isn't big enough at 25mm.
-
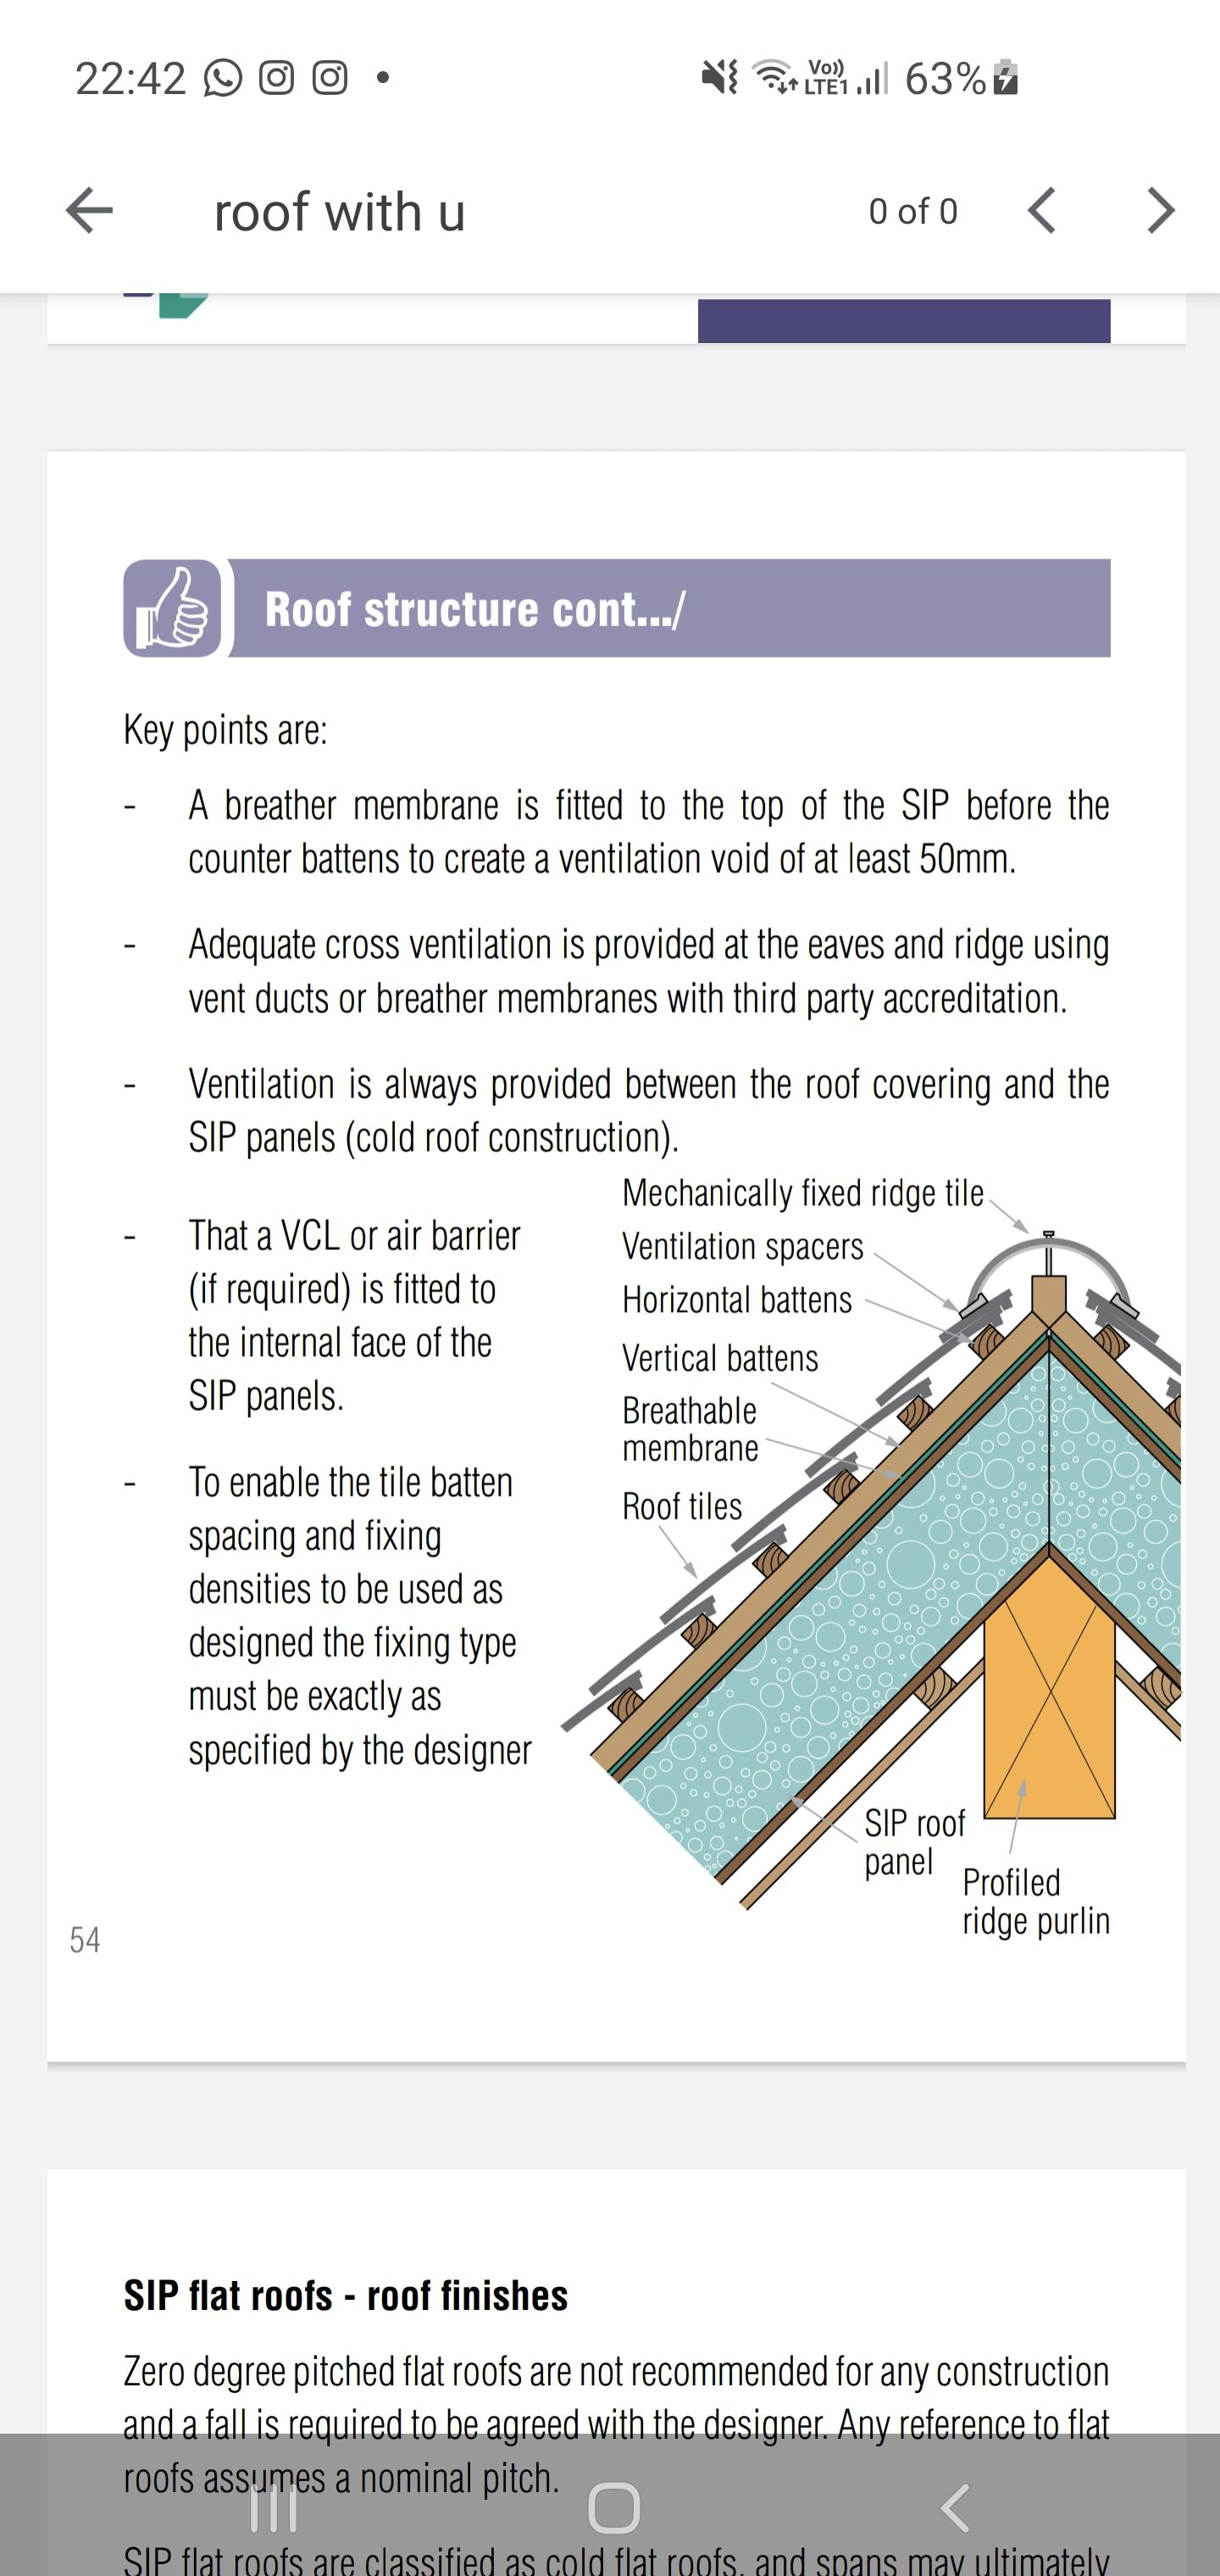
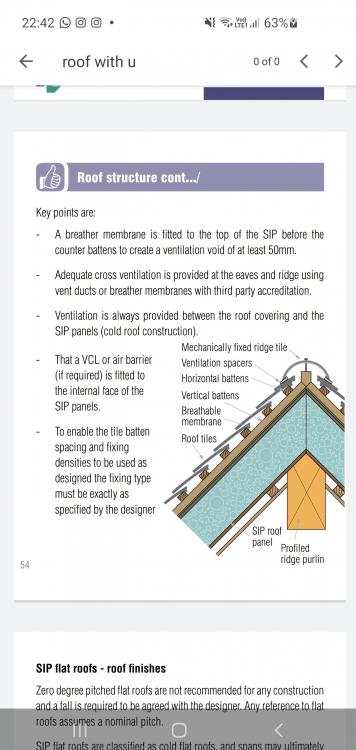
I have a SIPS roof coming, which will be slated. The SIPS roof will have a breathable membrane directly fitted then I had planned to counterbatten using 25x50mm battens then put 22mm sarking over the top, then membrane and slates directly nailed. However reading the STA guidelines tonight, it says minimum 50mm ventilation gap. So does this mean I need 50 x 50mm roof battens now? This plays havoc with my combination roof lights with the wall /roof junction. What's the norm here?
-
Part 5 - Foundations Finished (Finally)
SuperJohnG commented on SuperJohnG's blog entry in Scottish SIPS build
Hah believe it or not there is a bit where it looks like the moon. I had hoped to get it uber flat ready for the amtico as it's only 4mm thick and the glue is only 2mm.But that's why I sacked the power float (and my expectations) as my install price for the flooring included an 8mm latex screed so I have just assumed we will do that. Even knowing the mesh heights that you said I still managed to mess it up, it's one of those things you don't get till you do it. Isn't it. The stubs also couldn't find foam the day before, left it too late. Three of them are for sinks only, then one for downstairs toilet which is fine for a branch and then the other is a stack. Again just made peace with the fact I will figure it out later. ? . The bloody foam seemed hard to get a hold of and they wanted 30 quid for it as the only suitable stuff I found was perimeter insulation (I'd have paid the 30 quid gladly just couldn't get it delivered in time). Frame starts next week, guy had a site visit already and was pretty happy. The slab is pretty flat within a few mm most places so so dramas hopefully. I'll be glad to see it up eventually! -
It's kind of taken me 4 moths to get here, we broke ground start of January took a while to get the road and the rest of the ground built up with the stone (700 Tonnes circa!). But we have finally done the UFH, tied the mesh and then poured the concrete. UFH: Fitting the UFH was pretty straightforward to be honest. I had 1.1km of pipe to lay, and just planned it out as per the Wunda drg, I adapted a little as I went along to avoid awkward bits but it went fine. The UFH stapler was a godsend, made it Uber easy and was just great putting it into the insulation. The decoiler also a godsend, god knows how you would do it without one of those. Both well worth the purchase. I laid pipes out in concentric layout, it gives the most even heat distribution as a return is next to a feed pipe. It was fine doing it, i started with outer at 400mm centres and then turned back to leave me with 200mm spacing. Once back at the UFH manifold point I cut the pipe to confirm it wasn't burst and got a big whoosh of air (Wunda pipes come pressurised). The only mistake i made (or remember making was the lengths. I thought i had 11 100m loops, but turns out I had 10 loops at less than 100m, then 1 loop at 101m - which they supplied a 120m length for. Of course didn't realise that till the end and it was the last pipe to be laid...purely coincidentally. I took a slightly shorter route, but either that pipe was longer than 100m (I had at least 10m spare) or the length they worked out was wrong (unlikely) fortunately it worked out fine! I also used the clip track to secure them, which works well and sticks good to the insulation, doesn't do well at loops close to it but staples there sort it. I never fitted the manifold, I just used a clip track mounted high on a wee frame I built where the manifold will go. I didn't pressure test either....or pressurise for the pour, I wasn't concerned about holes as I was the only one there and I put 1000+ castles down to support the mesh to the heavy ground workers wouldn't' squash it on top. My pipes were laid on the insulation at the bottom of the concrete well away from the mesh and any chance of people drilling through them. I'm confident not pressuring will be fine during the concrete pour - those pipes are very resilient. Mesh: By Jesus - straightforward again, but f$ck me....the bloody wire tying loops. My back was dead..and i don't have any back issues, I was like Quasimodo bent over for days tying mesh together. I had a single layer on the main slab, with two layers in ring beam and three at sliders. I used maybe 1000 ties. The mesh castles worked well to support it and the hystools too to give the spacing. I defo didn't think about heights where your lap the mesh sheets as you end up 20-40 mm higher due to where triple sheets lap each other. So I have lots of spare hystools at 100mm. I had approx. 360m2 of mesh to put in, cutting it was done with stihl saw (quik cut) - made life easy. I also purchased a dewalt cordless grinder originally to do this but you would go through wheels like a maniac. So that was used for small cuts and came in handy trimming bits. The stihl saw (which i own anyway) made it easy. I did buy a set of 36" bolt cutters as someone said to use that - shit idea, mega hard and I'd have been there all day using them. They done two cuts, went back in the box and were returned to Toolstation. Rebates: I planned two flush thresholds for my sliders - I shuttered these using the 50mm packing that came with the Insulated foundation, worked ok - But i had to weight them down during the pour. Also - I worked the concrete below the long one, but forgot the short one and it left a space which I will fix this week prior to kit going up. I also done a shuttered section at my downstairs bathroom so I can fit a floor mounted shower tray. That worked fine - just need to dig it out. Concrete: We had C25/C28 Specified but just put in C35 as it was what the guys normally use. We had a lovely day for it, 14 degrees and sunny, went pretty well. We had a bit of a delay with the last part load - which was at garage, but turned out fine. We also done the pads too and just overfilled them with extra that was left, my pad heights externally to the footprint are for posts to support my canopy and ended up different heights but I just gave the kit supplier all the heights and then are cutting to suit. They are all well below the ground anyway. I wanted to power float, but I didn't manage to get it arranged and my guys didn't seem keen. I was going to do it myself, but ran the risk of doing it for the first time on my own slab and didn't want to majorly mess up what they had done as it would have been in the evening by myself. 36cube in total went in. The only issue I was left with was that the boys forgot the poker. They did the vibro screed and all areas were filled, but missing the poker meant that we missed the concrete under a slider rebate. The long one (4.6m) was fine as it floated up a little so I hurriedly spent some time moving it up and down working the concrete below it, then I added stones on top to level it off. I shoudl have done this with the short (3m) one but didn't think as it didn't float up. It's no major drama, getting some concrete this week and will fill it. It'll be a cold joint but it's at a slider with no wall attached. I added ducts for the island below the mesh to we can get power there. The day after the pour I cut a control joint and then I tried to cover it with plastic (DPM actually) but I was ill prepared and didn't have enough, so just stuck with watering it with a hose each day when I could. I did get a couple of small shrinkage cracks in the main slab where it dried too quickly (they had appeared the next morning) due to it being so sunny the day of the pour. But they are small and nothing to worry about. all in all happy. There is lots of other stuff I'm sure I forget but it always seems to elude me when I write a blog post. I also find it hard to find the time writing them - but that's self building for you! Pictures tell better stories! Lots included. I'm learning to not sweat the wee details, it's ok if things go a little pear shaped. It'll work out in the end. For now Foundations are finished and it feels good to be done here, we will backfill later and finish drains but that's in a few months. I just have DPM to fold up and attach this weekend (How do you fold up internal corners?!) prior to kit being delivered and erection starting next week. I've had two weekends off since the pour and it has been weird not being there every night and weekend. Things I learned: 1) Check all pipes lengths and lay them out first of all! 2) Buy the stapler 3) Buy the decoiler 4) Plan all your cuts out for mesh 5) Don't bother with bolt cutters 20210421_093630.mp4