Crofter
-
Posts
3451 -
Joined
-
Last visited
-
Days Won
10
Everything posted by Crofter
-

How to survive a tree falling on cabin
Crofter replied to Tennentslager's topic in New House & Self Build Design
Agree that management of the nearby trees is going to be much easier and more effective. You could always consider the rebuildability of the hut... lash beams together Polynesian-boat-style so that they absorb the flex and gracefully make their way to ground without breaking? -
Keep it under 30m2 and without obvious overnighting accommodation and you won't need a warrant. Likewise if you make it portable/moveable in up to two sections, which is the route i've gone down. Going the portable route lets you make it pretty big (6x18m exc roof overhangs) and obviously you can't have a slab, you'd have to go for a suspended floor. I would think that for a garden room that spends a lot of time empty, the main consideration should be keeping it free of damp, rather than worrying about energy consumption. So I would be tempted to make it both well insulated and well ventilated, and maybe not go down the airtightness route, unless you are going to go the whole hog and fit MVHR. Hmmm... sub 30m2, straw bale walls, design it around whatever windows you can get on Fleabay/Gumtree, little woodburner, optional single room MVHR unit to keep it sweet.
-
There's a great deal of choice on this. Fortunately all the vital statistics are available on the BBA certificates (don't consider any membrane which doesn't give you the cert number). I didn't have a spec to meet but made a choice based on availability, price, and getting what seemed like a good product for the money. I have an exposed site and a slow build so the stuff needed to be able to last as the only weathertight layer for several months. I used Glidevale Protect TF200 on the walls, and for the roof I went with Cromar Vent 3 Pro, which has not let a drop in since I installed it last summer. The wall membrane was not quite so impressive and there was a rip with consequent leakage at the SW corner of the building, but patching it with another layer solved that problem.
-
Lights, ceilings and skips full of wood......
Crofter commented on TheMitchells's blog entry in Scooby Cottage renovation.
Use a gun and then you can go back to the it after several weeks and it will still work. OK you have to pay £7 for the gun but consider that an investment. I've not had to throw out any part used disposable cans since. -
Lights, ceilings and skips full of wood......
Crofter commented on TheMitchells's blog entry in Scooby Cottage renovation.
Windows looking good- you've been busy! I've likewise had mixed results with the foam guns. I just buy them at £7 a pop from eBay. The gun grade foam is about £3.50 a can from Toolstation so just as cheap as the single use version. I'm on my third gun now and this one seems to be a keeper, after I ruined the first two. The trick I do now is to give the nozzle a little squirt of foam solvent to keep it clear after each use, but I don't ever unscrew the can unless changing to a fresh one immediately. Oh and glad to know I'm not the only skip raider on the forum! The shuttering ply I used for my piers came from a skip... -
Another question... where I have to butt two boards together, e.g. on walls that have vaulted ceilings above them, is it better to leave say a 5mm gap for easier filling, or should I just sit them flush?
-
Well in the absence of any other info, I think I will just minimise joints even if this means one or two joins end up lining up with openings. The sheets are fixed to battens which are separated from the studs by a layer of 50mm PIR, so I think there is scope for slight movement in the frame without that translating to cracks on the sheets. Certainly I have a lot more fixings holding the sheets to the battens than I have holding the battens to the studs, and those are long 150mm screws with a bit of flex in them. Could just be wishful thinking. No opinions on whether to leave a gap at the bottom or not?
-
Could he dig a ditch and divert the burn instead?
-
If the ground is flat enough to flood, there's probably not enough head for a hydro.
-
In my continuing search for an answer on this, Google throws up this suggestion: https://www.familyhandyman.com/drywall/taping/drywall-butt-joints-made-easy/view-all Basically you force the board into a taper by screwing down onto a thinner batten. I guess this could work but it seems a bit of a bodge.
-
Possibly. Maybe need some fine sandpaper to smooth off the cut edge of the paper. But I'm hoping this is a solved problem. I can't be the first person to wonder how to do this!
-
The choice is jump to the other side, leaving a bit needing patched, or end up with a board edge lined up with the opening, risking cracks. It has to be in one or the other. They're full size sheets.
-
Well I did say majority of people. Not everyone is mortgage free.
-
Tapered is the standard around here. Most people just tape and fill, and don't bother with a skim coat. It simply isn't possible to avoid some cut-to-taper joints. E.g. today I was boarding around a window that's 1800 wide. So each side has a board with a cut out, and the middle is a piece 600 wide. That piece can obviously only have one edge tapered. Then carrying on along the wall, the next opening will be on a board edge- hence my question about whether to cut a board in half lengthways to avoid this (this is what i did for the sheathing). If I continue without a half width board, I'll end up with a tapered edge at the doorway... but I guess I could just fill that?? Not ideal but it looks like I have to compromise somewhere.
-
We've been through this on the forum before. For the majority of people, energy prices are an insignificant outgoing compared to mortgage payments.
-
Having started plasterboarding today I've realised I have some fairly basic questions. I understand it's good practice to avoid lining up board edges with the edges of openings- much as you would do with the frame sheathing. But I can't do this unless I cut a board in half lengthways. Is it really a good idea to add an extra floor to ceiling butt joint (and a messy cut edge meets tapered edge joint, at that) just to avoid having a tiny joint above a door?? Secondly, how important is it to leave a gap between the boards and the floor? I get the point where you have an old house with a potentially damp concrete floor, but this is a suspended timber floor. Third, any tips on getting a good finish in places where I am joining cut boards, or cut boards meeting taper edge?
-
Another plasterboard/window detail question... Where the plasterboard meets the window opening, I was going to have a feather edge there. Will this leave too much filling to be done at the corner? The alternative is to cut the window opening out of the board and then put new battens in for a board join slightly further over.
-
Can I harness the excess heat in my conservatory ?
Crofter replied to joe90's topic in General Plumbing
I once stayed for a few days in a self built 'eco house' where thr south facing conservatory had a rammed earth brick wall separating it from the rest of the house. The conservatory had louvred opening windows to help remove excess heat. The idea was that the bricks would heat up through the day and then slowly release that heat into the main body of the house. I only stayed there for a few days and it was snowing so can't really report how well it worked. Especially as the owners made us sleep in a tin shed outside rather than in the house itself. They were a bit weird. Another thought: if you start roofing over your conservatory, it becomes part of the house according to building regs. So even though you are reducing energy loss, you might find that suddenly you have to make big changes to the glazed area and insulation to keep the whole house compliant. Apologies if you are already ahead of me on this one. Third thought: don't put PV *inside* a conservatory! You will lose a percentage of the energy as it passes through the glass. Maybe roof mount them to give extra shading without losing the 'conservatory' status? -
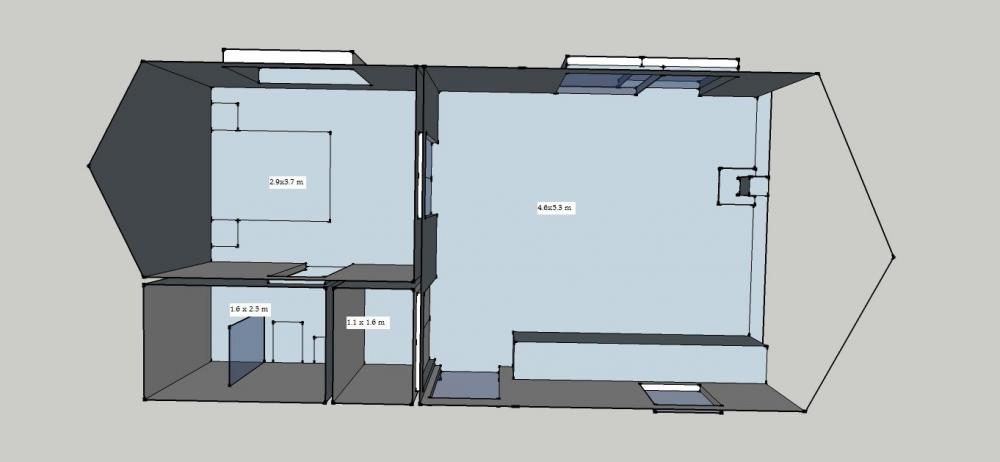
Yes I've given some thought to whether the washing machine is really needed. I think in practise it will be used by us more than by guests. It might not be essential but is a useful thing to have if you have the space, and I do think that I can afford to give 20% of my storage footprint over to it. And I can supplement the storage with freestanding furniture. Accessing the washing machine from the bathroom would alleviate the noise problem. So yet another layout would see the big cupboard split into two, accessed from kitchen and bathroom, and the bathroom side becomes the airing cupboard, with the UVC sitting beside the washing machine, and shelving above. This would leave the bedroom needing a freestanding wardrobe but I think that's acceptable. The baseline plan puts the UVC up in the (warm) loft. Unfortunately I have already purchased the kitchen, and it's sitting in a Wickes warehouse. I didn't buy an end panel either, because originally it was going to but up against walls at either end. Pondering making a small end wall that creates an upstand, essentially to stop things from falling off the end of the worktop, or being brushed off by people coming in the door. And it saves me buying an end panel and putting an end strip on the worktop.
-
Furniture layout is up for debate, for sure. And as pointed out, it's hard not to end up blocking the door or the sightline from the bed to the stove. My thinking at the moment is to have the sofa facing the big patio door, but far enough back from it to give a line of sight from bed to stove. The small two seater table would go on the wall between the stove the kitchen units (this was always the plan in the original layout). The remaining space could house an armchair by the patio door, and some sort of furniture in the corner (dresser, bookcase, or whatever- basically somewhere to put some secondhand paperbacks, board games, and a vase of flowers). I think people like looking at a stove, even if it's not on. But picture the scene. Throw some last logs on it, drain your glass of red, retire to bed and watch the flames dance as you drift off to the sound of the curlews on the shore outside, as the last glimmer of daylight turns deeper red and then imperceptibly fades to black. (Anyone want a holiday on Skye??) The more conventional solution would be to have a normal sized door offset towards one corner of the bedroom, and that then gives the greatest flexibility for furniture. But, meh, something's missing from that version. IMHO.
-
Thanks @Ferdinand, a pull out unit could help. It's funny how much thought can go into a cupboard! I've yet to sketch out the option of accessing the WM from the bathroom, which would mean dividing it three ways. Any comments on the bedroom-lounge divide? I've notionally put 1200 wide double doors on the centreline. This gives enough space either side for an 800 wide piece of furniture, e.g. chest of drawers plus a freestanding wardrobe. Aesthetically, it very much makes a feature of the woodburning stove and its flue which would be framed in these doors as viewed from the bed. Extra incentive to the flue bang on vertical Edit to add: I shouldn't need a whisky stash as I have one in my own house less than fifty metres away. Hopefully I can survive long enough without a dram to walk that far!
-
It's worth considering, but would not be straightforward. I have a width restriction on the building (another 600mm takes me beyond portable building limit), although a flimsy enough structure would probably be OK- roof overhangs, guttering etc are not counted in the width. So a simple roof, like a car port, might be allowable. Possibly more problematic is that the ground around the house is very uneven and sloping, so making a reasonable sized flat space at the back door is going to be tricky.
-
OK here's a version with the cupboard split, creating a shallow wardrobe from the bedroom. The wardrobe is 450 deep, and 1100 wide; the cupboard is now 1050x1100. Because of the need to put a washing machine in there, the narrower cupboard will be a bit hard to utilise fully- it's quite deep for its size, and there's only so much stuff you can put in front of the washing machine. But then again I don't need oodles of space (I keep forgetting this!). Somewhere for the fuse box, some spare linen, a shelf of cleaning products, and the hoover. The depth of the cupboard will also give ample space for things hung on the back of the door. I could move the main partition back a little, but that starts to make the wardrobe look a bit tight... I think? Again, not a huge amount of space is needed here, as when people are on holiday I think they tend to live out of their suitcases rather than fill a wardrobe with clothes. Or maybe that's just me. @MikeSharp01 Interesting that you think I could shrink the bathroom a bit. I sized it based on my interpretation of the building regs for activity areas around a WC and basin, and added a more generous 900 wide shower. I have the luxury of ignoring the regs if I want (portable building exemption) but I have used them as guidance for planning the layout.
-
Yes that's quite a neat idea. Only thing is I'm planning on having the washing machine housed in that cupboard, so making it smaller might make space a bit tight for that.
-
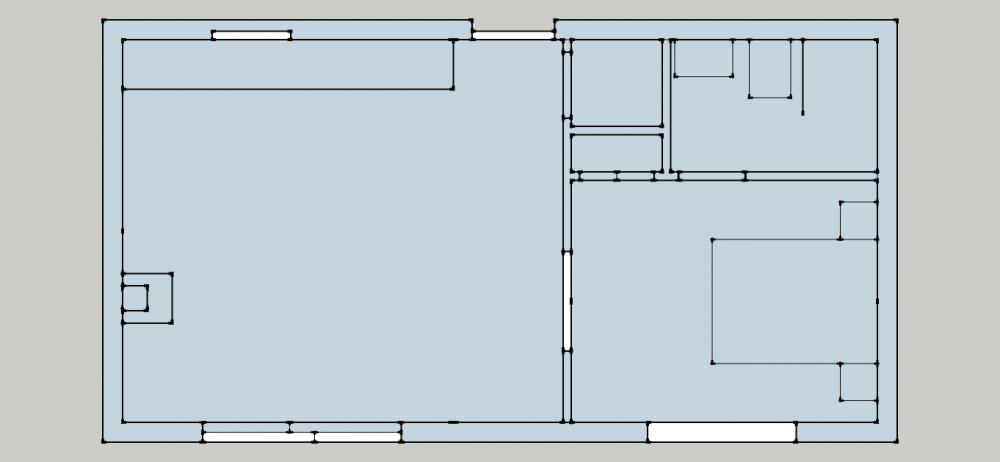
Having spent some time in the shell of the new house, .I've grown rather fond of the space and have become reluctant to start splitting it up with partitions as per my original design. Fortunately everything I have done so far is compatible with a more open plan layout. It's a fairly big change but actually means less building work. It takes the house further away from being somewhere that I would call a home, and makes it more of a holiday house- I am trading storage space for bigger rooms, and losing the practicality of having an entrance vestibule. I've attached a sketch of the revised layout that I'm proposing- any feedback very gratefully received.