Sparrowhawk
-
Posts
588 -
Joined
-
Last visited
Everything posted by Sparrowhawk
-
"Just make one model that follows the green line, not 3 models where I have to work out which to use when and on which settings, and guess which will be more token efficient..."
-
Wish you could transfer any you don't use to me! I'm doing open source work on a large 20+ year old C codebase, and designing something that will improve CPU and memory efficiency. Fable is significantly better at planning that than Opus, which leaves holes that I can spot at a glance. Fable still leaves holes, and I have to review it with GPT and have back and forth to find and fix them all, but it's a clear improvement. I've got access to GPT-5.6 Sol this morning and that may be doing a better job planning on this codebase than Fable is. I've also got a lot more OpenAI tokens to burn than Anthropic, and I have to ration my Fable usage. More new toys... There's software that will do that and estimate the tokens per conversation (can't remember the name of the programs). That hasn't been of interest to me, so on macOS I use https://github.com/steipete/CodexBar to keep an eye on how my usage is going.
-
I'm finding Sonnet 5 works out more expensive than Opus due to the number of tokens it's using (for coding). Not impressed with it TBH. Now Fable, that really is something else!
-

Fully glazed vs glazed with midrail - can't decide
Sparrowhawk replied to hauntedicecreamvan's topic in Doors & Door Frames
@hauntedicecreamvan Which door did you go with? I'm currently looking for a fully glazed door. -
Does aerobarrier negate need for airtightness detailing?
Sparrowhawk replied to SBMS's topic in Ventilation
Do these help? https://usceiling.com/wp-content/uploads/2018/11/AeroBarrier-X1-Sealant-Datasheet-and-SDS.pdf https://www.arcat.com/datasheets/aeroseal/AeroBarrier_X1_Sealant_Datasheet_and_SDS.pdf -
Does aerobarrier negate need for airtightness detailing?
Sparrowhawk replied to SBMS's topic in Ventilation
I'm assuming only bottom horizontal surfaces because it's not sticking to vertical surfaces, so it's not sticking but settling out onto the floor. It sounds great but I wouldn't want to risk it in a furnished house! -
Fabric and ventilation heat loss calculator
Sparrowhawk replied to Jeremy Harris's topic in Heat Insulation
Do you have more than one HeatGeek installer in your area? They come with a premium, but there was a 50% difference between the two quotes I got. Some are just taking the mick with their prices (and if people will pay, who can blame them). -
Fabric and ventilation heat loss calculator
Sparrowhawk replied to Jeremy Harris's topic in Heat Insulation
Consider going to a HeatGeek accredited installer, because they know their stuff and will install outside MCS or may be able to get a reasonable system design through MCS. And a HeatGeek installer will appreciate that you've already done a basic heat loss calculation to size up the previous system design! -
Nice, I had an 1898 house for 7 years which had the original plaster mouldings and they added real character to the place. You've answered your question Rads it is!
-
Retrofitting insulation in a dormer/ story and a half house
Sparrowhawk replied to woodstream's topic in Heat Insulation
Welcome @woodstream! Parts of my house are built into the roof like this. The 45 degree bits have badly fitted PIR insulation where the cold air goes both sides of it(!); we've decided the payoff from tearing down the ceilings to redo it isn't worth it, so I've focused on the vertical walls. If you need to crawl in the tight space, treat yourself to the recycled plastic bottle insulation, it's a lot more pleasant to work with. I put 100mm of this in the 1m high vertical wall on one side of our bathroom, and that alone raised the temperature by 2C in winter, so it's worth doing. Where you can get to the 45 degree rafters, pop mineral wool batts between them (remember it needs supporting, with netting, plasterboard, whatever - it will sag without) leaving a 50mm gap for ventilation. It can be easier to put wooden battens along the joist to enforce this gap. And then make it as airtight as possible, because draughts going round your insulation will undo much of the indoor comfort that your insulation brings. If you're up for it, put an air and moisture tight membrane on; otherwise plasterboard and seal all cracks carefully. -
My experience is you won't get a standard installer to do anything else and will have to either do it yourself or let them do the install and then do whatever you can for airtightness on the internal side.
-
Welcome @jc212. I've spent years since moving into this house (rubbish buildered and rubbish shelf-buildered) tracking down air leaks and fixing them, usually by taking the floor above up and doing it from there. You've a fun but ultimately satisfying journey ahead of you. Do you have buy-in to take the ceiling down, or take down at least for 50cm around the edge of the room? If you don't (and I can never get buy-in for this from SWMBO) then we need to think of a different approach. @Big Jimbo has posted good instructions above, though I find I have tiny air leaks around or through expanding foam when I use it to stick or seal PIR in place and which defeats the object. What I would add is get yourself a tub of Soudal Soudatight. Or Passive Purple, or Blowerproof, or any other brand. These are thick airtightness paints and really help to seal the leaks. Back to it, I would expect there's 1-3mm gaps around your joists if they sit into the wall, and air is coming in here. Pack these with something, mortar, caulk etc, and when dry paint with the airtightness paint. Then carry on with Jimbo's instructions re sticking PIR in place, or fill the whole ceiling between the rafters with insulation. Some of us have built our own blower doors to depressurise rooms in the house and make it easier to find leaks. Another approach is on a windy day when the wind is hitting your extension, to open a window on the opposite side of the house. This naturally creates a path for air to flow and you'll find the places that leak are quite noticeable.
-
Thanks @marshian for the mention and welcome @Rocket Ron. Edwardian, nice - does it have original fireplaces and plasterwork inside? A friend installed UFH downstairs in his open plan 1950s house, with 50mm PIR between the joists (fitted by a builder so not airtight), and then the tray system you describe on top. The slightly warm floor feels wonderful underfoot, as is the lack of radiators, but it's not been as economical to run as he expected. Here in my 1920s house I've kept with radiators as the joists themselves are close together and going to provide cold bridges through the floor. My flow temperatures are considerably higher than @marshian - about 45C when it's 1-5 degree outside last week. Doing a heat loss calculation, I wouldn't call the process easy, but I may have been too anal with getting the construction details right (there are contradictory U-values for most building materials). It was worth doing though. If I had a more standard house I'd try HeatGeek's tool to do one first. Where it pays off is working out if an improvement is going to be worth doing or not. In many cases, it showed that adding extra insulation wasn't worth the cost or disruption. But it gave me numbers for how much heat was lost via draughts, and stopping those has made the biggest increase in comfort inside the house. So my point is that the choice between underfloor heating or radiators probably won't matter in the long run, compared with nailing airtightness. But I'd do UFH because it's going to look better, and the extra heating cost would be worth it for me.
-
Mastic, silicone, sealants and foams.
Sparrowhawk replied to Nickfromwales's topic in Building Materials
Good thread, here's the ones I can remember using. I've had a number of different sealants because I've usually needed them at short notice and had to grab one from a local shop. Keep in mind I'm using on renovations not new build, so I'm working on poor substrates. Foams Illbruck FM330 expanding foam - good, but when filling gaps with sharp corners (broken bricks etc) doesn't expand into the corner to make it fully airtight, even with lots of wetting of the surfaces. Keep getting air leaks through or around a line of this foam in the 10mm gap between masonry and PIR. Soudafoam Gun Win. & Door SWS - less dense and flexible foam, but a bit better gap filling. Blue in colour and the blue stains (got some on the floor the second time I used it, oops) Soudal Gap Filling Foam Hand-Held 750ml - used these twice, stick nozzle in hole and empty can. Does what it says on the tin. Bonus item: bottle of acetone. Wipe nozzle of foam gun with acetone after use, stops build-up of set foam. Sealants and adhesives Geocel Contractors Decorators Caulk - smooths like a dream, cracks like an arse. Avoid. CT1 - strong adhesion, difficult to tool smooth, with water + washing up liquid or spittle. I saw a tip on here to use it first then pop white silicone over the top to keep it white - it's also easier to tool down doing it that way. Not hugely flexible once set - I wouldn't use around windows, doors etc. Everbuild Everflex 335 Premium Construction Silicone Sealant (Clear) - smooths easily, sealed the car roof well and has stayed stuck down for 12m+ Everbuild Everflex 450+ Builders Silicone - it stays white and flexible. Didn't smooth down particularly well, and the entire tube went off. I won't be getting it again. Everbuild Everflex AC50 Contract Acoustic Sealant and Adhesive - bought for a through-ceiling acoustic sealant. Would get Everbuild AC95 Acoustic Sealant next time as AC95 contains safer chemicals. Soudal Fix All High Tack - bought to stick on skirting board and it does that brilliantly. It also smooths well as caulking - but it's an absolute BEAST as it's so thick to squeeze out a fine bead. Still looking for a favourite caulk. Bonus item: No Nonsense Multi Nozzle Pack - when the nozzle goes solid the tube is generally still liquid. Bang on a new nozzle and give your tube a second (or third, or fourth) life. Bonus shout-out to Silicone grease which when popped in the cap has kept some nozzles from setting. Airtightness paints Soudatight LQ - brilliant stuff and sticks well even in dusty corners. Buy cheap brushes and chuck after use. -
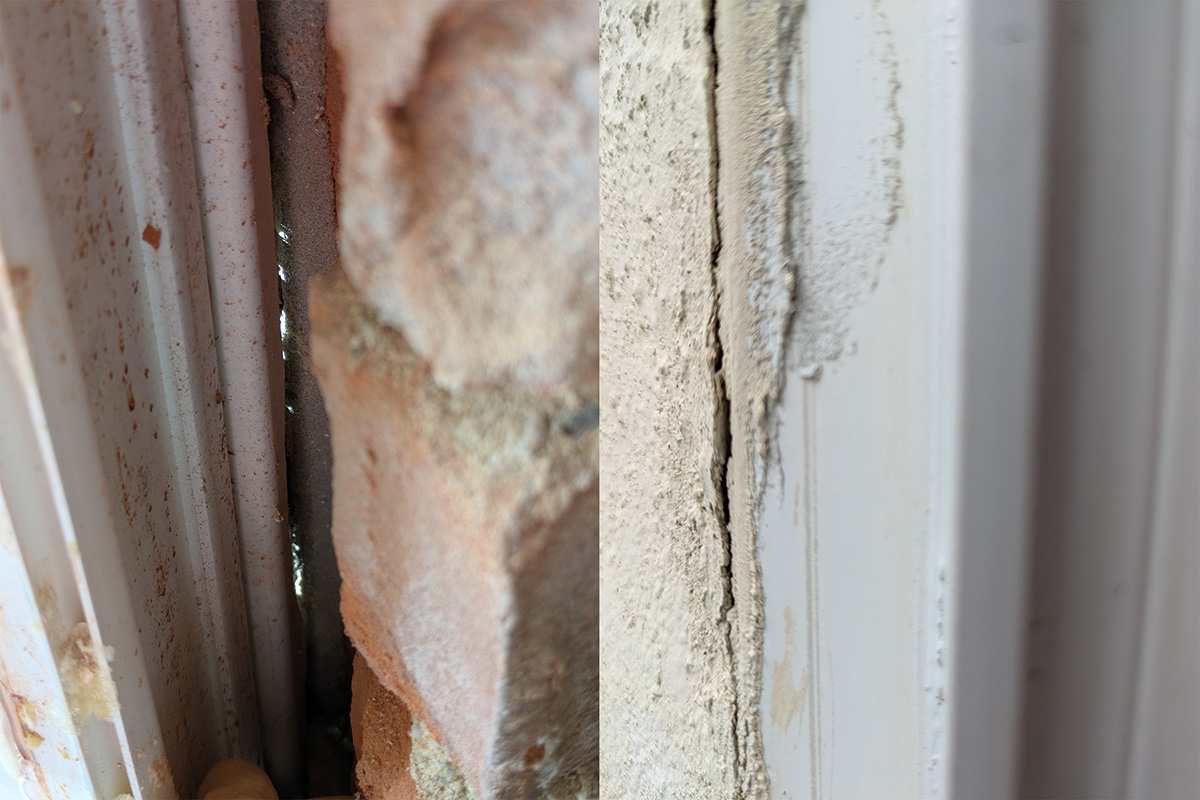
Oh yeah, that would have worked 🤣 I guess if fixing now, a timber packer between window and brick and then screw through it would do. With the window frame in place screwing a batten on would be a pita
-
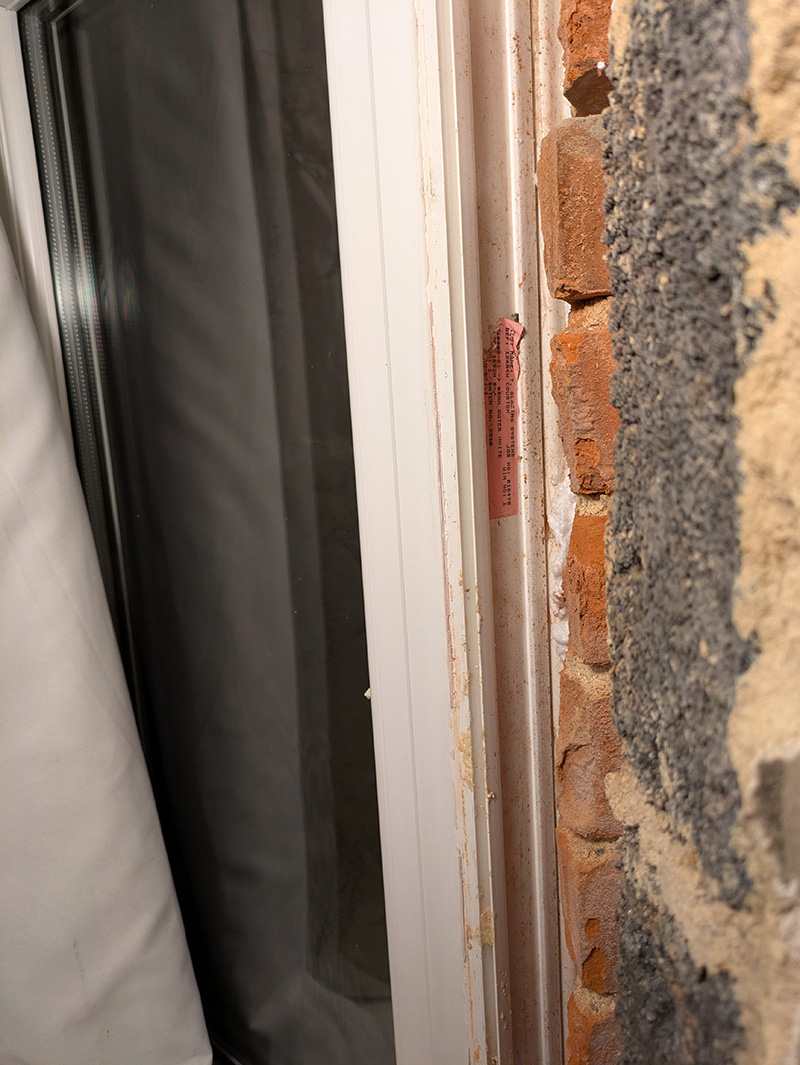
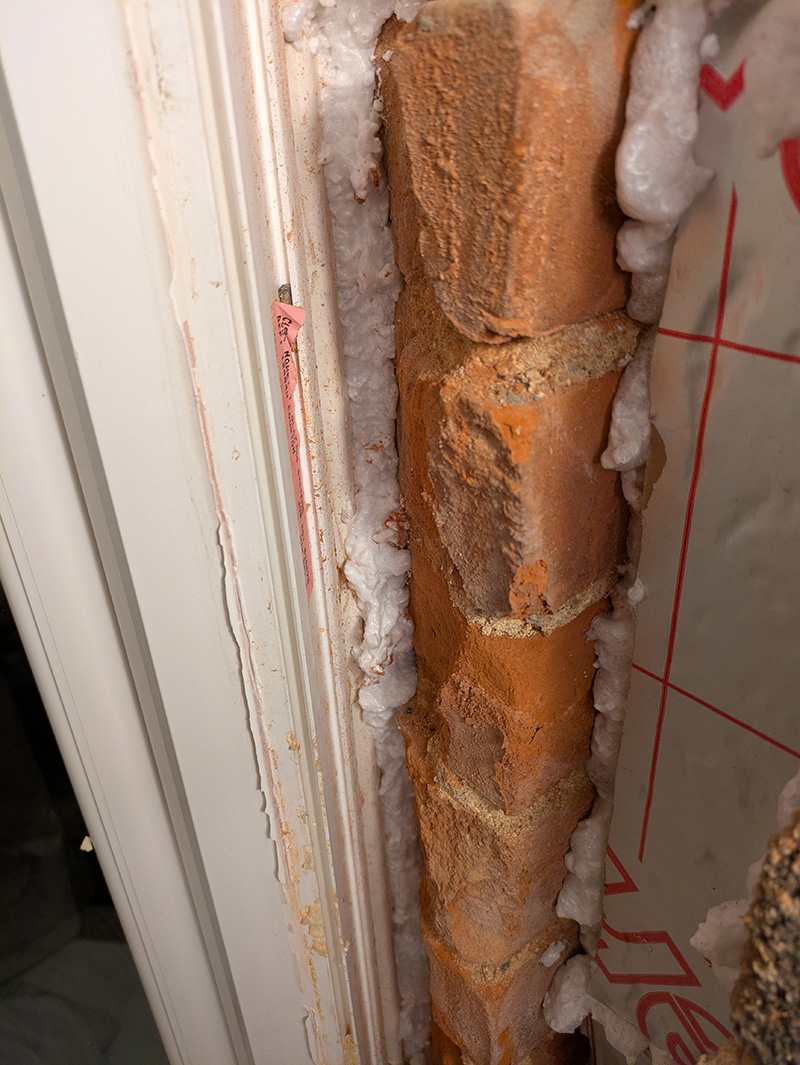
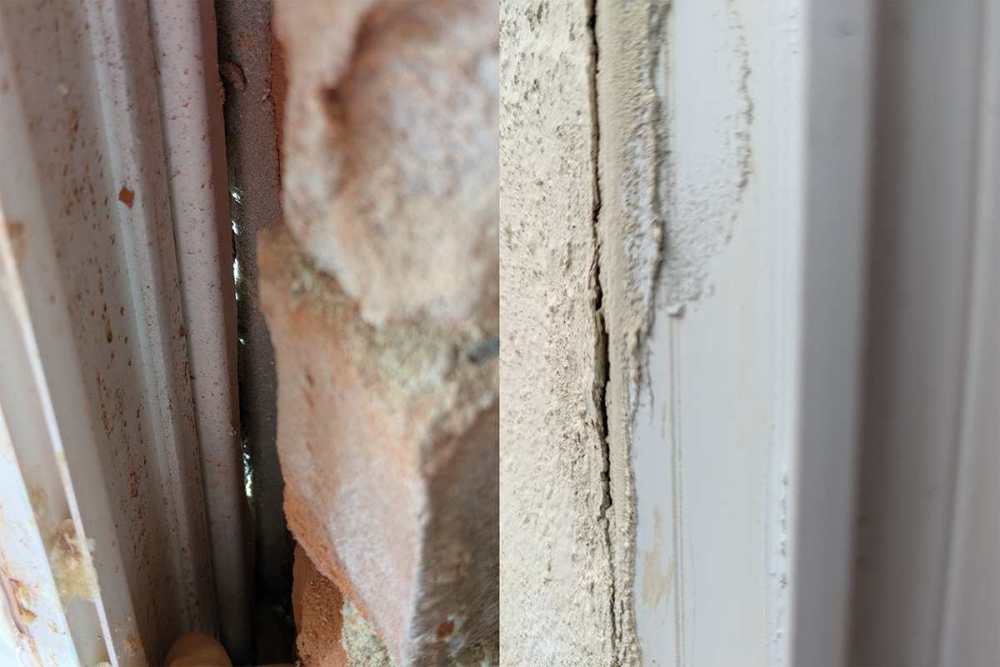
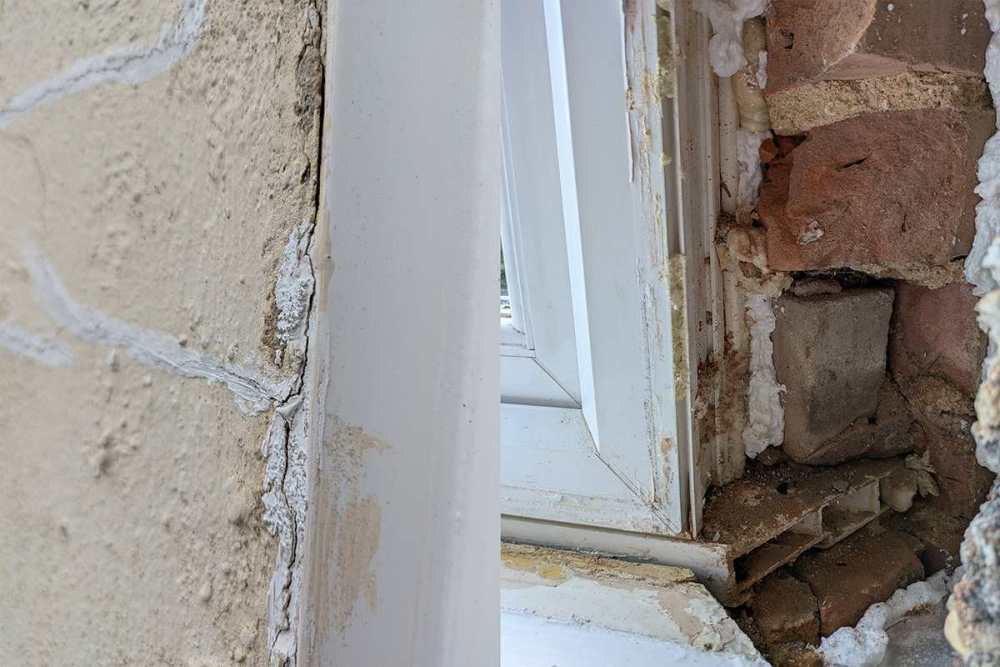
@Nickfromwales here you go - there's not a single screw on either side of the bay window to tie it into the masonry. It hasn't gone anywhere in the 20 years it's been installed, but from what you say that's not how it's supposed to be. There's two steps here then: Getting through the winter with it weathertight - whatever bodge will do Making sure when the bay windows are replaced in a year or two that they're installed properly Because the bricks have been cut at 45 degrees for the original wooden windows and are "well weathered" I can understand why they haven't bashed long screws through because it feels like there's not that much for them to bite into.
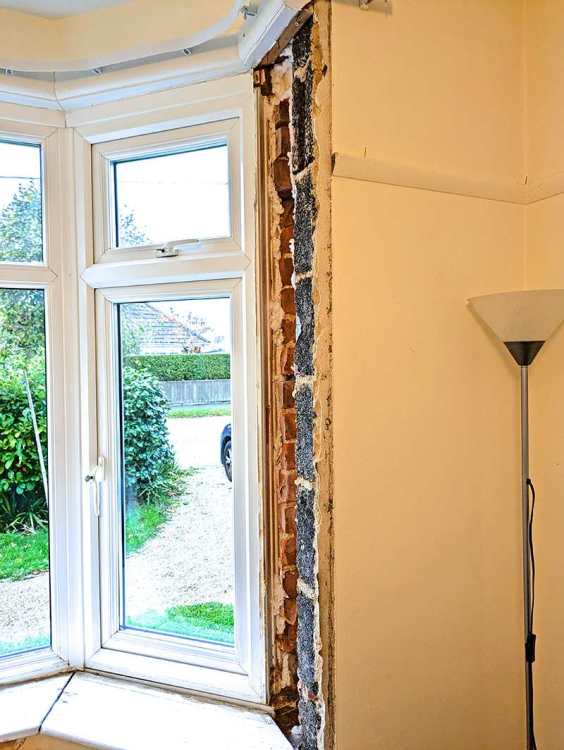

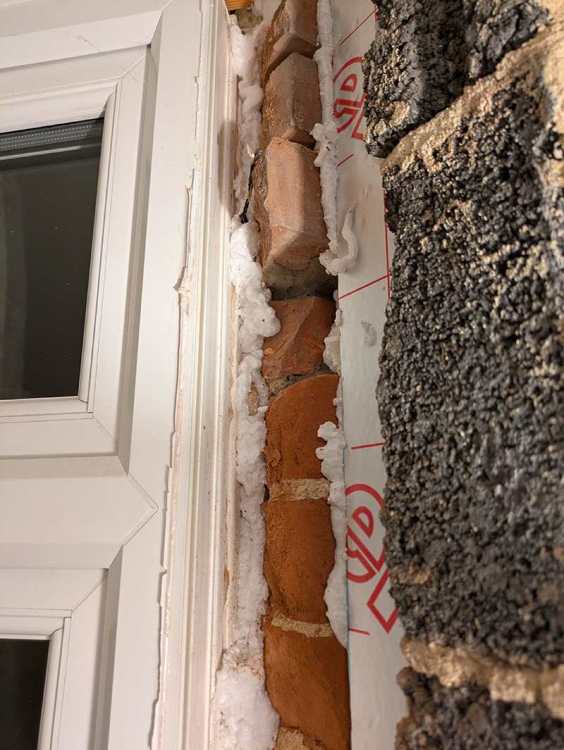

-
Opening up the side of a bay window, I could see daylight where the mortar had cracked away from the window. Water weeped in when it rained. I filled the internal gap with closed cell expanding foam, but I want to seal it from the outside as well. Last autumn I wiped CT-1 over the cracks which kept the water out for the winter, but it didn't withstand the expansion cracking in the summer heat. What can I do for a longer-term fix? Silicone might stretch enough but I want to be able to overpaint. And with the 135° angle where the window meets the wall it's not like a nice fillet of sealant will fit. Do I need to pop some plastic capping over this and stick it in place either side? of the joint?
-
What's the case for not getting an ASHP?
Sparrowhawk replied to kentar's topic in Air Source Heat Pumps (ASHP)
Hi @kentar going back to your original post... Last year we got a replacement gas boiler installed by a Heatgeek accredited installer. For some of the same concerns you have. The installer usually installs heatpumps but I didn't see our house as heat pump ready for a few more years (Gus Potter summarised well on page 2) so while we could have gone heat pump we didn't. And it's been brilliant. We've ended up with a system that runs at a lower temperature (we changed a few radiators) using weather compensation. Hot water reheats in 10-15 minutes, and that meant we could save some space with a smaller tank. So I'd say go for gas, and spend a bit more on an accredited installer to get an efficient setup. -
Using PIR boards to backfill garden path
Sparrowhawk replied to miike's topic in General Self Build & DIY Discussion
And pop them on the marketplace here. -
Good read @marshian, and that matches my experiences very closely. My heating curve ended up as Slope: 1.6 and Level: -7. It's still not perfect, as on days with lots of solar gain it overheats, while on other days, which are warmer outside but with no solar gain, the house is too cold. But I don't think that's fixable until we have better insulation and draft proofing. @Oz07 In my case we left the heating on 24/7 (previous years manually turned on/off) and our usage went from 13,300kWh to 14,500kWh - but the house was always comfortable, whereas in the previous year it had been down to 15C many winter evenings, and we were wearing coats indoors. This is still below the 16,500 kWh it was in 2021 when we tried to have it warmer with the old boiler.
-
window surveyor = posh company's triple glazing salesman?
-
Help with kerb appeal of an existing house
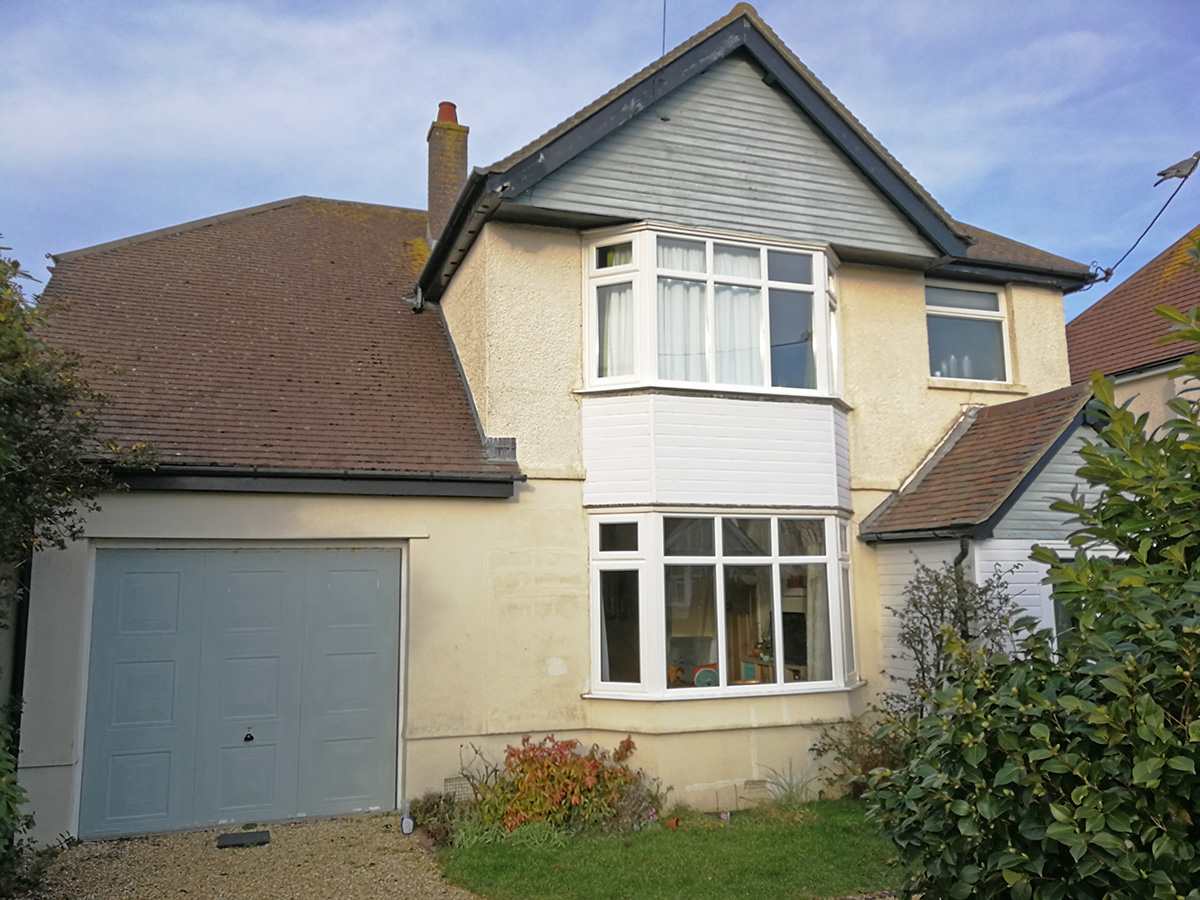
Sparrowhawk replied to Sparrowhawk's topic in New House & Self Build Design
Thanks @ETC a sketch or two would be appreciated. That's a good idea about looking back, I will look for earlier photos but I know it was built c1926-8 as the middle of 3 houses and extended (porch, 2 story side extension w. new garage) in the late 90's. I suspect the first floor pebbledash is original and it was red brick for the ground floor. Later rendered over to hold the soft red bricks together! The original roof was slate. Not much help but I have a B&W aerial photo from 1948 where our house (middle) is right at the back. Bournemouth is nearby so I'll look for similar period photos from there. @DevilDamo ChatGPT certainly has ideas 😂
-
Yes. Round here people slap thick render over the downstairs bit to hold the soft red bricks on the lower half together, and if they want contrast add cedral cladding or similar to the top half. Or render it all the way up. If it were affordable to "swap out" the lower half of the brick walls for new brick people would be doing it, because the houses which are still like that look cracking.
-
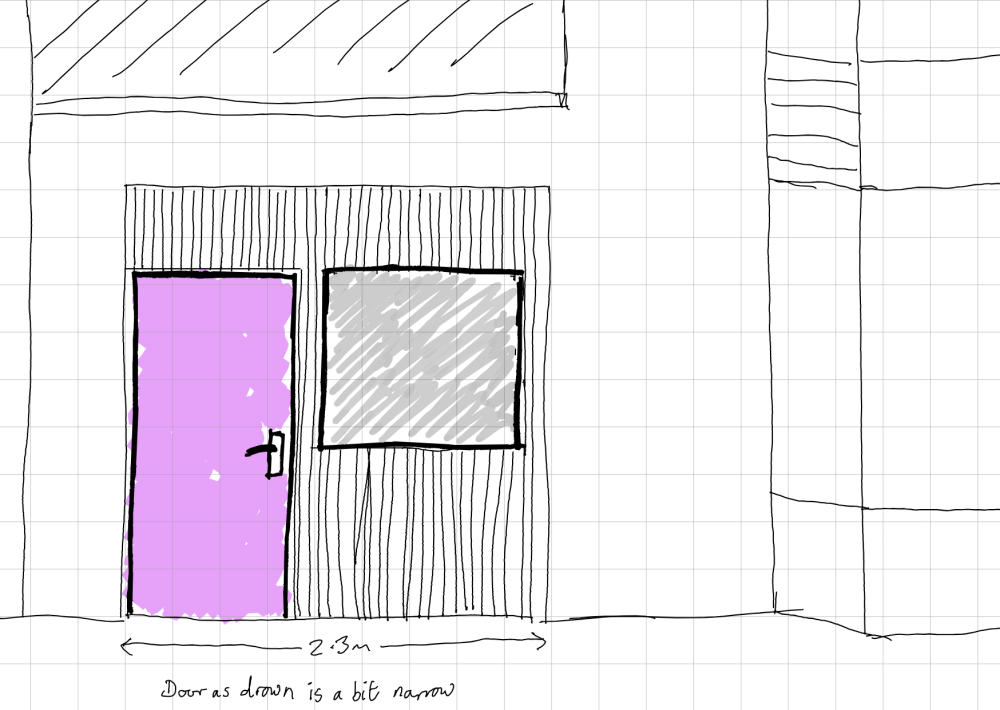
We're going round in circles here with the number of possible options, so I'd appreciate the forum's input. Having overhauled the front garden this spring, we need to bring the rest of the front up to scratch. Over the next few years we need to: Rerender the ground floor Repaint the house Replace the blue painted timber cladding and white PVC cladding (no ventilation behind!) Decide if keeping the barge boards and facias/soffits black or change to white Replace the windows Convert the garage to workshop/gym and pop an airtight front door on it (I see many ugly conversions, I don't want to be them) French windows on front? Or 1.2m+ wide door and window? Need to get wide handlebar push bikes and larges sheets of wood in and out Eventually rebuild the porch, so there's free rein here So there's lots of freedom, except for the roof colour which we're stuck with. We are struggling to choose the garage/porch style and pick colours that work together and visualise what areas should be what colour. We don't like the current magnolia/blue/white/black combo. The blue wood and the white PVC cladding sit awkwardly together. It's a seaside location. Next door has gone sage green for their doors and woodwork. We'd like to add a climbing rose between the current garage door and the bay window. I sketched something modern with cedar cladding for the garage door infill but my wife wasn't keen, and pointed out that french doors are more practical as they give a wider opening and more light, and will need less maintenance than wood, as neither of us like the natural grey it goes.


-
@TerryE Yes let me know the credentials for our GSE account and I'll see how our account looks.