zoothorn
-
Posts
4749 -
Joined
-
Last visited
-
Days Won
3
Everything posted by zoothorn
-
Ok just about got the sods out. @Onoff if I could get your thoughts especially.. Ok now I find whats under the osb top. Nearest door frame: roof batten nailed I think into the block below, with a lip of dpm around it & going down into cavity. The cavity doesn't go down down all the way here as I anticipated to find: instead a dpm sheet seems(?) to come up from 1 block below door frame, up & diagonally across 'bridging' the cavity > stapled onto CLS. So I sort of have a dpm gap shaped in a sort of 'V' going down 6" or so.

-
Ok Peter thanks- will do.
-
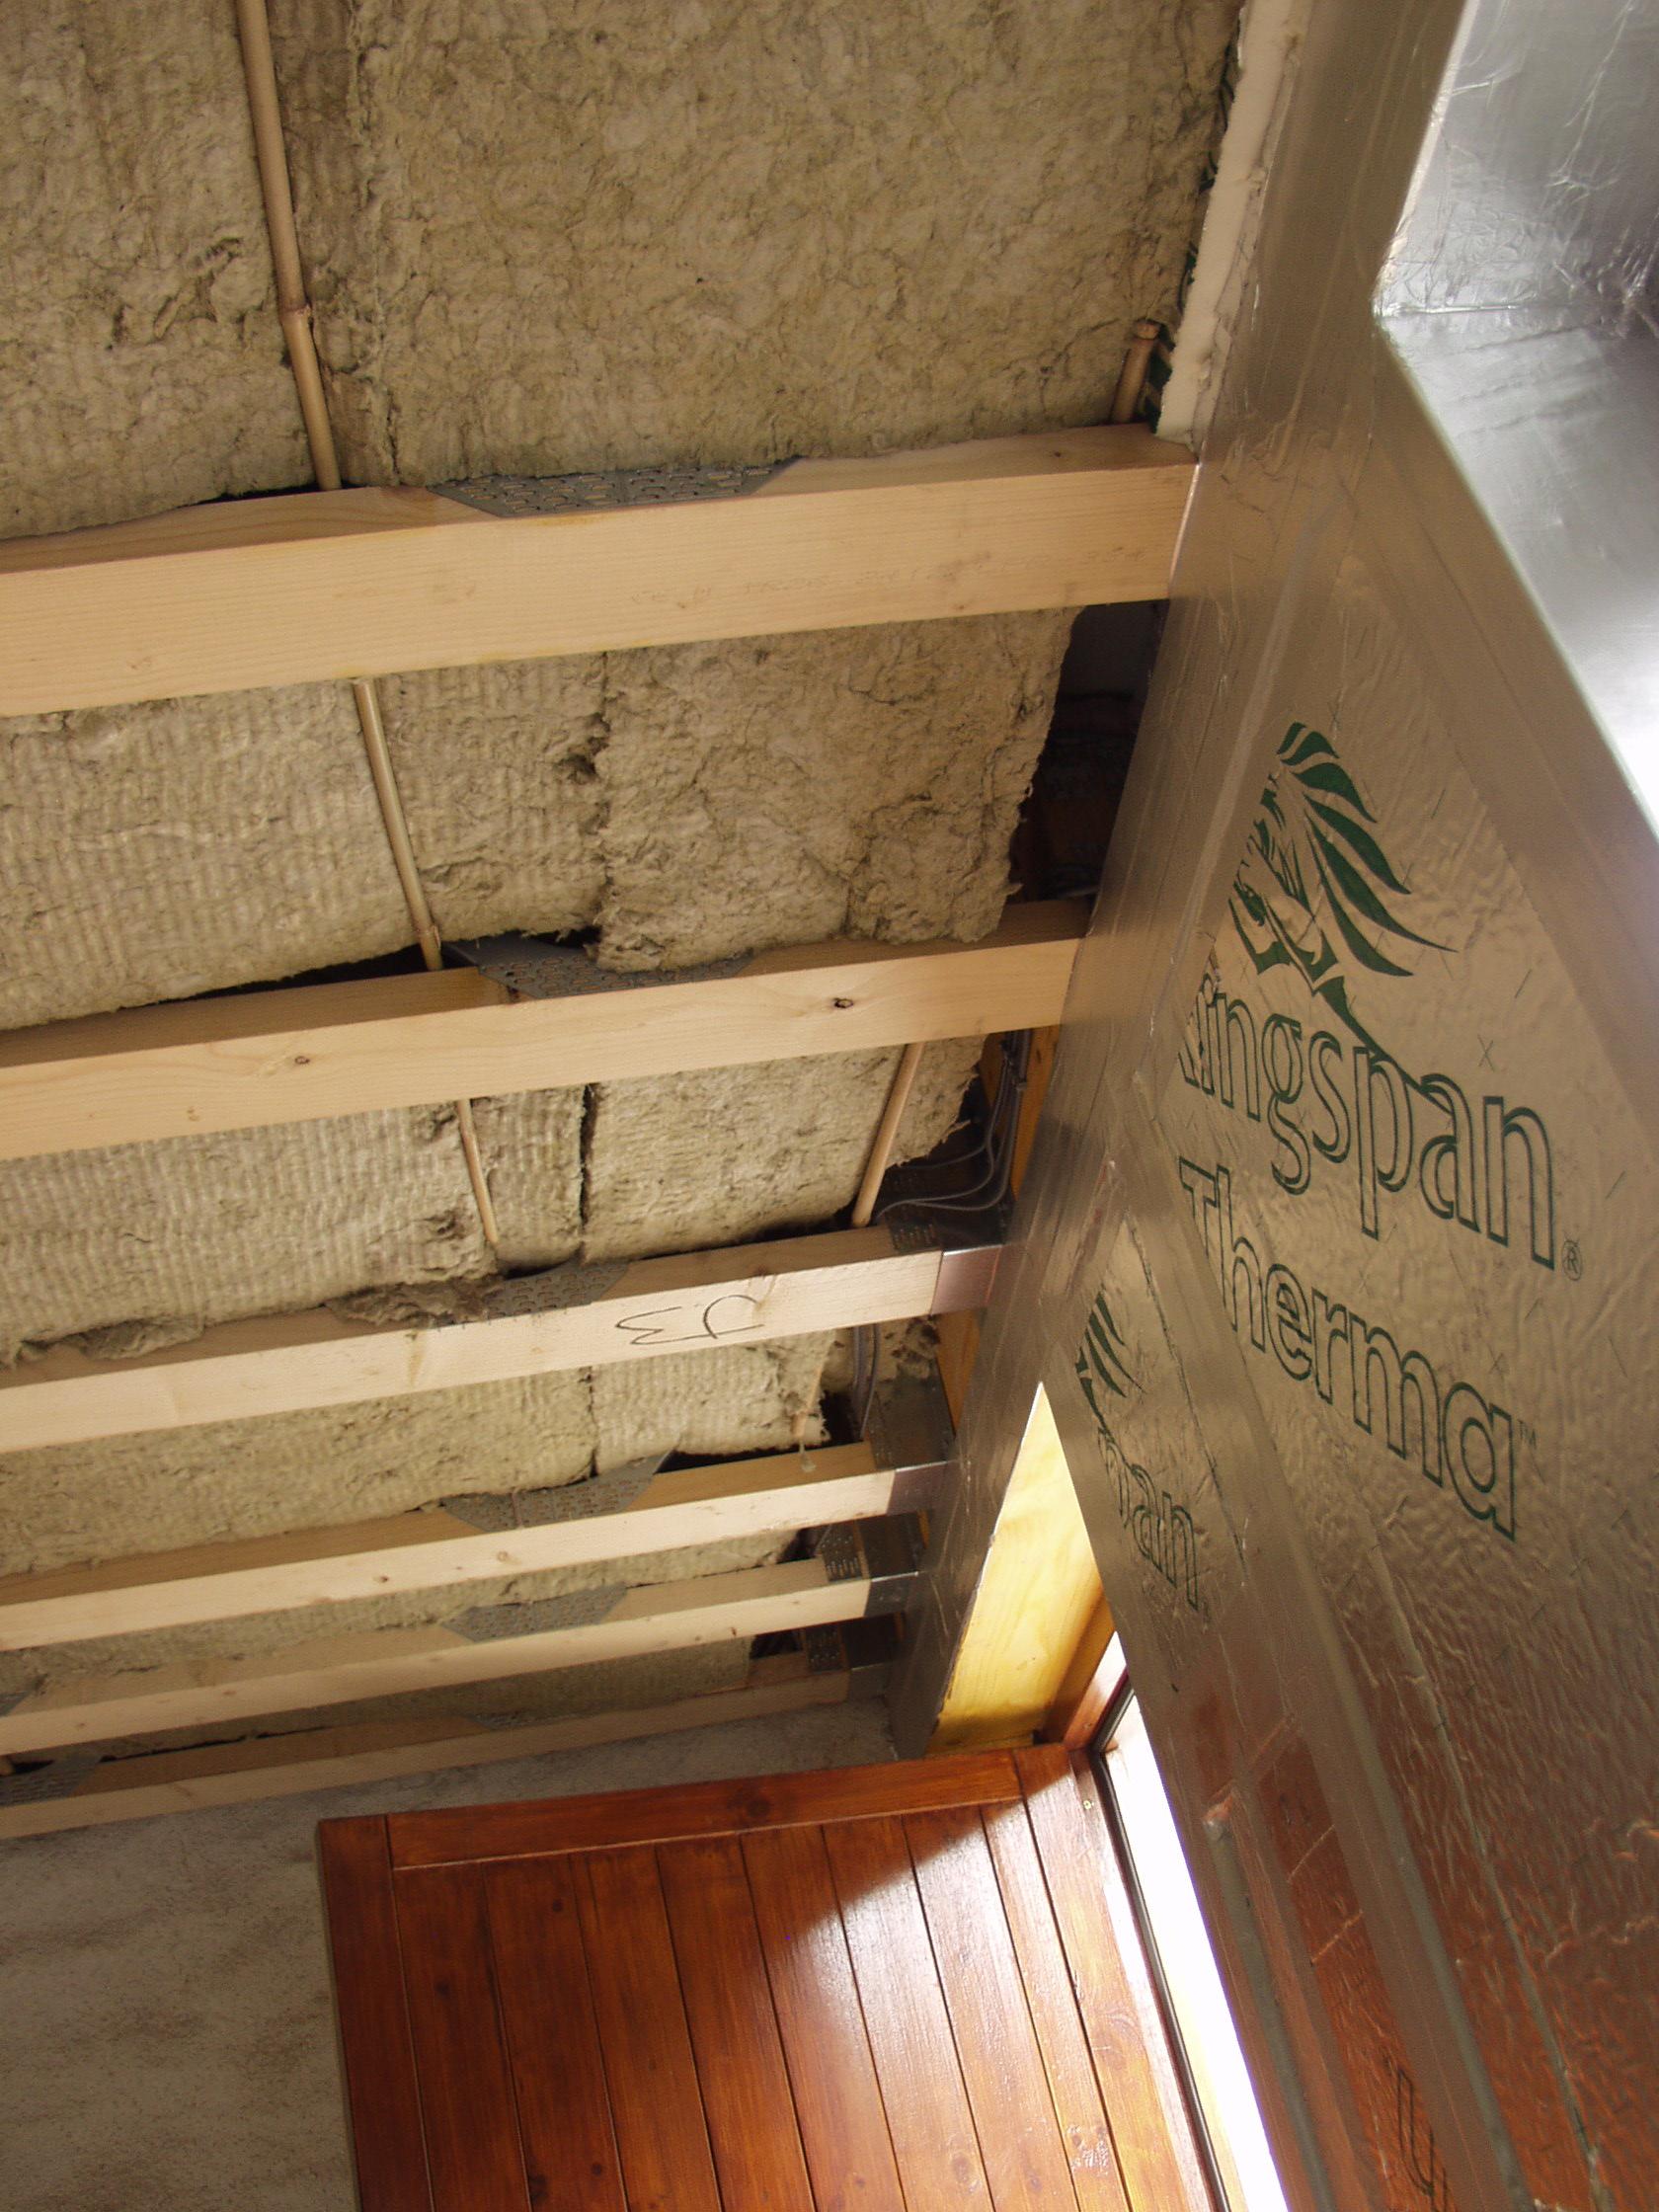
Ok I think I understand.. you mean my cables onwards from this stuffed 'junction area' are mostly either sitting ontop the rockwool, clipped to the side of vertical studs with a bit of gap before the rigid PIR (mostly so on the verticals so,).. & even if this congregation/ junction area above door has all the cables squished between joist & the rockwool.. as its only for this small 3ft section, its inconsequential. Am I getting the gist correct here? I'm not quite understanding "wrapped" whether it means an insulation 'sheath' (which not one inch of any cable has anywhere) around a cable, or a full surrounding 'envelope' of rockwool, or whether a combination of rockwool on one side & joist on the other designates it being "wrapped".
-
But aren't these cables though 'long lengths' ? they're coming from all over the extention > to this congregation area above the door > to all bunch together for the exit thru 2 ft wall.. into main house. I can understand that I'm not 'wrapping them in insulation' (I assume a sheath situation.. but can't picture it).. or.. am I not doing exactly this if I stuff me 'oles guvnor?
-
Hi Peter.. I just want to be super-sure on this fluff/cables proximity: could you explain what you mean by this ^ post? (I prefer to understand xyz before doing it). I seem to recall 'derating' mentioned before.. but it was complicated. Is there a way to simplify the answer for me (bar 'yes- just stuff it in b*tch!!') ?
-
Hi Peter.. missed this reply, thanks.. the thing is these holes/ gaps I've left due to being where majority of cables congregate > exit thru wall LHS of the door (in old wall). I'm not sure about the proximity of cables/ fluff you see, so reticent/ waiting for advice. Got fluff left.. but should I just stuff these areas & cover the cables then?
-
Ah good idea this.. will do my best with what Ive got/ not exactly great nor a long whatnot. report back. Thanks dpm..
-
bigass '+', gold fella screw. I only got electricians red long s'driver that'll provide any torque.. not shifty a jiffy tho. I'll have to attack it with rage, hammers & very coarse language I think.. then redo it/ found some osb.
-
Ok gotcha- thanks Peter.
-
Ok thanks chaps- I dont have a fine woodsaw, an old near shot one tho.. so will do a practise cut. I think pallets for support then if I can source. Many thanks.
-
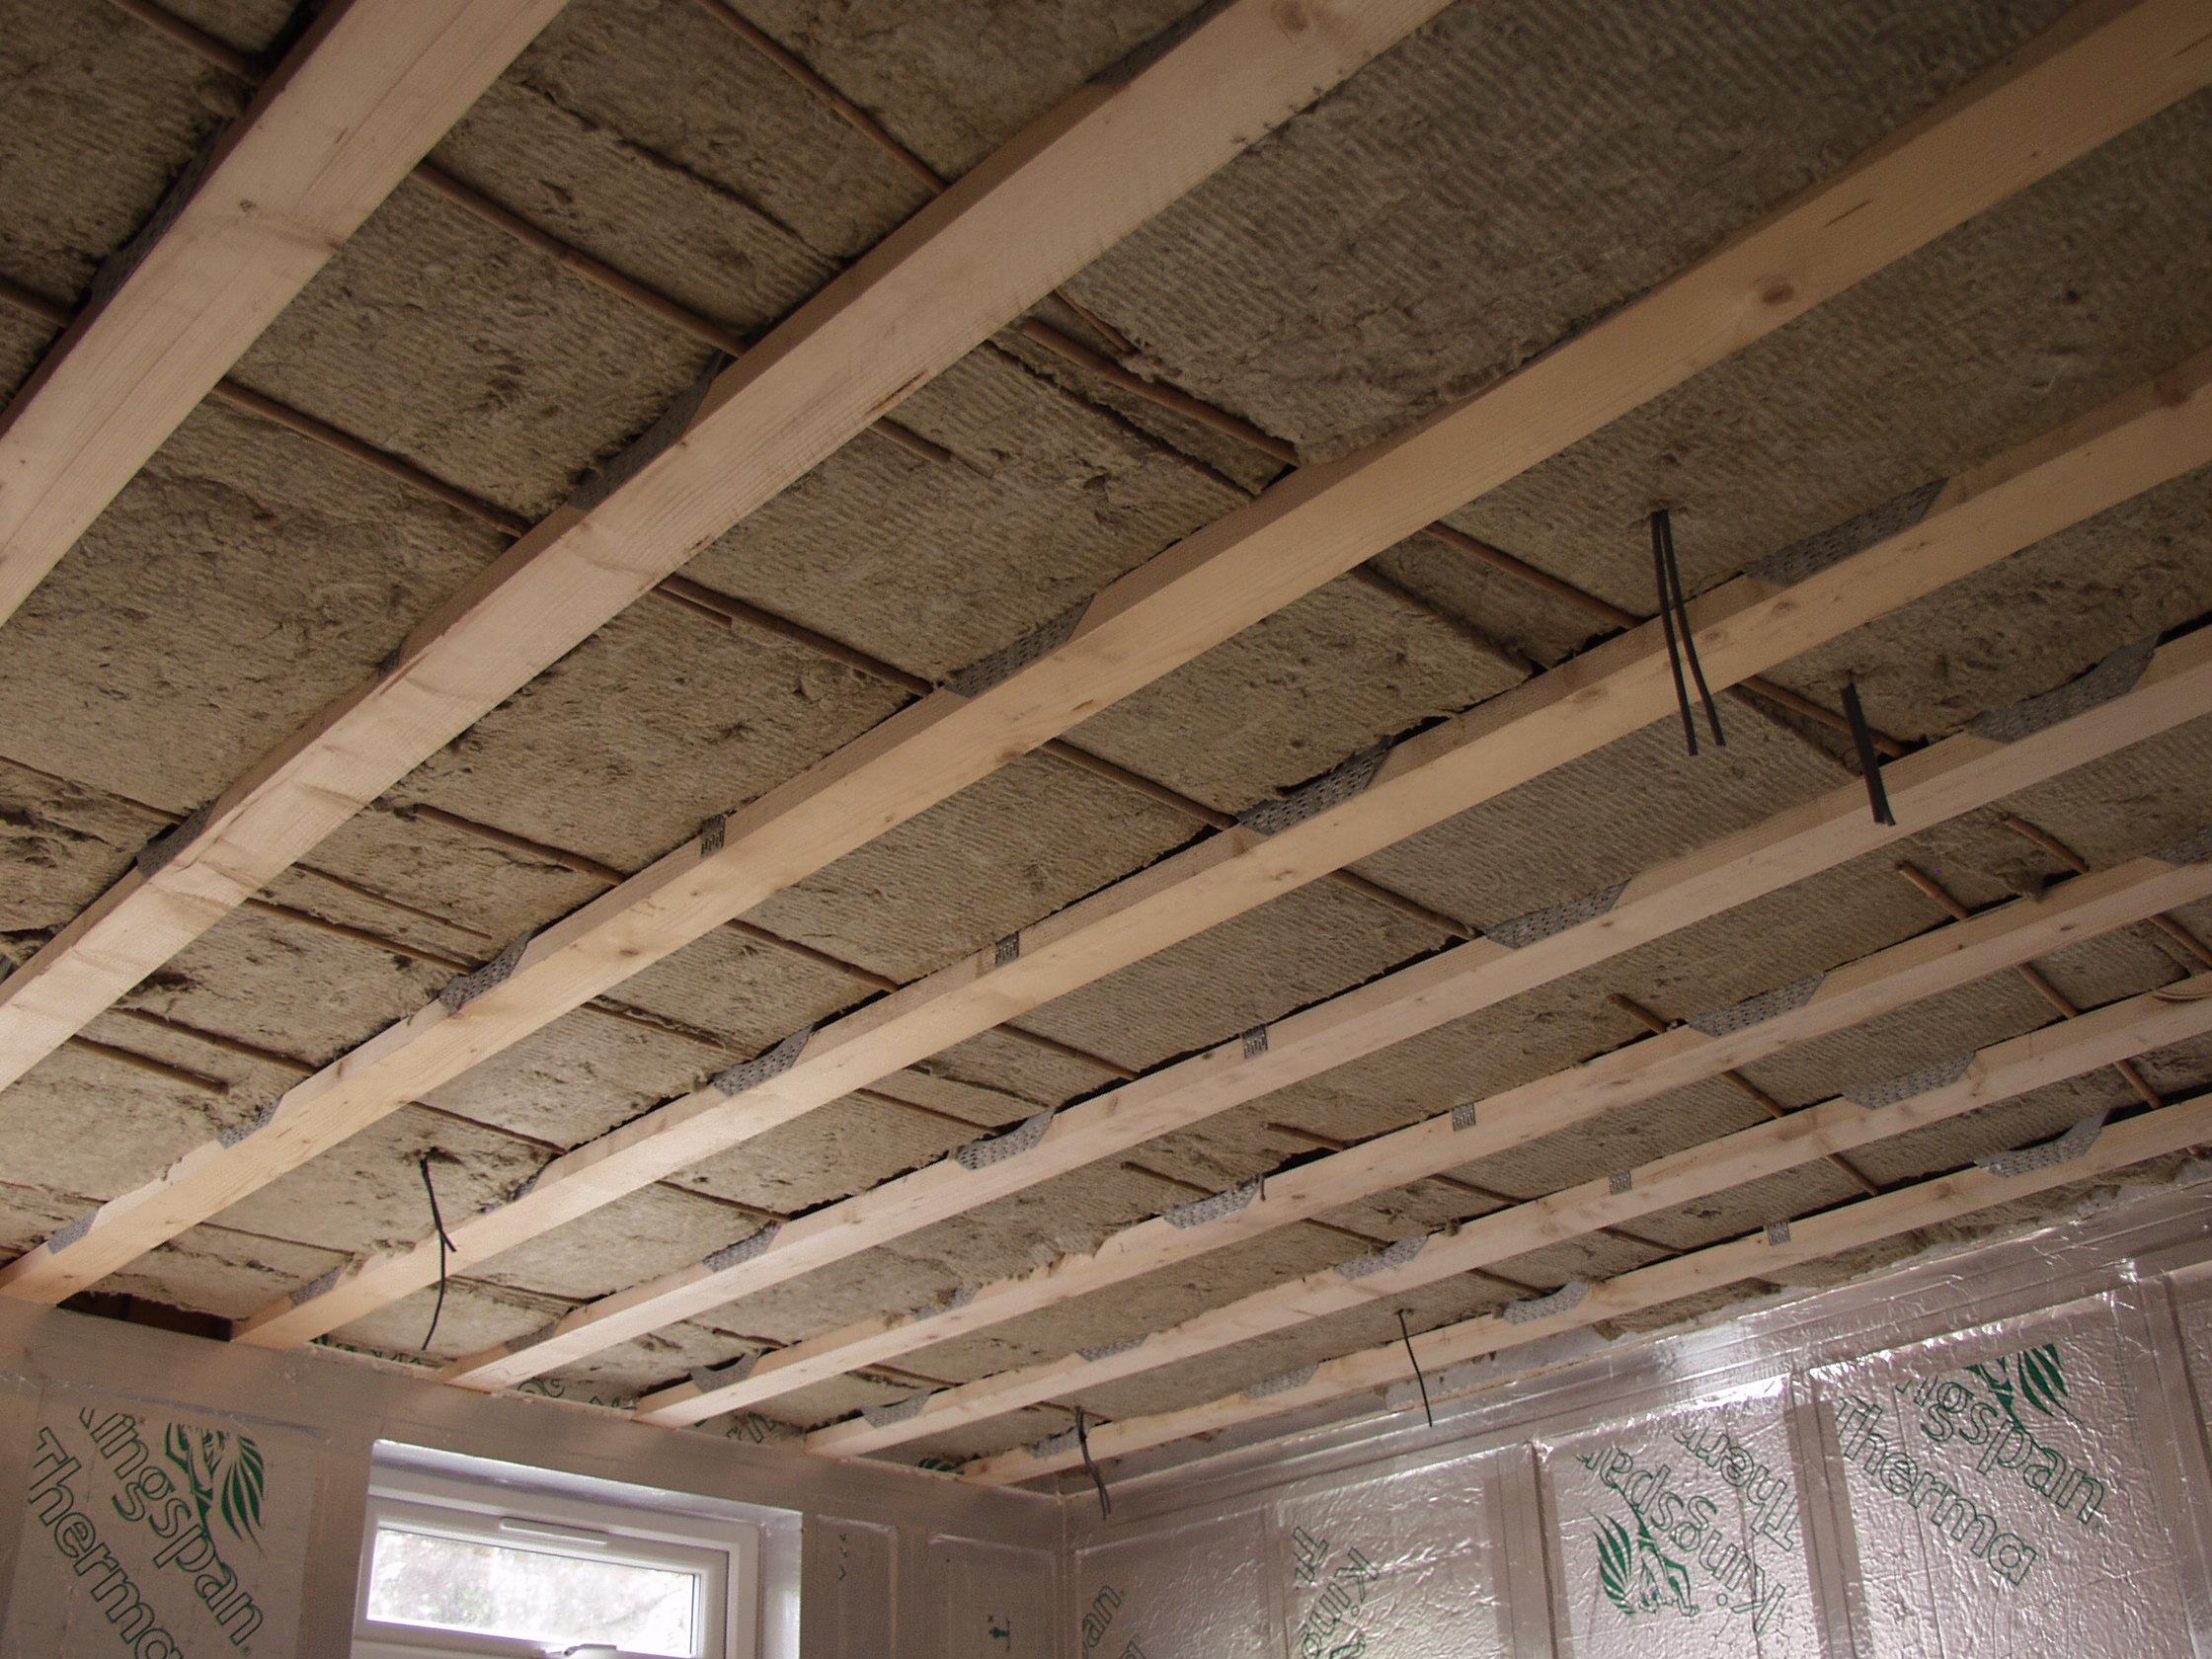
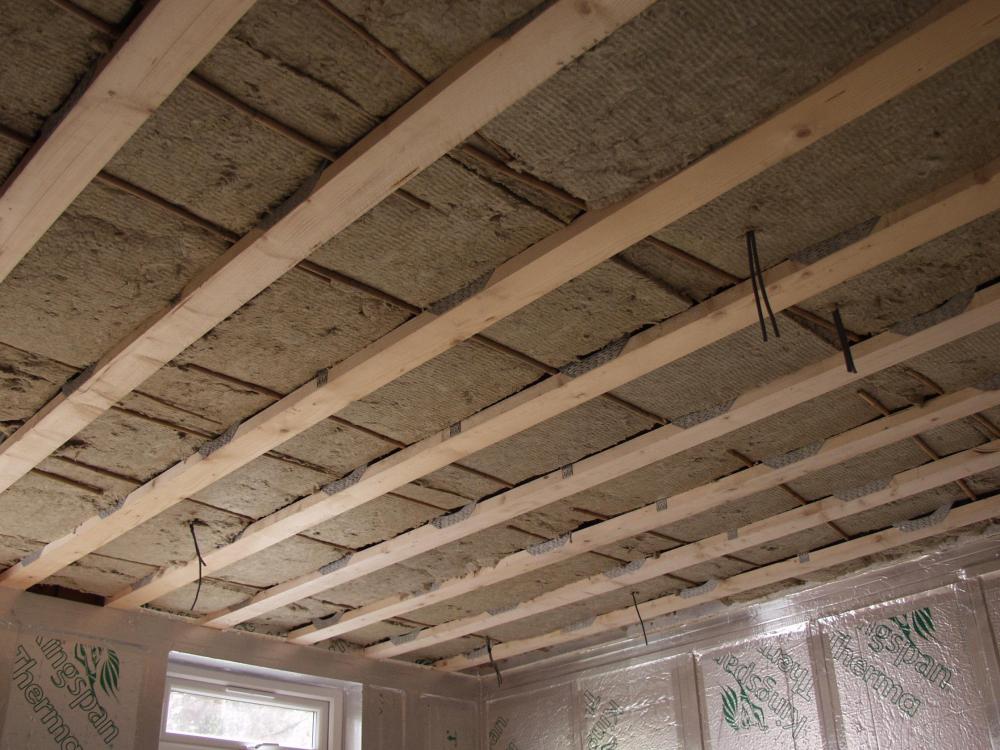
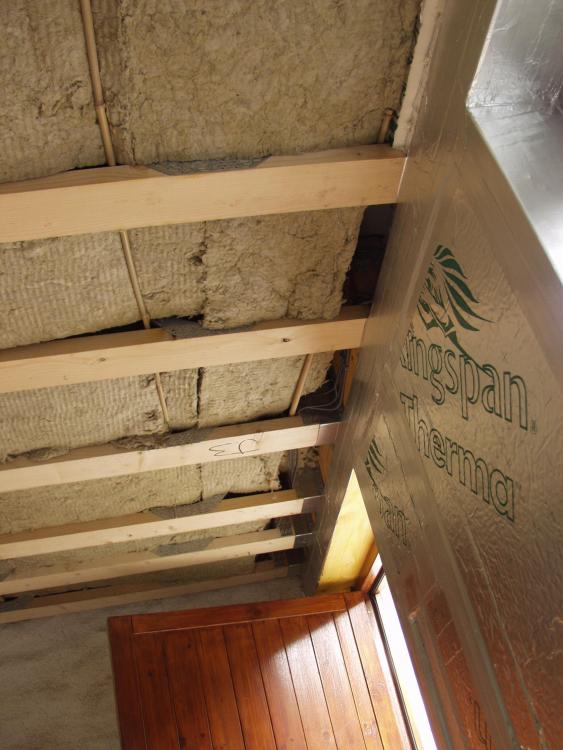
Ok thanks for the help- done the job (600mm W rockwool @ 140mm thick.. breadknife cut in half to 300mm W). So whether or not it has -any- noise containing properties after all that.. who knows.. IE the innitial idea of putting something 'sound containing' in was ultimately totally n/a it seems, as I was constrained fully in terms of what stuff I had to use, by the 300mm W of my joists it seems to me. And whether or not I've done it right- who knows. The many cables at the sides Ive done my best to avoid touching.. but these areas are voids/ I've especially no idea if this is correct here, above door area pic 3.

-
Hi ProDave. Its not so much the shape of the bits to cut (they're simple long rectangles), but how to cut & separate these thin rectangles from the majority left, without ruining them. Or is it just a case of doing it best like you would any normal shaped bit.. IE score one side (presumably the insulated side in my case) lift onto a batten & press > it snaps ? but then somehow I have to haul it upright > score down reverse side to complete the cut: this you see I'd imagine a n'mare of the cut bit likely just falling/ breaking. Or worse the main bit. Its just me doing it you see.
-
yes sorry/ got that wrong: actually looking at my diagram.. I have the 1st cut being the length of the board, by only 235mm W. Then two 1900 x 235. Next two 1900 x 130. So after the 1st trickiest cut (as its longest) I have a number of long thin bits to cut. Its how to cut mainly the 1st long section, without it falling off or snapping etc. When you say a saw.. are you suggesting laying board flat on a surface & get thru it like so? or propping it up & somehow supporting the thin width cut section/ all along it? I just can't think how if so.
-
Hi chaps. I am an idiot & I'm stood looking at my (9mm pB) 27mm insulated plasterboard.. how not to bodge up cutting it is the Q. I got -only- one 8'x4' sheet with all my 3 window/ 2 door reveals all marked out.. just squeezed all on this 1 sheet, great.. but some are long 920 x 200mm sections (door reveal sides).. so possibliity of breaking is high. And I can't get another sheet: I can't fk this up. Can I get some advice of safest way to do this? thanks- zoot.
-
I cannot get these BFO screws out dpmiller, not even shift 1mm round. I think I'll have to hack osb top off, hacksaw screws off.. but I'm wondering whether its better just to leave the damn thing as is & carpet over. Damn builder's overall 1ft extra depth bodge up.. causing endless problems: there should -never ever- be a sodding step here at all.. but I was forced to ask for it to claw back some balcony height > IE put doors up a step prior to building it. I dont have experience to know you see, how big an achilles heel this bloody step is re. possible cold ingress, to make the decision. Ok another angle to ask: if there was no step & the french doors were sitting on the floor level.. how would the floor continue into this recess area? & surely the last 50mm of it (before the door frame, covering the cavity below) wouldn't have any insulation directly below anyway. just the cavity. which is effectively what I have at the moment, bar my covering being osb & this imagined-floor being (presumably) more 22mm caberfloor.
-
@Onoff hi Onoff. Can I just pick up on this idea you suggested/ & or what I can do with this 'step' threshold area. Looking at your sketch again, I see you proposed put the PIR -ontop- of the existing OSB topped 'step/ threshold'. Only problem doing this, is the additional 60mm (let's call it) height, up to same level as the lower door frame you step over as your sketch suggests.. is I'll be uncomfortably skimming my head on the top part of frame going in/ out the door stepping from this heightened step. Builder bought me the lowest door possible you see (yet another £save to him it seems / infuriating thing for me to contend with) @ 1.85m H within the actual frame. So my idea was to add this step area (he hastily/ as cheap as poss made in 5mins).. but not any higher. The reason for this added 60mm step/ threshold (as it is now), is because I had to ask him to position the doors UP a bit (because he made the whole build WRONG by 1+ fkn foot low, as Ive outlined many times, so I had to scrimp & claw back every 50mm I could at any possible juncture: in this case claw back a bit of balcony height.. by placing the doors UP a wee bit > so they'll skim the deck by mm's opening out. Countless ramifications of the build error.. continuously hampering me at every stage: the balcony build, the last job, being the most fraught with consequense if I cannot get it cm perfect. "Oh it'll be fine, what's the difference anyway?".. I'm still fuming with anger!!
-
I could.. but isn't this 100mm x 50mm (height) gap -the half nearest the frame specifically- a continuation of the wall cavity below though? IE you foam or bead into it.. & a 'never-ending' job ensues.
-
Exactly.. but getting the sod off is nr impossible, for me. bigass screws/ massively torqued in. Isn't it though innevitable, that the threshold of most doorways are the 'weak point' & can only be "barriered" vs the cold up to a limited point. I mean my lower room door's is a slab of slate with a rebated groove ground into it for a door weatherbar stopper strip. There no way I can introduce any insulation here, nor, around the door's reveal either because I'm too limited for space to line it with anything around here.
-
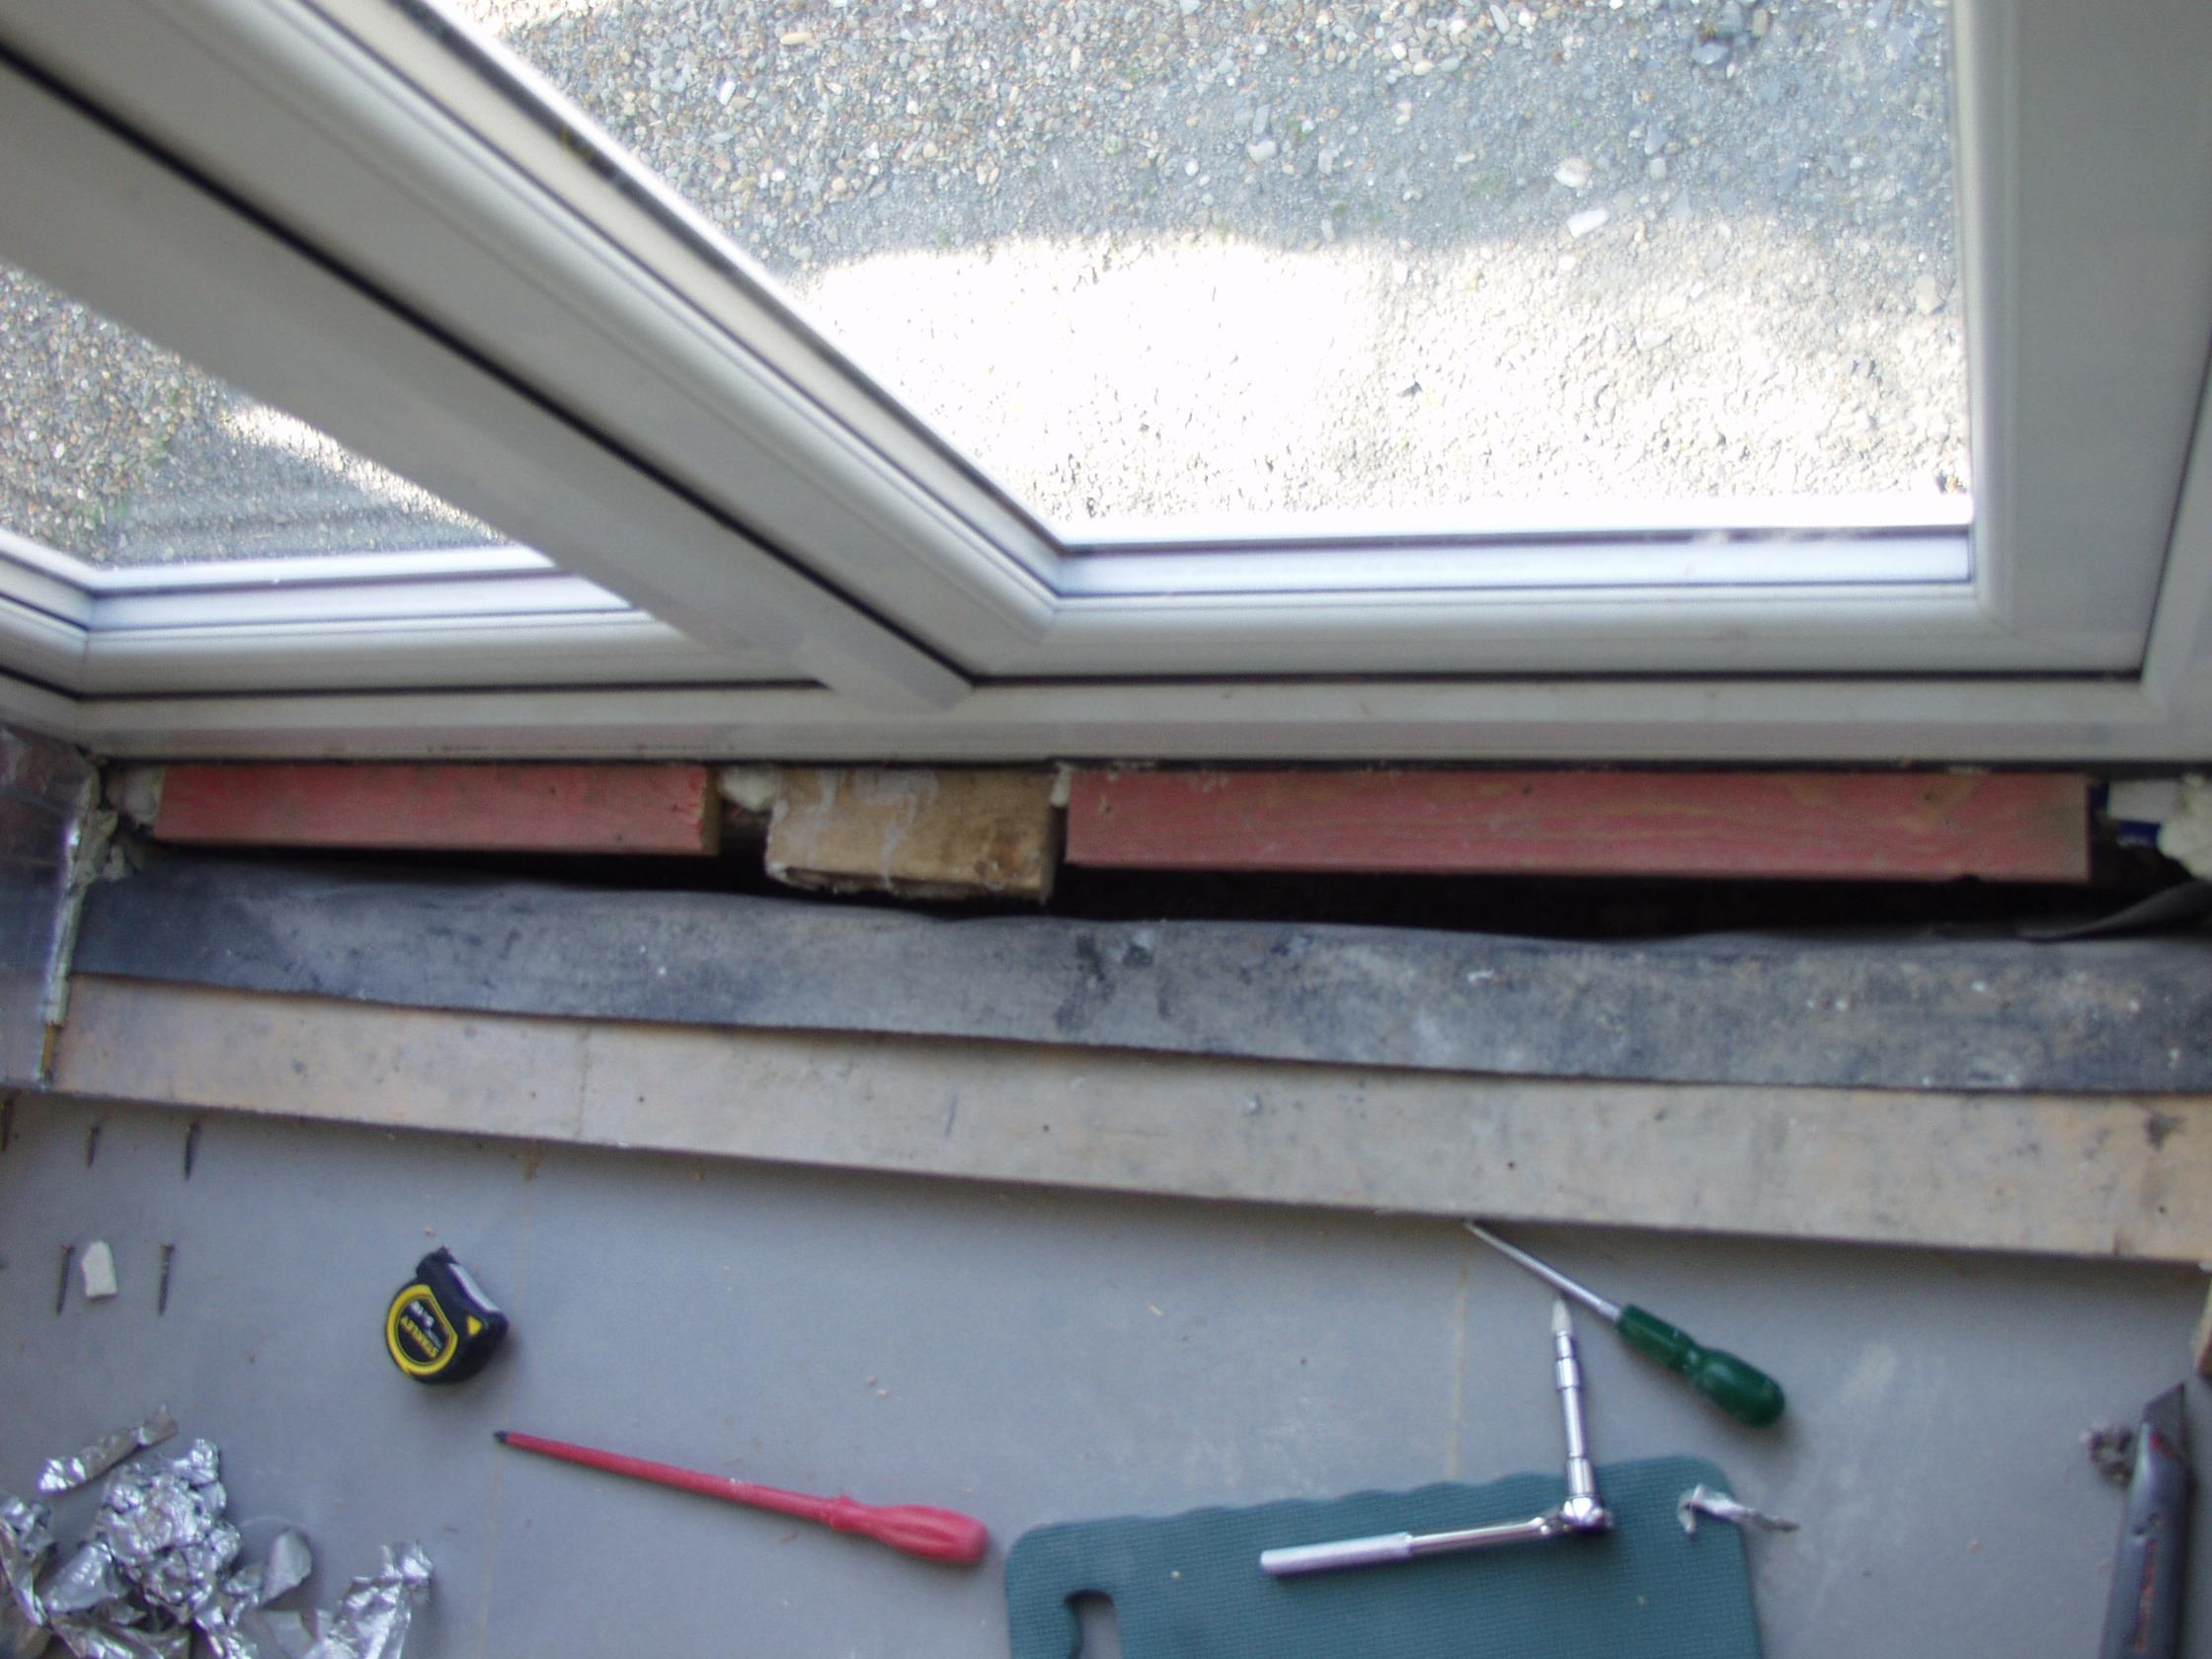
Hi Onoff. my cam can barely take a pic anymore/ unreliable, or Id do just that.. sorry. No your red arrow is vertical. My red arrow would be on the osb top, horizontally, up to the frame.. & from a point 1/3rd lets call it back of the osb top's 240mm depth. So where my tripod leg's up ~50mm on the osb: bang under here is the 100mm gap. Because the TF walls are a constant 140mm in depth, everywhere, so is this 'base' layer of CLS timber. So if you took this osb bit off, the tripod leg would fall down over the end of the CLS, into gap.
-
Appreciate the replies. job done.

-
Ok Peter thanks for that- better safe than sorry. Where the pva: water primer idea I had figures.. who knows. Good.
-
Ok thanks alot for that.. I feel calmer when I get one of your sketches, its Onoff opium! theyre ace. Ok understand the idea better now. Only thing missing tho in 1st profile sketch, is that the cls isn't up to the line of the door frame: its 100mm short of it @ 140mm (sill as I call it is all of 240mm to the door frame, set FAR back so door can open out 180*). So I have a 100mm gap.. I assume so/ assuming he didn't fill it with timber too.. over which the osb is hiding. This is why I was gonna hack the fkr off. Actually I could drill thru osb top couldn't I & see if anything solid below, just thinking as I type my spiel.
-
I'm not quite getting the need to support the timber top. As far as I can tell, its a solid bit of CLS (all used seem to have been 140mm for the studs, but the base [the horizontals you can see generally around the pic] onto which this scrap of osb is screwed. That's it. If I could get the top off.. but I can't the huge screws are put in with lord knows what strong thing. If I get the top off, hack it off then angle grind the screws off (cant think how else to do).. then I have 140mm of CLS timber > then a gap of 100mm (presumably builder didn't put in any more timber here) > door frame.
-
I cannot take a better photo, I do not have a better photo. That is why I state "its good enough". Not from a lazy opinion.. but bc my old slr cameras unable to take a pic now, & I cannot afford another. esp right now. We're not guessing as to the section. As I said its just one layer of CLS (is it?), & a scrap of OSB whacked on (you can see in the pic, even if its in the btm RH corner.. its clearly two bits of wood). I was only wondering really if A) it needed to be insulated from a regs pov, & B) how this could be done. I mean the sill on the door below, into the workshop: my builder put in a slate sill, looks good. But its not got a fart of insulation under it, or air-tight xyz on. He couldn't have put slate onto anything but a solid piece of either block or timber anyway I would suggest, so this door sill wouldn't ever be insulated.. so why I ask myself would the sill to the door(s) upstairs would need to be? only difference is its 2 (narrow) doors opening, not 1. Isn't it?
-
@Onoff that's as good an eg/ pic as is needed. No black gap, just some dpm lip coming up/ trimmed that off, & foiled the wood fwiw. Is it imperative I put even PIR on, can't it just be left as is > put on something/ not sure what ply is a good suggestion, but without insulating below it 1st?