zoothorn
-
Posts
4752 -
Joined
-
Last visited
-
Days Won
3
Everything posted by zoothorn
-
Aha ok. That clarifies things thanks ProDave. No I have defo established I'll be short (builder left me only 0.5 sQm of excess in board area vs floor) so I'll still need 2 new cabers. Any idea what they cost each approx? jewsons don't allow me to see prices/ no-one in my place so I assume TP the same: why is bewildering/ most stupid thing Ive ever known.
-
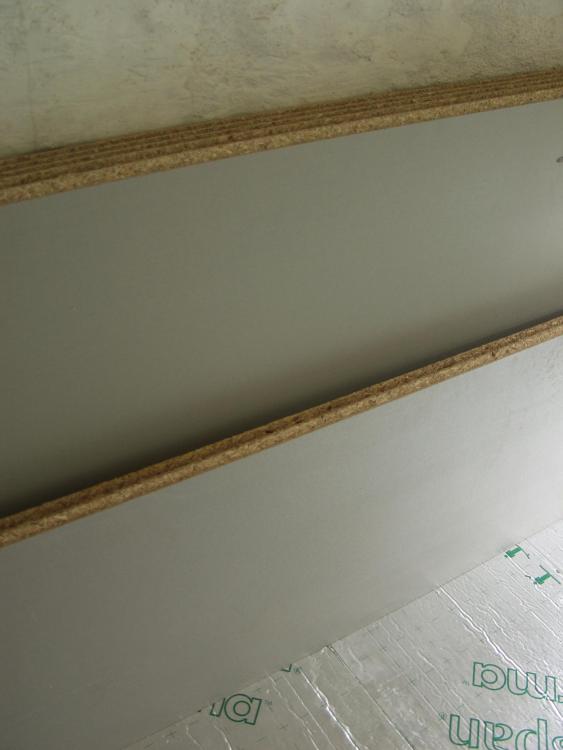
@Onoff I -think- the proof these are different/ are incompatible is this. But can you concur so I'm 110% sure? I have a caber & rogue board facing me. Like the photo eg above. Landscape format. Tongues along the top on both boards. So I am looking at the bigger area of visible tongue, from this angle. On the caber it is the grey side. So I am looking at the TOPSIDE of both boards. So far, they are similar. Ok I look to the RHS edge. On the caber+ I have the groove edge. On the rogue board I have tongue. This surely is proof enough they are different -and- they are incompatible. Would you agree? (or am I being thick/ am I missing something?)
-
No I was just asking if you were suggesting they needed screwing -together- (not into PIR) as well as the glue. No then. I've just set a bed of 50mm PIR, onto my concrete "whatever-its-called-its-not-the-floor" surface. I have 9mm spacers. I have my 1st board down. I have the day to try & fit the cabers. I will have a flaming gap where I'm unable to complete the job due to 2 unuseable boards. Thanks.
-
Perfectly reasonable Q Onoff, understandable. But I spent ages twisting it L to R, T to Btm, every which way to try & mate it with a caber+.. until I had to take breaks telling myself it had to fit/ why not etc until my head hurt (not knowing anything other than they are all the same at this point).. but finally I 100% concluded they had to be different. 100% sure. Always 1cm gap, just did not join. If I could find out what make these are.. final proof. Marking on the boards tally with this conclusion (tho un-discernable on the two odd'uns, clear caber+ writing on majority) also two odd'uns have both grey sides, cabers have one brown underside: implying perhaps different, but not conclusively so. Once I'm adamant defo different, I look for t&g differences: cabers seem slightly longer tongues/ grooves/ slightly different in profile: very very tricky job to fettle them.
-
I understand trying to ask who ordered boards. I did say twice my builder ordered them. On my quote WAY back it said "supply floor PIR, supply floor". I asked what floor? "concrete 70mm" ie usual type. So I assumed it would be fitted.. 'supply floor' means to all intents & purposes, to any client, 'floor to be done'. When I was trying desperately to establish if, or not, the floor had in fact been fitted as I just see a concrete top & did not know (& I couldn't ask builder because he was lying continuously/ hoodwinking me, so no faith in his answers).. I ask on here for help. Once it was established that the floor had likely -not yet- been laid, but, that I only knew one thing that the work on this stage -had- been completed by my builder.. I naturally ask "so where is the floor??". I ask on here for advice again > only then was it spotted that two tiny words "& fit" absent on quote, & so likely A) it was yet to come & B) that I was to be fitting it (What, me??! but how? him leaving me a mixer, bags of xyz materials?? No, its not feasable. So how would this concrete floor happen?? yet more confusion --it never ceases on this build from day 1 to last-- & I still don't know the answer to this Q). THEN I have the bright idea of instead using an easier floor.. I did not like the idea of making a floor of concrete, Id never mixed concrete, or know how to level a floor, or have tools to do it, & angry in the knowledge -I- the client was expected to do it [is this common practise?? to clients?? to Mrs miggins mixing concrete/ making a floor?? No, is all I know]. I ask BO officer can I go 50mm insulation & 22mm chipboard instead? (reason: less H: I need every extra cm). Yes, ok. I then ask builder can ewe substitute orig floor material, for 22mm chipboard? Yes ok. Weeks later the boards appear in a stack plus the 50mm PIR. All look identical as I think you can appreciate from my photo. I count & measure, measure floor area: more boards than floor. I have as far as I know, I've checked/ ticked the materials. So here I am, the damn confusion continuing 5 months after he's build & we've settled up.. finding these fkn 2 boards taking me an hour to figure out why they don't fit.
-
Hi Onoff. I haven't started the job yet (I need days of prep to clarify how/ what to do.. finding these 2x rogue boards scuppered me going ahead at the wknd/ as I cannot get more now for months). Glued & screwed? are they meant to be both glued & screwed together? you can't be referring to fixing onto the PIR, so I'm not quite following the Q. Its certainly in theory an ok idea to modify the edges by router.. in practise tho, its impossible without nipping into the grey surface area (to 'elongate the groove': & doing so, will mean they're then smaller than the cabers. Its defo a no can do.
-
No because then they won't be the same exact length boards' grey area.. & also the actual layout/ geometry of where the t or the g edges are, is entirely different on different edges to the cabers. They do not fit into the top (cabers). I mean surely you can understand, from this photo, from a client pov.. that it was logical to assume nothing other than they're the same? Surely!
-
I have handled confronting this damn builder like a boss thanks. Like a boss. Ive stood up for myself calmly, without raising my voice to his nastiness, pointed out clearly & perfectly reasonably my concerns all the way along.. & finally.. finally he caved in (as it were, so far as any builder would- not alot) by agreeing to do two small jobs for me foc (even with seemingly a few here all baying for the builder having 'done it correct!! done what he could!!' which I must say I believe 100%, was incorrect advice). But I take these foc jobs -only- as partial recompense for the build being not as I wanted/ not as the plan/ & I will always be unhappy about. That, is sticking up for plain principles & handing confrontation very well indeed thanks. I will admit I haven't taken confrontation on here well though. When you feel 1 against a stack of people (for eg as said, seemingly all baying for the builder having done the build right on everything, & my having been in the wrong instead) & you know you're right.. instinct is to fight/ fight, & I can blow a fuse on a post! I think understandably so, but I fully admit better to have just refrained on some occasions.
-
Spot the difference?
-
Ok understand the 20 sections of different sizes, thanks. He ordered the flooring. It just appeared suddenly one day, a pile all looking identical (as these two were mid stack, & how was I whose never even seen such sections of floor, meant to know anything other than 1. they look identical, & 2. establishing the floor area/ & area of boards was just in excess= boards all fine). Not ordered, the 2x boards are obviously spares from the floor they built for the room above. Different floor boards to caber+ presumably part of the whole the TF Co's package of items for the build. I only established this yesterday (after an hour puzzling over these two, so identical they look). So, he just ordered 2x less cabers for my floor below & shoved these in mid pile knowing it'd be months before I got round to laying it & found out they're useless. 3x £13.11+ vat = £40. In jewsons, from memory. It seems you can only see it only from my builder's pov but not mine (this is the distinct impression) which after being shafted & hoodwinked countless times by this guy, even if its for ~ £100 in this final eg.. I find unfathomable. Why can't you empathise with a client with little knowledge of the new materials (as clients we don't know them esp new stuff like caber xyz) rather than imply its a mistake of mine I have these two to contend with?? Am I just meant to take being shafted & hoodwinked by a builder as par for the course being a client?? I honestly have no idea. As Ive never had a build done before (& are you suggesting I should? I think maybe so). But my instincts strongly say a huge NO.. & I doubt wholeheartedly you would put up with any of it.
-
Aha ok understand your post now thanks Declan. So in my case, onto PIR, it doesn't matter if I put as short an offcut as 580mm to start my 2nd row? ie is there any issue with going with this 580mm diddly bit > full board > another diddly bit? Yes Ive definitely figured these two boards are -not- useable. Not only t&g profile different but edge shape doesn't align/ dissimilar anyway. Now I have to awful prospect of facing up to my builder (I thanked the lord Id never have to deal with him again) to try & get him to agree these 2 are incompatible [he'll just angrily shove one against a caber+ & say "they're fine" & then we're into argument > he gets angry/ I just can't face it]. Considering they look identical, & I was never likely to know these 2 different until doing the job, far after having paid for the 'supply' of the floor.. & builder likely knowing full well they'd not be useable/ so likely shafted me.. how would you attempt to go about this with him? also do you think the lack of glue should be mentioned too being £40 worth of D4-? or is it all my fault 'well you paid/ what do you expect if you didn't inspect each one at the time'?
-
As far as I can tell, these two rogue boards are not compatible with the 6x caber+ boards, but spares from the build/ the floor above.. IE saving wretched builder 2x for my ground floor I paid for. Not only are they incompatible, as far as I can tell, but he included no glue too. But Ive paid for this "supply PIR & floor".. although how he was meant to just "supply me" with a concrete floor (IE the words "..& fit" you guys told me were noteably absent on the floor quote) I've no idea, presumably leaving me with the PIR, 3x cement bags, buckets, aggregate, & hired a mixer too-? I had to beg to get him to agree going 22mm chipboard floor, instead of the concrete -which I think can be ascertained, he would have laid rather than leaving me with xyz materials to do myself even if "..& fit" were absent from the quote- because of the whole damn H issue with the build I needed to claw back 50mm. But it was cheaper for him anyhow.. let alone diddling me for 2x boards & 3x D4 glues (what's that.. £100?). Fknassh*le.
-
And yet -another- problem. I think. I seem to have mostly caber+ board, with its writing on "caber+ this side up" & a brown shiny underside. But two rogue boards. I cannot establish (my head literally hurts trying to spin it round/ upside down/ every which way) for certainty but I do seem to have odd boards, similarly grey, similar size, & with t&g profiles, but both sides grey.. & again I just cannot work this out.. what seems to be slightly different profiles to the majority caber+ boards. No makers name on. So, another question. Are there similar looking type boards on sale, grey long/ thin as per caber+ boards' size.. which are in fact incompatible with anything other than their own -identical- same boards?
-
Hi Declan52, apologies I just don't understand this sentence.. so the following two sentences too I cannot follow. When you say 'the end of the board'.. are you referring to the small offcut I'm left with? or the shape/ profile of the end of the board? (if so, I'm not understanding why you are referring to the profile.. as its not either of the things I'm grappling with, I don't think.. or am I?)
-
As far as I can work out, I have 2 rows which repeat. The 1st row is easy, LHS one full board @ 2400mm + most of a board @ 1500mm. The second row is doing my nut in. If I do as Russell suggests -& seems perfectly logical re. the grooves' orientation- I take my 900mm offcut from the 1st row, to start the 2nd row, I have left to right: my offcut @ 900mm + full board @ 2400mm + *another offcut @ 600mm. Its this *final offcut I can't understand what to do, if its too small etc, where to get it from. It just does my nut in visualising it (especially the grooves to factor in) until my head literally hurts. This is why it takes me 10x the time of anyone whose done it before.
-
Hi Russell. I will go over this post once I establish my bigger problem -just arisen-. Could you have a look at my post immediately after this ^ one of yours? (mods: please-please-please.. could you add numbers eg #35 to the posts?? its extremely difficult to reference posts [& information within] without: is this not a simple addition? thanks).
-
@PeterW could you help me out here. I'm in a huge pickle with this job. Another issue I have, is the ammount of boards Ive been given (no glue) by builder. As far as I can tell, he's worked out the floor area & allocated me -just- over this figure, in terms of board area. I don't know whether this is correct. On 1st thoughts I was thinking yes correct more board area than floor area etc. But now, laying the 1st down & seeing the offcut needed to get me to the wall to span the width of the room, is 2/3rds of a board.. I realise I cannot allocate two boards each per row (as has been done in my top room), scrapping the 1/3rd: as I will run out of boards. So I don't know how to work out the board area relative to the floor area, taking into account the width of a board, & the width of the room. As far as I can tell, once I use up most of a second board to join the 1st board, in order to span the width of the room, I'm left with a 1/3rd of a board left over. Now, I don't know whether its normal practise to use this 1/3rd.. or whether its not normal practise/ & you scrap this 1/3rd. So what on earth do I do? I've never seen on either my top room floor/ or any www photo eg's/ or any youtube clips.. of any small offcut being used. But I don't have enough boards to do the job without using almost every one of them up. Does anyone have any iodea what I'm talking about? I'm finding it difficult to try & explain, let alone know what to do.
-
Can anyone advise here? I guess I have 3 options as far as I can tell. 1) join two boards longways together, wait a day for glue to dry.. then position a few inches away from prior two boards (joined longways, in position) > glue the looooong two sections together. But I've no idea how the glue will bond the 2 boards, to be then lifted as one into position/ whether it might likely break. 2) or I have to contend with a big ~2" gap each alternate end, where I've fixed in a short offcut in (& how I get access to tap it home if the wall's in the way). Or 3) do I fix the one full board in, then angle-in the offcut & fix? this aleiviates the gap (if I can cut it perfectly) but I still have the wall in the way so I cannot get it in tight.
-
@PeterW useful clip. Was just about to start but more Q's arise. This is why its imperative I don't just crack on without massive time spent prepping/ researching taking me maybe days' worth of prep time in order to proceed with the simplest job, even if it might take only a few hrs. For eg in this case I have my 1st board -in theory- placed. I measure to the wall to get my offcut's L known. I cut it. But because of the wall I cannot get it in . So, I cut a bit off in order to join the t&g. So also needing an extra bit of room to insert it prior to slotting it home.. I'm left with 2 problems: the gap to the wall.. & how I can 'tap' the join together, if I cannot get access to the side. Its all fine to do this like the clip, or in my case upstairs done by builders onto joists with no surrounding walls.. but its a whole different job with walls around the floor.
-
Understood- good tip re. wedges. Is there a wiggle room period, or is the glue superfast set stuff?
-
Onoff are you reading this?! he's unusually quiet.. Quite right.. sorry that was the daftest Q/ rush to judgement. Great I'm good to go. Will have 2060mm once 15mm sound-stuff pB on ceiling (advised by my BO). So -just- about bare-minimum acceptable for H.. so I'm fixing down with D4 after all not doing a temp-job & pulling it all up Ive decided. Do I put -any- D4 between PIR & caber board? or will the oozed out stuff between joins act as a fix-enough.
-
Its only tidy cos I'm OTT'ing everything.. not bc I'm onoffocd, more bc as having never done xyz I'm making sure every box is ticked (with a capital T) in order for muggins to have an iota of hope to get it signed off by my scary BO man. Right now hang about Peter.. this ^ was just a premilinin prelimililiminary Q. Main one is thus: Ive just noticed the long caber boards are flat-edged on one side only. So I assume I shove this flat edge up to side wall/ fine, but how do the rest of the boards' single flat (short) side figure/ fit to the next? (especially if its a shaped edge).
-
Yup exactly- its like a baggy ''P" shape (the tail of the P where the PIR is pushing it against wall). Ok so I split the bubble bit at top, pull up over the thicker stuff/ bend all up, trim thick stuff to 1" maybe.. & staple the sodding lot flat as poss?
-
Hi Peter.. Ive got two tho. Understand bend the sticky-outy thick one up (as I'm doing I guess). So its just this pesky other 'side' one.. its kinda bulging out above the PIR you see, & going back in the wall. Better pic here..

-
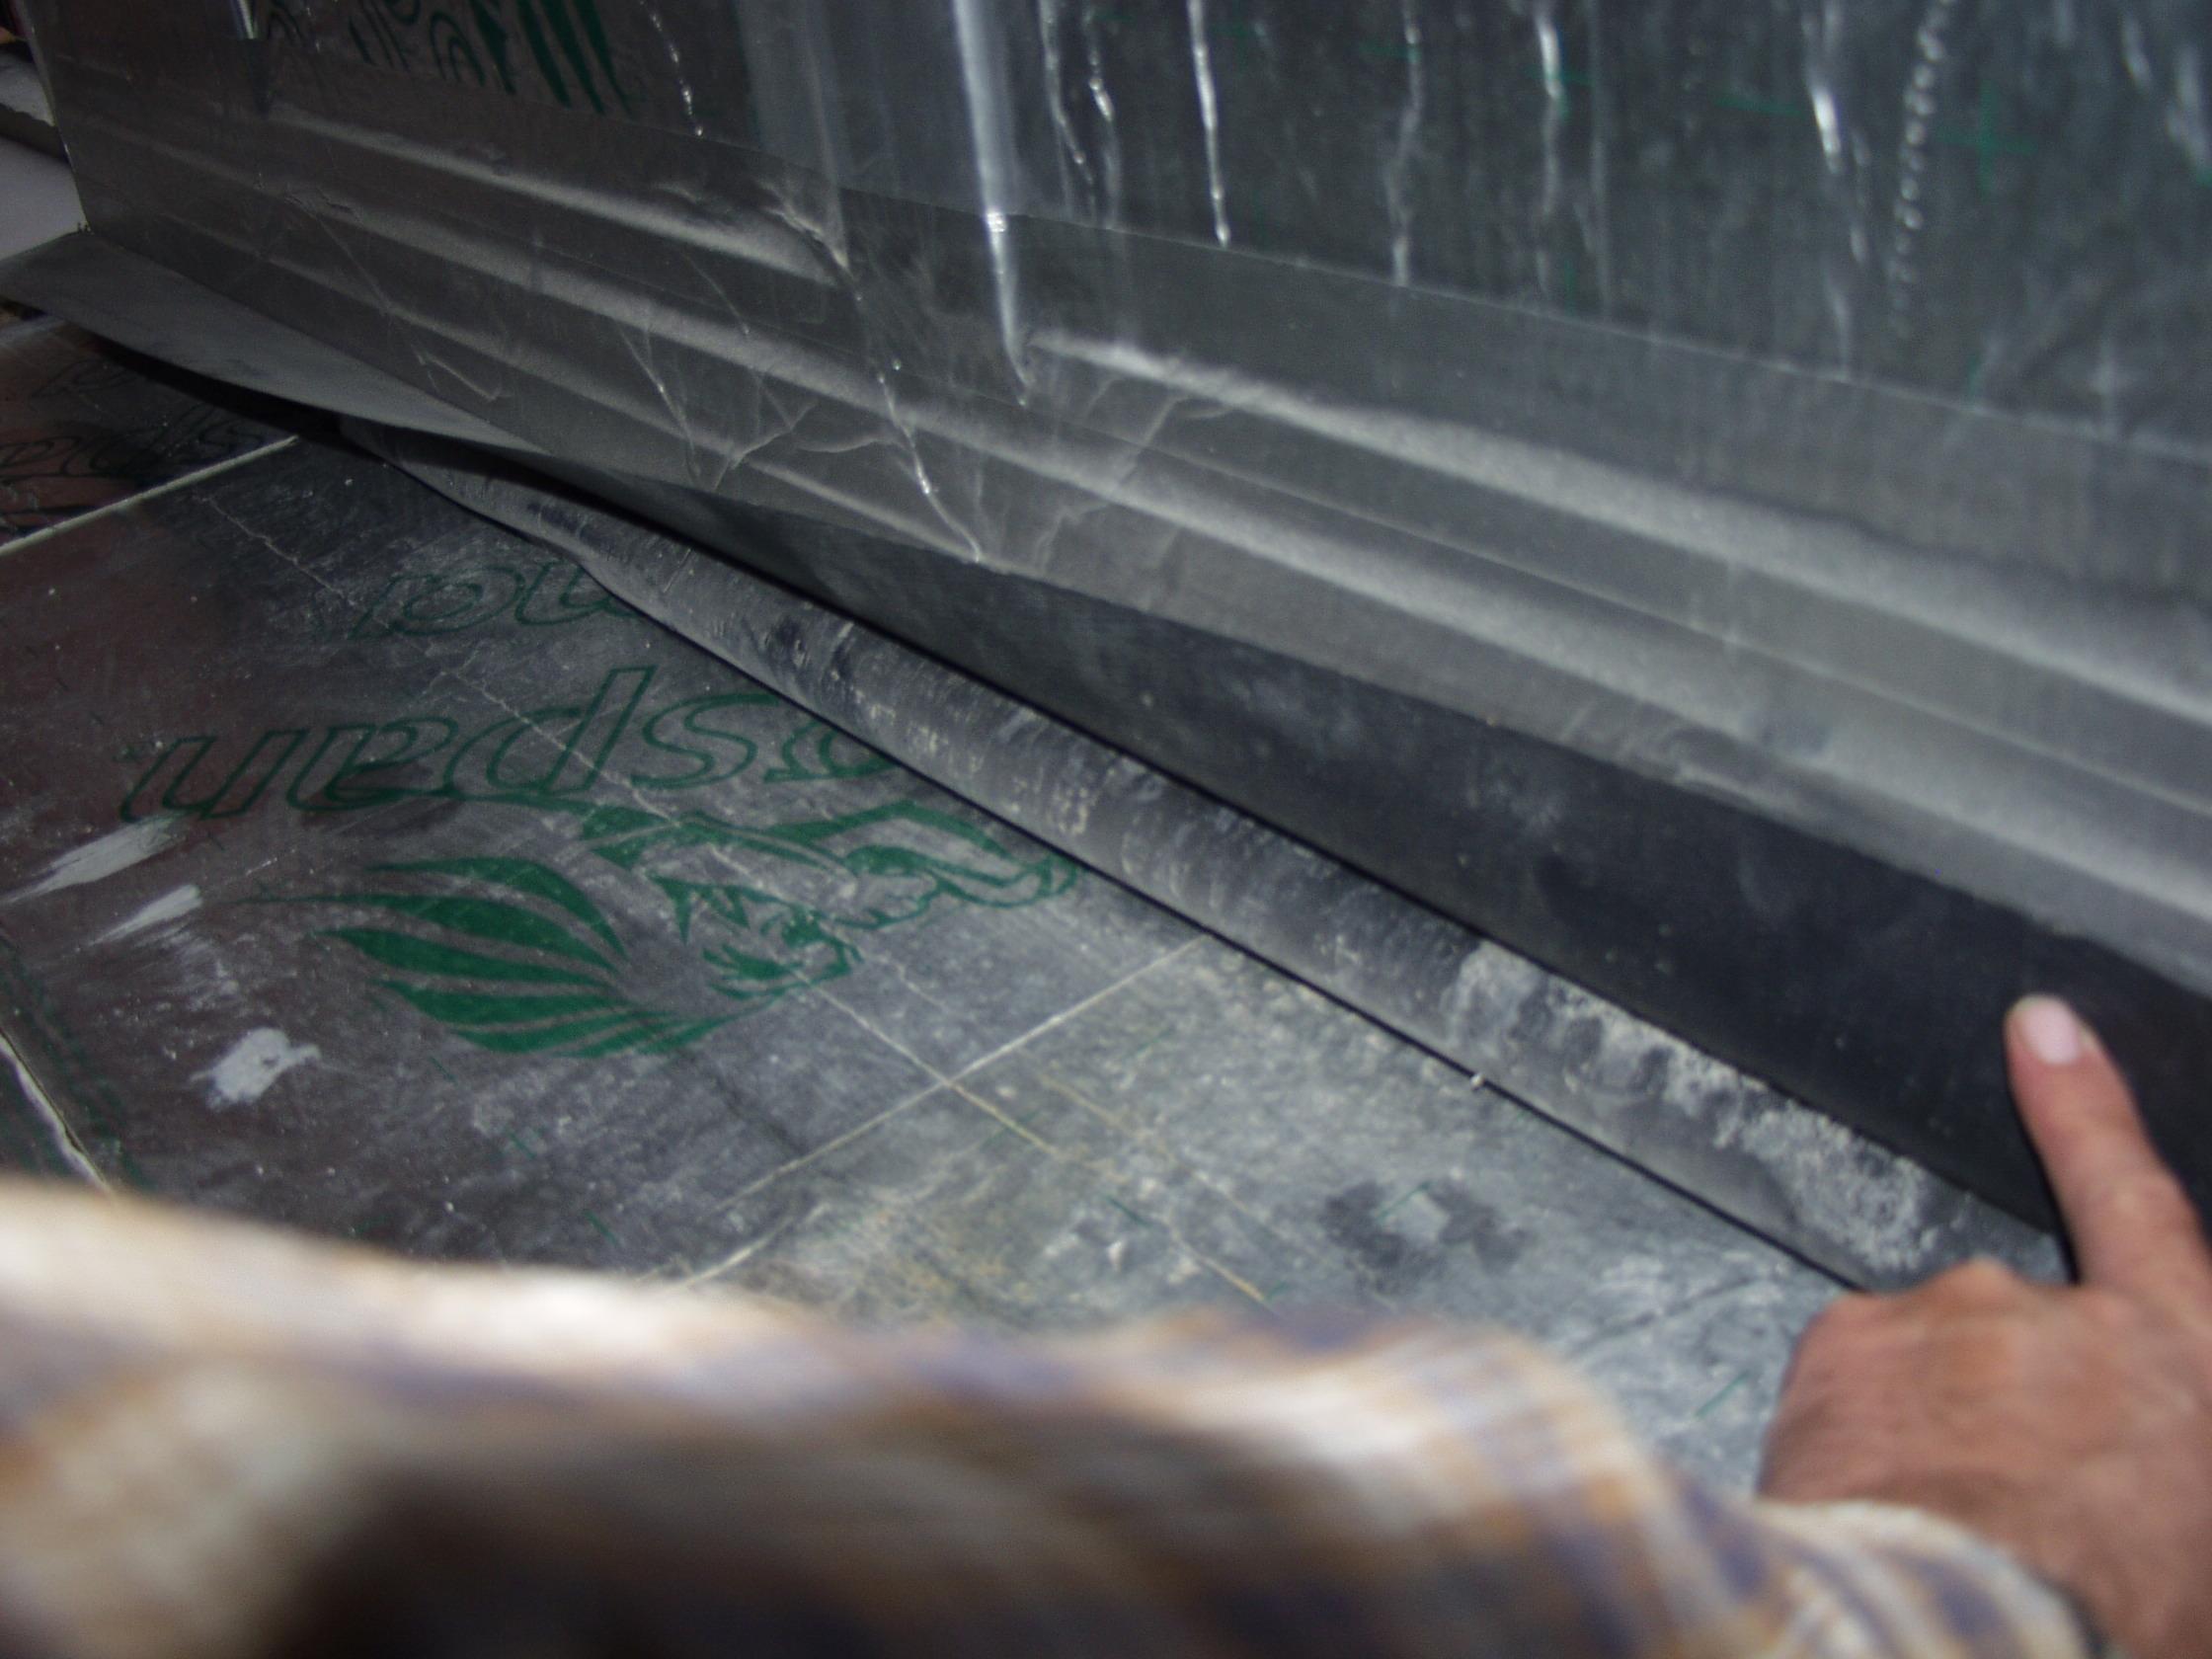
Hi Peter. I'm at last ready to do this caber+ 22mm boards. I've laid the 50mm PIR. (Pic below before last bits put in). First I have two dpm/ dpc's to tackle: the edges where PIR pushes up against has a thinner black dpm- its coming up from below the concrete layer below the PIR, up around the PIR edge, & goes back into timber wall (~50mm above the PIR). At this same entry point, I have what seems to be 100mm of excess (it seems) all round the 4 walls, exiting/ sticking out into the room: this is the other/ the much THICKER textured black dpm. Can anyone advise on what to do with these? bthanks, zoot.