


zoothorn
-
Posts
4774 -
Joined
-
Last visited
-
Days Won
3
Everything posted by zoothorn
-
Hi Onoff, this tip which IIRC you told me of when renovating my kitchen a few years back, has worked great/ did for my 98yr old friend's kitchen undersink area too. But.. doesn't work for areas you simply cannot reach/ access tho. Which is the issue here with my Ma's kitchen cable chewing problem. Hence only option is to clad the cable in something you see. The two grey cables in the very same area, they haven't chewed, one being std dishwasher grey cable & t'other a solid core )flat grey internal wiring) type cable, both not clad in anything. Must be a reason. Thanks
-
Absolutely- I tried my best to trace where the sink & dishwasher pipes exit, but strangely nothing obvious outside though. Yup need to put traps. They seemed to leave the other cables (grey slightly thicker dishwasher one, & a solidcore grey flat one) both under there too.. & just went all guns on the one fridge grey cable. Thanks, Zoot
-
Well well, I've never heard of such a product before- considering I can't find the exit point outside, for the sink & dishwasher waste pipes, nor can get access inside to where they go out.. this seems sensible. Or easier perhsps: some 20mm black flexible ribbed conduit to sheath the cable in: hoping I might stumble across something suitable in due course tbh. This episode does make me paranoid about car electric cables tho. Surely a car has ideal nooks & crannies for mice. Saying that I haven't eve4 had an issue with any car before tbh. Thanks Onoff. Zh
-
Hi Roundtuit, thanks for reply. Yup absolutely- but.. when I took out replacement fridge today, I looked underneath & saw the dishwasher & sink waste pipes dissapear way off twds RHS twds corner of other worktop cupboards. Simply no way (without all worktops & cabinets removed that is) I could get to the wall corner, to sure up around pipes with steel mesh. Anyway, my method of chopping all but 6" of Mum's fridge cable off, & adding a plug on, seems to have paid off. This meant I could separate the white extension cable from it, pass the female end of this thru sink cabinet back hole, then with a coathanger stretched out & a hook on the end.. looked underneath, & really rather brilliantly, fished/ hooked the socket out twds me, & mated it to fridge plug. Doddle then to put fridge back. Also then a doddle to undo out again, & add some flexi ribbed 20mm black conduit to sheath the white extension cable, which even I thought looked appetising to gnaw on. When I can stumble on such pipey numnums that is. Mum pleased. I thank you. Zoot.
-
Hi- yup if this was a build project/ simple/ Id put sockets L side of sink cupboard like you. But this is my mother's house 100m away, i do not have tools with me (she only told me her fridge packed up a day before.. once i got here!!! Argh! She's 87..). Plus she'd not agree to cutting new holes. Plus a massive faff & dirty too, even if it's the ideal way. All I need do, is do whatever the chap who fitted the replacement fridge did 2 days ago. I just cannot establish what he did it. Simply how he got the plug, onto the socket. Thanks, Zoot
-
Hi Rick, just bought your choccy box connector.. got it home & hasn't got the lug terminals inside I was expecting! D'oh! That was daft not to look inside it (Id assumed two sets of terminals you see in the middle, that are joined, & all you need do is attach cable A to oneside, & cable B to opposite side). I have absolutely no idea how to connect two bare cables together safely & securely, inside this empty white box. Nor could I get any kind of mouse resistant anything , shroud or flexible conduit, to put over my replacement cable. Which is just a standard 1m white extension cable mains plug one end, female socket the other. So. I'm back with my my approach as per photo above (with white cable attached). Assuming this is safe enough/ & I cannot see any reason why not.. I can then attatch the white cable's socket end to a coat hanger (as I still have no idea how Im meant to get a string or anything, thru the sink cabinet hole, & 60cm Leftwards, to where I can go into the fridge recess.. to grab it). Then undo it from coathanger, & pull coathanger back. If Im yet --still-- being thick/ missing summat.. could someone please holler!! Many thanks. Zoot
-
Hi Onoff, no Im not messing.. & I expected this response tbh. I still don't get it. How do I feed the string through from the RHS hole (twds the R, lower centre, of the adjacent 'plug socket' sink cabinet)... to get it out at the back of the LH cabinet? Some kind of extra long coathanger type rigid wire?? Thanks Zoot
-
How would the fridge cable here, have been manipulated, in order to insert the plug on it's end, into the adjacent (sink cabinet) socket?? Im tearing my hair out trying to figure out how whoever did this (or indeed any under-the-worktop type appliance, a dishwasher, washing machine/ anything) got it's plug, into the socket. You can see the BLACK plug in the double socket, on the RHS midway above the open door..
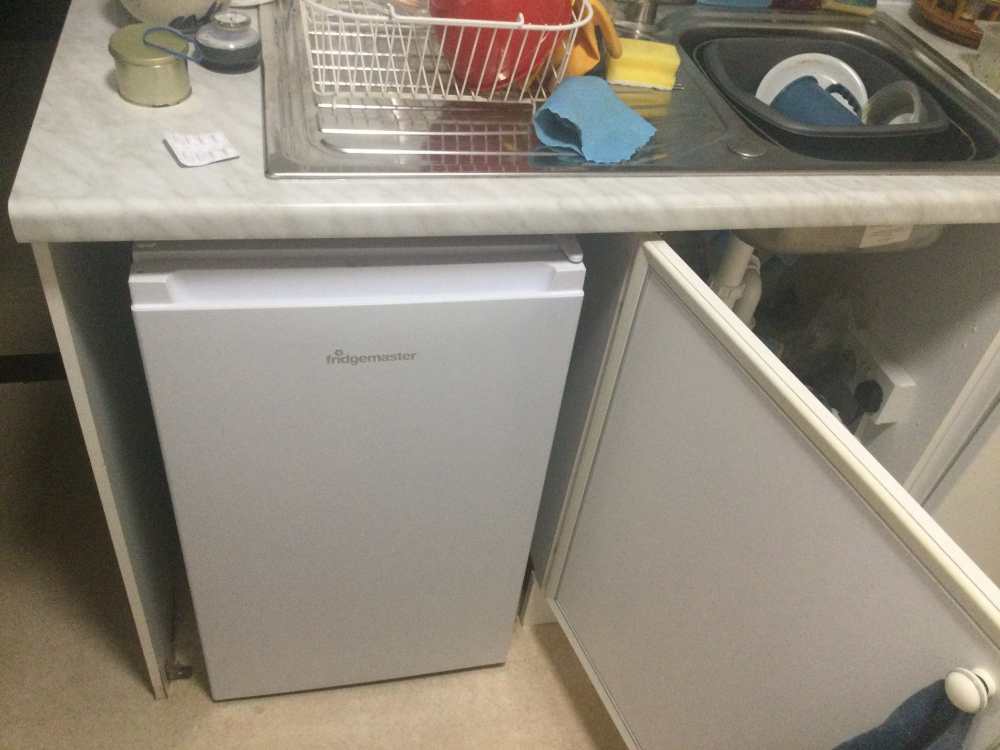
-
Ah yes a connector box like that would seem a better idea. I can buy one tmrw to replace the plug & socket. A few things remain though: could anyone ID some form of 'mouseproof' cable from either screwfix or toolstation? Im getting hundreds of results with the screwfix App thing that's been forced on me to use: I cannot abide it as it seems to calculate hundreds of unrelated items.. then Im sifting for a needle in a haystack. Lastly, forgive my idiocy here.. but it just occured to me how I get the cable fed through, at the cabinet rear. ?? IE say I have my 3ft x H 5ft kitchen cabinet 'hole' to slide my fridge into with the cable now replaced. Once it's slid in.. I obviously have no possible access to get to the plug/ cable behind it, to then pass plug behind & Rightwards into the back of the adjacent sink cabinet (same board back general hole where the sink pipes go out).. where the plug socket is. Thanks. Zoot
-
Rick, can I assume you meant this (kinda blindingly obvious to me now!) way with your plug/joint idea? (Edit: photo added below). [If so then once again, I self-nominate for the BH Big Thicko Cup.. '26]. Is there any safety compromises doing this way? I only ask as it's my Mum's fridge/ not mine. If all ok, I'll try buy a better 'mouseproof' cable tmrw & redo the female plug socket onto it. Thanks Zoot
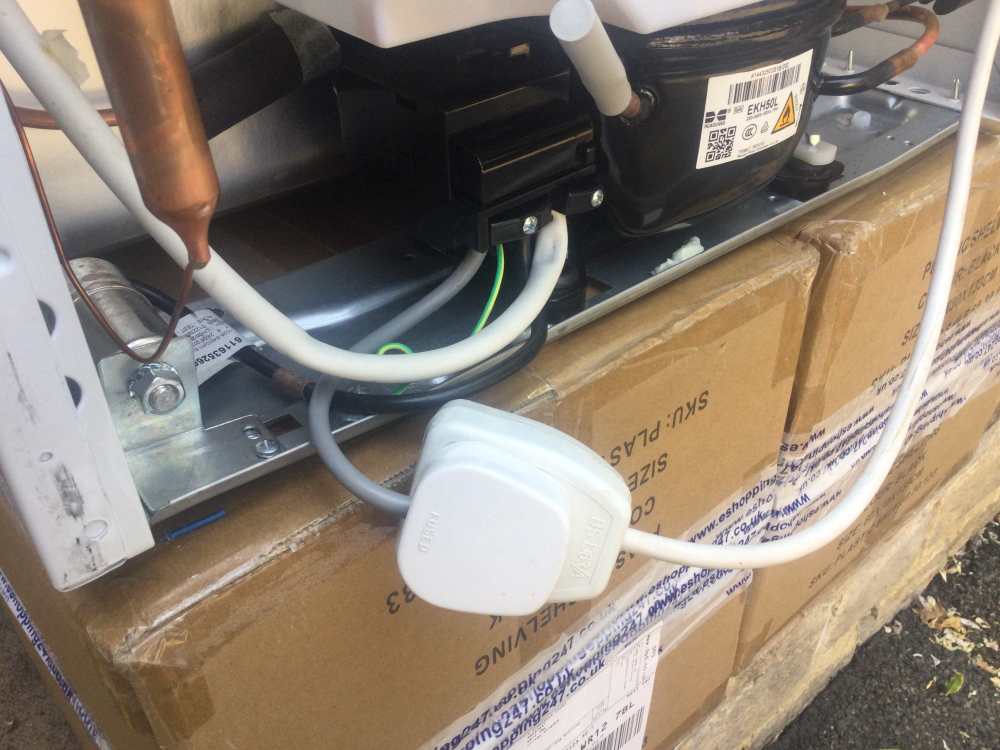
-
Hi there Rick. Good idea, bit I really want to replace cable for a mouseproof one.. afaik this didn't cause the kitchen spur or any, to trip the fuse. And I can't access behind the cabinets to seal up holes/ so mice will still be able to have another go. I will have to do this if I can't get into the housing tho.
-
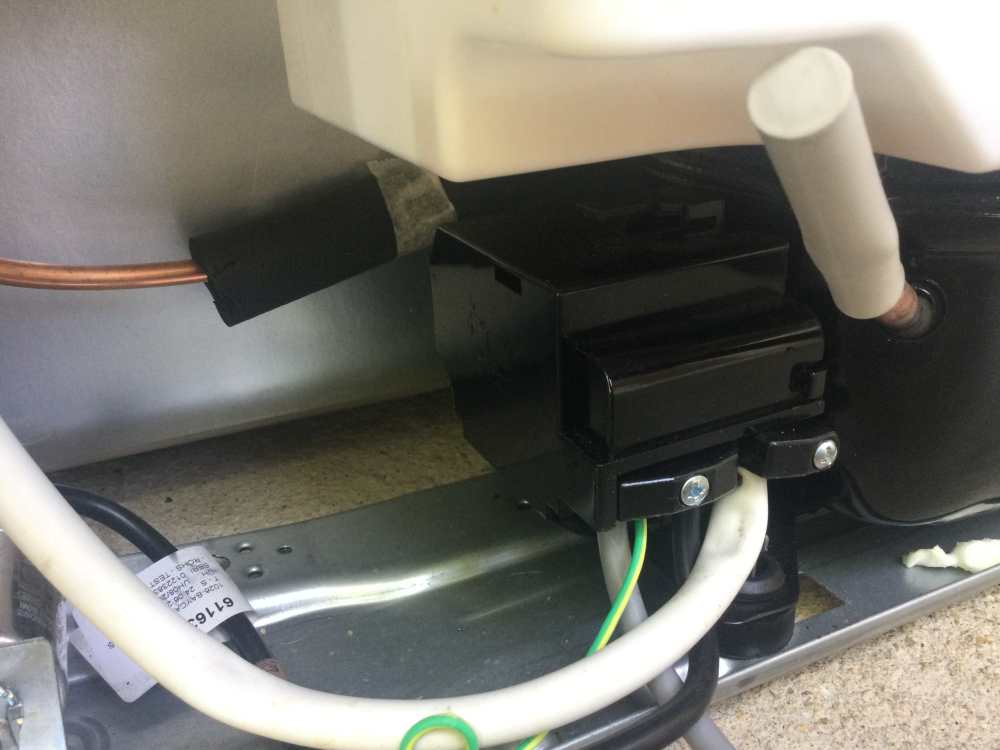
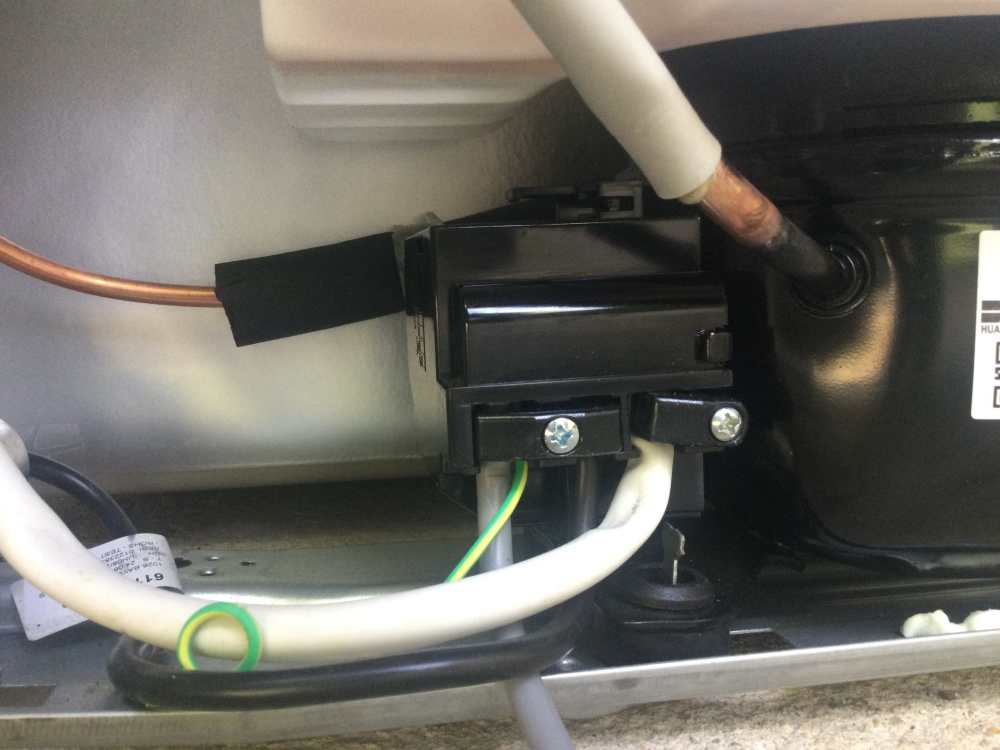
Hi there Onoff. I can clearly see this one I'm pointing to in pic 1, but even a flat s'driver trying to prize this clip up, only gets so far.. it feels like there at least one other clip, rearside or something.. Lord knows how I could get to/ pic 2. Thanks. Zh
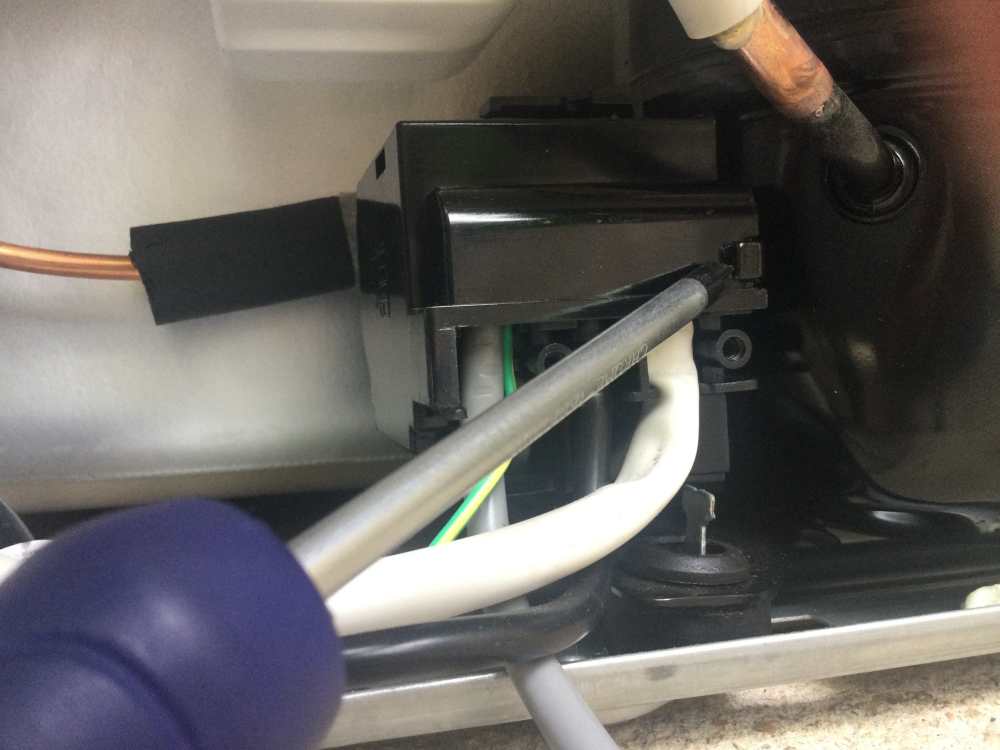
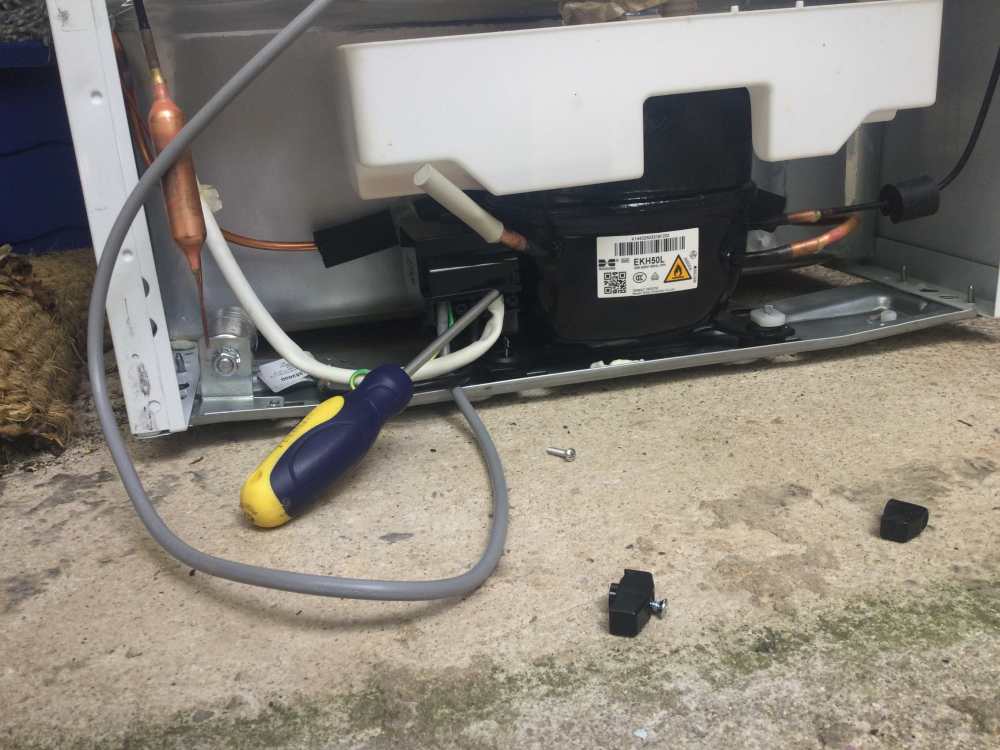
-
Ah. This is a step onward. Ok yup I can easily undo those two silver screws/ which removes the two little black cable clamps. But it's from here I'm at a loss- how to get into this terminal box. I can't really take any better pics: the wee clamps removed doesn't give me anymore logical way of entry. All I can see, is a small clip RHS on the housing.. but prying under this (which seems indeed to be some sort of clip locking two sections of the housing together)... I get nowhere. I just cant 'open' the housing. I'll just break the clip if I go any harder at it. There's defo something else I need to undo or unclip, to get the housing open. But I can't get around rearside of it ( to find another clip or aomething), being pretty obviously inaccessible. Great info about the flex thanks- That's exactly what I had in mind to buy poss tmrw in screwfix.
-
Hi BB, hope all's well in botusland. Yup those 2 cable clamp screws easily removed (should've said I did those in #1). Then on though.. I'm stumped.
-
Hi chaps, I need to replace a fridge cable, but cannot figure out how to access rear section, to remove grey mains cable. Hotpoint fairly new fridge. Photo here: seems to be a black square electric terminal housing. Anyone familiar with something like this? Thanks. Zoot
-
Great. Done! wiggling the flat sided section with spanner, & some wd40 seemed to enable me to free the brass valve without need to turn water off. Many thanks chaps. Zoot
-
Aha thanks Nick. I'm on board! So assuming universal thread diameter for this whole section, I should maybe just buy a new one. If I do that, I guess just a Q then, of whether I need turn off house water. My old friend.. won't want me doing that you see (even telling him I built my own bathroom with electric shower! I'm not a "qualified tradesmen" you see in his pov!). Grateful for that- fab BH help as always. Zh
-
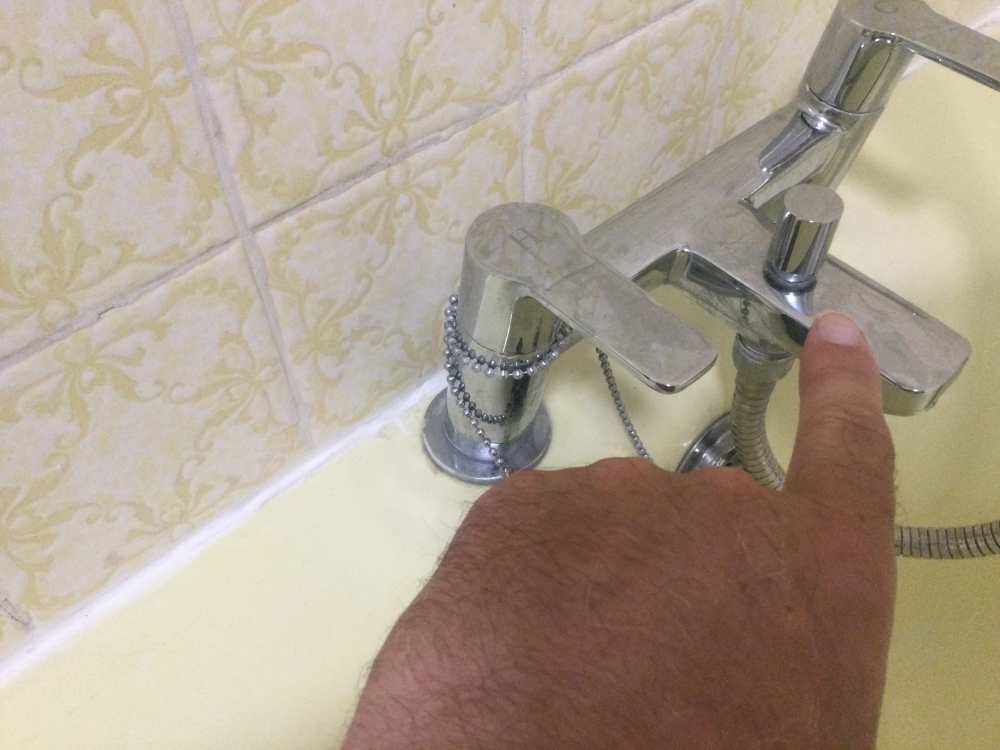
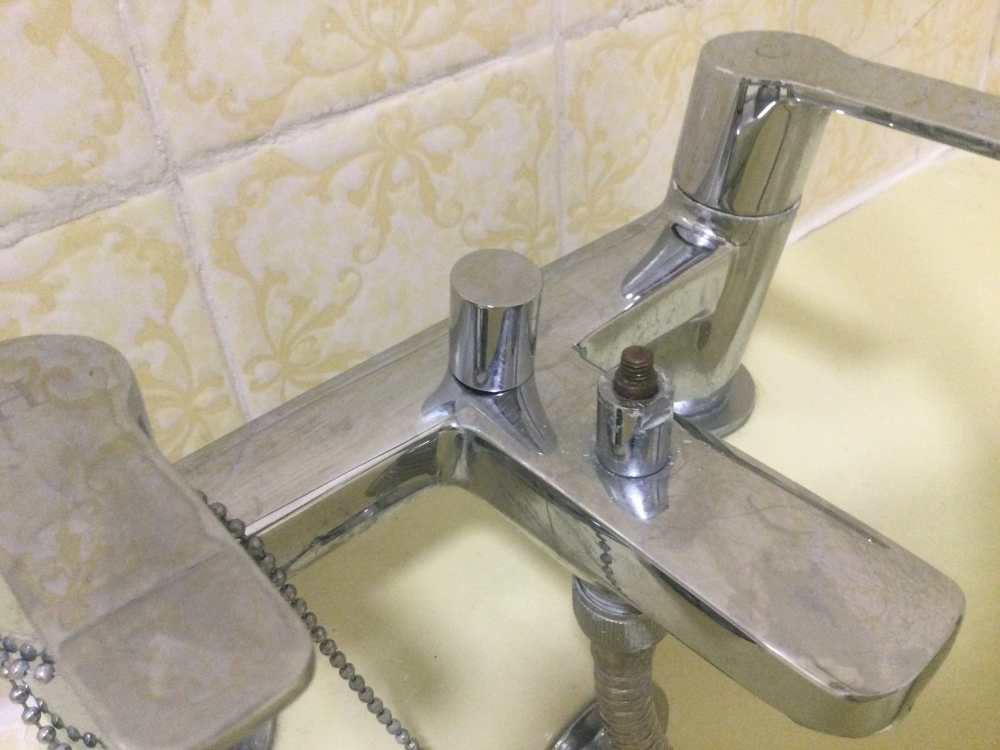
Hi G&J, Assuming you removed a section to do this soaking, could you possibly explain exactly which part you removed? And how? Can you see I have done step 1, & unscrewed the chrome cap. This reveals a brass section, onto which, the cal was screwed onto: the brass section has a thread on it. The brass section, surely then, is the section that is meant to move up-down, within the stationary chrome surround base section (this section Nick points to, but I have no idea what this flat spot spanner area is for). thx Zoot
-
Hi Nick, apologies I'm not understanding which bit yiu are referring to, to unscrew. Not being able to get to the house for a while too. I am 110m away. Of course I see your flat spot. But this seems to be the lower section, & the part that doesn't move, of the uppy-downy brass section.. which seems to be the section that is meant to move, & is stuck, within it. I have unscrewed the 'cap' to reveal the brass bit: with the cap on (& so far as I recall with these) the cap/ knob is supposed to be pulled UP, to divert water to the hose (& up to the shower head). Is this right. I can only guess this to be logical, bc with the cap screwed back on, it's then in the 'down' position, & is flush with the surrounding large tap "chassis" section. And the water is currently coming out of the two taps. Christ it's difficult to explain typing words in a box. Almost exhausting. Thanks, zoot
-
Hi ProDave, yup had thought of this, but awkward to get something to soak it in. Kettle, easy. Here/ this, in situ, I can't exactly immerse in a bowl of limescale dissolving stuff. Noted Viakal tho. Thanks, Zoot
-
Hi Nick, thanks for your 2 replies. No, the brass centre section seems stuck firm. I don't quite know which bit is meant to move (never unscrewed the top of one of these ever before- & no-one really uses these taps-up-to-showerhead things). I presume, in photo 1 where the chrome cap is screwed on/ as is meant to be, this section should simply pull UP say 1/2" or so. Meaning the brass bit with the thread on inside, should also move up 1/2". I can see your flat area on the outer tap section, but i wouldn't need to twist or use this for leverage.. would I? It's only the centre brass area inside it that I need to grasp & shift. Unfortunately I'm NOT near it presently (I live 120m away)- I took photos of these taps, at my dear old friend's upstairs previously unused bath area, which a new situation/ a live-in carer has just started using you see. At the mo, she only has the bath of use. Not ideal esp in this heat. Even if she's from Zimbabwe. Thanks, Zoot
-
Hi chaps, small issue preventing water going UPWARDS via hose, to a shower head, from a bath mixer tap pair. The valve thingy between the taps, is stuck. How to release it? Thanks, Zoot
-

Vaillant ashp (my battle with).
zoothorn replied to zoothorn's topic in Air Source Heat Pumps (ASHP)
Hi Onoff, sorry to hear you're struggling a bit there.. we both lucky only a few more weeks until it -should- be spring proper. Yes. You see I can make 1 effective room, 2 even. Despite having 1 old stone wall acting like a fridge on end. And with you guys' help this is in fact what I did. I have 1 room which retains this "low output" HP rad heat: my new build bedroom. The weirdness still affects it though: dark moisture-wet peripheries, of course on the stone end wall, but nowt to worry about if the room's warm. So you see now, I tramp down AM from this newbuild bedroom warm room (which I ventilate for 1/2 the day as soon as I leave it).. down into sittingroom, which thrn feels completely different. Then in into kitchen/ bathroom, which feel a step further on in coldness, & whichever adjacent room I flit between, I -have- to turn on a fan heater. Or I'd be uncomfortably cold. The sittingroom being big, can't be affected by the small fan heater: meaning I just vacate it until bearing an hour or two upon an leccy blanket + hottie, for my need to listen to my records/ vinyl. So I have the IDEAL comparison. New build room, to original old stone big room, to oldbuild 80's extension. The 80's oldbuild extension (despite the 1" of celotex you suggested adding in 1 kitchen wall, a perfectly good idea of course) is actually, worse than the old sittingroom. How.. considering no draughts (none anywhere- blocked all up within months of buying the place p, bc I could sense the cold even in july & thought "that must, surely be draughts- no, it wasn't so simple as that unfortunately).... how is it so bad, despite no draughts. Well this is the sticking point it seems. My theory, vs kind chsps' ideas on here (that the HP can be effective in the 3 problem rooms: I say a HP just can't be). I'm doing their tests now, so the results (of sorts) in 3 weeks. From this compsrison, I can tell the fundamental factor, is structure & how it can retain heat, outputting from a HP system with it's 'medium at best' temp rads. Thanks, Zoot -
Vaillant ashp (my battle with).
zoothorn replied to zoothorn's topic in Air Source Heat Pumps (ASHP)
It's hard work because folks refuse to believe it when I say this house is simply just one if those rare anomalies, one you just cannot seem to heat. If I sit on a sofa, & whacking a 9.5kW stove on FULL PELT for 4 solid hours, galloping through 2 huge baskets of logs, & I'm sat 1m away from it... if after 4 hours, my legs, nose, back especially is still feeling cold.. then this house is one of those rare infuriating anomalies. It's hard work, to convince anyone of this. It's hard work too, because the threads entitled "my battle with Vaillant", & nothing to do with how to run a HP (in this infuriatingly cold cottage). But folks wanted to help, convinced I was just being an idiot. Then I was oblidged ti answer the replies. And more join in. Now, at this point grateful as I am for the replies (quite unlike your suggestion here) I am finding it exhausting to read all, to try understanding many. Until I have so many, that I can only b3 SELECTIVE in reply. Basically I'm spent. Then it's hard work for others, who now feel that I've ignored them. It's hard work then for me, to put up with a fair few mildly insulting & condescending replies. Which then gather pace & others feel oblidged to join a small psck. Yes, it's hard work indeed. But I don't suppose it is for you though. Zoot Another regular member said they knew of occasional examples like this. -
Vaillant ashp (my battle with).
zoothorn replied to zoothorn's topic in Air Source Heat Pumps (ASHP)
Hi Rick, but if my rads furthest away from the new internal box wall thing (IE near cylinder), are equally as hot to the touch, as the rads nearest to it.. that suggests the balance is ok. Or if it's the outside HP which creates the water which runs in the rads (instead of the internal box near the cylinder), then I can safely say, that the furthermost rads to -this- are equally as hot to the touch as rads near to it. Evidently then the balance is fine. The install was only 6 weeks ago too- I wouldn't expect the rads to gave 'drifted' out in such a short time, nor that the installer (Vaillant affiliated & vg by all accounts too) wouldn't have balanced them upon install- if that is, it was one of the jobs he was meant to do. He asked me at this juncture, to bleed the rads: so I know he was doing some form of setting up, after the actual installation job had been completed. Thanks, Zoot Thanks Zoot




