Iceverge
-
Posts
4384 -
Joined
-
Last visited
-
Days Won
31
Everything posted by Iceverge
-
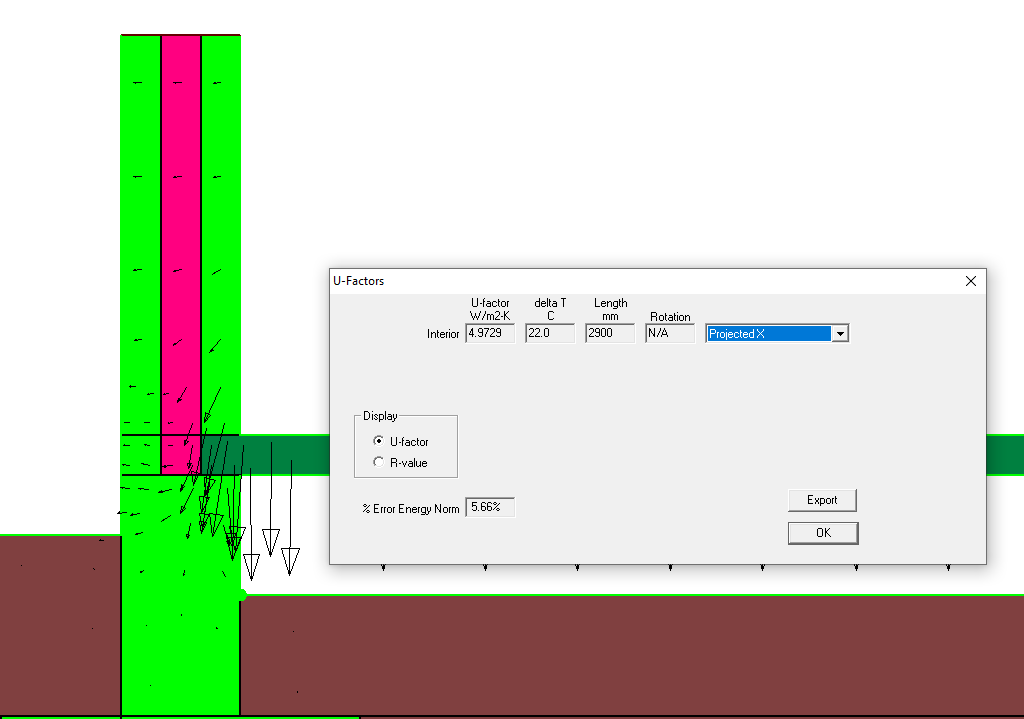
 It's called Therm. It's free obviously because I'm a skinflint. It's a bit awkward to use initially but it's a good tool to get a feel for how heat flows work. I might be able to find a PDF of how to set it up if you're interested.
 -
Interesting concept. I would love to be able to play with some software to get a real idea of this. I'll have a think of how I could manipulate Therm into doing this.
-
Insulated Concrete Slab Garden Office - Questions
Iceverge replied to Ticky's topic in Garages & Workshops
Yikes. A piece of string question.... Ultimately you are aiming to have your foundation on a layer that doesn't move with changes in moisture or temperature. Or at least moves a minimal amount and evenly. Any soil with lots of organic matter is a No No. Likewise any soil that will swell and shrink because it will get wet and dry repeatedly. Tree roots can have the same effect. Then there's frost, deeper is better but it depends on the local conditions. I've heard 600mm below ground but I have no idea where. What kind of soil have you got? Have you got the spade out and dug a trial hole? . Say 300*300 and 600 deep. Do this and post some pics. -
Stabbed by the soil investigation!
Iceverge commented on mike2016's blog entry in The Fun Irish (House)
Again for the curious, any links or a quick sketch for this method? -
Away from the laptop for a few days. At an educated guess 50mm of Kooltherm would be 0.35W/m2K. Typically it isn't worth the extra cost unless you really have to make a specific target for some regulations and you can't afford the space. Option 2 at an estimate would be about 0.22 W/m2K. The thermal bridge at the corner is the killer. Some kind of insulated plasterboard on the wall would help things immensely. Unless you can get the floor down to a true 0.15W/m2K or ideally lower I wouldn't put in ASHP UFH.
-
Get some references from them and interview the past clients. After some of the really awful stories on here about people loosing all their money so a trustworthy party is really important. Our builder wasn't the tidiest but honourable to a fault. A good individual who is fussy about their work can achieve excellent results so long as they are willing to learn old school or not.
-
sense check twin beam calculations
Iceverge replied to johnhenstock83's topic in RSJs, Lintels & Steelwork
For the eternally curious, how exactly do the beams get held together in this case? Is there a bracket bolted to the steel to prevent the steel twisting or is it simply a threaded bolt that maintains the beams at a constant separation to prevent one being pushed sidewards? -
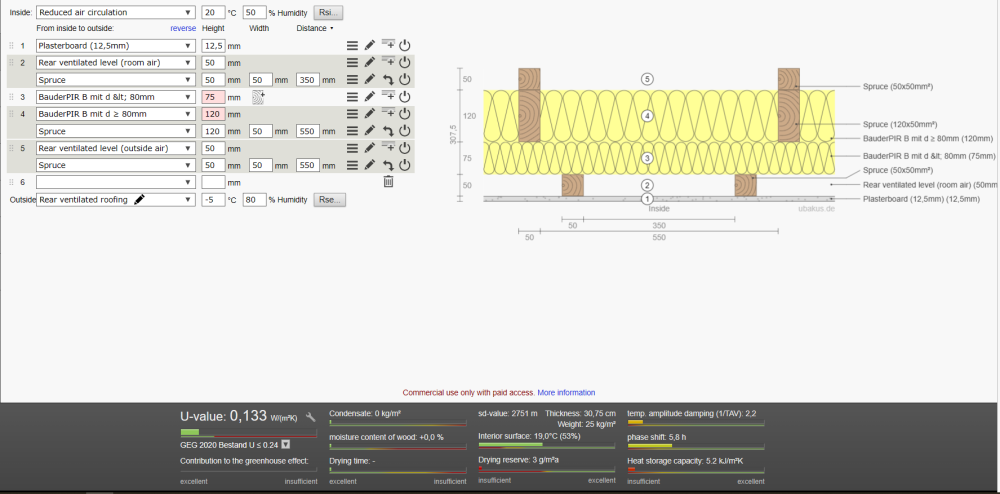
Running some quick costs on this. ( All from insulation4less) Take 3 examples. All the same U value. Decrement delay ( for heat protection) is worst with all PIR at 7 hrs and best with full fill rock silk at 10hrs. The cost of tape, screws , 50mmx50mm timbers and 100x25mm timbers are the same in all cases. Celotex 120mm £20.38/m2 Celotex 75mm £13.12/m2 FM330 foam £/1m2 Total £34.50/m2 Rocksilk 37 batts 2 x 60mm £13.44/m2 Celotex 100mm £15.27 Total £28.71/m2 Full fill Rocksilk 180mm £20.16 Celotex 75mm £13.12 Total £33.28/m2 BUT Fitting dense mineral wool batts is a pleasure, minimal itchiness and doesn't disintegrate like loft roll. Cut them with a sharp knife and they push right in. Almost zero wastage. PIR is tricky to cut straight unless you use a table saw or similar and the dust is not pleasant. When you have 4 x 560mm spaces between the rafters you will end up with about a 160mm piece to play with from every board. Wastage will be higher undoubtedly.
-
Vaulted ceiling joinery help
Iceverge replied to richo106's topic in Lofts, Dormers & Loft Conversions
I'm guessing since the insulation still isn't finalised this hasn't been done. Remind me once you decide on that and I'll try do a sketch of an airtight detail for the apex with a good service void. -
Vaulted ceiling joinery help
Iceverge replied to richo106's topic in Lofts, Dormers & Loft Conversions
Self levelling laser to get the correct starting points at both ends then a chalk line and snap a line. -
There's lots of types of fluffy insulation. I would encourage you to make sure it's designed for purpose. Trying to put attic roll in this application for example can be done but it's not worth the hassle. I did it recently with 150mm rockwool attic roll between studs because it was the only thing I could get easily. Like @nod says narrow battens won't be the best. They're constantly splitting if nothing else.
-
Cold roof with no VCL? Can I have spotlights?
Iceverge replied to Mattsville's topic in Heat Insulation
It was the placement of the lights I was thinking. Nothing says "please stab me with your trowel" more than holding your phone torch at a shallow angle against some fresh skim...... -
Your current proposal. I'll be ghrd to fit PIR between rafters and lots of foaming and waste. Long term my confidence I don't have much confidence in PIR not to shrink and leave gaps between the rafters. You'll need 175mm screws for 50mm into the rafters. I would put flexible insulation between rafters, far quicker and cheaper and more forgiving of any movement in the timber. Better for noise and fire too. A 22mm service cavity with 3x1 strapping @600mm cc would work well for 15mm plasterboard. 175mm screws again. What kind of membrane have you used above the rafters? Full fill may be an option. If you could do this with woodfiber you'd have a far superior decrement delay. You could go to 150mm screws too to save some money and make it easier to fix through the PIR.


-
Cold roof with no VCL? Can I have spotlights?
Iceverge replied to Mattsville's topic in Heat Insulation
I can hear the plasterers swearing under their breath...... -
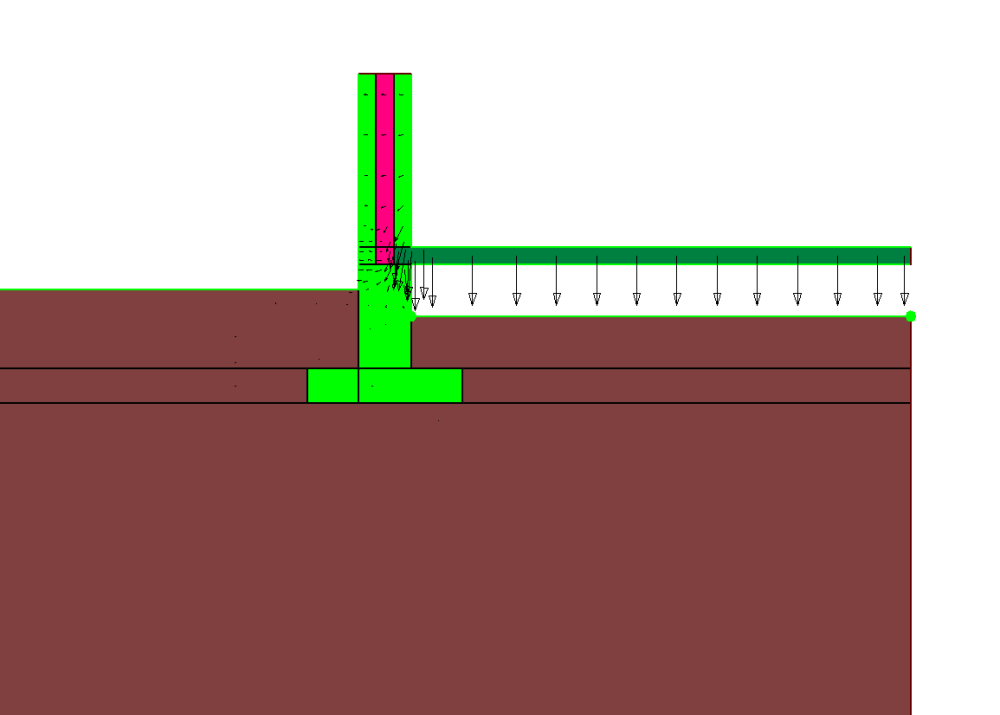
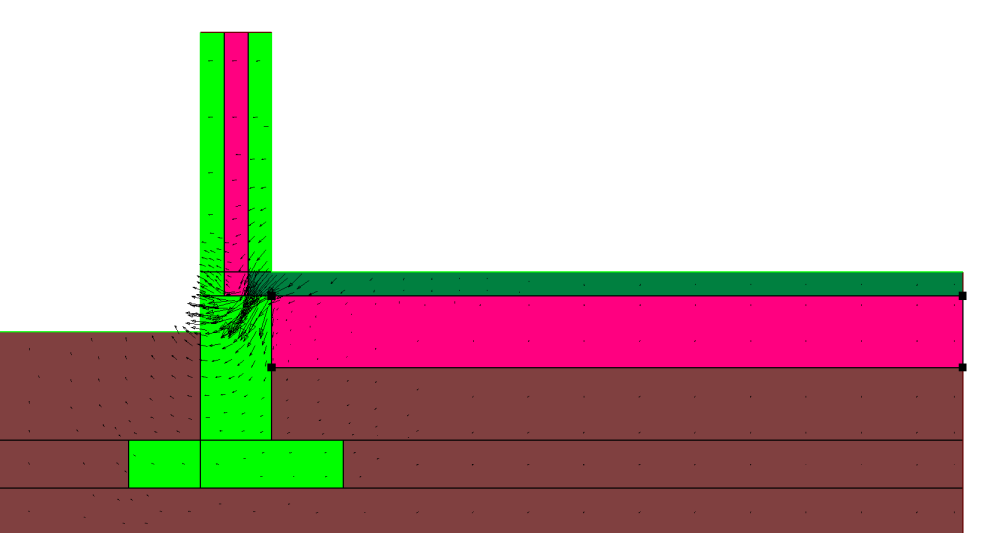
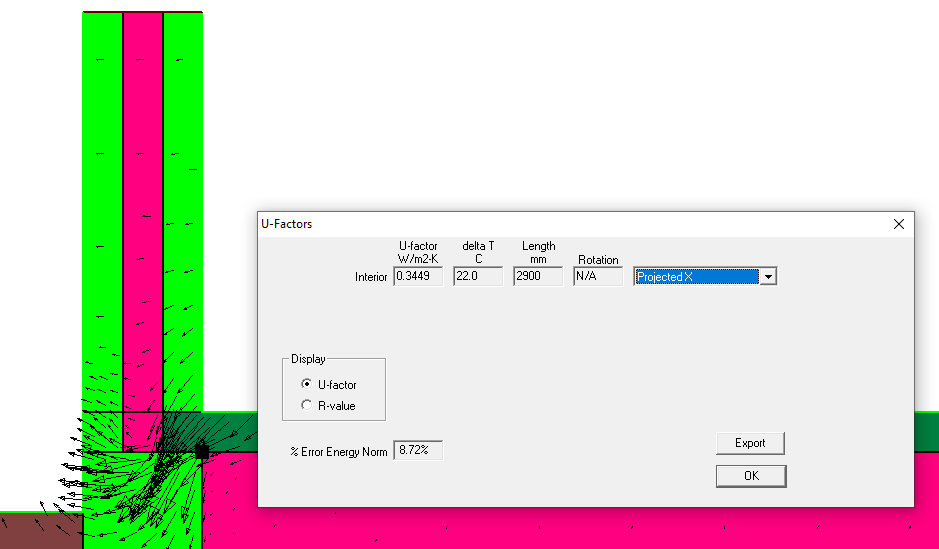
Here's another option. Lay 75mm PIR boards over the block and beam. Carefully foam all joints, trim and tape. Then lay 2 x layers of 11mm OSB floating over the top, joints staggered, glued and screwed. If you wanted to bump to Phenolic insulation you could lower the U value to 0.24 from 0.28 w/m2K but I wouldn't imagine it's worth the cost. You can still see the effect of the thermal bridge at the wall floor junction. Then use large radiators for the ASHP. Personally I think that you could fill the floor void as is with EPS beads nothing bad would happen. I can't under stand how moisture would magic it's way vertically through 300mm EPS beads.

-
BEFORE Without insulation. Assuming 100mm EPS in the cavity and full fill below ground level. AFTER With 300mm of EPS under the floor. The U value drops significantly but given the effect of the thermal bridge not as far as you'd think.

-
Investigating all avenues is anything but stupid. The quest for knowledge and discovery is what makes our houses on average much better than mass produced boxes. However if you do this and still go ahead the answer may be different................!!! I think you'll struggle to find an airtightness result for a house that uses sliding sash windows. I couldn't. If you search for "sliding sash windows drafty forum" on google you'll find plenty of examples.
-
Warm roof - which vapour control layer and which PIR?
Iceverge replied to BotusBuild's topic in Flat Roofs
i'm not really a fan of PIR. Rockwool have a warm roof system or I can't see any reason EPS couldn't be used. Has anyone done this? -
A picture could help.
-
The phrase "common sense" is a contentious one. I've only seen it used when someone self deprecates their level o knowledge,experience and application or someone else who is just guessing wildly and hoping things will work out. A scientific method might be as simple as drawing freehand some summer sun angles on a bit of graph paper and counting the boxes. There needs to be measuring and consciousness to get consistent results. Hence science. Almost all houses built everywhere ever have insufficient passive heat protection. Most rely on ventilation, active cooling or active shading so yes, almost nobody designs buildings is competent really. When windows are as insulative as walls it'll be a doddle. Just shade out the unwanted heat as needed. However at the moment they're relatively thermally poor and annual losses need to be balance with gains.
-
Alas, my genius concept is binned. 😭 You could always just hack up the steps and replace with a grippy slope to the front door, it seems to what those disobedient free spirited humans prefer anyway. Then have a slightly elevated slope for the car.
-
This might solve itself if you let it run its course. People are generally not keen on cold showers!
-
Stabbed by the soil investigation!
Iceverge commented on mike2016's blog entry in The Fun Irish (House)
https://www.screwpile.ie/housing This page has some residential links. From memory when I looked at their Facebook (before I quit it) the screw piles were to bolster a concrete ring beam. I toyed with the idea of a screwpile only foundation. I liked the lack of concrete and speed and novelty. I quickly ran back to concrete when I saw the cost and our ground didn't need any special treatment. Rain . LOL. Very occasionally it doesn't rain is probably a better way to put it. It depends on site value I guess but if you had to put 2.6m concrete "walls" into the ground it would seem a missed opportunity not to put a floor in too. A sump and pump and you're done, even just as storage area/plant area. A contractor built me a 4.6m X 17.7m X 2.7m deep slurry pit in 2020 for €17.5k.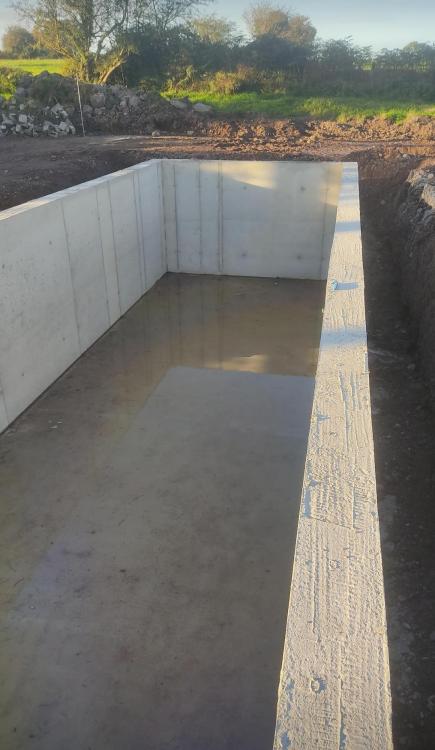
-
Insulated Concrete Slab Garden Office - Questions
Iceverge replied to Ticky's topic in Garages & Workshops
Keep us up to date with pics please. We're all learning. Put the bolts in when you pour the slab as above. plenty of tape, or a bit of snug pipe slipped over the top to keep the threads free from concrete. When the time comes for a DPC I would prefer a paint on one ( less risk of trapped moisture and no gaps). You can do a more effective job of air sealing too this way. Lay the sole plate on top of the bolts. Use a hammer to hit the timber such that the bolts make an imprint. Then drill the imprints. Perfectly accurate without the need to oversize the holes. Lay the sole plate on a fat bead of permanently elastic sealant or FM330 foam to create a robust seal between the floor and the wall. -
Stabbed by the soil investigation!
Iceverge commented on mike2016's blog entry in The Fun Irish (House)
https://www.screwpile.ie/ These guys are in Cork. I have no experience of them however. I think screw piles were actually invented here. If you do end up with a 2.6m dig I would consider a basement. Otherwise in good weather you should be able to dig trenches that deep and simply fill them with concrete to ground level. It'll cost more in concrete but it'll be quick. I don't know what the engineering term for this is. Be careful of trenches collapsing. Typical reading on here has suggested that going direct to a basement company's engineer or a piling companies in house in engineer can save a small fortune as they are much more au fair with the specifics than a general SE.