Iceverge
-
Posts
4384 -
Joined
-
Last visited
-
Days Won
31
Everything posted by Iceverge
-
Ideally the frame exterior would be only directly on contact with insulation. It's a thermally weak part of the house.
-
EWI an option?
-
I don't see any issue with the PIR externally, in-fact I prefer it there, keeps the studs warm, and warm = dry, and dry = durable. As for too much insulation -Nonsense- you can never have too much. Remember its not only about energy usage. It's about heat protection, warm up time and heat retention when unoccupied too. Also buying insulation in multiples of 25mm is cheaper than more unusual thicknesses like 30mm or 80mm. I'm not a fan of the PIR between the studs, I'd much prefer to see mineral wool there. As a material of very low permeability you run the risk of it trapping any moisture that finds its way in. Mineral wool would be better. How about. Fiber cement siding. 25*50mm battens. 50mm PIR breather membrane 11mm osb (metric sheets) taped externally for airtightness. Very important. Rockwool batts between 97*42 studs at 400cc. 12.5mm plasterboard Skim If you're worried about the screws snapping add a few nails, or a long screw at an angle upwards, or attach the battens to the roof overhang for extra security.
-
Sorry to hear about your Brother. RIP Building is testing when everything goes well not to mind your situation. Hopefully you get dealt better cards from now on.
-

Passivhaus Under Floor Heating & Water Supply
Iceverge replied to Carpe Diem's topic in Underfloor Heating
With 200mm of EPS I'm assuming masonry construction of some sort. That does mean some drying out time but I wouldn't expect it to be as high as you say. The power demand for the MVHR seems high too. Perhaps you are over ventilating. The smart home gubbins are a bit redundant in a passivhaus I always think. Can you show us any pictures of your install and any schematics? I wonder if your system is cycling lots or else trying to run at a very high flow temperature, perhaps asking for additional heat from an immersion or defrosting regularly. ASHPs work most efficiently being able to heat things "just enough" over a very long period. -
20mm and cement render. 100mm dense blocks. 250mm EPS blown beads. 215mm dense blocks. 15mm sand and cement and skim. Should have opted for the 300mm cavity to make it 650mm...
-
Vinyl onto osb. Will the texture show through?
Iceverge replied to saveasteading's topic in General Flooring
Lift the OSB and replace with 2x thinner sheets of OSB or Ply. Staggered, glued and screwed. It's almost impossible to convince the a human to undo work they've completed but it's a vital thing to learn to do on course to becoming a true master builder like your daughter will be. -
Have you a sketch of the detail you are using? Did you use window boxes in the end? It may be a fortuitous opportunity to install some external EPS insulation over the window frames?
-
Pffffft! That's nothing . Our walls are 600mm thick. The words "bunker" and "bloody castle" were murmured under the engineers breath when going over drawings at some stage.
-
Vinyl onto osb. Will the texture show through?
Iceverge replied to saveasteading's topic in General Flooring
With all these things I find it better to dry lay first. How was the OSB jointed or did the sheet cover they whole area? -
Passivhaus Under Floor Heating & Water Supply
Iceverge replied to Carpe Diem's topic in Underfloor Heating
What country are you in and how hot do you keep the house? We are in Ireland and use 9kWh / day (2adults+3kids) for DHW with an immersion and avoid 18kWh per day of direct electric at peak winter for heating our passive house. House is generally about 20⁰ This translates into about 2kWh/person per day of DHW and 0.1kWh/m2 per day space heating. For your three people the equivalent would be 6kWh DHW and 45kWh of Space heating demand in direct electric so 51kWh total. You should be at least aiming for a COP of 3 with the ASHP so I would expect your actual usage at the meter to be more like 17kWh not 40kWh as you have reported. The heat pump isn't working properly. Can you get a schematic of the install? -
Congratulations and welcome! I'm a fan of smaller houses. Plans please for our collective nosiness! Have you any ideas about a preferred build method yet?
-
If you have an appropriate sized Allen key it's not hard at all to adjust.
-
It sounds like a poor install. Can you get your hands on some cheap electric radiators and not use the UFH for a while to test the difference? I reckon you are mainly heating the terrain of Jersey and not your house at the moment.
-
@tw18 Welcome welcome. Where to start......... Thinking always beats spending so keep the credit card under wraps for now. £200 and some DIY could make a significant difference. @Marvins AIM APE is probably a good place. "A" Airtighness, lightly to be shocking on a 2008 build. Make a DIY blowerdoor like I did here as shown here and get sealing. Given a day or two with the kids helping you might be able to half your ACH rating with some acoustic sealant and foam. https://www.dortechdirect.co.uk/tremco-illbruck-sp925-airseal.html https://www.dortechdirect.co.uk/fm330-pu-foam.html "I" insulation. The floor......not an easy fix. Probably not terribly well done by the sounds of things. Walls. What do you have? Probably 100mm of mineral wool? Maybe 60mm of PIR? Can you find out? It might be possible to top this up. Attic. I suspect you mean the kingspan is between the rafters (not the joists) if this is the case I reckon that it was a half assed attempt at a warm attic but they were ventilating as per a cold attic. Hard to tell without seeing. Pictures please. In any case the Rockwool isn't doing anything and I guarantee you the whole thing has a gale blowing through it. Windows. Jersey isn't cold but it can be windy. Are the windows all correctly adjusted. "M" Mechanical ventilation. Needed to contol humidity, CO2 and VOC's internally. It needs to be on all the time at a low level. MVHR is best, dMEV is good but PIV will work too. What do you have now? Noisy bathroom fans? A dryer house will heat quicker and feel warmer. APE IS air source heat pump, solar PV and Electric vehicle. Leave them until you have the fabric sorted in my opinion.
-
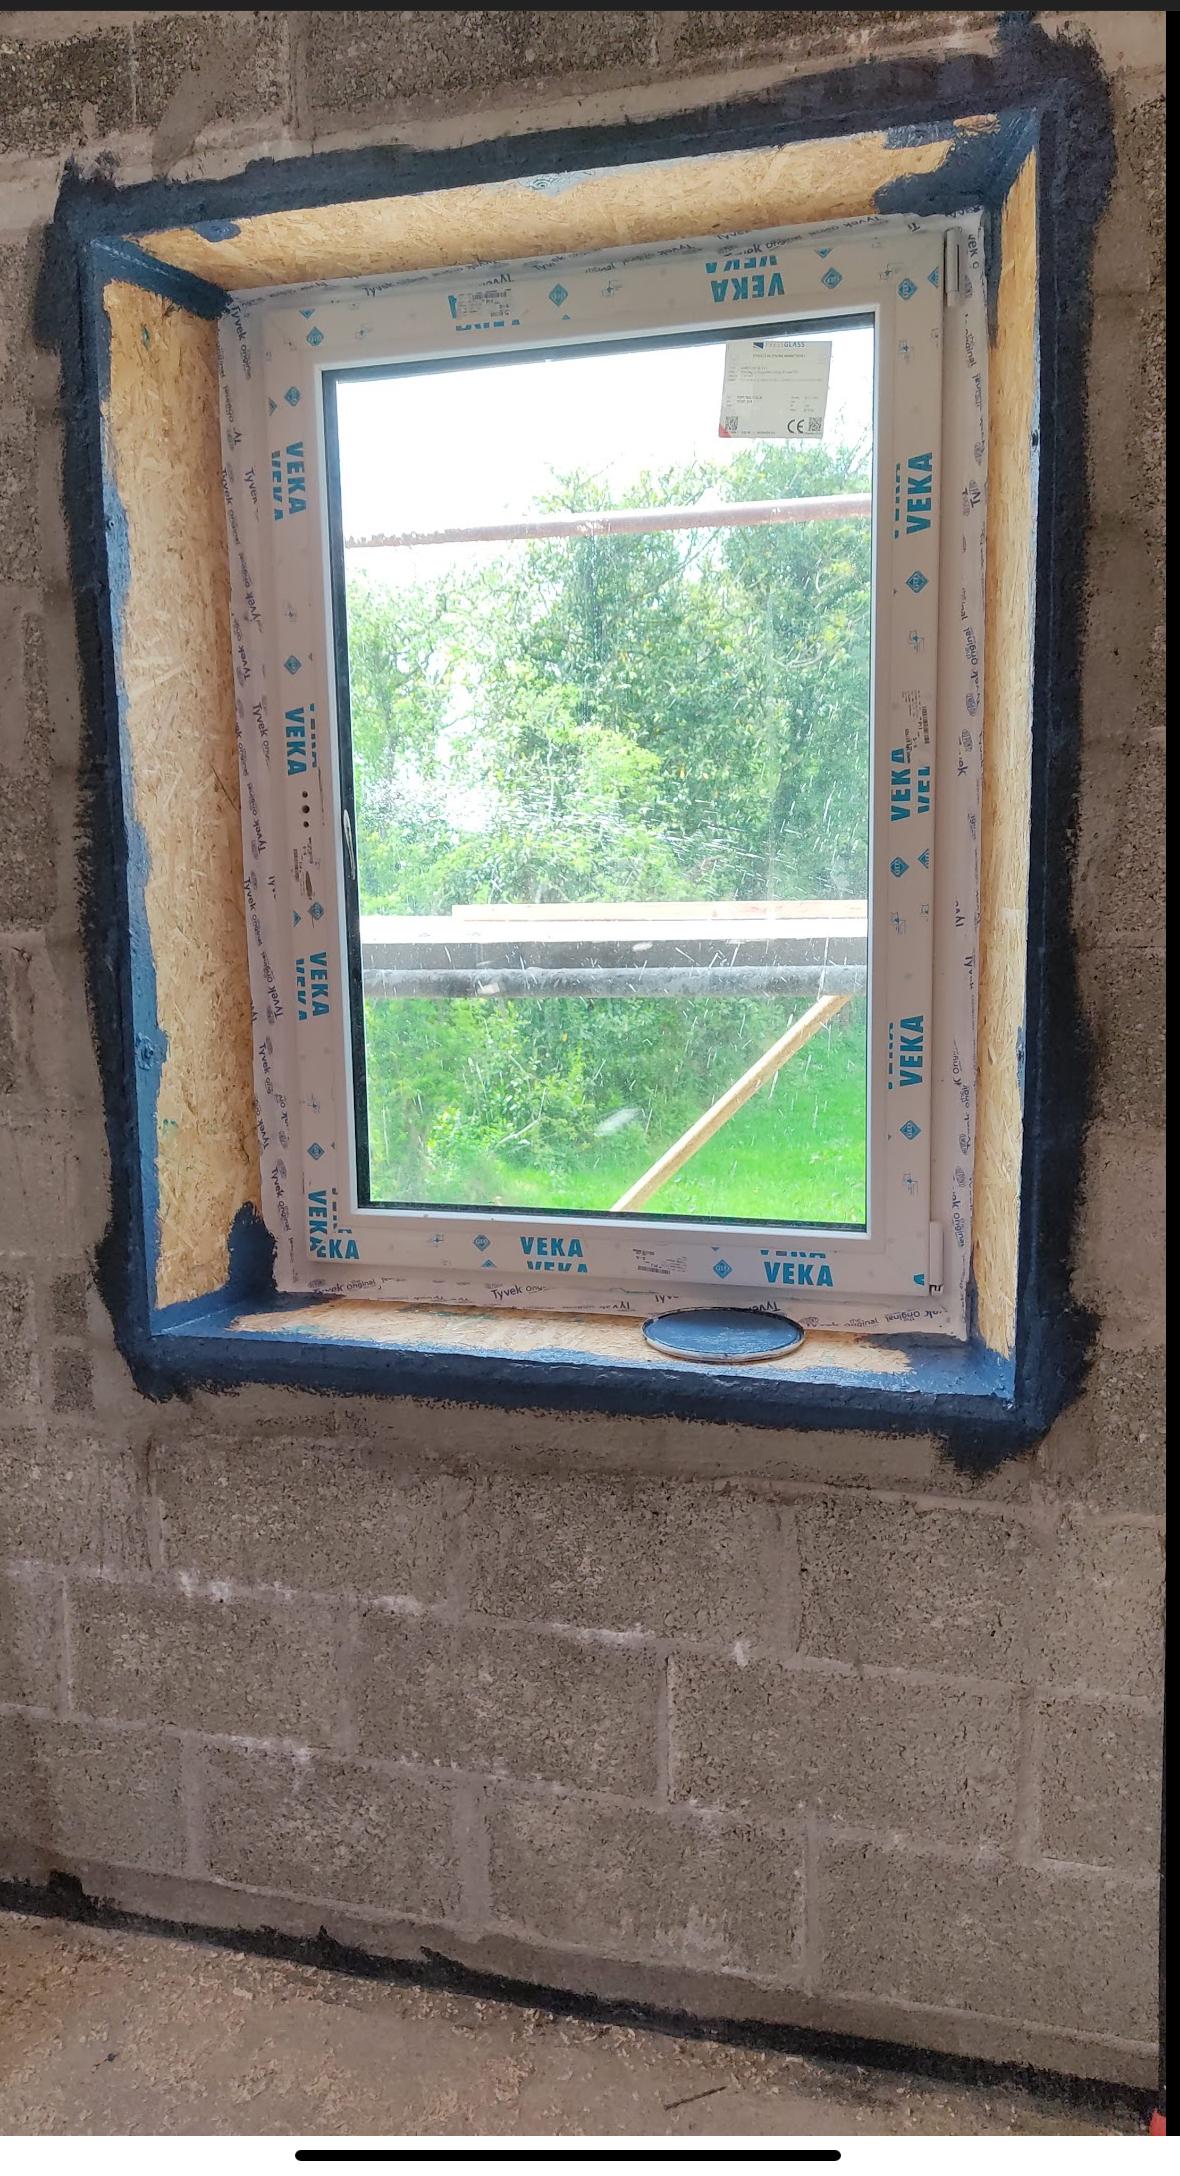
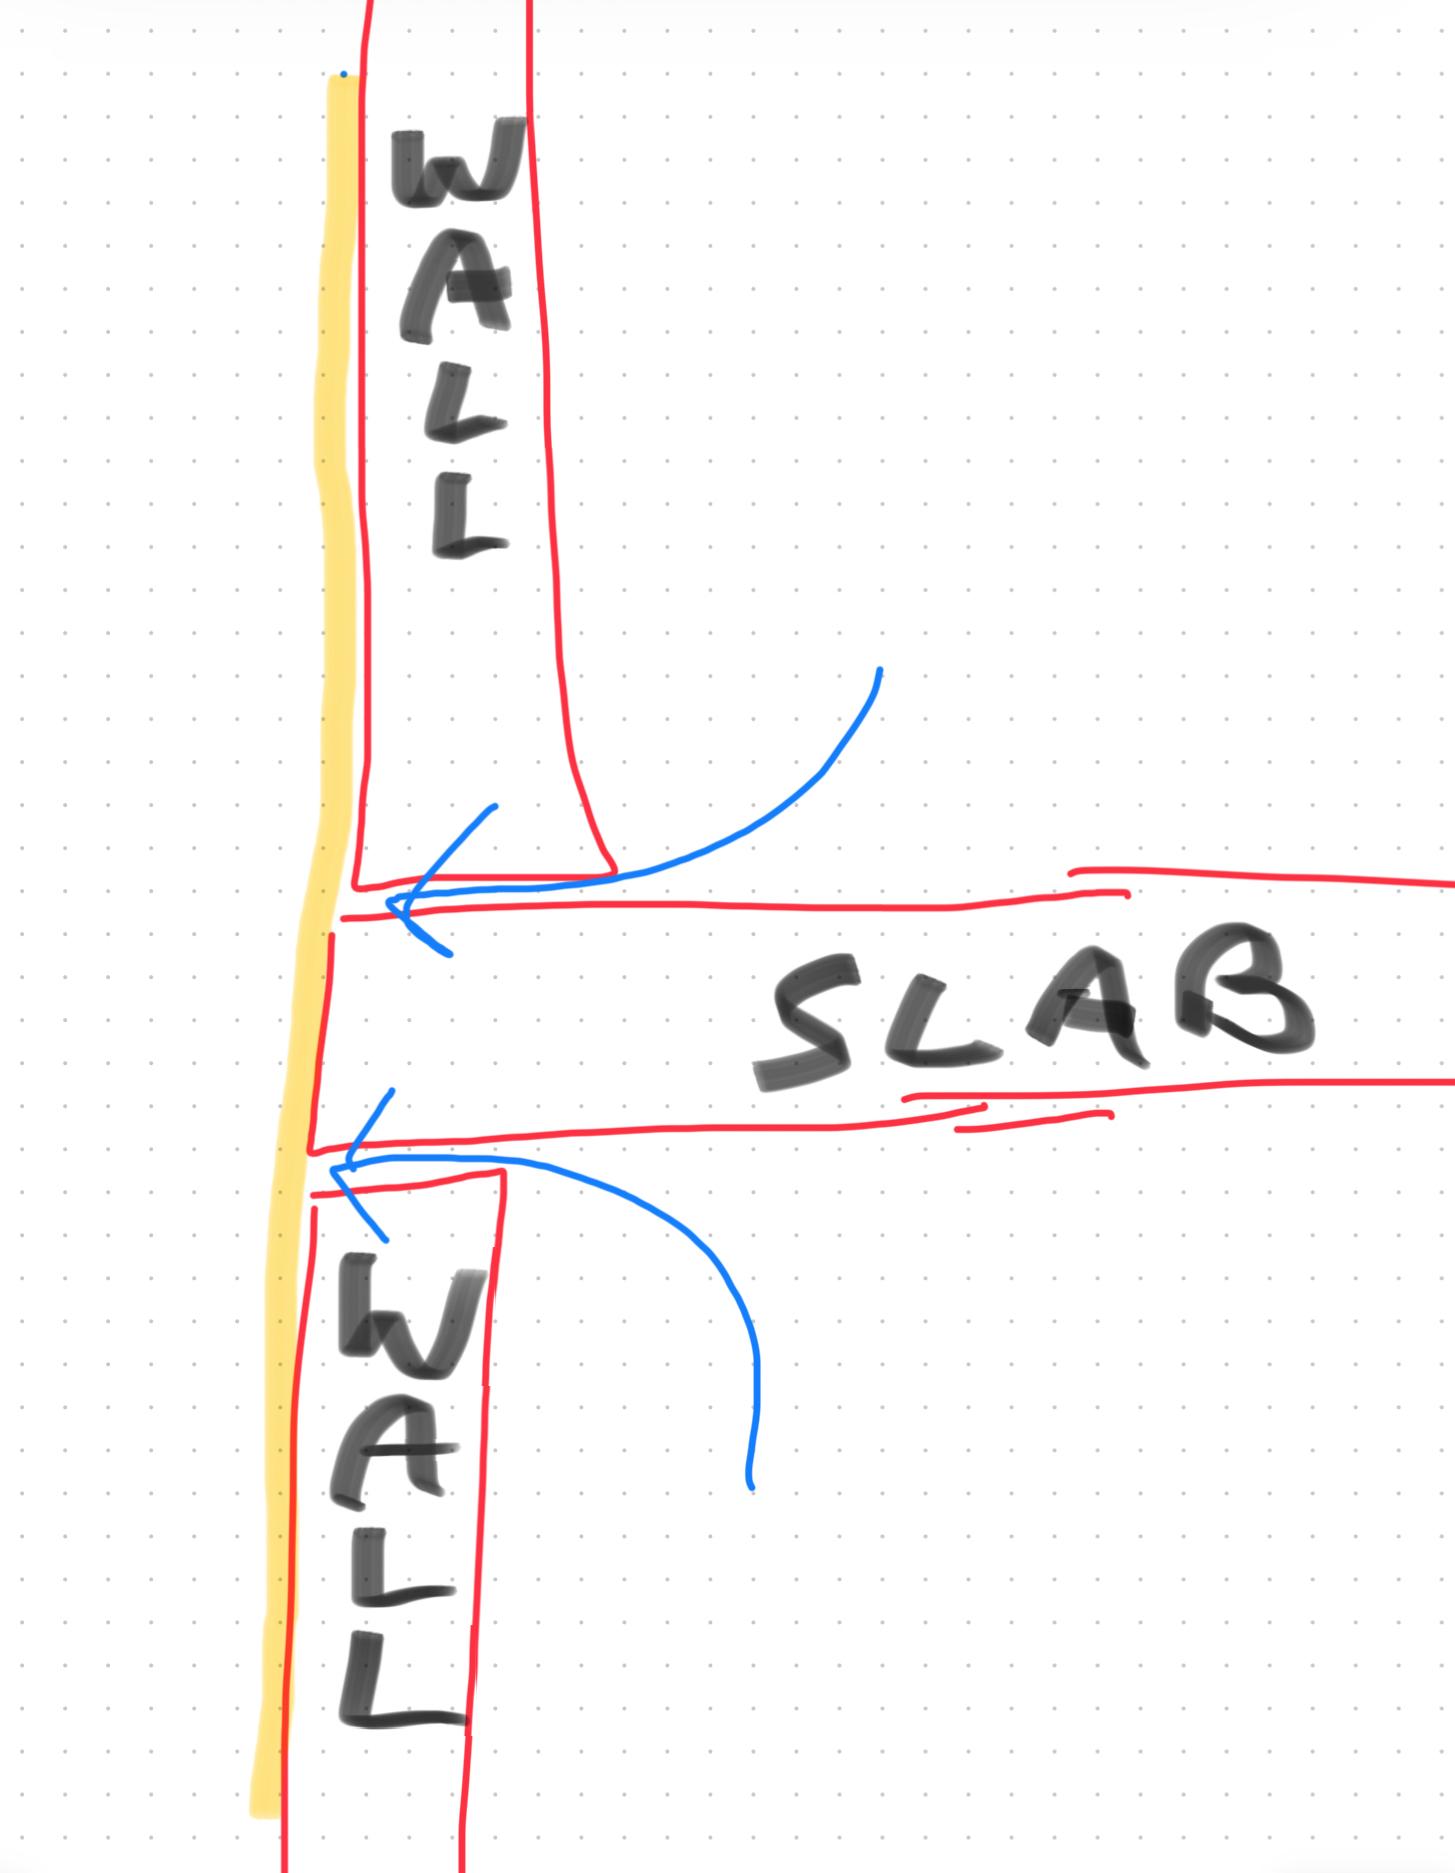
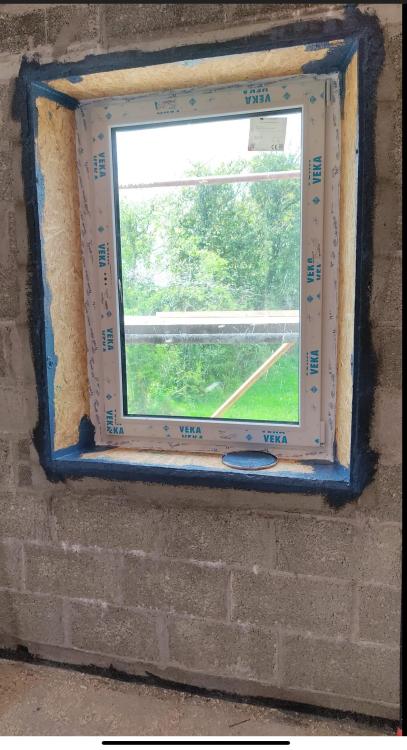
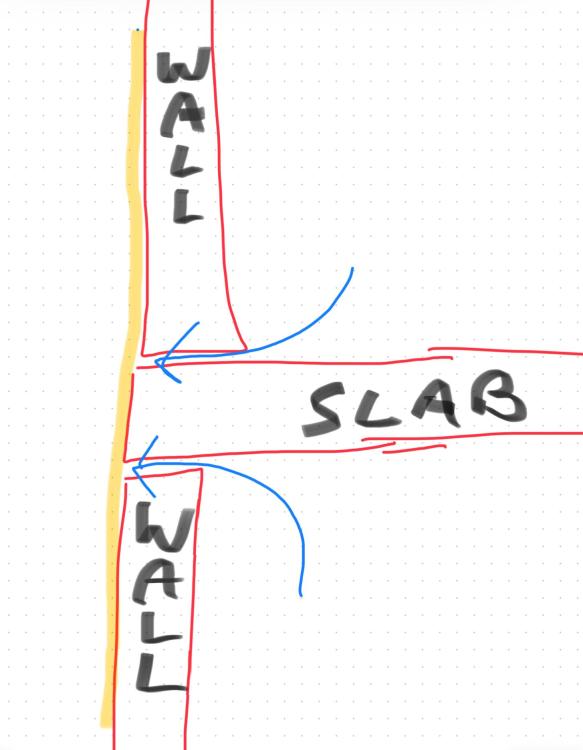
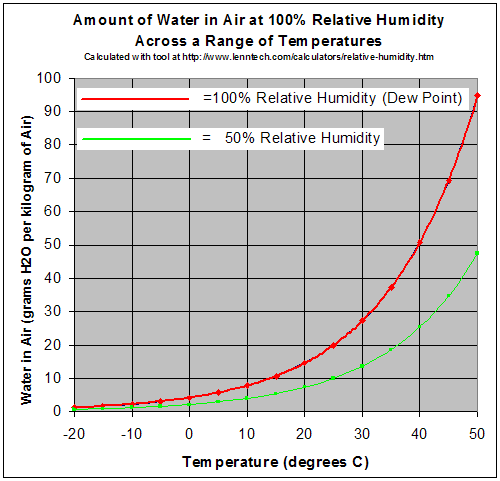
Sure. Vapour needs a surface to condense onto, like a bathroom mirror. If there was an unbroken airpath under and over the slab then it could have moved un hindered until it met the cold back side of the render. Normally done to join two parts of a house together to prevent air leaks at the interface. It's best done with some permanently elastic material like airtightness tape or paint to accommodate any movement. Walls to floors. walls to ceilings, walls to windows etc. the idea is to create a completely airtight seal. Here is how I did our windows and floor. I filled all large gaps with sand and cement mortar and then painted on blue airtightness paint which dried to black. Tape was used to seal the OSB window boxes to the window frame. (For anyone who's interested we used a parge coat first near the floor and around the window to save using up too much expensive airtightness paint). Have you any actual measurements of the bedroom relative humidity? Air tends to equalise pretty well in a house with open doors. You can pick up a cheap hygrometer for less than €10? I'm working on a best guess here. Do you have internal photos too? Was it ok before the Evertex? Has the wall been mechanically stressed regularly , for instance by a football? Over a 1m distance with 50° of temperature difference they will differentially expand by less than 0.3 mm. Assuming the interior of the house is at a relatively stable temperature then maybe the outer 50-100mm might be subject these variations over a year. In any case the differential movement would be 0.01-0.03mm. About the width of a hair, hardly significant. The air leakage is the vapour heavy air from inside making its way to the outside via air paths. Its the absolute humidity you need to think about although its hard to measure so the relative humidity is often used. Relative humidity is temperature dependant though so external air at 100%RH and say 10° actually has less moisture than internal air at 20° and 50%RH. Do you have a mechanical ventilation system? Pictures please. in good light, close and wide shots. Theres no point in finding any products until you really nail what caused the issue initially in my view. Yes if it is stripped back to the bare surface first. However you would still have moisture trapped behind it. I would hold fire on any purchases for now. The moisture that caused the issue originated (i think) from inside. However when this damaged the render then the rain was able to damage it further. I think Ireland is just too wet to consider materials like lime render unless you are prepared to constantly maintain it. Thats why almost all houses here have sand and cement over a block rain screen. It's just so massively moisture tolerant. Its no different from a ventilated metal rainscreen, or timber or fiber cement. Although in a cavity wall it does contribute to the structure it's primary function is to keep the rain off the inner wall.
- 31 replies
-
- 2
-

-

-
- concrete slab
- lime render
- (and 1 more)
-
A friend of a friend built one. Light guage metal with I think 100mm of external PIR and then a block rain screen. Dead fast and accurate but he works for a company that does them for commercial buildings so he was able to get it at a competitive price. It wouldn't have been comparable to masonry or TF otherwise. The thermal bridging of the studs is really significant compared to timber and merits close attention to detail.
-
If you're not too far is massively simpler to just build in the duct to the block work.
-
My preference. External brick coated in brick cream. EPS beads. Internal leaf Parge coat sealed with tape to floor slab, windows and roof membrane . 47*42 mm timbers fixed to the wall to form service cavity infilled with mineral wool. Plasterboard Skim.
-
What can you do...... Well good news is that the house won't fall down. You should start to take note of internal humidity. It should be no higher than ~60% RH at ~20⁰ .Heating and ventilation is how to achieve this. Ideally mechanical ventilation of some sort. This will prevent the issue getting worse. Ideally you would remove skirting boards and ceiling plasterboard and air seal around the first floor slab internally. Practically this is probably not possible unless it's limited to a very small area of the house. In any case you will need to sort the external render as now it's exposed to the Donegal rain it will degrade quickly. This will require removing the existing paint and render and reapplying something of a higher permeability like lime or silicone render. Even something like less permeable (but more permeable than Evertex) like sand and cement with it's very high tolerance to moisture would probably be ok if you were to control internal humidity. However these solutions would only work if any exterior paints were to be of high permeability in the future. A couple of coats of an exterior urethane based paint would undo all the work again, especially with lime render. ( Sand and cement may survive as it doesn't mind the damp so much) The most robust and permanent solution I can see is to apply a layer of external wall insulation (EWI). In Irelands temperate climate, this would ensure that the vapour that escapes via the cracks above and below the slab would almost never reach a point in the wall below the dew point and condense. Normally this is rendered with a silicone or acrylic render however in our climate of driving rain this would need to be done very carefully or you might be back where you started from. It's not encouraged in Norway any more for that reason. https://www.mdpi.com/2075-5309/8/7/93 External cladding , metal wood or fiber cement over the EWI would be very robust. Come to think of it you could omit the EWI and just do this anyway but you wouldn't solve the problem of water condensing in your wall then. TLDR. 1. Control internal humidity with heating and mechanic ventilation. 2. Apply EWI + Render with caution or 3. Apply an external rain screen with or without EWI.
- 31 replies
-
- 2
-
-
- concrete slab
- lime render
- (and 1 more)
-
The evertex coating you used has popped up on lots of forums with issues regarding bubbling and peeling etc. They must have had some issues with previous jobs because they closed and reopened under the name https://everflexcoatings.ie As far as I can tell it's a very thick paint, probably of very low permeability. When airborne vapour escaped from the interior of the house via air leaks it got to a point in the wall where the temperature fell below the dew point, the vapour condensed to water and as it couldn't dry out it soaked into the original line render, diluting the adhesives of the lime and it fell off as you can see. My theory is that insufficient air sealing was done below and above the first floor slab. There was an easy path for indoor air of high humidity to pass right through to hit the back of the render. Here it cooled and condensed into water. As the original lime was of high permeability, the condensed water was ultimately able to dry though it to the outside so damage was limited. However when the Evertex was applied the water couldn't go anywhere, it soaked into the lime render and then you had problems, gravity did it's part and the water migrated down the wall destroying the render below the slab area too. The almost perfectly straight fault lines in the render are my evidence of air leaks combined with the impermeable paint being the issue. I would almost certainly rule out differential expansion of the slab and walls as they are similar materials, and the distinct two lines at slab level rather than a complete band point towards air leakage rather than a thermal issue. TLDR: Bad air sealing above and below the slab allowed moist internal air condense behind the impermeable paint dissolving the lime render.
- 31 replies
-
- 3
-
-
-
- concrete slab
- lime render
- (and 1 more)
-
Yup. Install 18mm OSB racking on top of the trusses and use this as your A/T layer. Taped at all seams. Then wrap an airtight membrane around the ends of the trusses returned to the internal face of the wall. You'll need trusses without rafter tails for this. Then install 100mm mineral wool between the trusses and 100mm PIR over the top like a hybrid roof for a u value of 0.14. You'll need to put extra timbers on top of the OSB for overhangs and rafter tails. From the top. Slates Slate battens Counter battens Breather membrane 100mm PIR (rafter tails installed here too) 18mm OSB taped for airtighess 100mm trusses with mineral wool infill.
-
Keeping that piece of wall is insane in my view. Build a new wall with a wide cavity filled with EPS beads or mineral wool batts or reject a timber frame and get the vat back.
-
A good airtighess layer is the best bang for your buck, start there. After that PIR wins the cost Vs thinness competition.
-
Timber Frame Soleplate overhanging cavity
Iceverge replied to john0wingnut's topic in General Structural Issues
Were they selling the Majpell!? It is the best of stuff mind you. For what it's worth all our window boxes from our house are 18mm OSB (40m2) untreated and we had a test of 0.31 ACH 50. In my view even good quality 11mm OSB, the stuff with a nice smooth consistent finish is plenty airtight.