Iceverge
-
Posts
4462 -
Joined
-
Last visited
-
Days Won
32
Everything posted by Iceverge
-
Adhere the J bead to the window you mean? wouldn't that be very slow and messy?
-
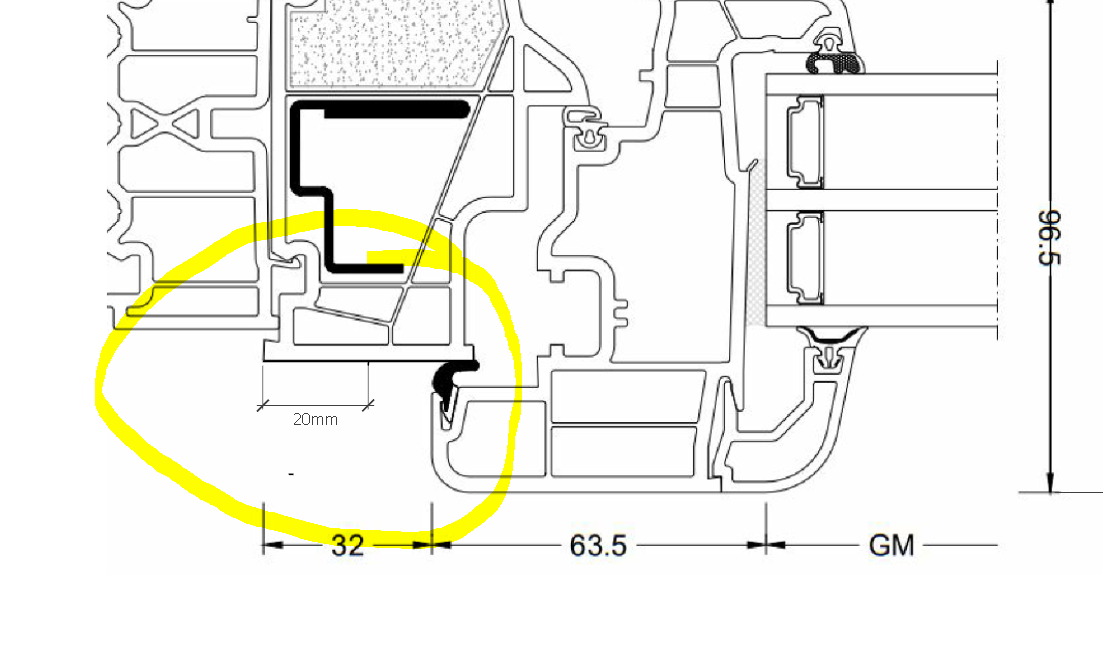
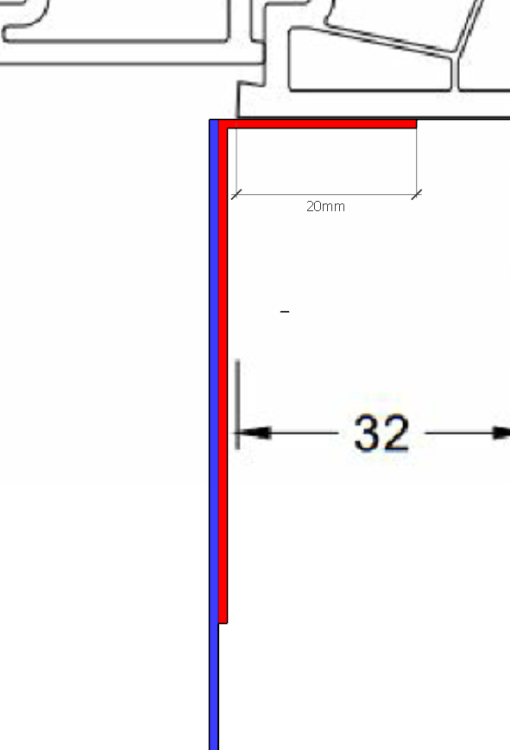
I was thinking that but using a scaled drawing I couldn't see the screwing into the frame going well if it was any wider. I guess there is the option still to use the 20mm setback to have slightly splayed reveals.
-
Just checked my policy, it says nothing about locked windows. just closed and fastened. @craig have you had a glance at my suggested detail for the jambs and head if the window? Any comments?
-
Didn't have these either, Maybe it's an Ireland vs UK thing.
-
 I'd you can get to the bearing then have a look at the number stamped on it. It's normally an off the shelf item. Most motor factors would have one in stock.
 -
Probably still too vapour impermeable and lightly caused an issue. Insufficient in Ireland, the air is just too humid to absorb enough moisture to do without constant mechanical ventilation. If you can I would install a dMEV fan in all the wet rooms. Unity CV2 GIP (greenwood.co.uk) These are quite good, low noise levels and if you keep an eye on ebay you can get one posted to Ireland for about €60. You'll need to core a hole in the wall which will require someone with the appropriate drill to be hired and a electrician to wire them up. It's impossible to say really without having a poke around, it could all have originated from outside. I'm making a best guess from the pictures. Not really, cement blocks are very porous. Just the cavity wall creates a very tough barrier for water to cross from outside. My advice remains the same. Mechanically ventilate and heat inside. Insulate outside. Add a rain screen with a cavity outside.
-
Maybe @craig has a better detail. Also his expert eye might be able to judge the installers effort better than me.
-
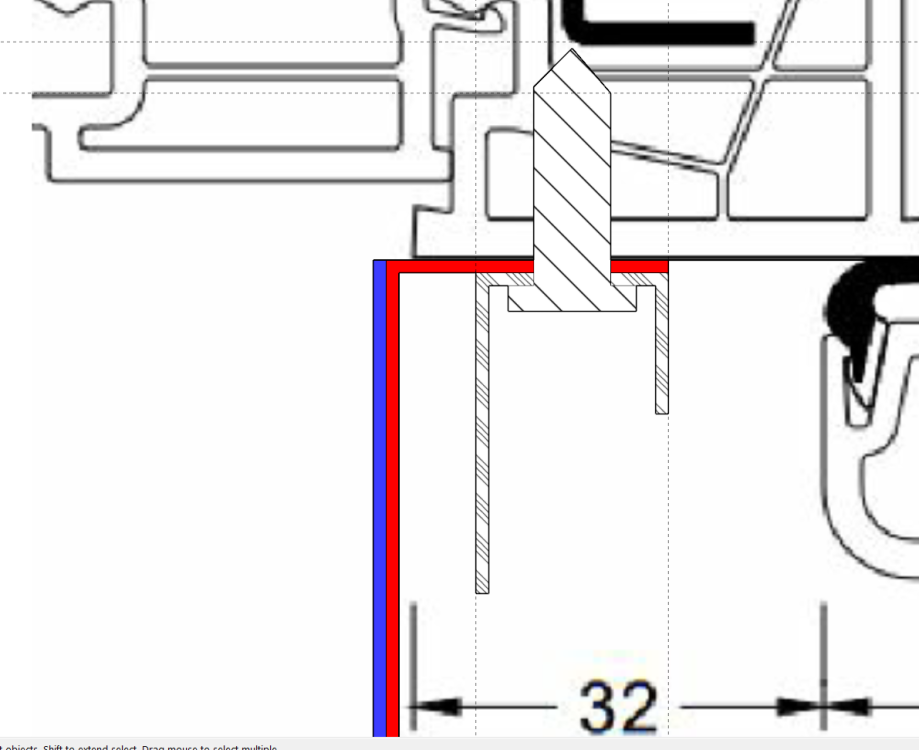
There may be an issue with the clearance being too tight on the sides of the windows with hinges and I'm unsure of your planned window board detail as it'd be very tight even with OSB window boxes when your frames only have 32mm clearance
-
Ok bear with me here's my suggested steps. Based on Larry O'Donougue's blog which has since disappeared. Step1. Draw an accurate line 20mm in from the edge of the window frame with a pencil. Tis will mark the edge of your tape and bead later. Below is a vertical cross section of your window. Step 2 Fit some Split back A/T tape to the line and the other side to an appropriate length of airtight membrane to reach into your inner leaf. Here's a zoom in of the corner. Step 3: Using SELF-DRILLING LOW PROFILE HEAD SCREWS 5.5MM X 19MM Screw a 12.5mm plasterboard metal end bead to the windows so that it lines up with the edge of the airtightness tape. The screw hole through the tape will seal ok. Your may need to predrill or at least centre punch the beads for accuracy. Step 4. Add mineral wool to fill the space behind the A/T membrane. Return the A/T membrane to the inner leaf and tape with fleece backed tape suitable for plastering over. The airtight membrane will sail over the straps, sealing them outside the A/T envelope. Step 5. Add plasterboard. Packing as required with dabs of adhesive to get it to the correct angle. Here's a zoomed out view.


-
What window profiles are you using? Inward or outward opening sashes?
-
Nothing unsalvageable. Any wider view of the windows, including an opening sash? Those straps won't be touching the outer leaf so I wouldn't fret too much about it. In any case point thermal bridges make minimal difference.
-
Have a look at the bearings. £5 could gona long way. Our extractor fan will need them replaced at some stage. Maybe another year.
-
Do you plan on keeping the garage as is or making it an inside room? What's the budget like, can you afford new windows for example?
-
MVHR, ASHP and DHW
Iceverge replied to Nic's topic in Mechanical Ventilation with Heat Recovery (MVHR)
Do you have any house plans to share perhaps and we could have a look. In general..... Keep everything separate if you can. It's cheaper, easier to commission, simpler to operate etc -
MVHR, ASHP and DHW
Iceverge replied to Nic's topic in Mechanical Ventilation with Heat Recovery (MVHR)
Almost impossible. You're have to import one from the continent and get a Poujoulat or Schneider flue to stand a chance of being airtight. Also you'll need to get someone other than the regular stove monkeys to install it. The push fit flue fittings won't stand a chance of being properly airtight. I abandoned it for this reason. There's lots of studies about stoves and their effect on outdoor air quality but nobody really cares. The ones about indoor air quality are much more conclusive. Basically they're completely fine and safe............... ......unless you need to open the door to refuel them. Then a chunk of very fine particles (PM1 and PM2.5) flood out into the room giving everyone cancer lung and heart disease. Here's a summary of a study by Sheffield Uni if your Mrs needs convincing. https://express.adobe.com/page/IXMsfspVKUP3e/ -
EWI is the ideal solution here as your house interior is lovely. Yes you would need to add a bellcast to the roof . The stone walls wouldn't mind in the least. They'd be happy to be warm!
-
COP of MVHR
Iceverge replied to Iceverge's topic in Mechanical Ventilation with Heat Recovery (MVHR)
I find that I can smell or taste the humidity levels in a room now that I've been paying attention to it for a few years. I walked into my parents kitchen earlier and instantly recognised it as North of 70% RH. It felt close and stuffy. I try to keep the MVHR dialled down as much as possible but in recent months I've felt that 36% fan speed isn't enough and dialled it up to 41%. I think it is a factor of less windows being opened due to winter. Mrs at home on maternity, more babies clothes being dried inside. More moisture being dragged in on boots and coats etc. A dMVHR would be the ideal solution. -
COP of MVHR
Iceverge replied to Iceverge's topic in Mechanical Ventilation with Heat Recovery (MVHR)
I think I did the sums when building our house. It's what definitively swung it to MVHR for me. Take a typical house, 4 occupants, 0.3ACH as per passivhaus and a volume 400m3. Average temperature annually were I live is about 10deg so a dT of 10deg indoor (20deg) to outdoor. First the MVHR house. 0.3ACH *400m3 = 0.033m3/second (33l/sec) X density of air @1.2kg/m3 = 0.04kg/sec X specific heat capacity of air ~1Kj/kg/K X dT of 10 = 400W of heat lost by ventilation losses. but we have MVHR so 400W * 85% heat recovery = only 60W of heat energy needs to be replaced plus the fans at say 40W so ventilation takes = 100W. Next the dMEV house. Each house occupant produces an average of 2.5l of vapour that needs to be removed so 10l/day in the house or 0.11g/sec. Air at 20 deg can carry about 18g/m3 of moisture while at 9deg it carries only 9g/m3. Taking a 1m3 block of air at 9 deg and heating it to 20deg means we could absorb 9g of moisture. That means that only about 13l/sec of air need to be heated and moved through the house to keep the humidity under control. With no heat recovery that's 157w plus the (smaller) fans of 13w = 170 W for the dMEV. From the above we can see that dMEV even at 1/3 the airflow of the MVHR uses 1.7 times the energy. If you used the MVHR a 24 hr period would use 100W * 24hr = 2.4kWh The dMEV would use the same energy in 14hrs so may well be better in a house that was only occupied 60% of the time. Most of us however don't run MVHR at the occupied demand rate 24/7. We run it slower and use the internal air volume to buffer air quality during times of occupation say 0.1 or 0.2 ACH. In reality MVHR always wins in this regard, as does dMVHR. Of course this disregards Filter cost Install cost Noise Building disruption Particle filtration Maintenance costs Comfort Cost savings by having a reduced heating system dMEV has a place for: Budget constrained buildings Retrofit Very intermittently occupied places (churches, village halls) High variations in fresh air demand. ( sports team dressing rooms etc) Unreliable maintenance practices ( filters!!!) Install skills and design knowledge for MVHR is absent. -
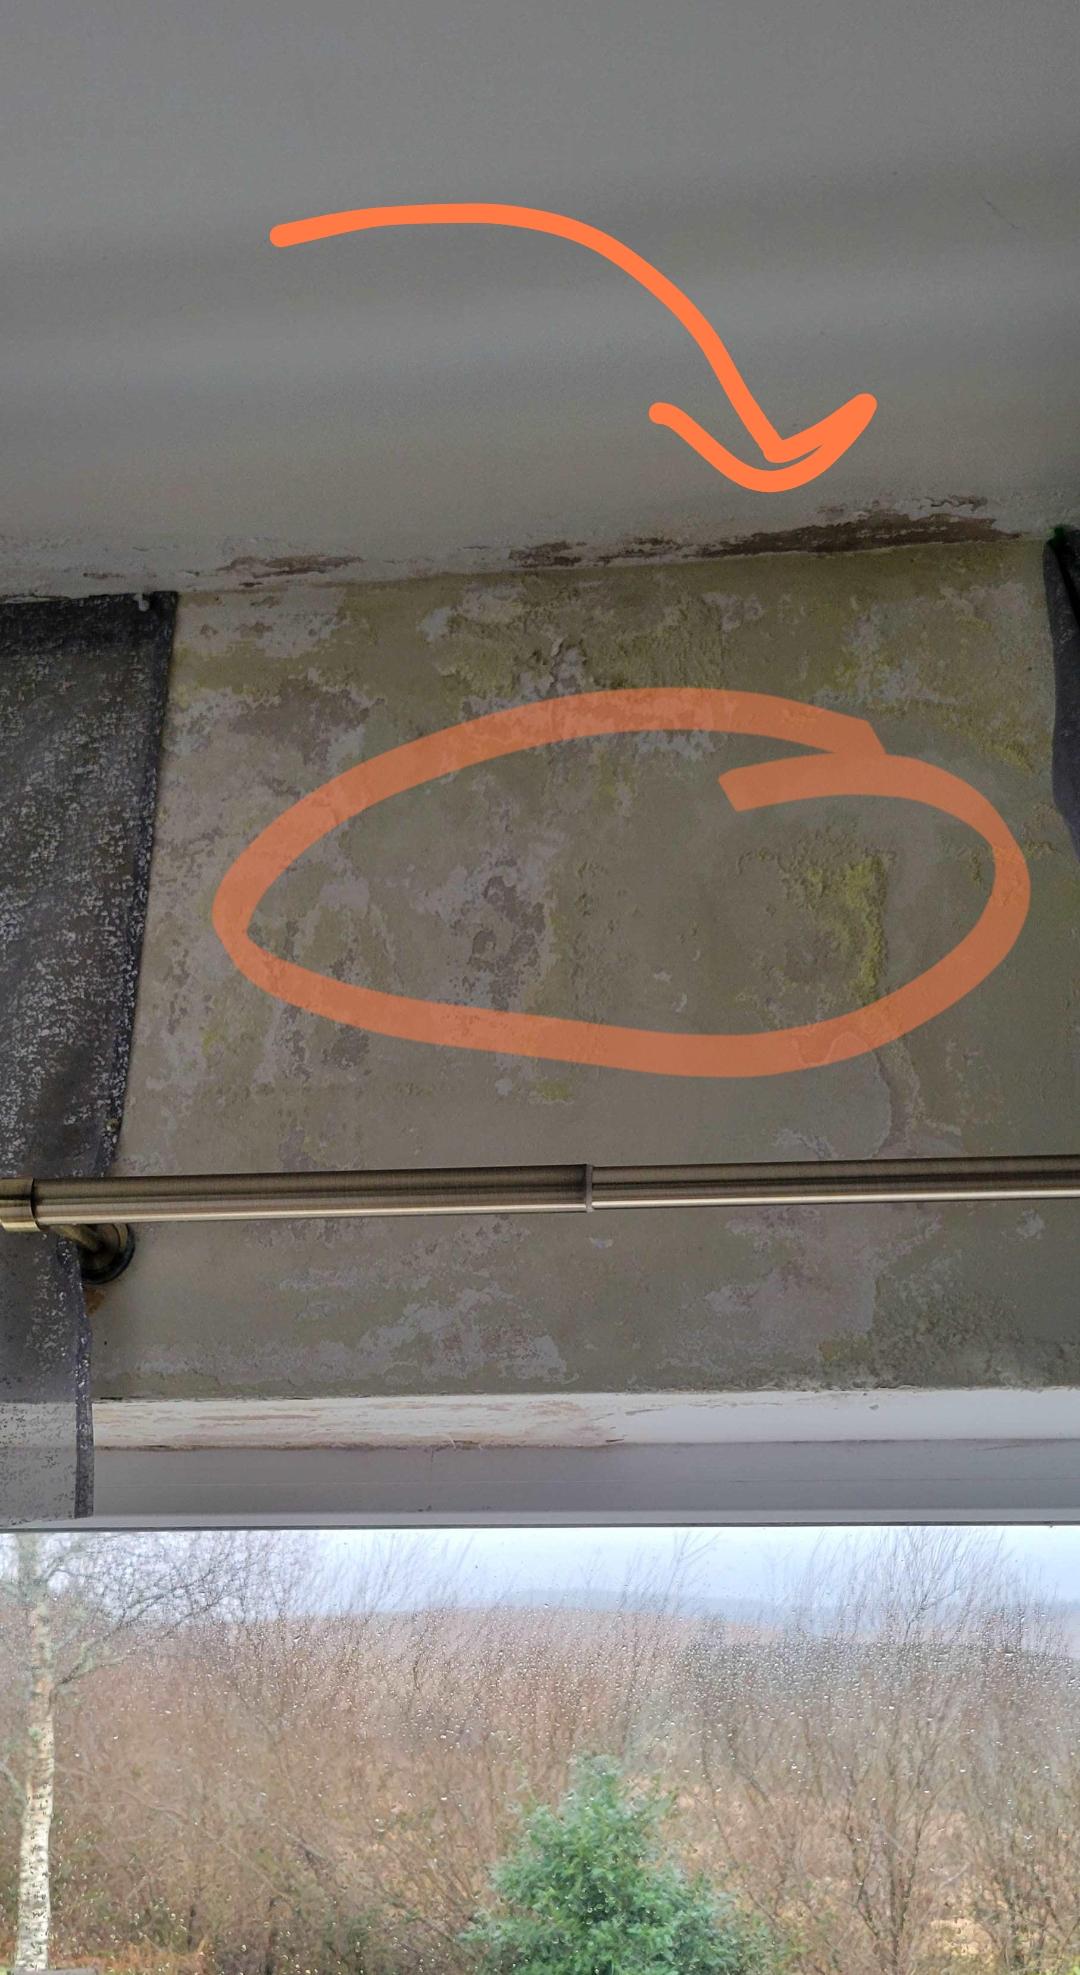
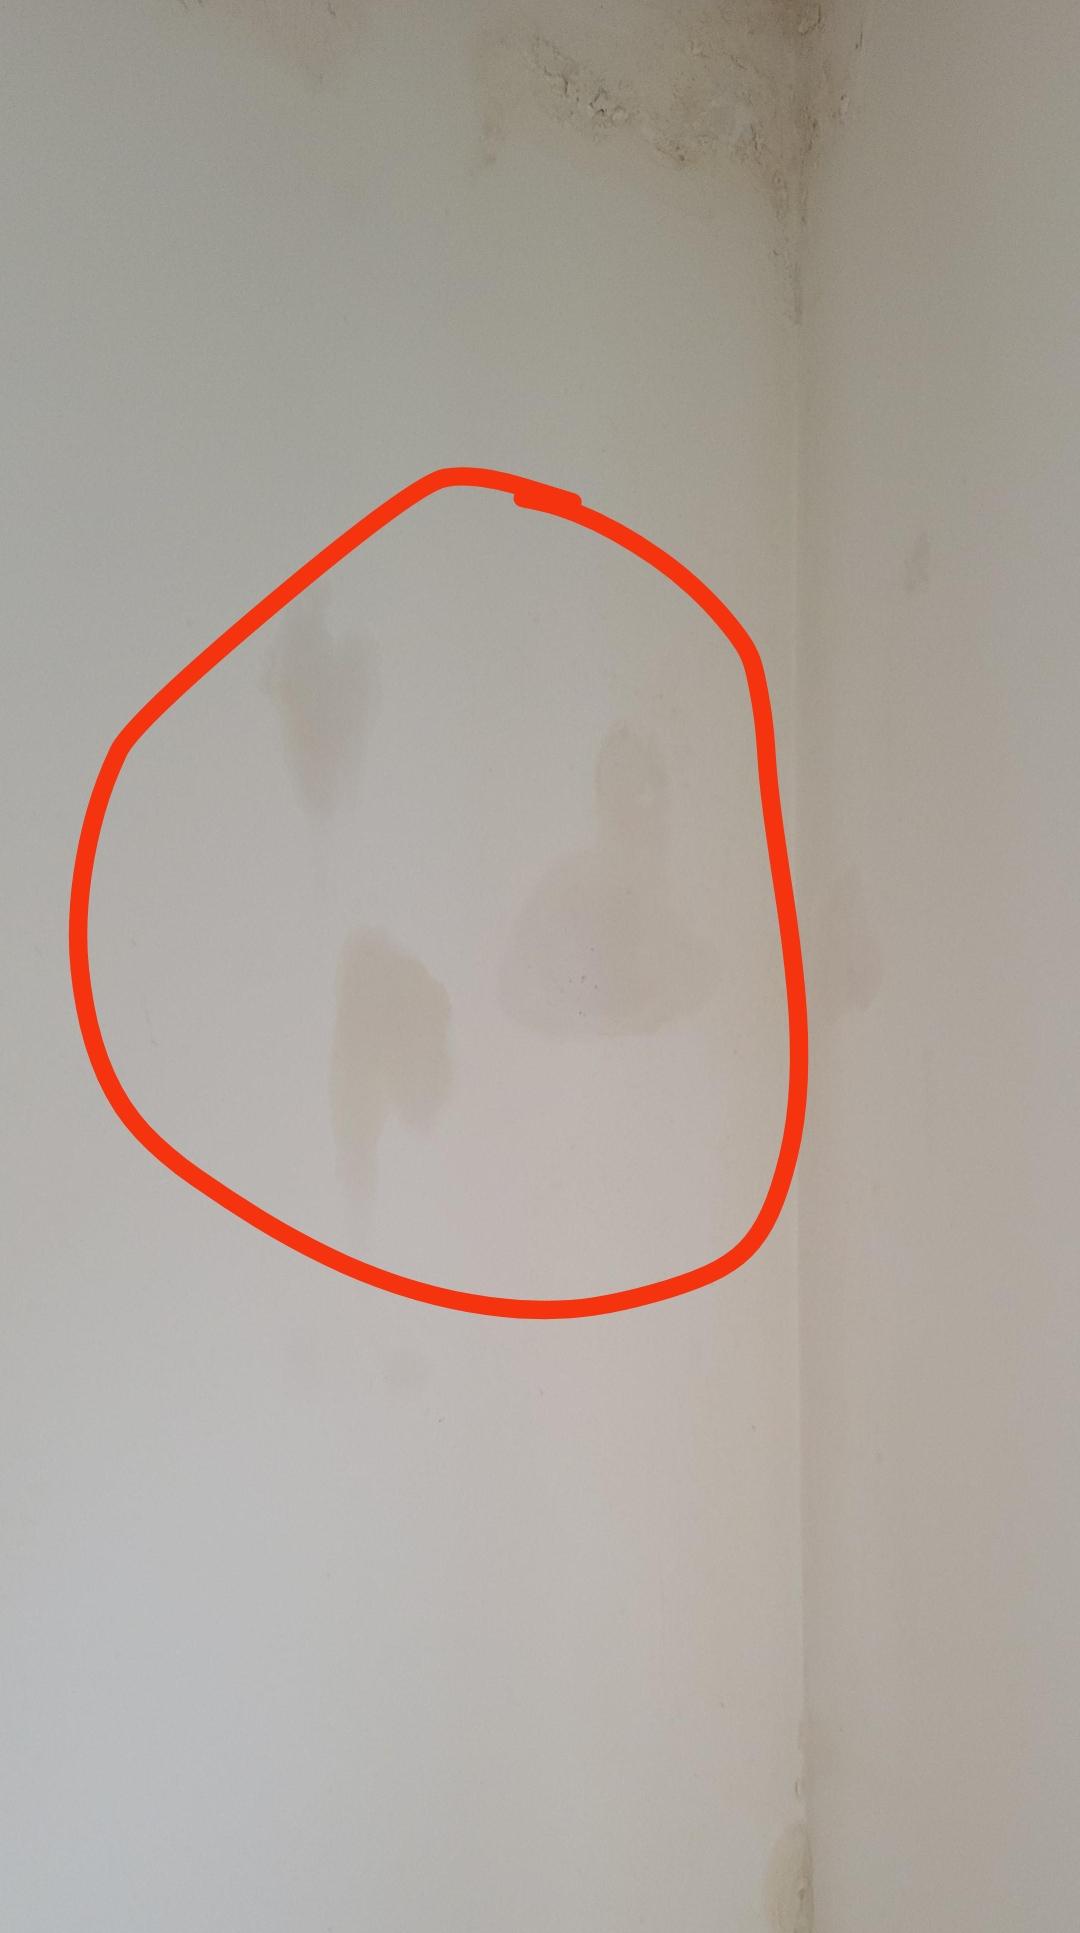
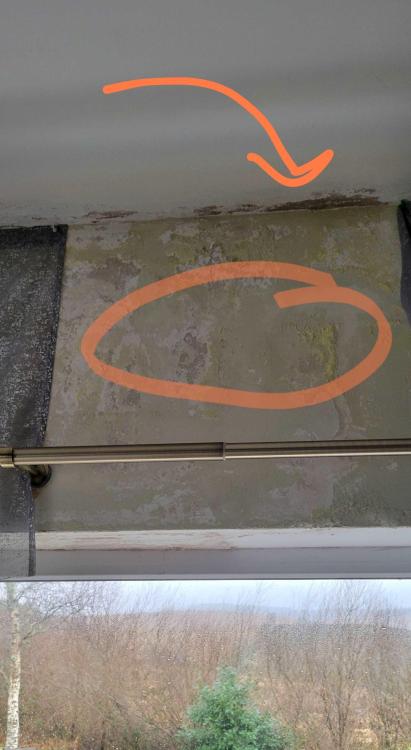
This is probably a cause and happily a part of the solution to your issue. Is there extractor fans fitted to your bathrooms? This might be an easyish fix. You'll need something that moves a gentle steam of fresh external air through the house all day. As an aside this quirk of unventilated houses is only a problem of the past 50 years in all of human existence. Olden houses were constantly ventilated and heated by a fireplace that burnt from morning to night. Almost everyone believes that moisture damage in a house comes from bulk water from the outside but in reality this is very little. It's understandable because a leak is easy to see with your eyes. I don't think it was a problem in your case. In reality most of the damage comes from internal moisture laden air condensing onto cold surfaces and then not being able to dry. Let's pick through those pics. They're really helpful. I think that a combination of high internal humidity (caused by low temps and low ventilation) combined with trapping of some construction moisture by material's of low permeability has created an issue that we see above Can you remember the paint you used internally? I suspect it was "plastic" emulsion that combined with the smooth surfaces of the gypsum plaster sealed the wall. Unfortunately this trapped moisture inside (from construction and air leaks) and it leached up the wall to the ceiling. Where it started making it's way across the plasterboard. The resulting bubbles are because of the water dissolving compounds in the wall and expanding. This is a little more concerning in my view. The very localised area of dampness suggest a higher chance of external water getting in. Can you take photos of the outside of this wall and show me please. Specifically at and above the area of leaks and to both sides. In any case the advice remains the same. You need to grasp this by the "physics" "Chemistry" from a tub or bottle won't fix the issue. DRY THE WALL by 1. Internally lower the humidity by (I) increasing temperature and (ii) increasing ventilation mechanically 2. Prevent condensation happening in the wall by keeping it warm by (I) internal heating (ii) external insulation 3. Stop any rain ingress by (I) adding an external rain screen. (ii) overhangs help too.

-
Blocks don't like being laid in the wet! Wait for a dry day.
-
COP of MVHR
Iceverge replied to Iceverge's topic in Mechanical Ventilation with Heat Recovery (MVHR)
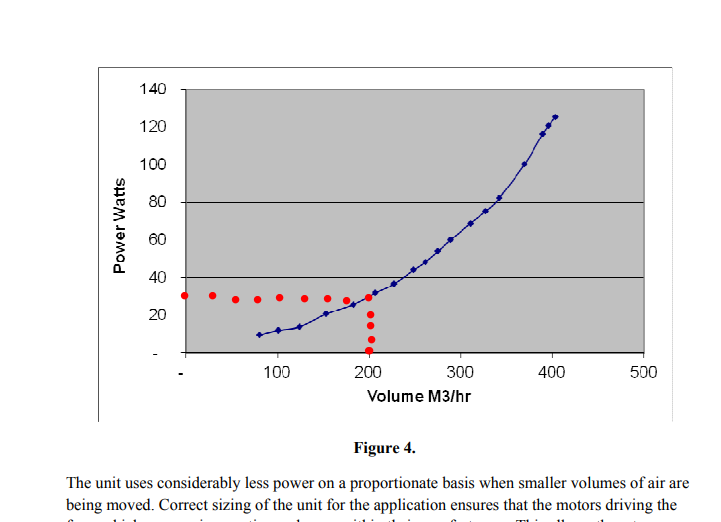
The energy trade off improves the colder it gets too. Unlike ASHPs or combustion devices. From a energy efficiency hierarchy it's £ much better spent in my view. -
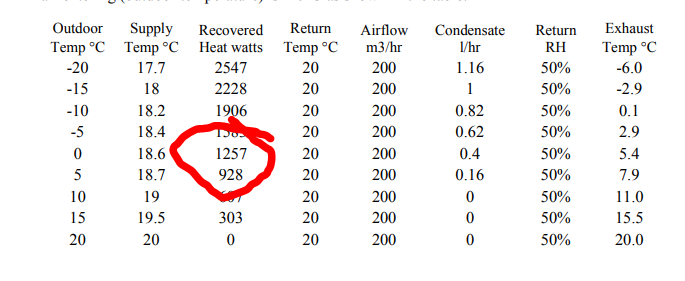
As we all know the efficiency of ASHPs is measured in COP or coefficient of performance. A good ASHP might have a COP of 4. For a little light pre bedtime reading last week I was perusing the manual of my MVHR. unit . I happened upon a table. Further reading led me to this. Note that at zero degrees, nostril freezing cold, the MVHR unit recovers 1257W of heat whilst only expending 30W of electrical energy. This corresponds to a COP of about 42. Yup FORTY TWO.
-
Timber Frame Soleplate overhanging cavity
Iceverge replied to john0wingnut's topic in General Structural Issues
If you're going DIYing this @john0wingnut there's a lot to be said for sticking to off the shelf materials. Stuff that you can pick up easily at a local builders merchant. Dimensional timber, OSB etc. You could do a double stud wall or similar. Here's your proposed build up.
-
Very nice. Might be best to post a de-identified version FWIW. Couple of questions. Are the Velux's for a vaulted ceiling or light in the attic? Will the attic be warm or cold? Do you have any preference on build methods? Would you consider swapping the bi-folds for french doors. Better for noise, much better for draughts, better thermally and cheaper too.
-
It'll certainly help. Out of interest do you have any pictures as to how you're installing your windows? If they're still not in you could apply airtighess tape. It'll save much time later.