Iceverge
-
Posts
4462 -
Joined
-
Last visited
-
Days Won
32
Everything posted by Iceverge
-
That'll be fine. Personally I would always prefer a ventilated gap above a drainage plane but what you've got will work.
-
Parapet. Flat roof! Can you design them out?! A cross section would be good of what's proposed.
-

Radical different heat loss and radiator output quotes
Iceverge replied to Matty D's topic in Air Source Heat Pumps (ASHP)
Waiting to take flak again for this. Is an A2W ASHP the correct choice for your farmhouse? Those room heat losses suggest that you have an older building that might be more suitable to intermittent heating. Espically if it's not occupied 24/7. Continuous maintenance of say 21deg will get very expensive unless you're in a super low energy building. Intermittent heating needs a high power heat source. Domestic heat pumps tend to top out at about 16kW while the smallest oil boilers begin at 20kW. You may simply not get enough power for economical operation with a heat pump vs FF. -
Concrete screws for cladding batons ?
Iceverge replied to Firsttimer's topic in Insulated Concrete Formwork (ICF)
@Chanmenie That sounds like a complete pain. I've been picking through my brain for ideas to save work. Cladding over thick external forum has been a debate on US forums for years. 1. You could build an independent metal or timber frame external to the ICF. 2. Maybe even a block wall. 3.Perhaps locate some kind of powder driven fixings that would penetrate all that EPS and concrete. 4. You could independently support the vertical battens at the top and/or at the base to take the vertical load reducing the need for so many fixings. Unfortunately the best answer I can think of is to install the vertical battens pre pour with long screws and let the concrete take care of the rest. -
Design for mull of Galloway. Thoughts?
Iceverge replied to DannyT's topic in New House & Self Build Design
Any specific reason for the Celecon? It does almost nothing for the U value, costs more and cracks easier. Lighter to lift though. -
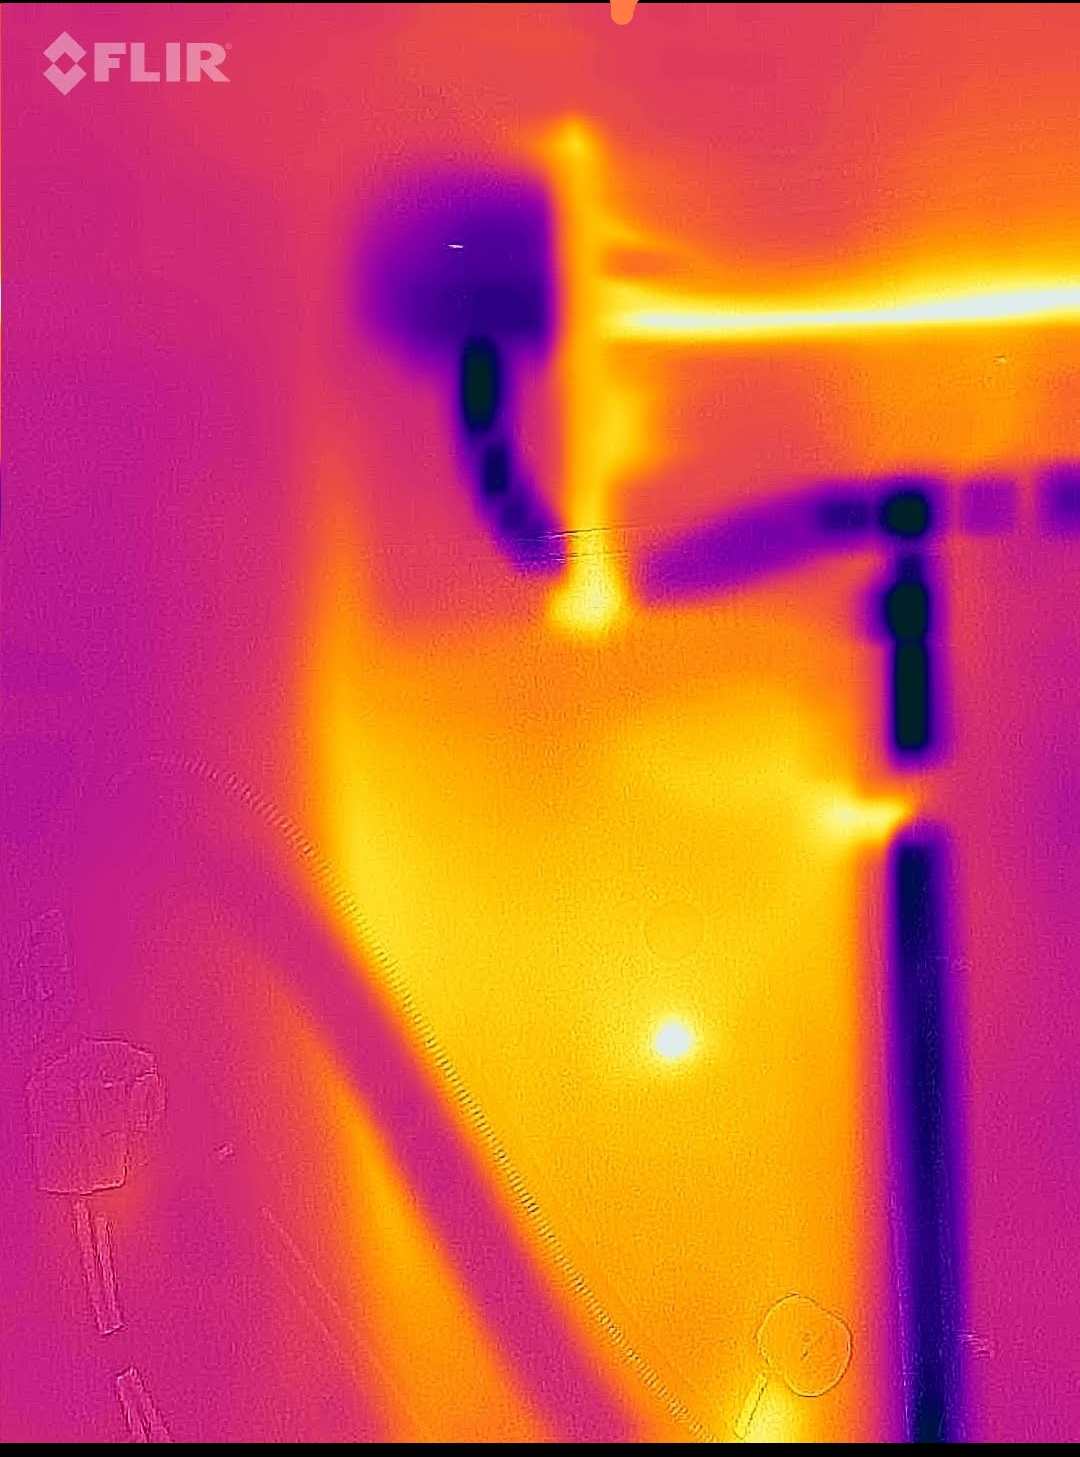
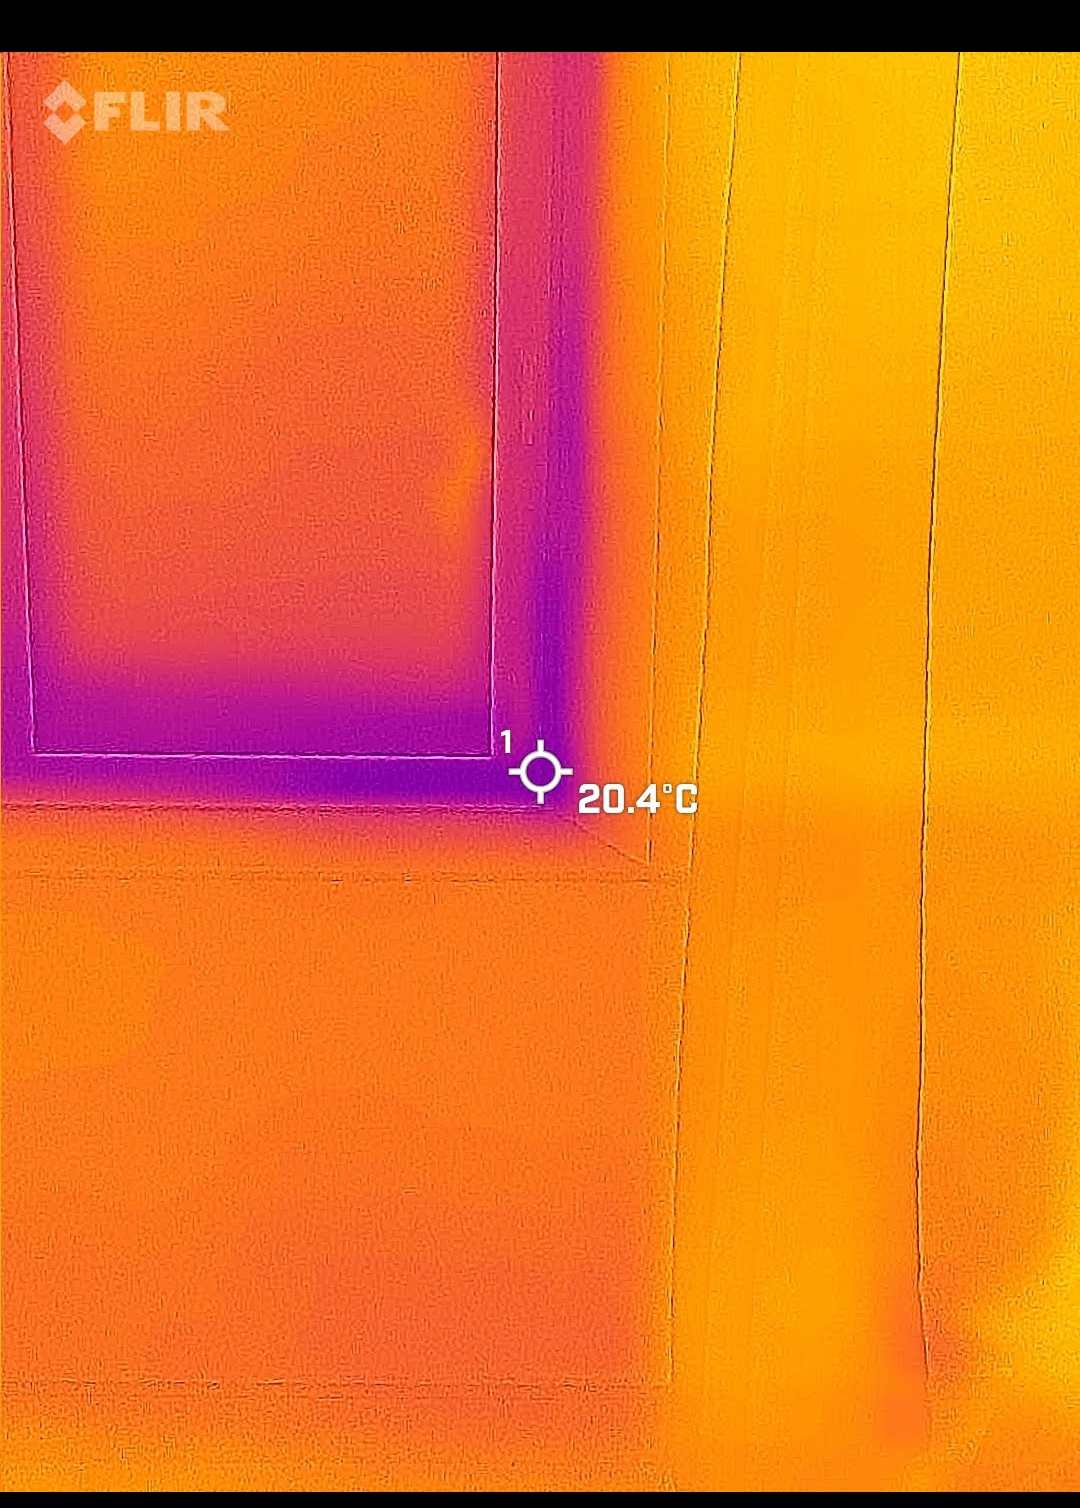
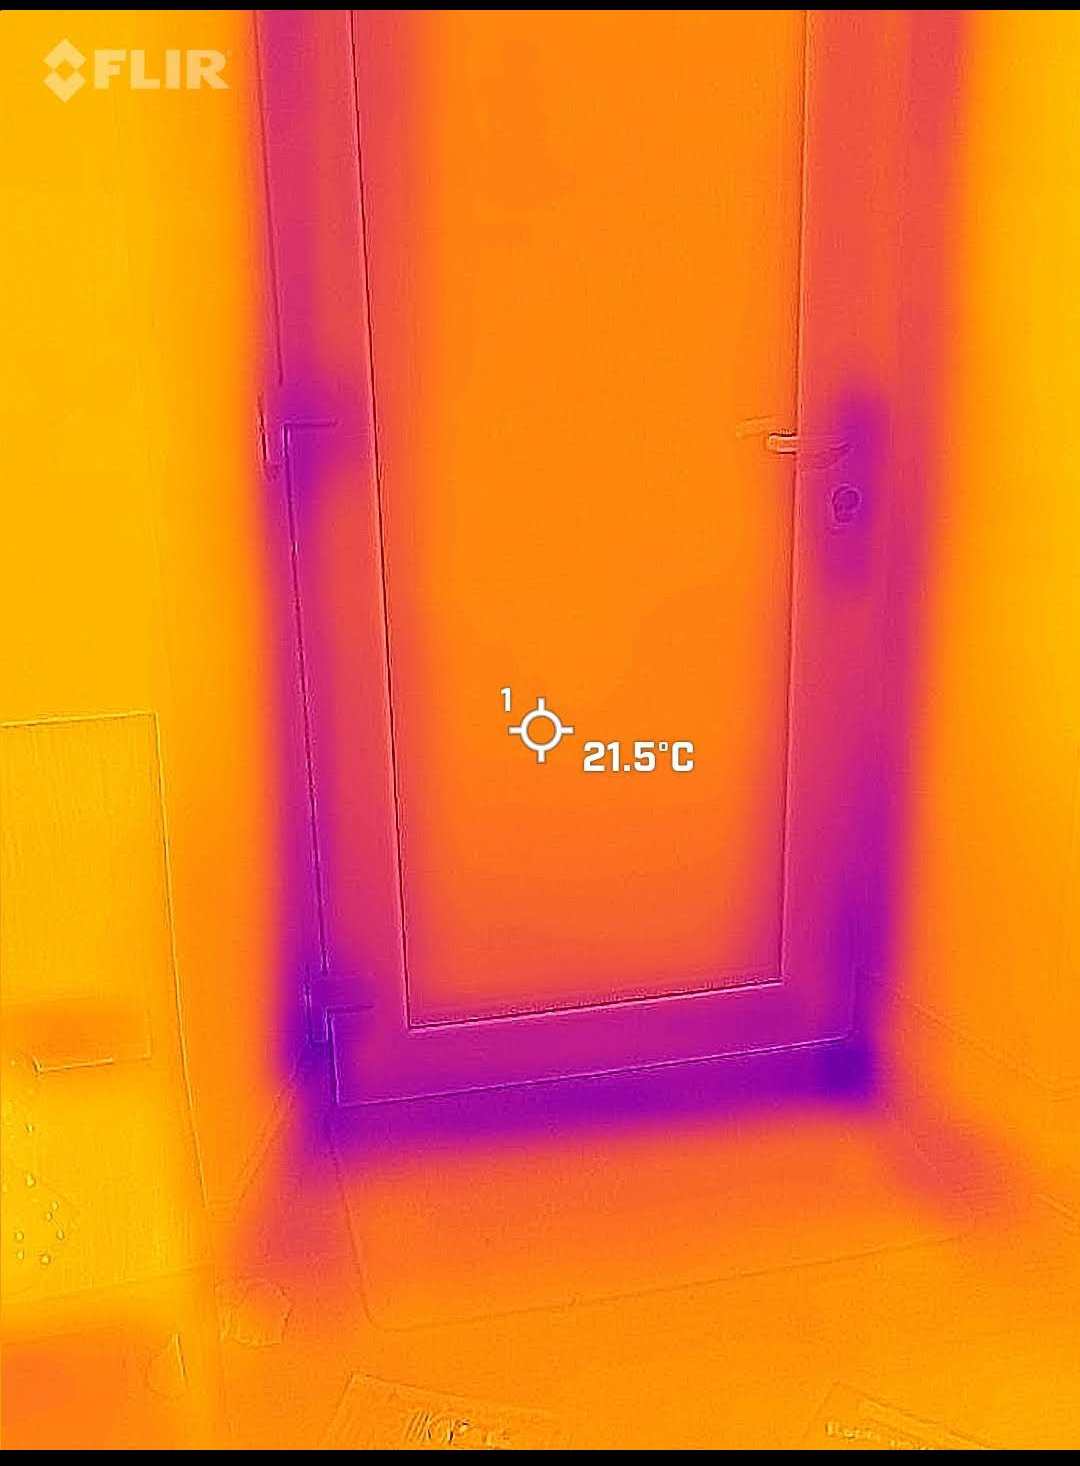
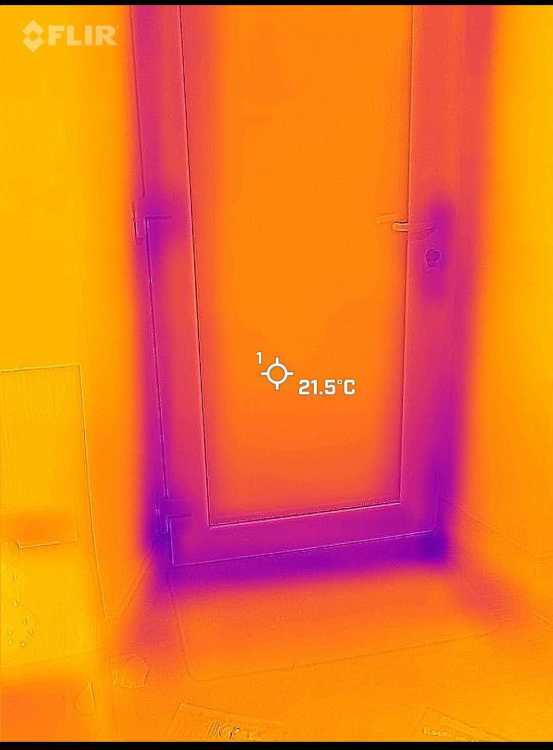
Bought the USB C Flir for android. The resolution isn't mega but its good enough for DIY. Think it was about £150. Here's a pic of the UVC with the hot tap running. You can see the hotspots of the pipe going to the bathroom and the blanking plug. The dark blue line on the right is the cold inlet with the expansion vessel top left. The diagonal line is the vacuum cleaner! One of our windows from the inside. Our front door from the inside. It does a hybrid photo if you have lightning so appears better than it is resolution wise. You can see the thermal bridging at the locks, hinges and thresholds.


-
I think I'm going to start a therapy group for confused DIYers regarding thermal comfort, energy usage and building health. Don't worry, I too was once afflicted. Symptoms include using the phrases "Thermal Mass" "Breathable/Breathability" "My old builder/architect said" "ASHP/Gas/Solar is always or never either excellent or terrible" "It's Eco isn't it!" Confusing and conflating Airtightness and breathability (whatever that is) and ventilation. Mixing up environmental pollution, climate change, embodied carbon, recyclability running costs and things that are green and indeed greenwashed. Don't worry, you are not alone.
-
What you could always do is if some trenches around the outside of the existing slab and make proper foundations there. Just use the slab as the internal floor. You'd know what you were dealing with then at least
-
It's fashionable. It's cheap to do on a new build. You don't have to juggle furniture with radiators. People love the feeling of a hot floor,however....... Hot floors are a sign of very inefficient UFH. An efficient UFH system with a huge chunk of insulation underneath will feel the same as a non heated floor with a huge chunk of insulation underneath. Not hot - Not cold. By all means stick some electric UFH just under the bathroom tiles for a little bit of luxury in the morning post shower. My 2p worth, install big pipes and rads and continue with the boiler. It'll run more efficiently at low flow temps anyway I think . Calling @JohnMo? When it dies swap for an ASHP. Get some insulation on the walls, anything is worth it. Parged brick, battened service cavity with mineral wool and then plasterboard my favourite method at the moment. Get your airtighess strategy nailed.. Install some kind of continuous mechanical ventilation. Even a few dDCV fans will make a world of difference to the health of the occupants and the building. Good luck and welcome to the forum.
-
Design for mull of Galloway. Thoughts?
Iceverge replied to DannyT's topic in New House & Self Build Design
Depending on the engineering of the wide cavity you could consider moving to Dritherm 37 at 225mm instead of 32 at 200m for the same U value. It'd be about £18/m² Vs £30/m². Might save a couple of grand, although I'm told the 37 batts are harder to fit than the 32 ones. Another option would be EPS beads. On a rendered wall with a wide cavity I think you could completely submerge the house and nothing would cross the cavity. -
Static caravan sewage?
Iceverge replied to Amateur bob's topic in General Self Build & DIY Discussion
No connect 2 recepticles together in an appropriate fashion and it will act as a septic tank. Have a look at that wikihow link. So long as you're careful with the amount of toilet roll you put down the loo and spare the detergents it will work safely for decades. (Good practice for any waste water treatment). If you're near a farm slurry pit the waste from a human or two would not be noticed if a pipe was to make its way in there. Not recommended legally I have heard of it happening. -
Static caravan sewage?
Iceverge replied to Amateur bob's topic in General Self Build & DIY Discussion
https://www.wikihow.com/Construct-a-Small-Septic-System -
Static caravan sewage?
Iceverge replied to Amateur bob's topic in General Self Build & DIY Discussion
Can you get the house septic tank completed ASAP and connect to that? Otherwise I know of a person who made their own "temporarily" septic tank. It lasted years with no issues. 3 x IBC for about €50 each joined together in the same fashion as a septic tank with lots of holes drilled in the third one as a "soakaway". All buried and connected in an afternoon. For a person or two in a static caravan I think the environmental risk on appropriate soil would be absolutely minimal. -
Design for mull of Galloway. Thoughts?
Iceverge replied to DannyT's topic in New House & Self Build Design
Why not? it's a nice square design and has a realistic chance of getting excellent airtighess and thermal bridging from your posts. It's always more tricky with smaller floor areas but you may be closer than you think. The parapet will be useful as a safety feature when you're mending the leaks it causes too. Pitched roof every time for me I'm afraid @ETC. I would consider corrugated metal. There was a very nice house near me in this style.
-
Design for mull of Galloway. Thoughts?
Iceverge replied to DannyT's topic in New House & Self Build Design
Ah ok. That could work. In any case it would be vastly superior to insulated plasterboard dot and dab. -
Some of them are bonded......
-
Design for mull of Galloway. Thoughts?
Iceverge replied to DannyT's topic in New House & Self Build Design
Very nice design. Be careful about those large Westerly facing windows though as you'll have lots of overheating on sunny evenings. I think a provision for external shades would be wise. I would consider getting rid of the roof lights in the western roof too. Building a slightly wider cavity and putting more insulation in there will be cheaper than the 25mm IWI. My preference would be wet plaster internally. Keep us posted. -
250mm Full fill eps beads.
-
Might there have been a chimney there at some stage that was taken down? If so it's possible it was providing some structural benefits. Whatever the case I wouldn't be overly worried about it if there's no sign of water ingress. However I would get up there with a few 2*4s, a bottle of glue, some clamps and a few screws to patch it up if it was in any way flimsy. If it is allowing in water however, allow maybe £5k to get that side of the roof sorted.
-
Cold unventilated loft - condensation risk?
Iceverge replied to G and J's topic in Roofing, Tiling & Slating
Lay the wall membrane first. Then use double sided tape.
-
Cold unventilated loft - condensation risk?
Iceverge replied to G and J's topic in Roofing, Tiling & Slating
I'm happy to stand my ground on having a sealed loft with no ventilation as per the tyvek detail. I had it out with the roofers on this one and they all were shaking their heads but that was 4 1/2 years ago and no issue so far. I was wondering @nod your thoughts though on plasterboard @400cc vs 600cc? -
Cold unventilated loft - condensation risk?
Iceverge replied to G and J's topic in Roofing, Tiling & Slating
I'm not an expert but I thought that was case. Maybe @nod or someone has chapter and verse I would double board them too. -
Without any more info If it's that age I wouldn't worry about it. Patch up the render. Cut along the cracks with a concrete disc and use some flexible sealant to fill. Sand and cement will probably only crack again quickly. It'd be worth resealing around the windows too while you were at it. Make sure the rainwater goods and all drains are in proper order and you're good to go.
-
How old is the house? Do you have any more wide angle pics? Any pics of the interior? Has it been Decorated/ cracked filled recently?
-
Cold unventilated loft - condensation risk?
Iceverge replied to G and J's topic in Roofing, Tiling & Slating
Don't do this. Who ever is installing the plasterboard will tear the membrane. Use 70*20mm strapping to make a service cavity below. It might enable you to push the trusses to 600cc too rather than the standard 400mm needed for 12.5mm plasterboard