Jeremy Harris
-
Posts
26430 -
Joined
-
Last visited
-
Days Won
360
Everything posted by Jeremy Harris
-
They look good, wish I'd known about them when I was cleaning up my own (rather rough) stonework.
-
Hydrochloric acid. Sold in 5 litre drums in Wickes, et al specially for the job as, unsurprisingly, brick and mortar cleaner! Just use it carefully! It's already diluted and don't add anything to it, in case it creates a reaction. It should do the job on its own with a bit of patience and scrubbing. It works because mortar (well, the cured cement in it) is soluble in most acids, and bricks, being fired clay, aren't. It will dissolve the mortar if you're heavy handed with it, and you do need a stiff brush, long sleeved rubber gloves, eye protection and ideally something like a rubber or plastic apron to stop the stuff making holes in your clothes. Easy to use, and should clean those bricks up better than most, because of their hard finish. You have to pick the sort of firm bristle brush carefully, I managed to melt an old washing up brush because the acid attacked the plastic bristles. It doesn't seem to attack the bristles on a stiff yard broom I have, the type that look "natural". It's easiest to spray on with a small spray bottle, and do a small area at a time until you get a feel for it. It can be quite hard work. Don't be tempted to use power tools. Years ago I tried a steel wire brush in a drill with the stuff, cleaning old render off a granite wall. It throws small drops of acid everywhere (seems obvious now, but didn't to me when I was in my 20's.................).
-

Extractor hood
Jeremy Harris replied to Pocster's topic in Mechanical Ventilation with Heat Recovery (MVHR)
It's always a bit of a challenge! The MVHR cannot recirculate cooking smells though, as it only ever delivers fresh air from outside to the rooms in the house with air feeds, so the cooking smells still go outside via the extract side of the system (fresh air in and extract air out are kept separate in MVHR). You can't easily plumb a hood in, because there's a risk that oils and fats will clog the ducts, filter and heat exchanger on the extract side of the MVHR, plus the hood extract rate will over-power the MVHR and cause it to run out of balance (more air being sucked out than is sucked in). The simple fix is to use a recirculating cooker hood, one with decent filtration, and allow the kitchen MVHR extract (which is the highest extract rate of all of them) to remove the remaining smells. if need be, you can add a boost button in the kitchen to increase the MVHR fan speeds on demand, as you might in a shower or bath room. -
I suspect Barney is referring to ecology in terms of surveys for newts, bats, badgers etc, rather than the Building Society of the same name! We also used the Ecology BS for a small mortgage and found them very nice to deal with - real human beings who consider each application on its merits, rather than script-following call centre types that we encountered with other lenders.
-
LED replacements for halogen work lights
Jeremy Harris replied to joe90's topic in General Construction Issues
Yes, should do the job just fine, and has the benefit of more adjustments than the one I used. I fitted my PIR in the bottom of a watertight plastic box, that was like this, with mounting lugs at the ends: http://www.ebay.co.uk/itm/24x12x7-5cm-IP65-Plastic-Electrical-Junction-Project-Box-White-Gray-/252639923825?hash=item3ad2834e71:g:Ep0AAOSwHMJYLXnO This one's from a Chinese supplier, but I'm sure I bought mine for a pound or two more from a UK seller. A 7Ah 12V sealed lead acid battery will just fit in one of these boxes, with a small bit of room either end. -
I think you're probably in in the majority. We did much the same and there were only two people who caused a problem. The first was an electrician I'd got in to do the external electrical installation. He arrived half way through the day (and we really needed him to turn up on time, as the DNO and supplier were scheduled in later that week to put in the supply) and when I took him a mug of tea in the afternoon, just after he'd finished wiring up the electrical box in the sewage treatment plant, I spotted an SWA gland brass collet sat on the ground. I picked it up, made a light joke about it being easy to forget to slip all the right bits on before putting the cable in the gland and he replied that the collets weren't really needed. I kept quiet, made an excuse to drive up the road to get a mobile signal and started ringing around to get another electrician in for a day or two's work, and put the DNO and supplier off for a couple of weeks. I then went back, sacked the electrician and said I'd pay him for his half day in cash, and got another chap in later that week. He went around with me and pointed out that all the SWA glands were loose, that the earth banjos had all been fitted incorrectly (and why he'd used them was a mystery, as I'd provided a bag of Piranha nuts and crimp eyelets) and that an earth link in one box had been made with an off cut of blue sleeved wire, with no earth sleeve or even a bit of green/yellow tape over it. All told, none of his work was acceptable, and some was downright dangerous. How he'd got a ticket I never know. The second was more serious. I'd hired in a couple of labourers, on a day rate, on the recommendation of another tradesmen I trusted. I started spotting empty half bottles of vodka in the skip, and wondered where they were coming from. One afternoon I saw one of the labourers come out of the portaloo, tucking a bottle back under his jacket. When challenged he admitted to having a "bit of a drink problem". He got sacked and sent off site immediately, but I did pay him till the end of that day. The other labourer said he knew the bloke had had a problem for years, and was currently banned from driving for something like 5 years. To their credit, the two trademen that had receommended the bloke were as surprised as I was to find he was pissed all the time, as it didn't show, and the bloke was a hard worker. My view was that I couldn't take the risk of having someone drunk on site, and had to be hard over about it. Other than that we got on really well with everyone else, in fact we're still in touch with a lot of the people that helped build our house, and view them as friends. They are all listed on my blog, with links to their own websites, as our way of trying to return the favour they did us by doing such a good job.
-
LED replacements for halogen work lights
Jeremy Harris replied to joe90's topic in General Construction Issues
Thanks, I'll take some photos of the outside lights as they are now later, and some this evening with them on that shows the spread of light from them. Even though they are only "10W" they seem plenty bright enough to light up the paths around the front and side of the house well. -
LED replacements for halogen work lights
Jeremy Harris replied to joe90's topic in General Construction Issues
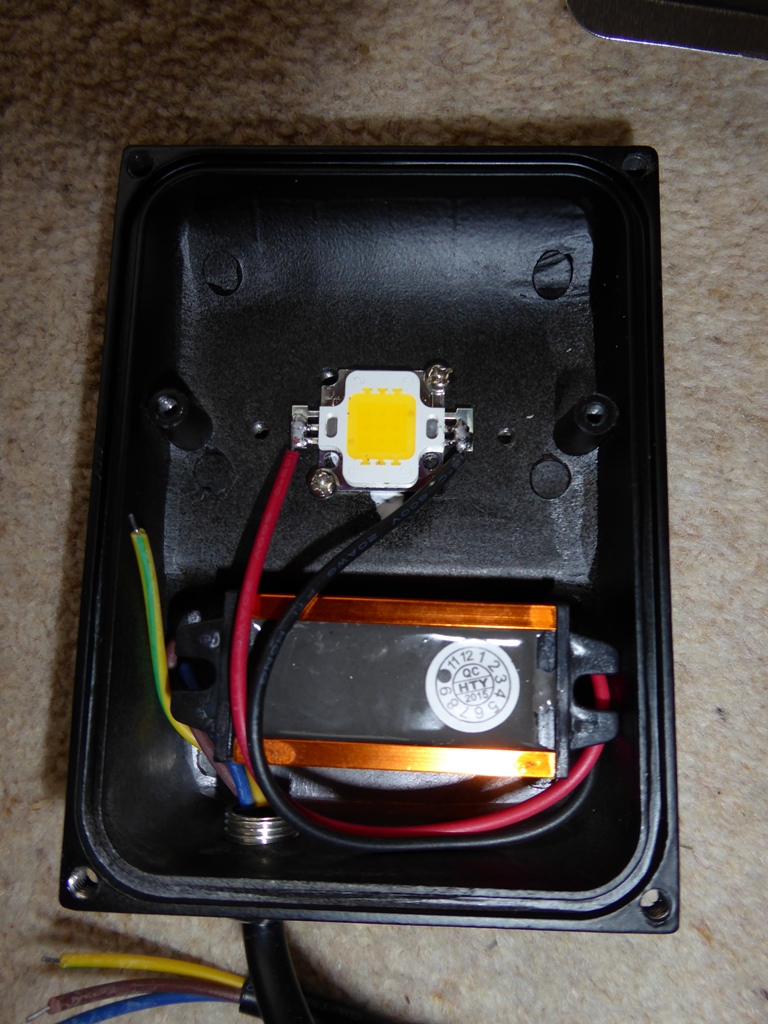
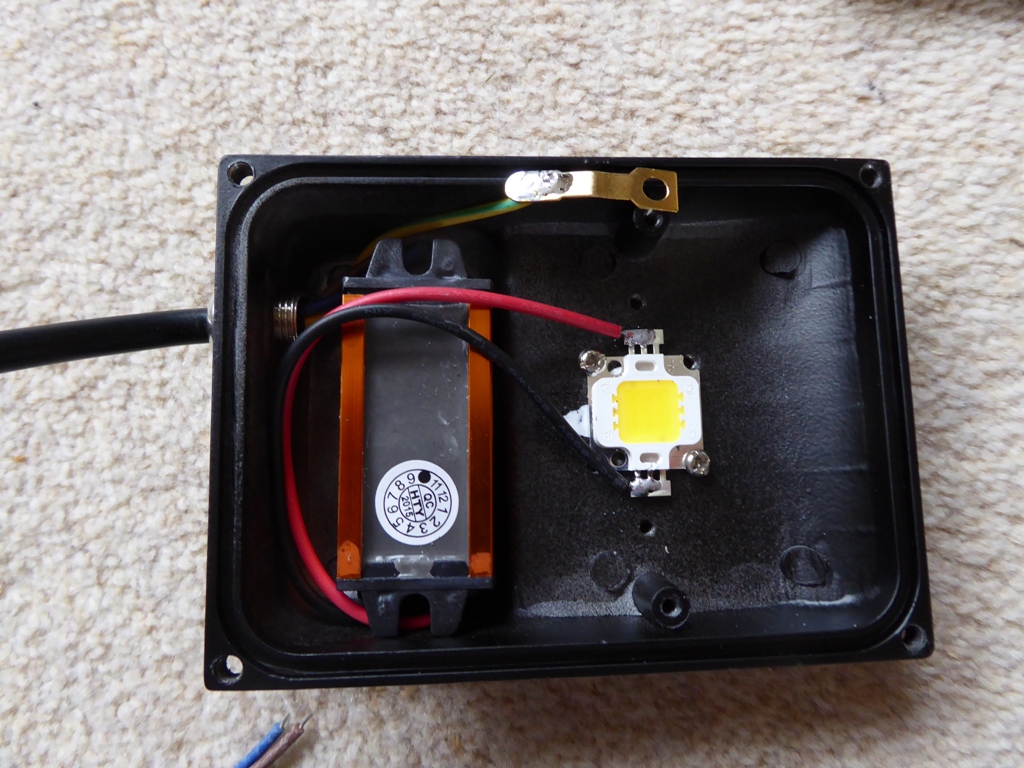
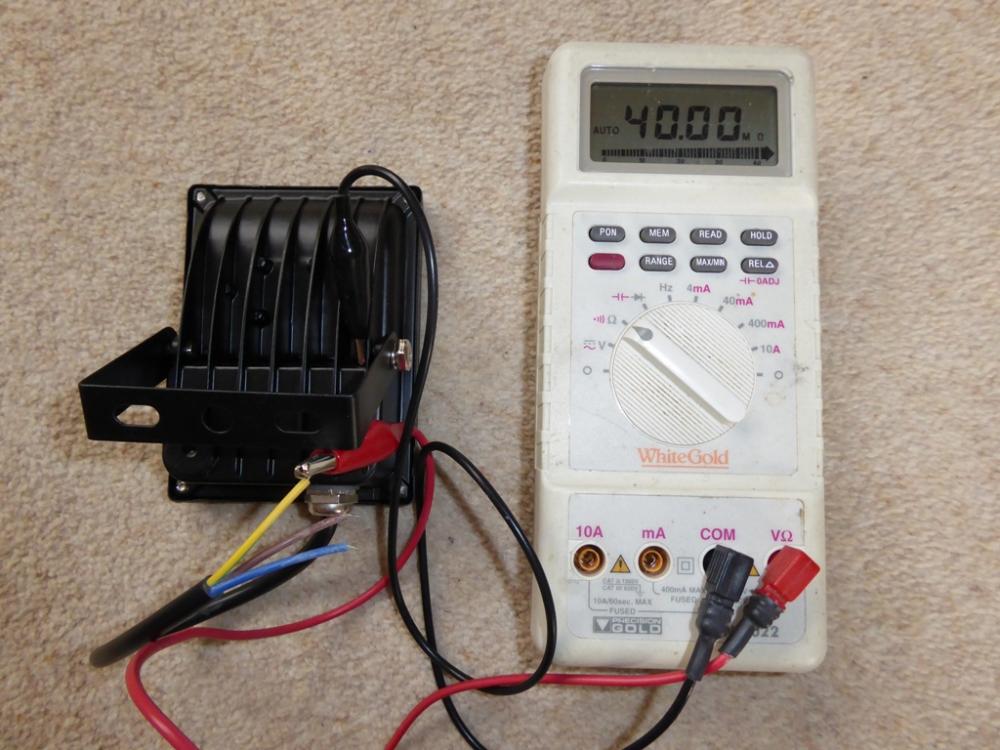
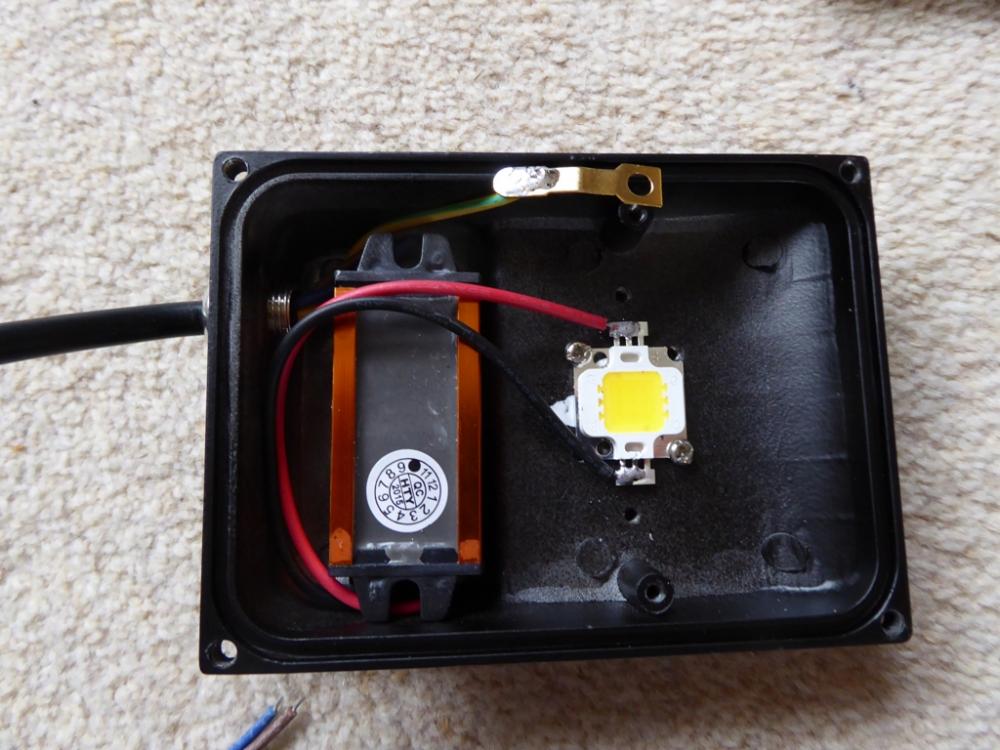
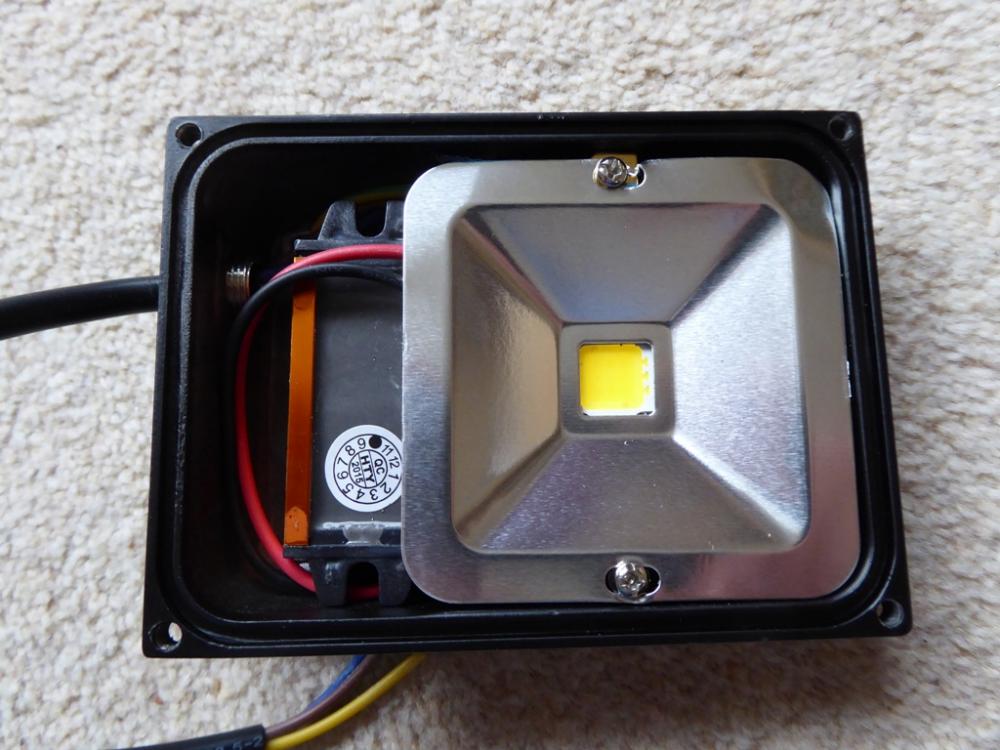
Sure, although I have two types now, the ones around the side of the house were the originals, put up quickly because there was no easy way of getting mains power to that wall (the problem being that I hadn't thought to run a cable up outside, and being a passive house it's not at all easy to run a new cable through an external wall). The ones around the side are two 10W 12V COB LED floodlights, like these: http://www.ebay.co.uk/itm/10W-LED-Flood-Lamp-Outdoor-Security-Light-IP65-Landscape-Floodlight-Lamp-G4-Corn-/360944005882?var=&hash=item5409f072fa:m:m5cZS9BBL3vdujKSXrmVZRw They aren't as powerful as their rating suggests, mine are closer to 7W than 10W, but they are plenty bright enough. I wired both of these lights back to a waterproof plastic box, screwed to the wall. At the bottom of the box I fitted a 12V PIR switch, with a night sensor (lots of the ones on Ebay don't have a light sensor and won't switch a couple of amps DC, so you need to hunt around for one). I made a bracket to go inside the box to take a 12V, 7Ah sealed lead acid alarm battery (they are about the cheapest around, because they are so commonly used as alarm back-up batteries). The charging is from a small 18V 2.5W solar panel (one of these: http://www.ebay.co.uk/itm/HOT-5-6-18V-0-2-1-5-2-5W-Solar-Panel-Module-System-Solar-Cells-Charger-Energy-/291545049148?var=&hash=item43e170683c:m:mp3hyNZPOYxpyvy3pfLAzGg ) fitted on a slightly angled bracket on top of the battery box. To control the charge to the battery and get the most out of the small solar panel. I used a switched mode MPPT charge regulator, one of these: http://www.ebay.co.uk/itm/New-5A-MPPT-Solar-Panel-Controller-Voltage-Step-down-Module-Constant-Current-/291991743947?hash=item43fc106dcb:g:KdQAAOSwnHZYbaqO, set to give a float voltage of 13.2V, for a long battery life. The panel only charges the battery at a maximum of around 100mA or so, but that is ample, even in winter, to keep the battery fully charged, as the timer on the PIR switch only keeps the flood lights on for around 5 minutes, and it's rare for them to come on more than two or three times in the evening. Doing the sums, the worst case energy used by the lights if they used their rated 10W each and were on for 20 minutes every evening, would be around 6.7 Wh, and the panel charges at around 0.5 to 1.5 W in winter daylight, so the batteries are charged by just about enough on a winters day to allow for the worst case. In practice, there are many evenings when the lights only come on once or twice, or maybe not at all, so the battery always has plenty of spare capacity. The battery theoretical capacity is 84 Wh, so discharging it with 20 minutes worth of lighting is only using around 8% of its capacity. This means there's enough reserve capacity for the system to go for a few dull days without the battery being discharged significantly. At the front of the house I've opted for a more discreet solar power lighting system. We have a glazed gable, with the glazed front door in the centre. The lower glazing is connected to the upper glazing with a joining cill, that has an alloy drip lip. The groove behind this was exactly the right width to take a 1.8m length of high power waterproof 12V LED strip. Instead of the bulky sealed lead acid battery, I used a very small 1,8Ah 12V lithium battery pack, with an inbuilt charging and battery protection circuit. This charging circuit needed to be fed with a constant 12.6V, so I made a small voltage regulator, set to 12.6V, and connected it via a diode to the same solar panel as I used around the side. I also used the same type of PIR switch. This is a lot more compact, and the LED strip throws light exactly where it's needed, and complies with our "Dark Skies" rules on outdoor lighting (the AONB we are in is seeking official "Dark Skies" certification, so all households are being told to shield outdoor lights and put them on PIRs or timers - we have no street lighting either). I'll try and take some photos later showing how the lights look when fitted. When I warned about the 240V versions of these floodlights being very dodgy, here are some photos I took when I stripped one down that show the earth problem (or, rather, the lack of an earth!) These were sold in the UK and are branded GLW, and I note that a safety recall was put out about this very problem. The 12V ones are fine, they are safe as the voltage is too low to be a risk. This is how they arrived from the UK seller - obviously Chinese made! This was my quick and dirty earth test, as I was suspicious about the earthing and like to check Chinese stuff, as I've seen far too much rubbish from there. As you can see, the earth wire is not connected to the case, which is scarily dangerous. When opened up, the reason for the open circuit in the earth was obvious, the idiot manufacturer had made no attempt to connect the earth wire - it was just floating loose inside the case! My solution was to solder on an earth tag that could then fit under a screw (I cleaned the paint off before doing this). This is the partly re-assembled flood light with the earth tag secured to the case. I checked and got good continuity between the case and the earth lead, so the light is now reasonably safe. This is the only 240V one of these lights I have used, it sits above my car charge point, pointing down and operated via a PIR switch, so that I can see to connect the car up at night.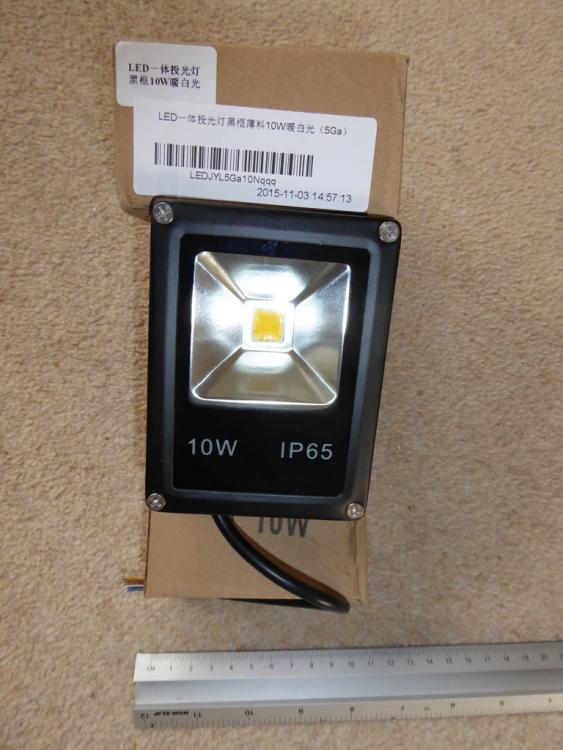

-
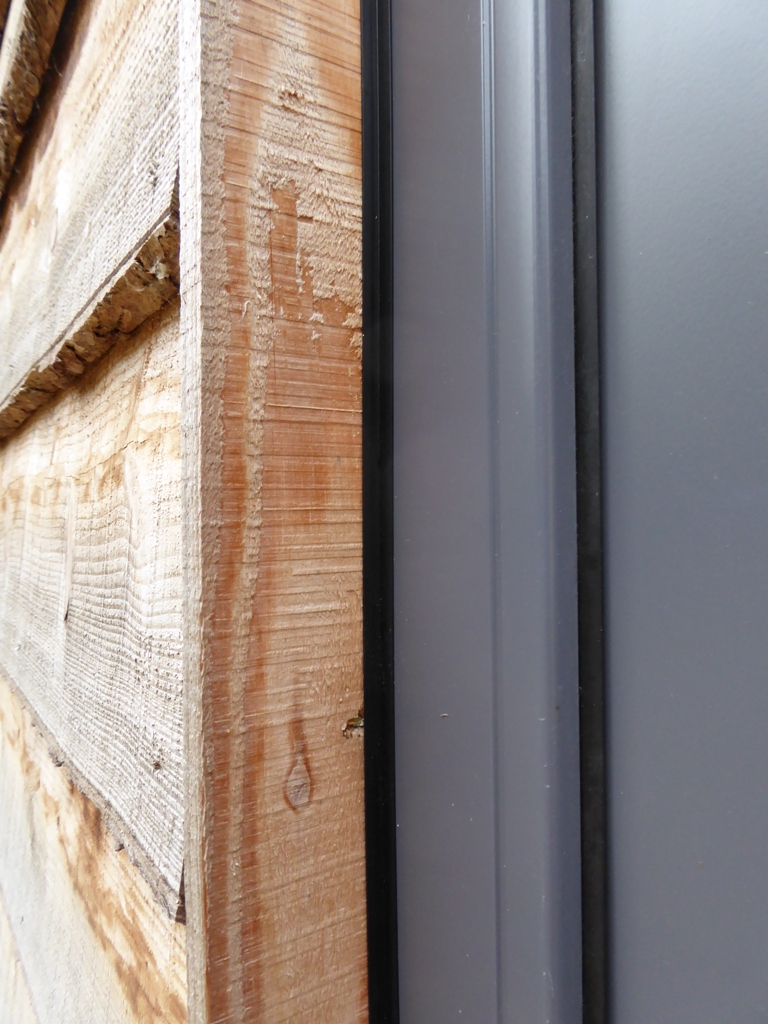
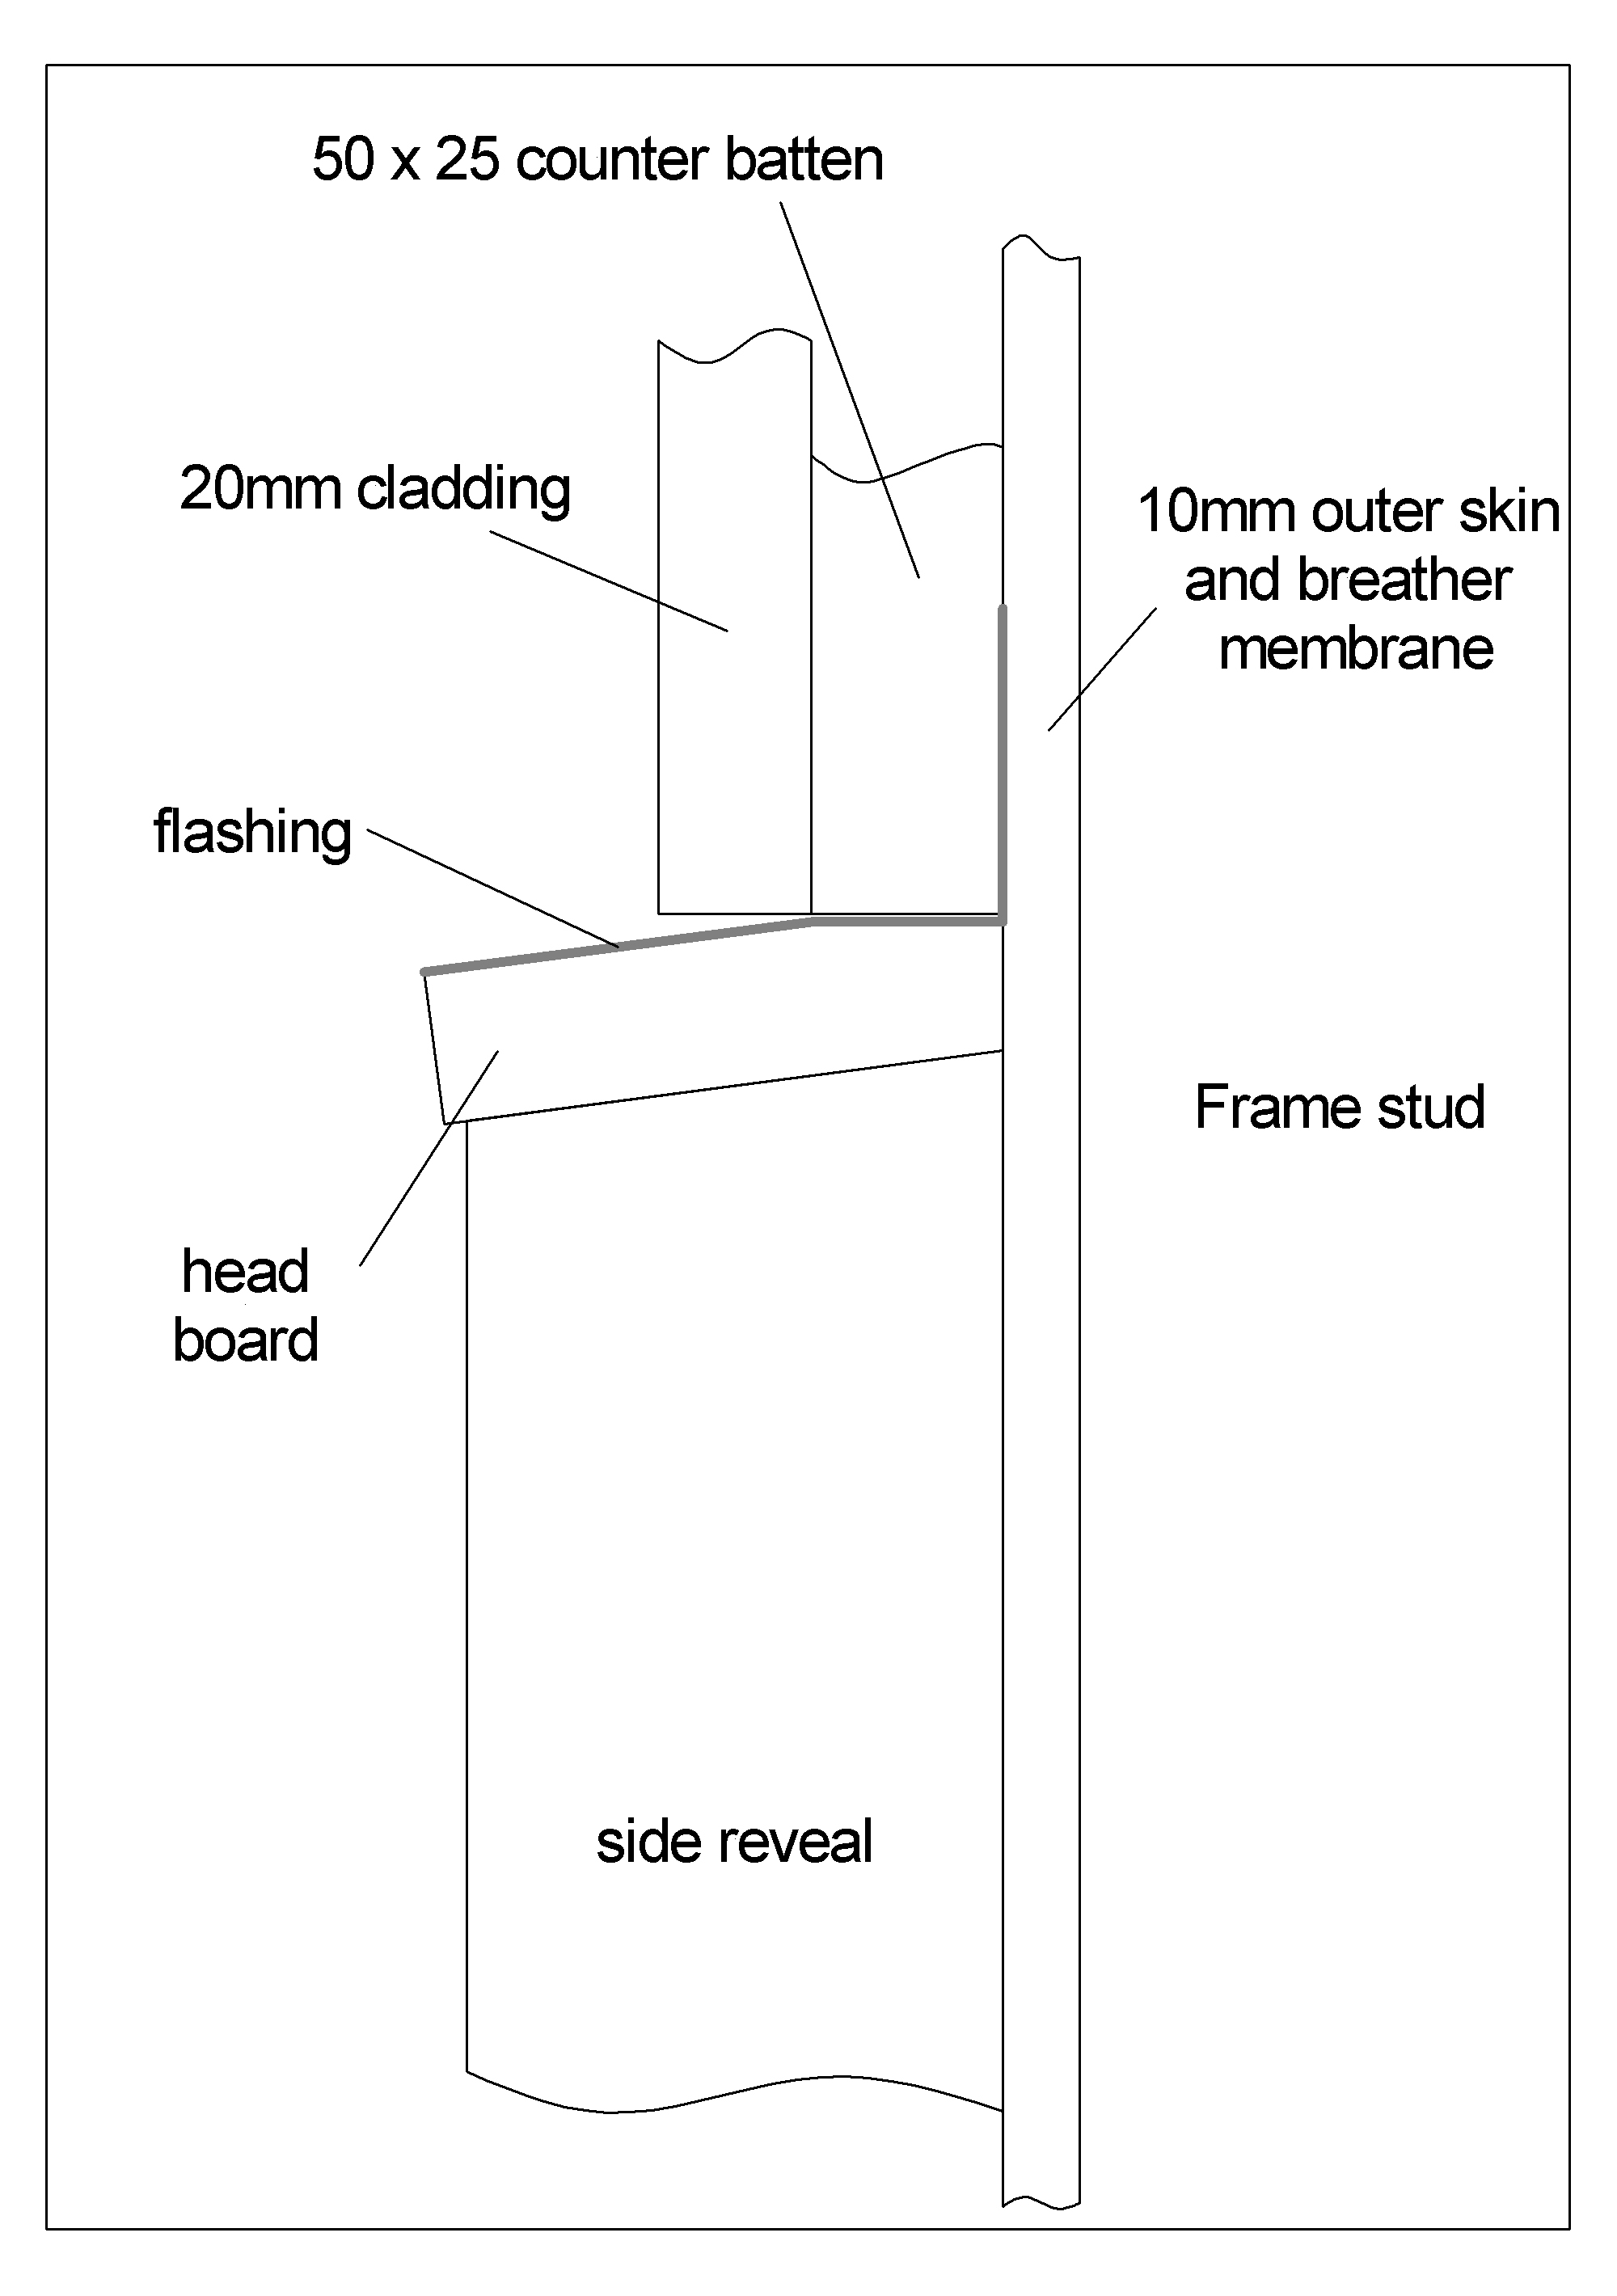
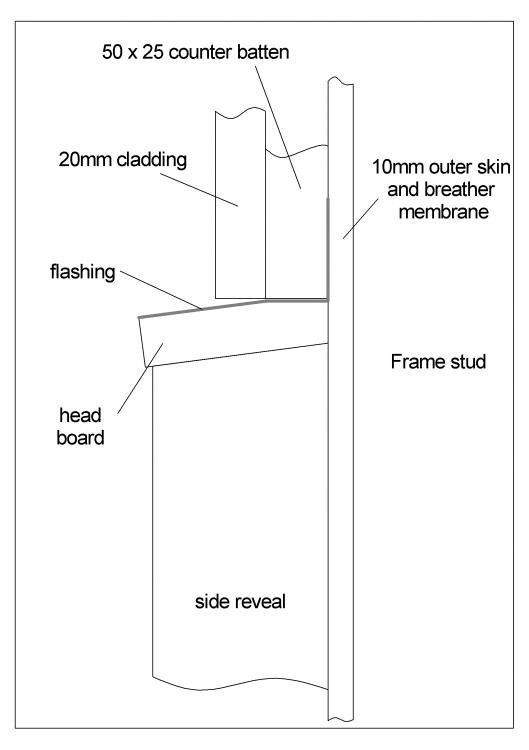
We found that getting a neat finish where the boards around the reveal abut the window wasn't that easy. In our case we have windows with integral cills, so the lower part of the reveals at the sides was easier to cut than those shown above, but I didn't like the idea of just a bead of sealant to fill the corner. I found a supplier of small section black PVC angle, 6mm x 6mm x 1mm, and bonded this with clear neutral cure, high modulus, silicone into these corners. It was a bit fiddly, but I'm glad I did it as it looks neater than a bead of sealant, I think. This is a section of the way we finished the head of each opening:

-
That's a posher version of mine! I didn't have the hose connection, but relied on a hand-pumped pressure spray. I also only used two stiff broom heads.
-
I've directly compared the cheap multi-buy fittings from Screwfix with a couple of very expensive Pegler fittings, and frankly it's very hard to see any difference. I probably still have some are fittings around, and could take samples of the brass from each and ask a formed colleague to analyse them, but in general the finish of the fittings, neatness of threads etc is a pretty good indication of the quality. I don't think I've ever had a problem with the cheap big bags of fittings from places like Screwfix or Wickes, certainly none that I can recall.
-
I tried a few things, as our subsoil is a very sticky clay that was tough to remove from boots,and the best I found was a mix of a small pressure spray filled with water, plus two stiff broom heads nailed to a heavy board, with the business end pointing upwards. Put this right outside the door and the combination of a squirt of water plus rubbing the boots on the bristles works well. Inside I used those super-absorbent floor mats, the ones that are rubber-backed and soak up a load of muck and can then be stuffed in the washing machine. That kept most of the muck out, until we had the hard landscaping done and so had clean paths to get in and out of the house. Getting people to remove their boots every time they come in doesn't work well, I found, as some people are in and out all day long.
-
What information do Building Control actually need?
Jeremy Harris replied to Triassic's topic in Building Regulations
They quoted our slab U value as 0.1W/m².K, but when I calculated it out properly it was lower than that by a bit, around 0.09W/m².K IIRC. The same system gives differing U values depending on the shape and area of the floor, because of the perimeter impact, and also there's some variation from any structural internal walls, as the insulation depth under these is usually only 200mm, rather than 300mm. -
Thanks Ferdinand - that plot shows EXACTLY where we got caught out - buying at the peak around 1988 and having to sell at near the bottom of the dip in 1993! We couldn't possibly have timed things worse, although we had no way of knowing what was going to happen a few years after we bought the house.
-
To be honest, the future selling price will be a complete lottery, anyway. We have had periodic "boom and bust" cycles with house prices over the last few decades, and you could very easily lose 20 to 30% of the price in a "bust" cycle, whether it was a self-build or any other house purchase. For example, we lived down in Cornwall for around 16 years and bought our second house (a move up from the terraced cottage that was our first home) in 1988. We paid around £78k for it, IIRC, and I then bought the adjacent joiners workshop, some land and a row of three garages for an additional £15k about 6 months afterwards, renting them out to cover the increase in the mortgage. At that point we felt lucky. We'd made a handsome profit on selling our first house (but I had spent two years renovating and rewiring it), and had got about a 60% mortgage on the new house (which also needed renovation, it was a cottage built in around 1768). Then, with virtually no warning, in 1992 my job disappeared, as the research establishment I was working at was closed down. Like many who'd joined the old Scientific Civil Service, I wasn't offered redundancy, but told to move to run another research establishment, in Scotland. Back then, my employment contract was very like being in the services, my employer had the right to move me anywhere in the world, as long as they gave me 6 weeks notice and paid my removal and legal costs. So, I moved into a rented cottage in Portpatrick, Dumfries and Galloway, whilst we tried to sell the house in Cornwall that we'd paid a total of £93k for. We were told by my employer that we couldn't sell just the house and keep the workshop and garages, as if we did they wouldn't pay any of our legal fees or removal costs. My wife stayed behind for the year it took to sell the old house, and it eventually sold for £56k, so we lost £37k on what we'd paid for it. We bought a new house in Scotland for £55k, and ended up with around a 90% mortgage! I believe the same thing happened again a few years ago, with house prices plummeting and people losing loads of money if they had to sell at that time. So, I don't think you can ever bank on a house going up in value, or a self-build even breaking even when completed, as it just takes another crash to wipe out any gain you might make.
-
That was our fear, but then we weren't too fussed as long as we could afford it and we got the house we wanted, as we don't intend to sell it.
-
Our target was £1200/m²......................
-
FWIW, we had some prices for an insulated passive slab foundation from three suppliers, and they all came out about the same at around £11k for an 85m² external ground floor area (so including the wing insulation), excluding the UFH pipes that were included in our frame and foundation price. So, the foundation element of our build was about 25% of the total frame and foundation cost, allowing for things like the UFH pipes etc, which means we paid a bit more than you for the frame, insulation, sarking, membranes etc, at about £315/m², with the insulated slab foundations and UFH pipes accounting for around £105/m². I know our frame cost was a bit higher because we have a room in roof design, with a big laminated ridge beam and the rafters hung from that, and that all had to be cut and built on-site. I've been told that the frame would have been around £40/m² less if we'd had a standard trussed roof.
-
The breakdown for us was around £420/m² for the foundations, frame construction and erection, insulation, airtightness etc. Glazing and external doors (all triple glazed, passive house stuff) added another £65/m², roofing, gutters, fascias downpipes etc (excluding in-roof PV panels - add around another 30% to this if not fitting in-roof PV) £70/m², external cladding (our house has a larch outer skin) about £30/m². I've left the detached garage costs out of this. The total to first fix, excluding the ground works that just levelled the site and put in cable ducts/drain pipes etc, came to about £585/m², round this to about £600/m² to allow for inflation and add a bit because a large part of our roof is covered by in-roof solar panels, and if we'd not had those there would have been another £2000 or so of roofing cost, so say around £615 to £620/m² to first fix and you'll be in the right ball park. Your block outer skin may cost a bit more than our larch cladding, but to offset that, our frame has 300mm of insulation in the walls and 400mm in the roof (and there's 300mm of insulation under the floor slab), so our U values are a lot better than you're aiming at (we're 0.1W/m².K roof and floor, 0.12 W/m².K walls, with glazing that's around 0.7 W/m².K). Our completed build cost came out at about £1340/m², more than I'd wanted, but we did end up going for more expensive stuff internally than I thought we would.
-
LED replacements for halogen work lights
Jeremy Harris replied to joe90's topic in General Construction Issues
I've just dug out one of my old halogen work lights, and it looks to be dead easy to just unbolt the light part from the frame and fit something like the units that ST has linked to. Probably as cheap as mucking about looking for lamps to fit in place of the halogen ones, if you already have work lights. The two points I'd make are that cool white may well be better than warm white, in my view, and that I'd strongly suggest whipping the front cover off and making sure the earth lead is connected. Testing it with a meter is not a good indication that it's actually screwed down to the alloy casing internally, in my view, as it could easily be just loose and happen to be touching the case, so appear to be relatively safer than it really is. I've had around 4 or 5 of these apart now (the slightly smaller 20W ones, that are essentially the same design), and two had earth leads that weren't properly secured, two were half the rating they claimed to be and were using a 300mA driver rather than the 600mA driver needed for the higher power COB LED, but generally the standard of construction was pretty good, at least as good as any work light bought from the likes of ToolStation. Screwfix or wherever. I've had two 12V, 20W ones on the wall of our new house for well over a year now, running from a home made battery pack, solar panel charger and PIR switch, and the only issue with them has been the screws going rusty. I replaced all the screws with stainless ones and I can't see any reason why they shouldn't last for many years now, as the rest of the construction is pretty good (glass front, decent silicone rubber front seal, cast alloy casing, decent waterproof cable gland and a decent constant current driver module to drive the COB LED. The cables are too short, but it's easy enough to under the gland and front plate and fit a decent, robust, longer bit of cable. Generally I prefer the light from these COB LEDs (Chip On Board). In this case an array of matched LED chips on a ceramic board, bonded to an alloy mounting plate, that takes the heat away from the chips well when it's bolted down to the alloy case of the light. They seem to give an even spread of light, with no ho spots, pretty much ideal for a work light. -
LED replacements for halogen work lights
Jeremy Harris replied to joe90's topic in General Construction Issues
They look a reasonable option, but I personally prefer cool white if you can find them. Somehow my eyes prefer cool white light when working, although the warm white is often a lot nicer for general house lighting. I think it's certainly a good idea to look at using LEDs, and I'm looking at using some of the spare outdoor LED floodlights I've bought as work lights, over my bench, as they don't flicker the way fluorescents do. I currently have old incandescent lights over the machine tool bench that's still at the old house, because the last thing you want is mains frequency flicker when you're running a lathe or milling machine. Edited to add: These are the type of flood lights I've bought in the past (from several different suppliers, all equally variable in quality!): http://www.ebay.co.uk/itm/10W-20W-30W-50W-12V-220V-Day-Cool-White-LED-Floodlight-Outdoor-Landscape-Lamp-/121807463401?var=&hash=item1c5c4a63e9:m:mlklmqD3MPNl1obZKlm5Mow but please look them up on Big Clives YouTube channel and then do a safety check internally as he shows, as some don't have the earth wire terminated properly inside. They are easy to make safe usually, the issue is usually just sloppy assembly in my experience, where whoever screws the things together couldn't be bothered to fit the earth wire terminal - one of mine had the earth wire and eyelet just dangling around inside the case! -
What information do Building Control actually need?
Jeremy Harris replied to Triassic's topic in Building Regulations
I had the same experience when a place I ran was being UKAS accredited as a Notified Body, under the EMC and LV Directives. Keep all the paperwork to the bare minimum needed to show compliance, else you make a rod for your own back in keeping it updated, plus, as you say, it give the assessors fewer opportunities to find fault........... -
What information do Building Control actually need?
Jeremy Harris replied to Triassic's topic in Building Regulations
Our BCO was happy to accept the Kore report on the foundation system as being OK, they didn't ask for any further info at all. There is a version of that available direct from Kore, now, I believe (or at least I've been told there is). They'd never seen a passive slab system, either, and when the inspector paid his first visit he was pretty curious about the whole thing, but generally very impressed with the standard of work being done, and I think that went a long way to making him feel comfortable that the company knew what they were doing (and I think that probably counts as much as the paperwork submitted, or at least that was the feeling I got). -
What information do Building Control actually need?
Jeremy Harris replied to Triassic's topic in Building Regulations
Glad it was of help. I wasn't asked for any structural calcs at all, but that's because MBC sign off the whole structure using their SE, and in our case that included a large laminated ridge beam plus a smaller laminated beam for the gable (which also uses ridge-hung rafters and no purlins or ties). I think your best bet may be to call the senior building control officer and ask. I did this after I'd submitted our application and found our chap was extremely helpful and pragmatic. -
What information do Building Control actually need?
Jeremy Harris replied to Triassic's topic in Building Regulations
Hope I got it right, then, and your building control people are as helpful as ours were! Our initial inspector was a delight to work with, really interested in the way the house was built and keen to learn about low energy construction methods.