

Jeremy Harris
-
Posts
26430 -
Joined
-
Last visited
-
Days Won
360
Everything posted by Jeremy Harris
-

self build.....where to start.....
Jeremy Harris replied to Amateur bob's topic in Introduce Yourself
As already mentioned here lots of times, if you do a lot of work yourself then £1000/m² may be possible. If you just employ a builder, then with the best will in the world you won't get close to this cost. The big saving with self-build is doing as much work yourself as possible. -
Anyone know how how to compare insulation values?
Jeremy Harris replied to gwebstech's topic in Heat Insulation
You can use the U value for the thickness to compare different insulation types, or the lambda value. For example, the lambda for rockwool/glasswool is typically around 0.035 W/m.K, the lambda for PIR foam is typically around 0.022 W/m.K, so for the same U value (insulation effectiveness, in effect) then the thickness of rockwool needed would be ~1.6 x the thickness of PIR. In other words, 160mm of rockwool would be about the same as 100mm of PIR foam like Celotex. -
Fine mesh works fine, but the unravelled curly scourers were just the right thickness to fill the 25mm gap and just be sandwiched behind the cladding at the top and bottom. Being stainless means they should last practically forever, too.
-
The snag with ordinary wire wool is that it corrodes very quickly. Stainless pan scourers would probably work OK. We used loads of industrial/catering stainless pan scourers as insect screening behind our cladding.
-
No, not usually. All they own is the run from the road to the meter or stopcock. In our case we don't have gas or mains water, and have the electricity meter out in a box in the fence outside, as it's more convenient for the meter reader, it was a handy location for our temporary site supply during the build and it's also a handy location to run the fairly hefty cable to the car charge point.
-
The regs stipulate that meter tails cannot exceed 3m, but there's an easy (and sensible) way around that. Just run the tails to a fused DP isolator switch (like these: https://www.tlc-direct.co.uk/Main_Index/Distribution_and_Switchgear_Index/Switchfuse_SP_and_N/index.html ) and then run a length of 25mm² 3 core SWA from the switch into the house. Our run of SWA is around 15m, but it could easily be longer if needed.
-
MBC timberframe - new external wiring for internet cable
Jeremy Harris replied to ragg987's topic in Timber Frame
If the insulation isn't yet blown in, then take advantage of that and stick lengths of conduit through the walls wherever you think you may need to feed wires. It's a lot easier to do this without the cellulose. Use the same technique, a very long 6mm drill to drill the pilot hole, then a hole saw either side to drill to suit the conduit. There's no need for the cone I made up, just cut the end of the conduit at an angle and it will make lining it up with the outer hole easier. -
I cleaned ours around a year or so ago, as they had acquired a thin film of what looked like algae or lichen. It seemed to make a small difference, but it's hard to be sure. They could probably do with another clean now, TBH. Last time I borrowed a window washer pole and brush, one of the water fed ones. Did a reasonably good job of cleaning them.
-
We took out a small mortgage to fund the build, so incurred interest payments for longer than planned (roughly £600/month), I drove over here every day, which was a 32 mile round trip, and site insurance costs were about double the cost of normal house insurance.
-
Be interested in hearing what they think there is to "service" on a non-serviceable system like PV, too. Smacks of someone trying it on to me. Lots of people with PV installations are now in a position where any extended warranty they may have had from the installer has disappeared, as a consequence of so many installers going bust when the big subsidy bubble collapsed. We're in the same boat, but frankly I'm not that bothered, as there's nothing to service with a PV installation and I accepted from the start that any warranty probably wasn't worth the paper it was printed on.
-
Our roof has 400mm of Warmcel pumped into it. It works very well, and has a reasonably long decrement delay, which helps to stabilise the temperature a fair bit. It's very good as acoustic insulation, too. Our bedrooms are room-in-roof and we can't hear when it's raining outside at all. I'm not sure of the cost, as a lot would depend on how easy or difficult it is to install in your specific roof.
-
Two reasons. We wanted the meter box in before the house was built, so we could use it for the site supply (saved paying twice for it). Also, having a meter box embedded in the wall of the house would have been a massive thermal bridge, the very last thing we wanted. By placing the meter box in a fence that now forms our mandated wheelie bin screen, we could have the temporary site supply hooked up to it, then just swap over so that the cable supplying the house connected up to it later.
-
The method I used was this: Get a short length of galvanised fencing wire, some chicken wire mesh and a can of foam. Screw the chicken wire up into a ball and thread and tie the fencing wire to it, so that there's a length of fencing wire poking out. Push the ball into the duct around the cable/pipe, leaving the fencing wire coming out the top of the duct. Tape the fencing wire to the cable/pipe so it's out of the way. Squirt can foam deeply into the mesh so that it expands to fill the duct. Leave the foam to cure and carefully trim around the top. This forms a vermin-proof plug, that can be pulled out if need by in the future, using the fencing wire.
-
self build.....where to start.....
Jeremy Harris replied to Amateur bob's topic in Introduce Yourself
You're right, and worth noting that our build ended up costing about £1,380/m² at 2013/14 prices. -
I think all self-builders have one or two stressful moments during the build, and often they are directly related to things costing more than anticipated. I budgeted on our build costing £1200/m² (in 2013). I costed everything pretty carefully beforehand, and shopped around a lot to get the best prices on materials. We went a fair bit over budget, and came in at about £1,380/m², which amounted to about £24k over budget in total. The main consequence of this was that the build just took longer, as we weren't prepared to compromise on what we wanted, so I just opted to do as much work as I could myself. Not being skilled meant that things just took a lot longer, as I had to learn the skills as I went along.
-
self build.....where to start.....
Jeremy Harris replied to Amateur bob's topic in Introduce Yourself
Yes, bungalows tend to be more costly per m², as the roof costs per m² apply to every room, rather than the roof costs being split by the number of storeys. It isn't a massive difference, though. Taking our roof cost as an example, had our house been a bungalow of the same floor area then the roof cost would have been roughly double, but that would only have added about £70 to £80 per m². -
I believe that the wires come out of the sides of the glazing units (@NSS might be able to advise), so as long as there is enough space there it should be OK. I had the opportunity to look inside the glazing on our front gable, as a glazing unit had to be replaced (under warranty). There were plastic packers all around the edges of the glazing, with a gap of around 3mm to 4mm between the glazing edges and the inside of the frame. As long as the wires could fit inside that gap it seemed likely that Sageglass could be installed. The best thing would seem to be to drill the wire holes in the frame exactly in line with where the wires come out of the glazing units, but not having seen a unit I'm not exactly sure how the wires are arranged.
-
self build.....where to start.....
Jeremy Harris replied to Amateur bob's topic in Introduce Yourself
Some basic costs of our 130m² build: Foundation ground works (levelling, putting in services and laying compacted stone) = £2.8k Foundations and fully insulated and airtight frame (air tested to PHI level included in the price) = £54k 3G windows and doors (PH standard, installed cost) = £8.5k Roofing and guttering cost (excluding PV system) = £9.8k External larch cladding cost = £9.4k The basic cost of our completed, watertight, insulated shell came to about £84.5k, so about £650/m² (at 2013/14 prices). I don't know how that compares to other build methods, but suspect it's not that much more expensive. The insulation level in that £54k build was 300mm of EPS under the slab, 300mm of blown cellulose insulation in the walls and 400mm of blown cellulose in the roof. The measured airtightness (included in the build contract cost) was 0.43 ACH at 50 Pa. -
self build.....where to start.....
Jeremy Harris replied to Amateur bob's topic in Introduce Yourself
The added insulation and airtightness for our house barely made any difference at all to the finished cost, though. I passed the spreadsheet of our costs to an architect who visited and he reckoned our basic build cost was slightly less than he'd expect for a house built to just meet building regs. The key for us was using a build method that inherently gave good insulation and airtightness, and which was quick (so much lower labour costs). -
I've looked at ways of doing this, and it does seem possible to remove the existing glazing and drill small holes for the wiring. There would be some disruption where the wires are chased into walls, but no more than that caused by adding a new socket. The key thing seems to be whether there is enough room in the frame to lead the wires to the holes. It looked as if it might be possible for our frames, but I've not positively confirmed this.
-
self build.....where to start.....
Jeremy Harris replied to Amateur bob's topic in Introduce Yourself
What you see on TV in the various self-build programmes is often a million miles away from reality! These TV shows, rather like the self-build magazines, have a vested interest in making things look a lot cheaper than they are. They exist to fuel the "self-build dream" and attract advertising from all the various companies trying to sell premium products to custom house buyers. Sure people can build for £1,000/m², or less, if they put a lot of graft in, but I know of no one that has had what amounts to a turn-key house built for them for that sort of price. Around here you'd be lucky to come in at under about £1,600/m² for a basic spec turn key self-build. -
self build.....where to start.....
Jeremy Harris replied to Amateur bob's topic in Introduce Yourself
Looking solely at the economics, I'd say that self-build is only cheaper than buying an existing house if you are prepared to do a fair bit of the work. Small scale housebuilding is barely profitable for those with the skills and experience now, which is why so few small builders seem to build houses anymore. Years ago it would be fairly common to find small local builders buying plots of land and doing speculative house builds, often as a way of staying in work when business was a bit slack. They could then sell the house at a profit and go and buy another plot of land. This doesn't seem to happen as much now, as the profit margin on house building has dropped. It used to be that the "rule of thirds" could be applied, 1/3 for the land, 1/3 for the build cost and 1/3 profit. Profit has dropped to between 10% and 15% for large house builders, and is probably even lower for smaller scale builds. Take our build as an example. I spent over three years working pretty much full time on it, yet it still cost almost as much to build as it was worth. The build cost came to around £320k in total (including the land etc) and it was valued when complete at £340k. If I'd employed trades to do all the work it would have probably cost more to build than the final value. I doubt that's particular uncommon, as many people (like us) use self-build as a way to get a custom house that exactly fits their needs. There's no doubt that those who are prepared to do a great deal of work themselves can self-build for less than the cost of buying an existing house. It's also possible for those withg a bit of experience of self-build to save money by using their experience to avoid spending more than they need to. -
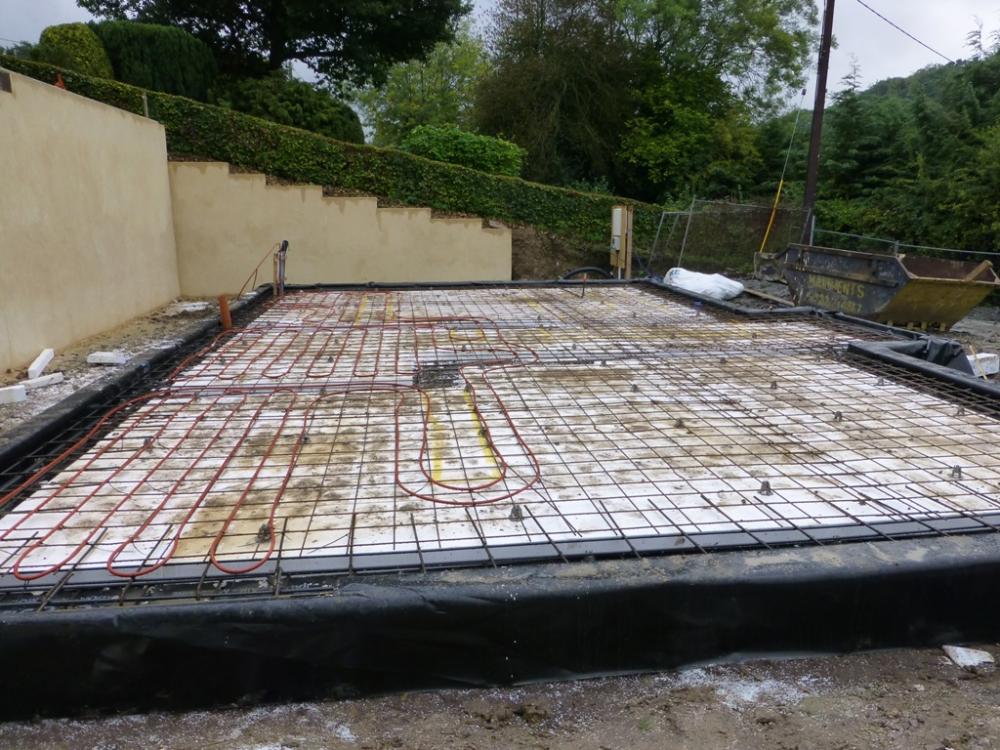
Our slab isn't polished, but was power floated to form the finished floor to which we laid travertine stone and bamboo. We have a pretty large area of 12mm thick travertine, so if there had been any movement in the slab it would have cracked the stone for sure. The steel reinforcement is in the centre of the slab, with the UFH pipes cable tied to it. The slab is thickened around the edge to 200mm, and the same across the area where two load bearing internal walls sit:
-
If the slab is reinforced then it's extremely unlikely to crack. Our slab is 100mm, with steel reinforcement and UFH pipes embedded in it, which is sat on 300mm of EPS insulation. PIR foam is about the best (affordable) insulation you can get, I'm afraid. The only stuff that outperforms it is either vacuum insulated panels or aerogel, but both are expensive and I'm not sure they are OK for under slab use.
-
I bought a small, fanless, mini PC through Alibaba a year ago. Turned out to be very well made and reliable. The price was very competitive when compared to anywhere else, probably because I believe the Chinese government subsidise export shipping.


