LA3222
-
Posts
1185 -
Joined
-
Last visited
-
Days Won
11
Everything posted by LA3222
-
I wonder who will be the first to say you don't need UFH on anything other than the ground floor of a well insulated etc. build🤔 FWIW, I have three manifolds (2x13 ports and 1x2 iirc) and they feed off a single flow/return. I have it in 28mm up to where it branches off - each branch is 22mm to the manifold. I have a pump on that 28mm flow and then a pump each on the two big manifolds. Nothing on the 2 port...it relies on the push from the 28mm flow pipe pump. No issues with flow. 280m2 - yours will maybe need two flow and returns in 28mm?
-
Insulated Concrete Slab Garden Office - Questions
LA3222 replied to Ticky's topic in Garages & Workshops
Is it just me or is drifting into the realms of OTT? The slab is for a single storey garden room, not a great big multistorey house - all this talk of ring beams and the like is a lot of unnecessary time/cost. Yes to how its being insulated etc, no issue with the thickening per se....just stick A142 across the whole thing in the top layer, I really wouldn't bother adding layers in the 'ring beam' - this is basically a big shed🤷♂️ -
Where is your PV inverter? Reluctant to put them in house...
LA3222 replied to Carrerahill's topic in Photovoltaics (PV)
Mine is outside, on the wall and exposed to the finest weather Lincolnshire can throw at it. What's the issue. My house melts as it is, sod having that inside. -
All my stuff is makita, got a random dewalt SDS drill that runs on the old 18v NiCads. The batteries are all dead now so I got rid - thought it would be easy to find an adapter online to allow me to use my lithium makita batteries instead. I'm being cheap. Anyone know where I can get one, don't want to buy a makita sds or a new NiCad if I don't have to! Ta.
-
Fixing battens and plasterboard to SIP ceiling
LA3222 replied to nh26302's topic in Plastering & Rendering
I cant see a drama, plenty of screws to secure it to the SIP and job is a fish. -
Fixing battens and plasterboard to SIP ceiling
LA3222 replied to nh26302's topic in Plastering & Rendering
I agree with the 100x25mm - got to be screws for SIP though. -
Fixing battens and plasterboard to SIP ceiling
LA3222 replied to nh26302's topic in Plastering & Rendering
Just need screws long enough to protrude 20mm beyond the face OSB sheet - that was the tech advice given to me by a screw company who had tested the pullout strength etc. I was pointed to them by the tech bods at Kingspan Timber Solutions Tech dept. For 50mm battens I'd go with 90mm. Do you need 50mm battens for the ceiling? I used 47mm for walls and 22mm for the ceiling purely because I had no requirement for a deeper service cavity on the ceiling. -
Rockwall for brick wall, completely filling cavity?
LA3222 replied to KayleyH's topic in Heat Insulation
Pretty sure that whenever timber frame is involved there needs to be a minimum 50mm ventilation cavity. -
Everytime I see someone ask a SIP related question on this forum I just know that the first response will be 'don't use SIP'. Rather than say don't use something due to personal bias, why not offer up a solution to the actual question being asked and then some reasoning as to why you think it would be better achieved via another approach. To the OP, you may want to post up a sketch/section to explain your ask - easier to understand from a drawing rather than text.
-
You served up to @pocster on a plate there @Onoff🤣
-
Looking good....Still think you are nuts doing this a second time. I reckon I still got 3 years of work doing mine - damned if I will ever do this again, it's so demanding on time!
-
Yeah do the shut down if you want to change those settings
-
I'm not sure you will find many people spending 2k on a loft ladder🤨
-
I installed both sets of my stairs having never done them before. Took me a day to get the main stairs in (kite winder) and then a couple more doors mincing to get the rail and spindles etc done. Took me a week of mincing to do my spiral staircase.
-
I did mine myself. Spark did the electrics, I did everything else - system was running for a year before I had a plumber sign off the G3. He spent half hour looking at it and cost me £300.
-
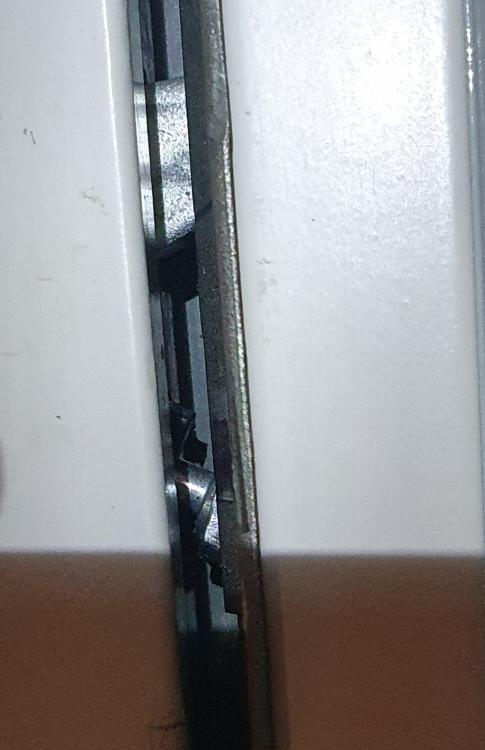
The door latch has broken and is wedged into the door keep. Found this little gem out when I went on the hunt for a new light bulb. Bemused to say the least. Anyone have any good ideas for this Christmas pantomine🤨
-
Stick a repair coupler in and be done....that's what I intend to do fir my damaged pipe🤷♂️
-
Halifax won’t accept Council Completion Certificate
LA3222 replied to northdownbuilder's topic in Self Build Mortgages
Never a truer word spoken! The only reason I took a warranty out is because I knew the mortgage companies would want to see it! -
Been a while since I did this, all I can recall is that I closed all of the individual flow and return valves for each loop and then opened them up one at a time. This did/does work because I identified the faulty loop and it is still closed off now and I've been using that manifold for over a year now. No loss of pressure or water marks since it was capped. I should fix the leak and then get the loop back in the game really, it's in the master bedroom and is one of three loops in there so it would help a lot with keeping the right temp - just keep getting sucked into loads of other jobs though!
-
I wouldn't stress bud. Move on until you can pump it up to 3 bar with water and then see what happens. You've got a long way to go, you will have hiccups along the way and that's all this is, a PITA - yes, insurmountable - nah. If it makes you feel better I asked the missus if she wanted the hob (I.e. power) installed in the island - she said no, me being a idiot chinned off a duct. Guess who changed their mind🤨 Cue me chiselling though a concrete slab a long line so I could run power. That was after I had to buy a flir, Jerry rig the ufh to a willis heater in order to work out where the damn pipes were! A PITA yep....but easier than I thought whilst I spent half hour stood staring at the floor and hating life😎 Make sure you mark the area well so when you come back to it, you can identify where the water was showing. Marker pen will not do as it will disappear as you work on the house due to dust etc.
-
Its not that much of a pita. Close the flow and return on the manifold for each loop then open them up one at a time to see if they hold pressure. Half hour or so. It should be even easier because the leak area is known so the assumed faulty loop should be easy to identify. When I had to play this game I didn't know which loop was damaged so had to repeat for all 11. It was loop number 7!!
-
Rog - didn't notice that bit!
-
Isolate and pressure test the individual loop which you think it may be. I have a similar issue with my first floor UFH - wet patch kept appearing, at first I dint really pay attention to it. After a while I started messing with the UFH in earnest and realised the pressure kept dropping - isolated and tested the loop to confirm it was leaking. I must have put a screw through it by accident - much easier for me to fix though as it's in a pug mix under 22mm flooring. It has been like that for over a year now - I've got the repair coupler, just haven't done it yet. The affected loop is just closed off.
-
Certainly looks that way! Is this the badger?:

-
Yeah, no dramas there. This has been up and running for over a year now....pretty sure it was fine in the last heating cycle - the issue seems to be a recent developement