Nickfromwales
-
Posts
31381 -
Joined
-
Last visited
-
Days Won
346
Everything posted by Nickfromwales
-
My vote is for............"hair didn't grow around it, so now I'm going private"
-

Include windows in an invitation to tender?
Nickfromwales replied to DaveKF's topic in New House & Self Build Design
It actually depends on which one you choose, and what you actually ask them to do. I have a good chap who charges me a very nominal sum to do a BOQ to reflect a "minimal acceptable standard" and then I cut him loose. I just want the framework so I can then use it to input the clients choices and get to a design freeze, that way they can see the budget expand and contract with the different choices they make; often some have to compromise, particularly when we show them the professional fees etc and when we add in the stuff in the prelims that they quickly skirted over when first considering building a house! I think it's an essential process that each project needs, afaic, to keep a firm control on costs and for getting design freezes done early on which then allows the client to go out to tender. -
Include windows in an invitation to tender?
Nickfromwales replied to DaveKF's topic in New House & Self Build Design
Most of my clients want to touch / feel / operate the units, slide and fold the doors etc so are more hands on in this respect tbh. -
High opacity paint is specifically for new plaster. The only time you'll get issues is if the plasterer has polished the plaster to a shine, and then you would be better off doing a mist coat (watered down) but for the last 15+ years or more I have gone pot > roller > wall & ceilings without issue.
-
Yes. I don't fit (or avoid with a passion) the multi-component dual trap combination nonsense that a lot of mid range kitchen sink suppliers offer up. Instead, that all goes in the skip and I just fit 1x or 2x McAlpine bottle traps and end of subject. Bombproof. The pipework downstream of the traps gets a T cut in down as low as is practicable, with a 50mm spur of pipe in it and then the WM upstand connects to that.
-
Screed floor quote guidance
Nickfromwales replied to Spikeuk's topic in General Self Build & DIY Discussion
Did you mean to say 100mm of insulation? 65mm for dry screed is the minimum thickness I would use dry screed at over insulation, and we've only done thinner where it can be bonded down with a specialist primer. Have you not considered Cemfloor liquid cementitious screed? -
😭
-
You can use some of the corkscrew type fixings tbh, but not just screws into PB ideally, but I have done it a good many times and just put a screw in every hole on a smoke head (about 7 screws) to be "safe". Only time you'll be caught out is if you're heavy handed swapping one out.
-
If the hot water is heated by solar in summer and off peak electricity during winter, via a HP, then DHW will cost pennies, but heating water in the machine via direct electricity will be almost 100% efficient, whereas transporting hot water across the length of the house, sporadically, will be very much less efficient; setting aside the subject of how cheap it was to actually make the hot water. If you’ve a hot return then that would help obvs, but would need to be on. Cold fill afaic, savings would be very little, if any, unless the machine was next to the hot water tank, as you can use the PV to heat the washing machine if it’s used 2 hours prior > 2 hours past midday eg in that ~4 hour window.
-
Not great if your foil surface is the VCL? Normal gaffa tape would have been better vs using flimsy foil tape for fixing them….. But as above, cables should have been behind and pulled in whilst the insulation was installed. What lights are going in, as you’ll need recessed pockets in the insulation for spotlights?
-
🚩
-
No expert, just simple honesty from where I have done these things when in exactly the same mind frame as yourself, sir, and it turned out to be a pigs breakfast. A fast way to make an excellent kitchen install 'tacky', for want of a better word.
-
The only issue here is that the driver needs to be constantly fed with 230v. Personally, and after fitting high-end kitchens for 20 years, the 'disco doors' effect will wear off pretty quickly. Don't do it, is my 2 cents.
-
Leaving a desk fan on oscillate in the room on a low setting will help move the air about and aid drying.
-
Finishing window reveal around brackets?
Nickfromwales replied to BadgerBadger's topic in Windows & Glazing
For clarity I wasn't referring to your job, as yours was a lot better, sorry. Should take more time to type my replies -
You may have to get it signed off by a UK SE and then BCO if it doesn't have accreditation for use here / in this application etc.
-
Did you use high opacity paint designed for application to new plaster? I have skimmed and painted newly plastered walls and ceilings over the last few decades, and the only time I have had issues is when some bell-end working for me had watered-down the paint.
-
Upside is a bit of time investment to make the home of your dreams where you will live, said dream. Suck it up and get stuck in
-
Finishing window reveal around brackets?
Nickfromwales replied to BadgerBadger's topic in Windows & Glazing
An inch of packers on most?? Vs using cranked brackets. Methinks "not", sorry. -
2nd layer of osb underfloor
Nickfromwales replied to Eldad's topic in General Self Build & DIY Discussion
Oh, and use glue!!!!!!!! -
2nd layer of osb underfloor
Nickfromwales replied to Eldad's topic in General Self Build & DIY Discussion
That will squeak forever more. Take the OSB off, bite the bullet, or regret it for….ever more. Adding layers = 💰🔥 -
Finishing window reveal around brackets?
Nickfromwales replied to BadgerBadger's topic in Windows & Glazing
Yup. Shocking. -
Finishing window reveal around brackets?
Nickfromwales replied to BadgerBadger's topic in Windows & Glazing
Like these geniuses?? 🤷♂️🤦♂️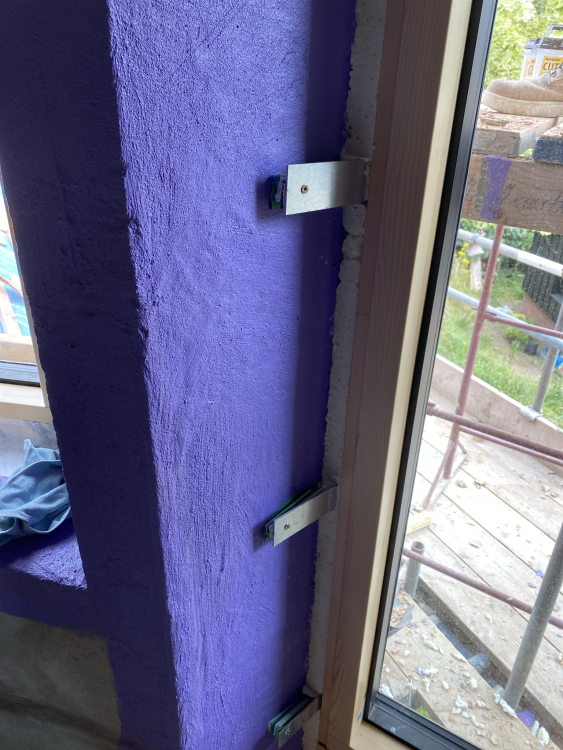
-
Lather it on son!
-
J K Rowling couldn't make this shit up. More popcorn anyone?