AdamSee
Members-
Posts
158 -
Joined
-
Last visited
Everything posted by AdamSee
-
You are not their employer, nor there co-worker. Your legal obligations are pretty loose here. So the questions are; 1. Is it your problem....no. 2. Do you want to be pondering that question after they have injured themself?....also no. Solutions - Provide advice, try to convince, inform them of the potential outcomes and loss of earnings. Sleep easy.
-
I believe the profit aspect of that is correct. But the line between "covering your costs" for the meter installation and "making a profit". Is equivalate of using a paint roller on a A4 page. Leaving the mid ground somewhat debatable.
-
Technically, isn't this what a HMO does using sub meters? Is that not classed as reselling electricity?
-
Can't connect the SWA cable. Practical help please.
AdamSee replied to saveasteading's topic in Power Circuits
You need a Wiska box, these are IP 66 rated so suitable for outdoor use. But they have M20 holes on the side so the SWA gland can screw straight onto the box. https://www.tlc-direct.co.uk/Products/WK108B.html I find the best way to get a decent earth connection is to use the spring rings rather than the bulky earth bar clamp. -
Was your son a climber by any chance? I had a wooden pull-up board above my bedroom door just after uni. It had big grips at the top to jump and grab (I'm short) and a crimping pockets below. Or in your case, a crimping rail. Essentially allows you to do pullup using fingertips only. Thing was called a Beastmaker. So that I didn't f-up the wall, I mounted a piece of 18mm ply to the wall first. This spread the load further out to the left and right. Then mounted the pullup board to it. Painted to match the wall when done. Looked "ok". A bevel on the sides would have improved its look.
-
Nice work with the adhesive, it uses alot, but thats the proper way to do it. I see you've also used soundcoat as a parge coating by the looks of things. Another proper job there. To get a long run of boards in line. My method is to put a chalk line on the floor, roughly 25 or 30mm away from the wall. When standing in front of the board, look down and that line should be parallel to the board face. Don't worry if it's ahead of behind the board line. Just ensure it parallel. Check for high / low spots and general plumb of the walls to avoid any nasty surprises. Particular in the top corners. For the gap in-between the boards, I would chuck some bonding coat in there, rather than leaving it for the plasters to deal with. Takes seconds to do, and makes for a more consistent plaster finish.
-
I play around with recycled plastics quite a bit and I've yet to find a glue that sticks to it. Use lost head screw for best finish. Depending on the decking type a bit of WD40 on the screw before driving it in helps buy displacing the plastic instead of cutting it away. The head becomes more "lost" in the plastic. Make sure to use stainless screws. Nothings worse than a fancy, permanent, rot proof, ever lasting decking structure.........with some rusty ass screws stuck in it. Btw, What decking did you go for?
-
Connecting toilet pan to broken clay pipe
AdamSee replied to Del-inquent's topic in Waste & Sewerage
As you said. Cut off the clay pipe below the crack. Use one of these to convert to a PVC pipe. Adaptors can be found from screwfix / toolstation. Link here: https://www.screwfix.com/p/mcalpine-push-fit-single-socket-drain-connector-black-110mm/4255V?kpid=4255V&cm_mmc=Google-_-Datafeed-_-Heating and Plumbing?kpid=KINASEKPID&cm_mmc=Google-_-TOKEN1-_-TOKEN2&gad_source=1&gclid=EAIaIQobChMI6-vH9J37gwMVf49QBh1wcAAyEAQYAyABEgLBHPD_BwE&gclsrc=aw.ds You could use a compression style rubber adaptor. They work fine and don't restrict the internal bore. If the pipe was horizontal I would recommend that option. Alternatives could be fiberglass lining it if you think its cracked under the house. Quite pricey to do. -
I've put UFH pipes through walls. Drill a hole large enough for some flexible conduit, make good with some motar....expanding foam.
-
Gap for washing machine, is 600mm ok
AdamSee replied to cwr's topic in Kitchen & Household Appliances
I would leave more than 600. Eg. 620 for the first machine, the 600 for the next. Learnt this from a recent annoying mistake. Left 1200mm for the two machines under a utility counter (my utility is essentially a hallway with a door either end). But once I had fitted the architrave on the door in front of the washing machine you could no longer open the detergent drawer. Certainly couldn't get any skirting down the side. -
Sweet looking bathroom pocster. Hopefully it remains leek free. Funny story relating to my post about my shower build....it eventually leaked. Not from a fitting, but from the diverter valve. Getting the faceplate off was a pain in the ass due to vast quantity of silicone use. Tried dental floss, rubbish. Got it off using two wall paper scrapers in the end. Had to replace the diverter in the end, and resealed it using minimal silicone this time. Best of luck!
-
Cheap sturdy vacuum cleaner for DIY cleanup
AdamSee replied to Gill's topic in General Self Build & DIY Discussion
I have the bosch gas 35 m class extraction. You can use it with it without the bag depending on how problematic the dust is. The extra long hose is very useful and it has an alarm when it's full or blocked. Overall it's a brilliant machine which is well suit for professional use, but it had a shitty flaw built in to it. After using it for a few weeks its pitch sounded off and it lost suction. Turns out that the internal soft foam sound insulation had come loose and blocked the exhaust. Had to opening it up and fix it once and eventually I removed it all together. It's overly complicated in there too. 4 out of 5 I guess. -
I've found a lot of the gu10 holders to be like this now, rather than the old type where you had to try and get the bulb in from below and twist them by applying pressure to the bulb. I assume it's the only way to maintain a ceilings fire resistance. The detachable connection block is good for the old style gu10 Philips hue bulbs, which were very tall. And didn't fit in much.
-
That wishbone looking bit of spring steel near the top of the black part of the fitting would usually hold the gu10 bulb. Remove the bulb from the fitting nad slide it in from above and in a sideways motion. Looks like the bulb will sit approx 50mm back from the base of the fitting.
-
Remembered to check today. The tracks I have are 1400mm long. Explains my issue with them.
-
Easier option, use the supplied tails and replace the (assumed) brass olive supplied with a copper one. That can be compressed directly on to the plastic pipe. Remember to still use a pipe insert.
-
I have the makita plunge saw....its goods, but same as Istevensuk, the tracks are naff. One has a slight cup to it, so the saw can wobble ever so slightly, no amount of adjustment seems to get it to cut consistently. The other thing I don't like about it is the track length. When cross cutting an 8 x 4' the track is too short, unless you're at maximum plunge depth. The track adjustment knob (used to take the sidways movement out from between the saw and rail) just slips off the rail end, leaving a crappy cut for the last few cm. Very annoying.
-
We have a large fiberglass flat roof on our extension which wraps around the property and most days it lets off some large crack / bang noises. Where the nigh time temp has dropped recently its let of some whoppers throughout the night, really wakes you up. Only been a year so its still early days on weather its going to collapse or not. My workplace however is a 20 year old industrial unit, one of those two tone grey ones and the noises it emits are immense. Aluminium cladding on a steel structure......sounds like people are walking around on the roof / mezz. Really creepy at night.
-
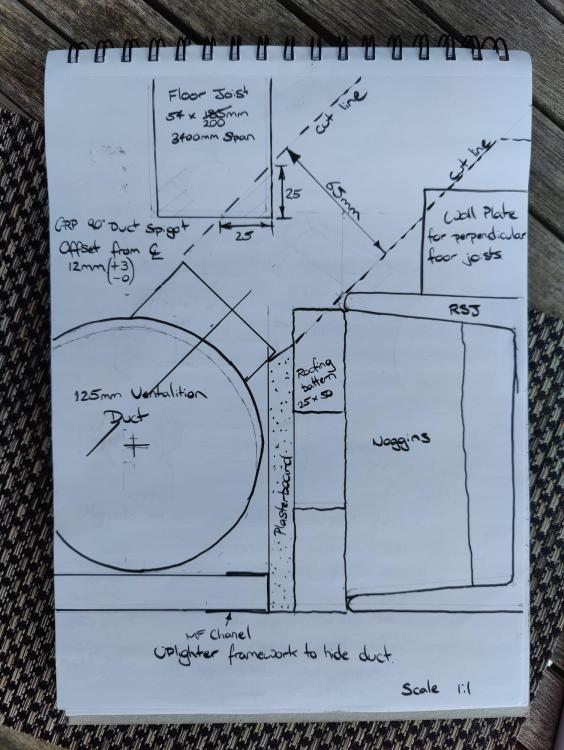
Thanks for all the input fold. Had yesterday evening off so didn't get a chance to work on this. So my aim is to ensure that I don't constrict the airflow at it has a further 3 to 5m to go via flexible radial ducting (x3). my joists are 54mm wide, I would have to shave off 25mm (max) to be able to squeeze through a 60mm duct at 45 Degrees. The joist is supported every 40cm by the perpendicular joists which sit on that wall plate. So load on the joist is pretty well distributed. Which is fortunate, because there's no way of sister it for reinforcement. Making this adaptor is now pretty straight forwards. Going to mould it straight over a well lubricated bit of spiral duct, which has a piece of 60 x 200 ducting affixed to the side at roughly 12mm off the centreline. Can pop it off when its set, clean it up, then glue it back on with something abit more flexible and a few rivets.
-
I did consider using PIR or polystryene and covering it in foil tape. Could then dig it or dissolve it out as suggested, but wouldn't have the an ideal internal finish. I had written off the idea of squeezing in a 54 or 60mm duct as it would mean shaving the joist down which I was under the assumption was a big no no. Granted the joist is supported along it's length by the perpendicular joists, so its got the least amount of load on it. And it would only need to be the corner removed. Unfortunately I can't access it well enough to sister it up. Will post some photos of the current situation tomorrow.
-
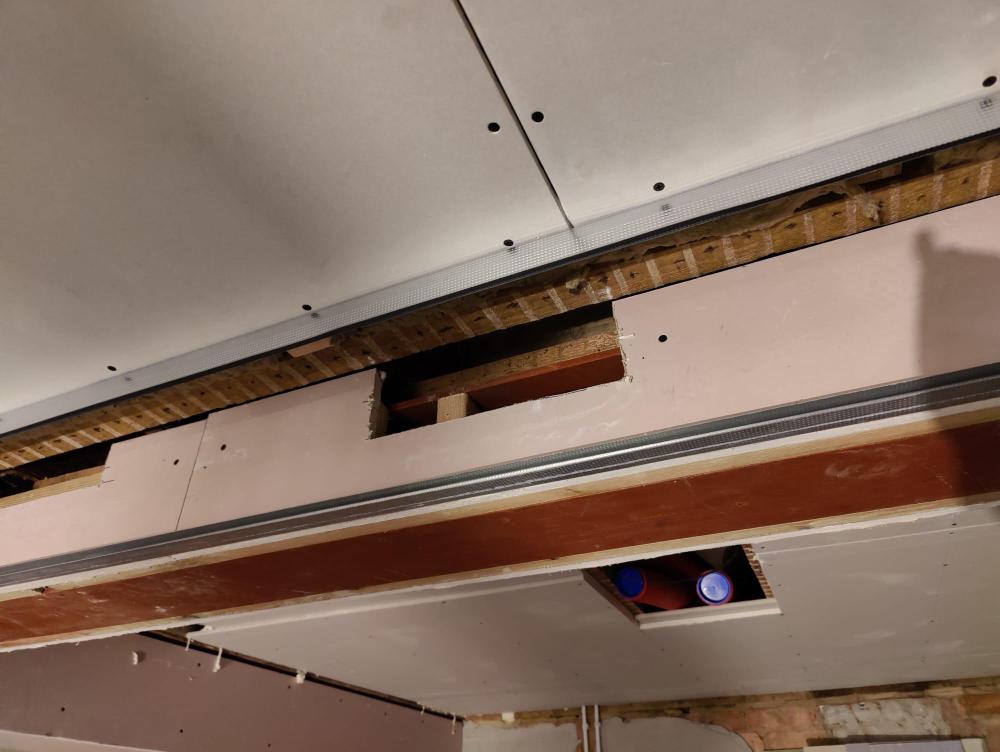
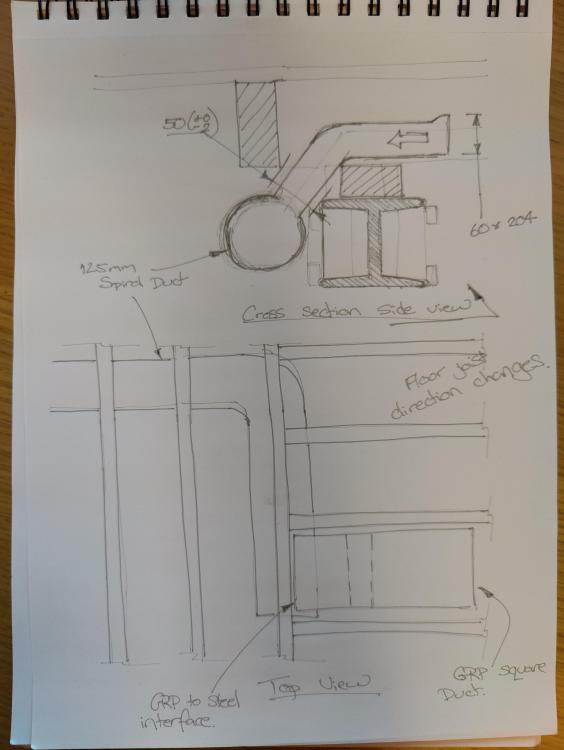
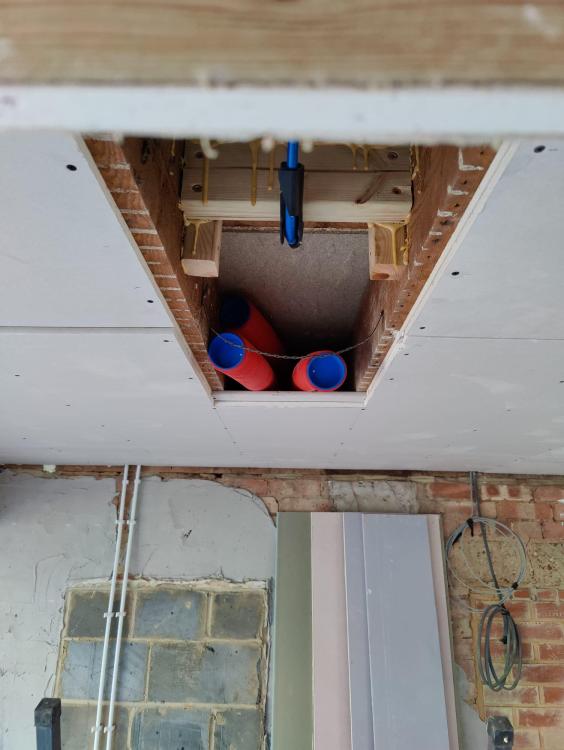
Long story short. I have to squeeze a duct over a RSJ through a 50mm gap while mainingtaining 8,500mm2 of ducting area. This is to be used to extract stale air from the downstairs bathroom and utility and send it 16m up a 125mm duct to the loft mounted MVHR unit. So my question is. Has anyone made custom ducting from GRP? And can anyone forsee any problems with this in a inaccessible ceiling void? I've seen on Jeremy's blog that he's made a exhaust silencer out of MDF and others have made custom distribution manifolds out of timber. But I've not see anything made from GRP. I've thought about various other methods but due to time constrains my options are limited. I've attached some very quick sketches of the difficult location that I need to get the pipe in to. Part of the issue is that I have to squeeze the duct in-between a new RSJ and the existing floor joists which run parallel to it. The RSJ is supporting the floor joists which are perpendicular to the forementioned. This is actually helpful for duct running as it provides a void to run the duct through over my kitchen. But the new RSJ is too close to the parallel joists to get off the shelf fittings in and even it I could buy something I still cant get a square ducting coupler to join on to the side of a round duct (which is a spiral galvanized duct) My plan for making these fittings........is still a working progress, leaning towards making it as two halves using a MDF mould to ensure the inside wall is nice and smooth. Can readily join the two together when the things made. Thought about 3d printing but concerned about the strength, air tightness and would need to be made out of many small sections. Any thoughts, or ideas would be great. I've attached a sketch. Top drawing is a cross section view looking at the end of the spiral duct and a side view of the gap the custom ducting needs to squeeze through. Lower drawing is a plan view showing how the joists change direction.
-
We had the same problem with a 10mm bottom plate on the RSJ. I didn't pick up on this issue until after it was fitted so had to make do with what the builders left me. The gap I had left with just too thin for insulated plasterboard, so I instead used plasterboard held in place with a lot (full coverage) of low expansion foam. Theres a lip on the frame which helps hold it in place while its setting the the inside edge of the wall was a MF structure which allowed an additional screw fixing. Seems pretty solid. Problem here is that there's no vapour barrier, it's a working progress.
-
Posts and Rope/Chain
AdamSee replied to canalsiderenovation's topic in Landscaping, Decking & Patios
I've used 10 x 10 recycled plastic from here https://www.earth-anchors.com/product-category/lumber/ for decking in the past. Won't rot, so it's ideal for here. They have a free cutting service. Not sure if that extends to a free drilling service. But it's worth an ask. It's available in 8 x 8 which would work for rope posts. Just needs the holes (and the rope). What's your plan for fixing them? Can you dig near the edge or allowed to bolt to the hard standing that is the edge. Best of luck.


.thumb.jpg.31750575694ace0a7661d55fb85816be.jpg)
