AdamSee
-
Posts
158 -
Joined
-
Last visited
Everything posted by AdamSee
-
180mm roof vents
AdamSee replied to thomas's topic in Mechanical Ventilation with Heat Recovery (MVHR)
Did you find a suitable vent for your roof? I'm currently having my roof re-tiled with plain rosemary tiles and I was really struggled to find a suitable vent, in the end I went with the Ubbink UB41. They have the usual looking dome with the air that comes out underneath and provide 20k of air movment. Theres a option for plain tiles but I couldn't find one in terracotta colour. So in the end I went for the universal one, which just has a plastic skirt that can go under the tiles. Won't look as good, but should do the job. They go up to 160mm aswell, Bit smaller than you require but I would have thought it would been fine. -
I would be surprised if this didn't work regardless of how well you butt seals the toilet seat as your just changing the direction of air flow, our main bathroom is a jack and jill type, so anything that can help really is a help, but at the end of the day the supply vent In the bedroom should keep air flowing in the right direction to manage it. Frankly, I'm just a fan of overkill and over engineering. Granted mvhr is no different to any extractor, it's just that my original idea of venting through the roof ment that any of my concerns about smells would be vented in a place thats not near any possible windows. But I guess at the end of the day, anyone who's got a external venting kitchen extractor isn't worying about these sort of things. Just a unnessecary worry that I have.
-
Onoff, this is brilliant, what's the plan for connecting what i assume is 40mm pipe up to your ducting system? I'm sure I could sneak this in without the wife noticing.
-
Err......no....didn't think about that.....back to the Google. Update, right,I had found a decent match from several different manufacturers already but the max free air space of one vent is 7500mm. And Im unsure as to weather these would be suitable for air intakes. I guess I could use two for a exhaust so that any smells exiting the house leave via the top of the roof, at a combined 15,000mm it's certainly better.
-
JSHarris, I've heard of your toilet idea in the past and I must say that I'm a big fan of it, surprisingly I can't convince the other half that it's a good idea. I have seen that Geberit have copied your ideas on the their monolith toilet frames a just added in a carbon filter. From everyone's answers, I now have two questions to ask myself, one is do I buy the horrible colour red vents and repaint them to match the terracotta tiles or risk putting a extra duct near my neibours window and hope the've lost their sense of smell. Like everything it's going to be determined by available time. Dam.
-
I know people have mentioned in the past about the MVHR bringing in smells from outside, but what are the chances of smelling things outside that have come from the house? Our retrofit project is moving along and were currently having the roof retiled with plain terracotta tiles. (approx 6" x 10"). Originally I wanted our supply and exhaust to be on the roof but finding the right vent with the correct size in a nice terracotta colour is a massive pain. So im wondering about changing them to sofit cowls but these will have to be beside our bedroom window, one either side of a bay. But I remember at my last place that my kitchen extractor was fantastic at projecting the smell of what I was cooking down our road incredibly well. The last thing i want is for my neighbors to open there windows and constantly be smelling strong kitchen/bathroom smells. So what are the chances that my neighbors are going to smell what were up to? Or am I best going back to the roof idea? If i carry on with the roof vents I wont ever be able to get to them if they need servicing or cleaning.
-
There's a very good chance this is what you may have found: https://hbspecialistsupplies.com/collections/twinwall-drainage (not sure how much this site will appreciate external links, apologies if it dissapears) I found a few sellers who were buying this ducting and selling it as "air duct", you see it all around the motorways for routing cables in so the internal surface is left without a lining and the colours are suppose to reflect what type of cabling is inside. For instances purple and orange is suppose to be data and lighting, but i cant actually remember. Weirdly, this actually says "twinwall" on the website now....I'm sure that wasn't there several months ago, I'm now debating whether my last statement is just a load of bs or can this be used for ducting? It's dam cheap stuff for 50m.... Anyone want to set me straight here?
-
Hi Mike I'm in the same situation as you. Me and my partner are renovating a house and I've gone to quite some lengths to seal off every source of air leakage possible. From a VCL on top of the floor joists downstairs and under the ceiling joists in the bedroom ceiling. Everything has been taped and plastered in to the wall parge coat. We did decided to down the MVHR path, I'm not sure whether at the end of the day we would see the full benefits of the heat recovery, but if you trying to make your house as energy efficient as possible it probably means no trickle vents or random air bricks dotted around, so I assumed that to comply with part F Ventilation we would need something to get in fresh air. After a while you convince yourself that the MVHR makes sense as your going to need the extractor in the bathroom, kitchen and utility, why not just go that one step further? I guess we could have gone down the PIV route, but my wife works from home as a tailor and the heat generated from constantly pressing jackets seems too good to waste and the house becomes unbearably stuffy without a good amount of airflow. I guess a blower door test once your finished will give you the answer you need and being a bungalow it shouldn't be to hard to retrofit everything from the loft. Personally im curious to see what ours works at as, as I've dot and dabed walls, hence the parge coat before hand. I just cant get the hang of wet plastering.
-
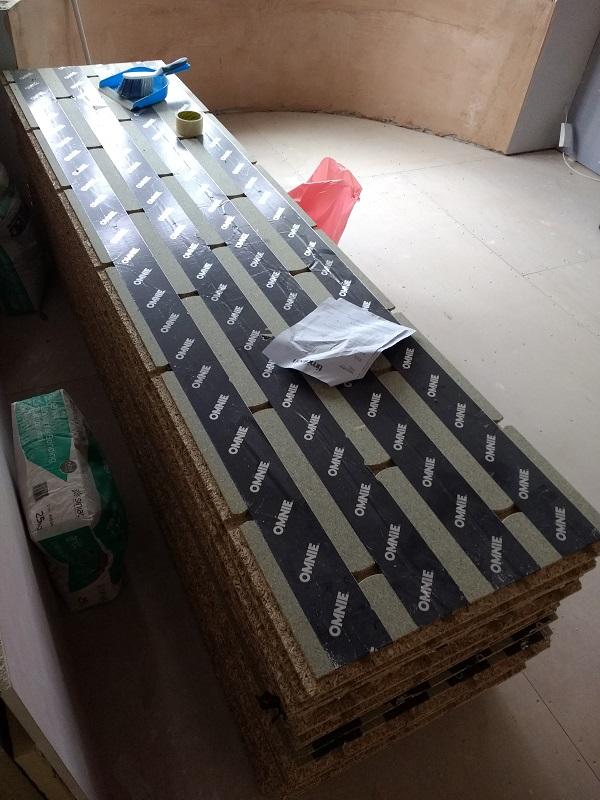
I used Omnie to do my renovation job. I used the torfloor system which is just chipboard flooring routed out to accept a 12mm pipe, but they do all the normal screed systems etc. The price seemed reasonable, but hard to compare as everything has to be quoted for and its priced as an lump sum. Was delivered within the week tho which was great....excepts its all be sat in my living room for 4 weeks now.
-
Been looking in to spray foam and currently wondering if anyone's used it or know people who have used the kits from Foamseal? Started building the stud wall and realised that it would be considerably easier if I had a floor in place at the moment. Minor dilemma mixed in with usual procrastination, apparently there are two different types of spray foam, open cell and closed cell, the closed cell doesn't need a VCL but the forma does. If the floor is in place already I cant fit the VCL and because of the type of floor im using, i cant exactly attach it to the floor for various reason. But either way, without knowing what type of spray will be used I guess im just going to have to make the wall first and be prepared to seal it up. It took a few minutes for me to realise that I had answer my own question. So.....here are some pics. Floors up, bricks back in place, bottom of stud wall coming together, think I may level off the joist before going much further. Its not that ones out of places, its that its actually smaller and ones bigger. And here's all the flooring for upstairs which arrived not too long ago, 22mm t&g chipboard flooring pre-routed for 12mm UFH pipe to be laid in. This actually forms part of the structural deck. Its very sad, but I'm unbelievably excited about getting this in.

-
Spray insulation sounds like a viable plan, would be good for where the wall continues through the floor and joins up with the wall cavity and RSJ. But why does it need to be a even thickness? With the current shape and the stud wall that will be made im probably looking at a difference of 50mm on insulation thickness.
-
Im pretty sure this was held together with wall paper as well. The combination of that and the plaster skirting was definitively doing the job. Thanks for the tips folks, pretty sure I've got a roll of wire mesh around for this that will work. Can bonding/hardwall coat be used as a parge coat or would i be best with a sand/cement render mix? I have used soundcoat as a parge on nearly all the walls downstairs, but the stuff is quite hard to come by around here, not sure why, but cant just pick the stuff up on the Saturday morning shop and typically, i'm all out of it now.
-
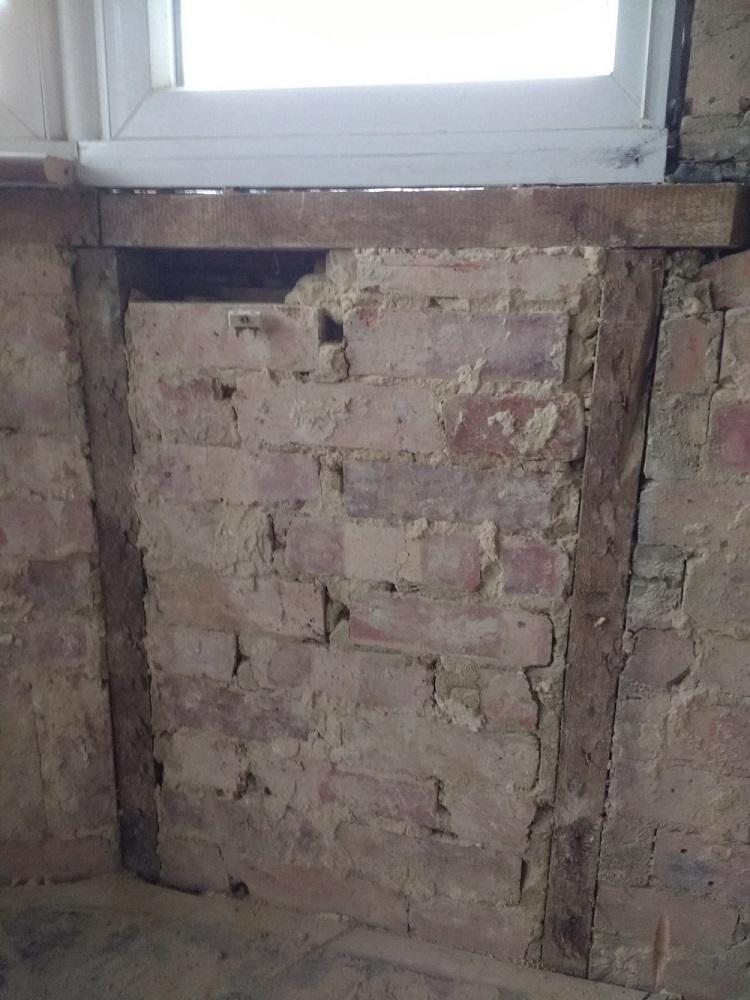
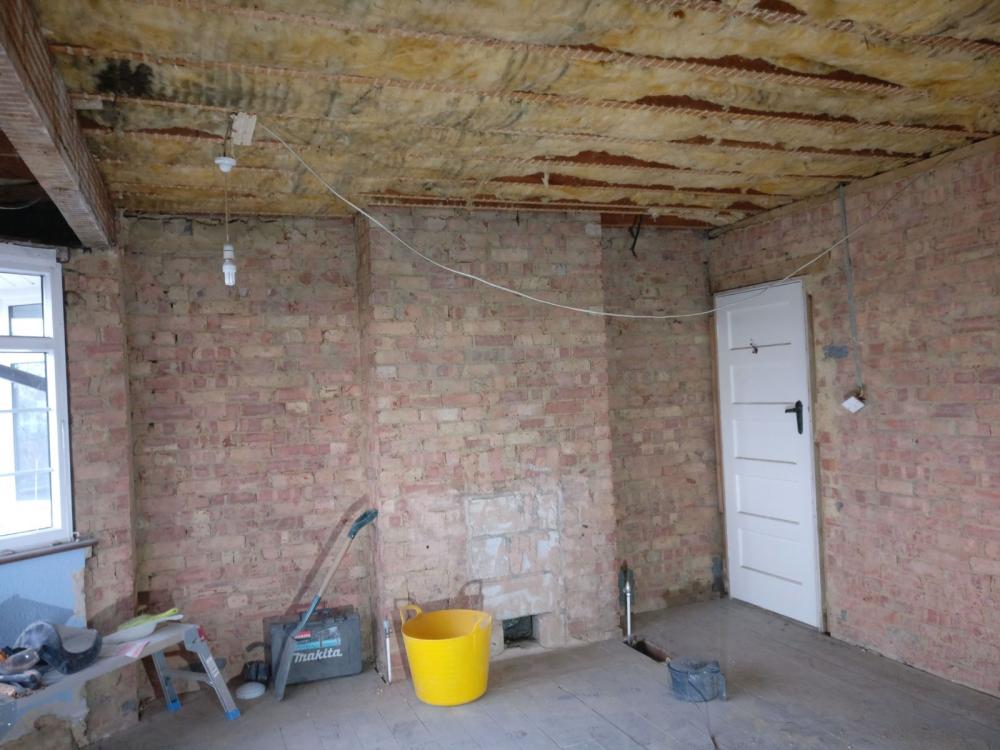
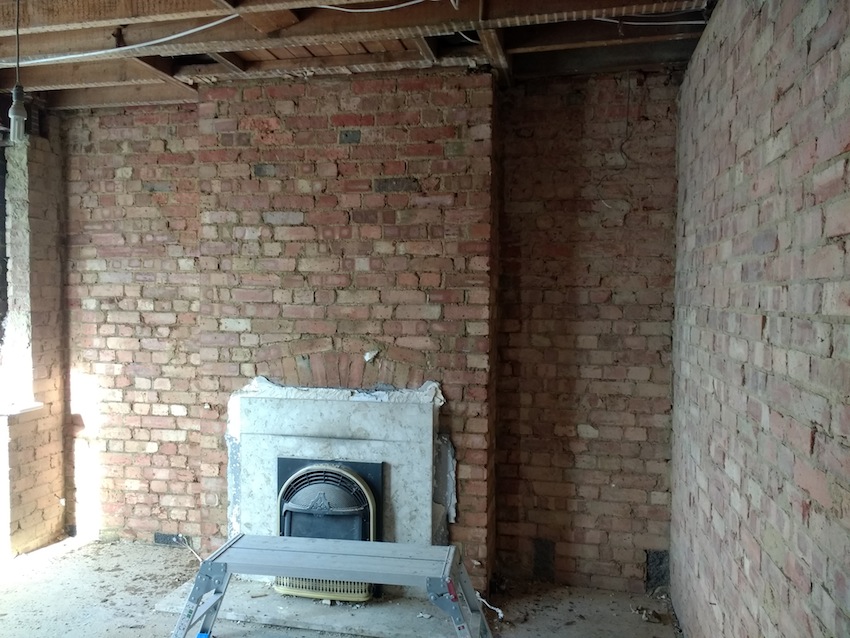
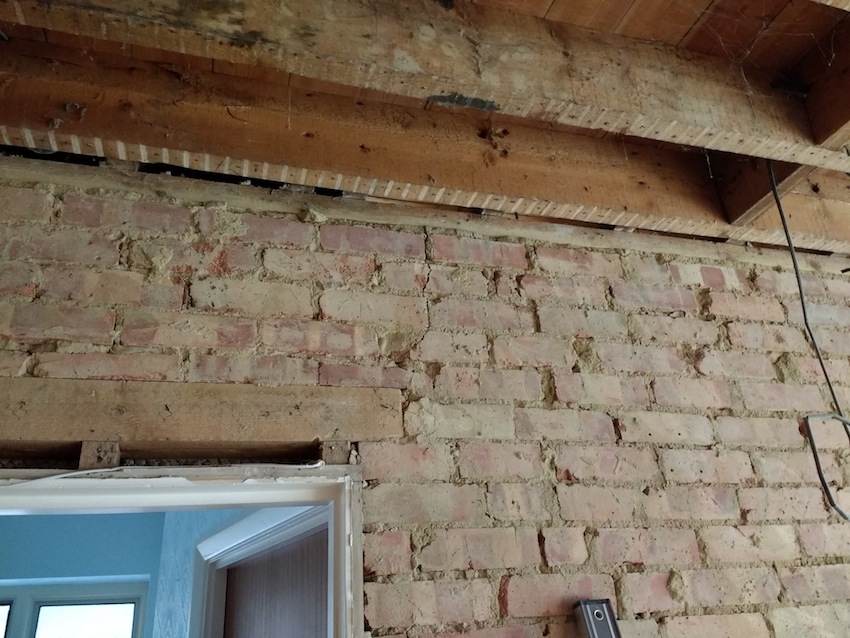
Well had abit of a development earlier. Alot of the plaster on the wall was blown and so I though before I do anything I should strip it back and either patch it up or re plaster it. Well it pretty rapidly all came off and left me with this. So you can now easily see how the wall was constructed and there's one thing for sure, this ain't air tight. There's quite the breeze coming through which isn't a surprise considering there big gaps around all the timbers and a brick missing in one spot to which you can see the outside tiles through. So where do I go from here? Obviously the hole needs refilling with another brick. But whats the best way to reseal it all up before insulating? I've got left over plaster over air tight tapes and paints. Pretty lost with this one.

-
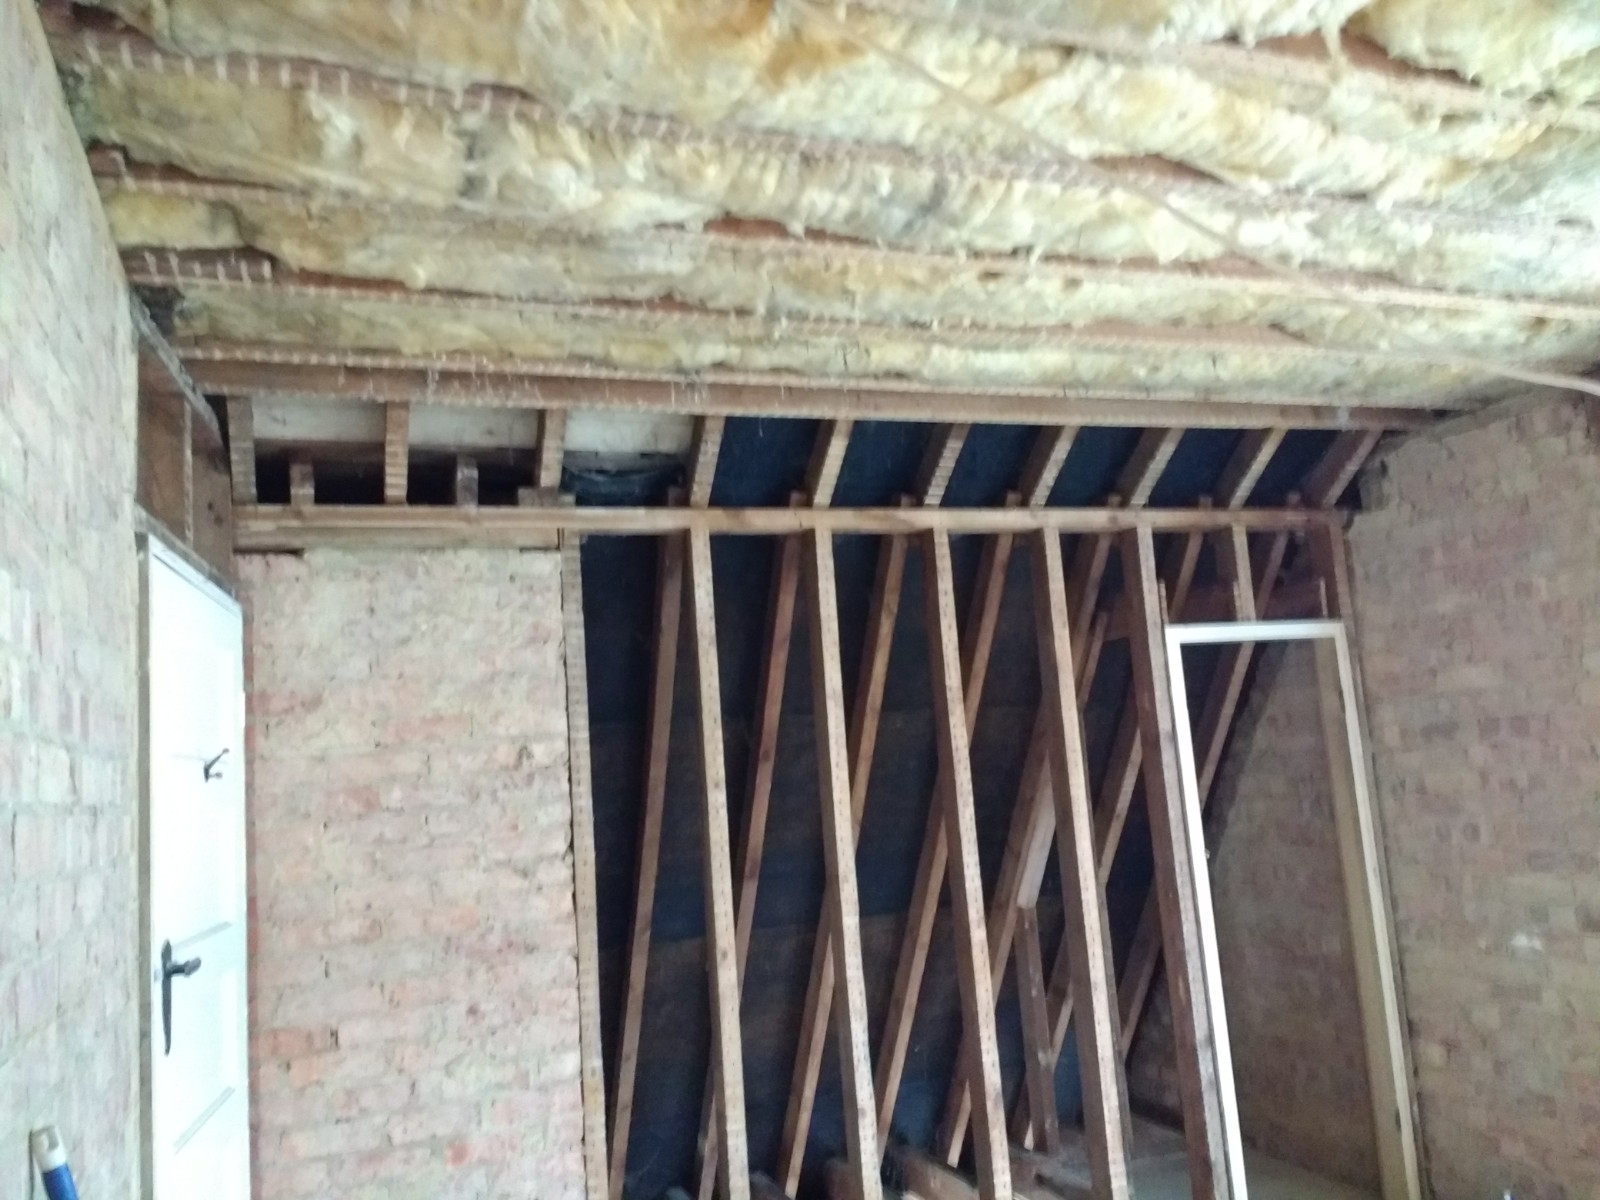
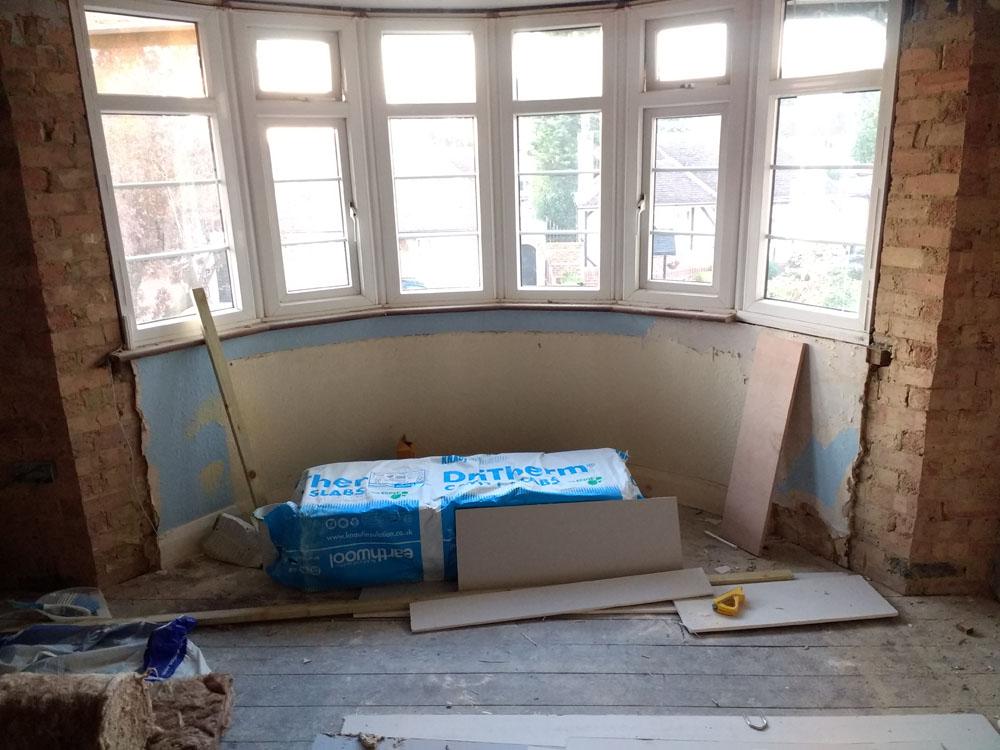
Loving that idea to keep the curve, may have to go down that route and see how it works out. The stud wall idea is only going to be made from 2" x 4" so there isn't going to be much insulation in there, so i was planning on going over the top with say 40mm insulated PB so I was prepared for it to be faceted. Your right about the window taking some of the weight and the original timber windows would have been load bearing, were currently awaiting new bay windows to be installed but there still weeks away and there now designed to be load bearing. I'm just unsure as to weather I'm being paranoid about moisture getting in to the insulation and not escaping causing the frame to rot and I definitely have no idea about things such as "dew point" and how its affects things. Its pretty much the 2nd to last major job I have to do before I finish off the front of my house, and really don't want to bugger it up by rushing it and not thinking it through.....or over think it and not get it done at all.
-
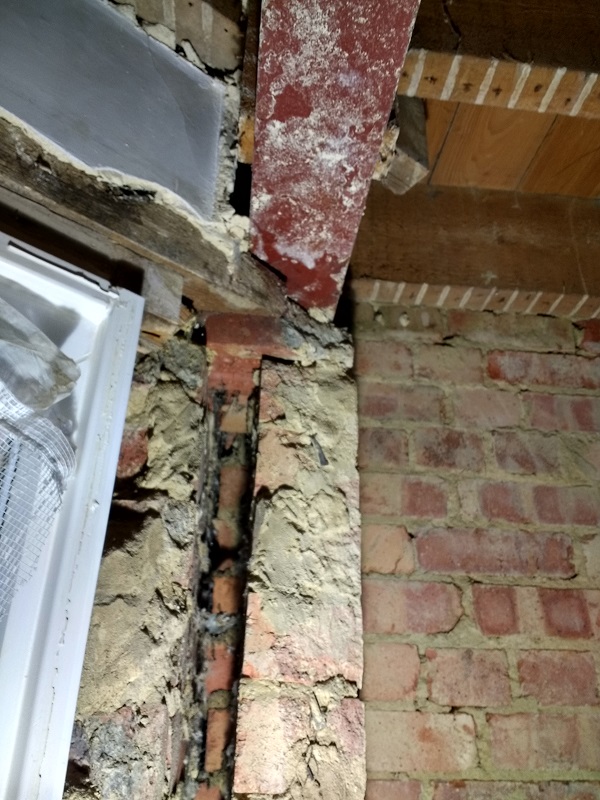
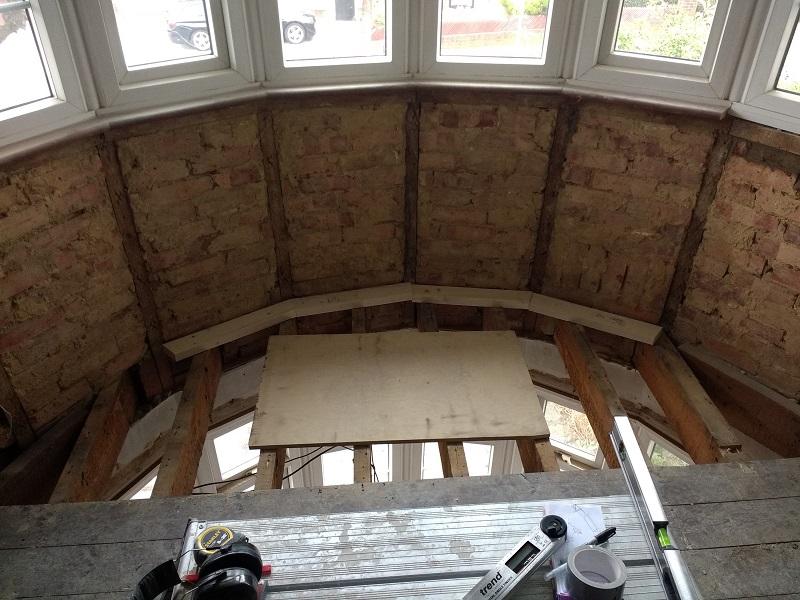
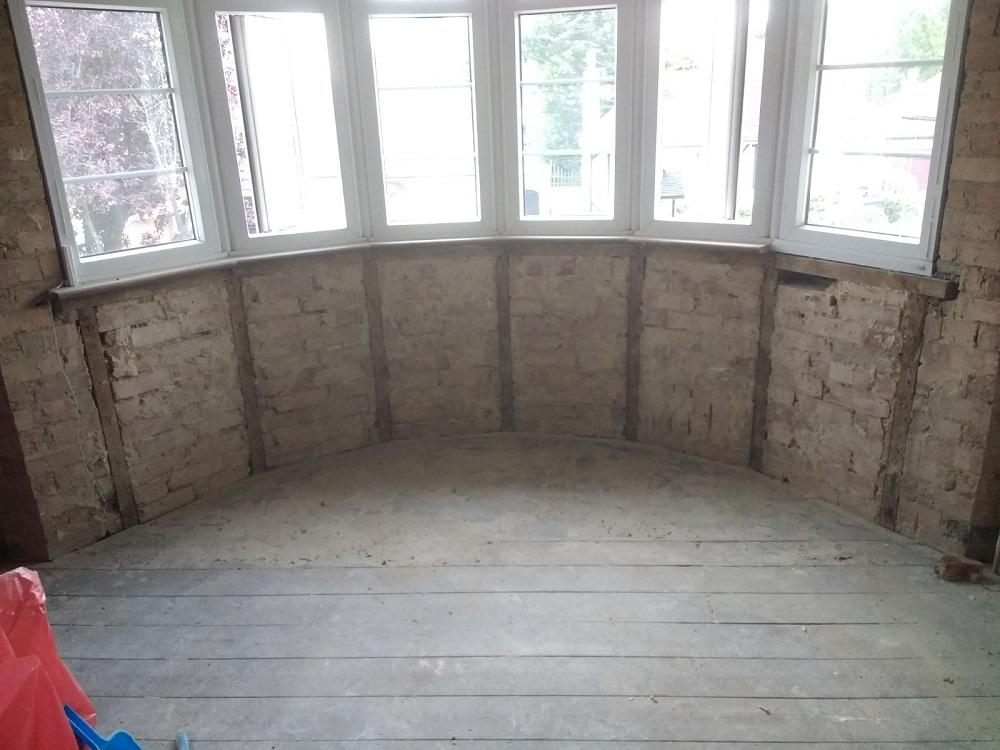
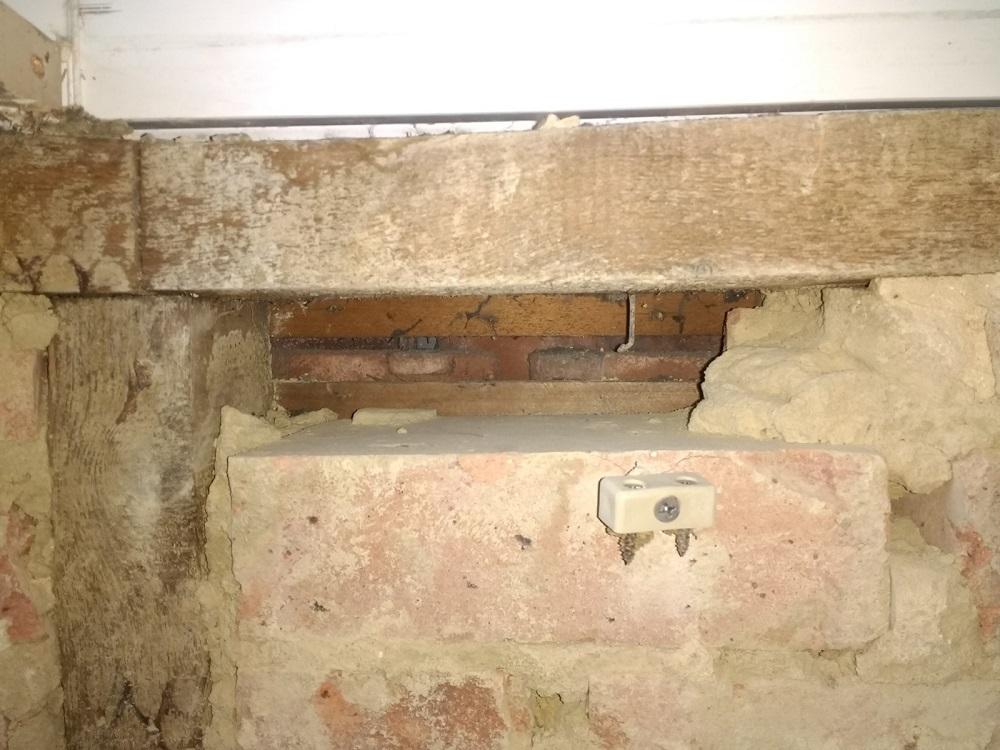
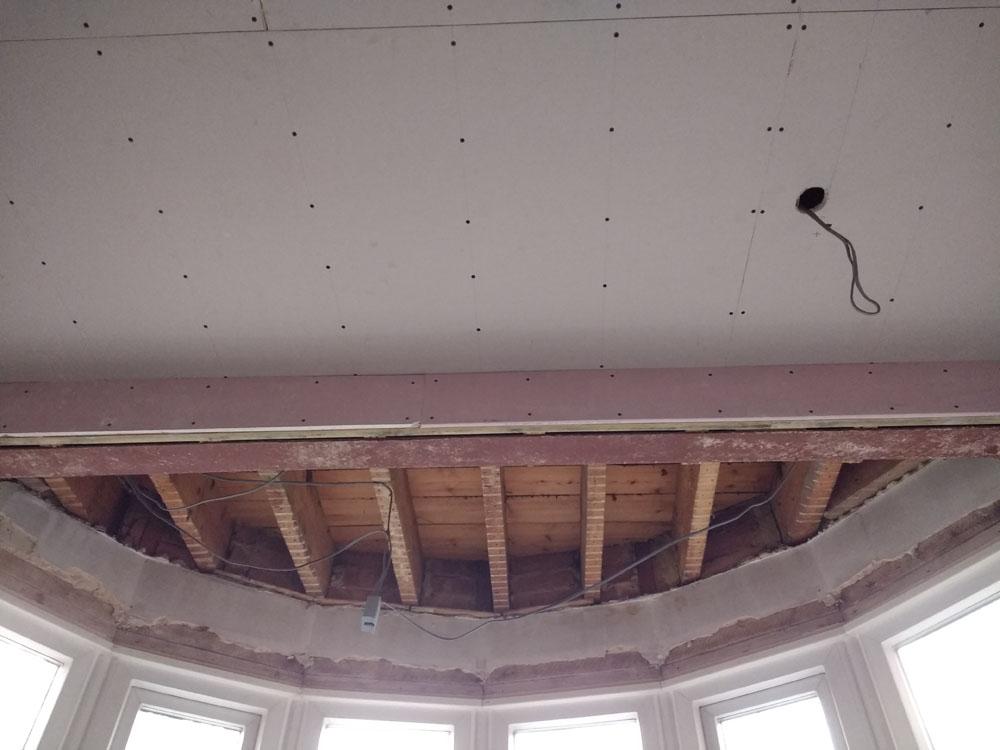
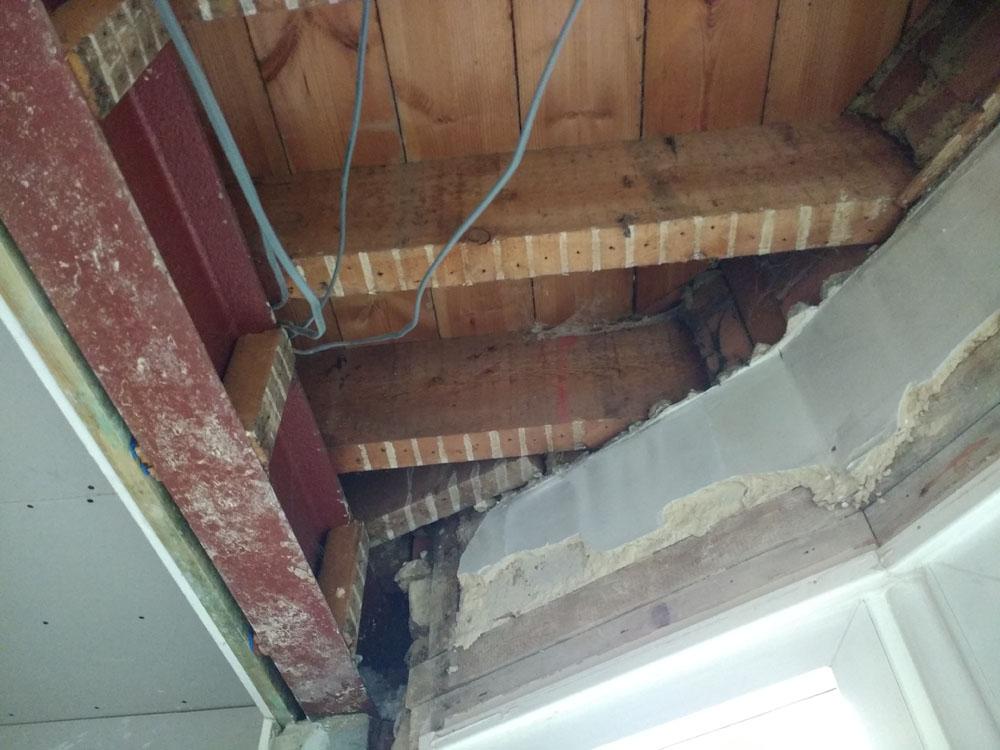
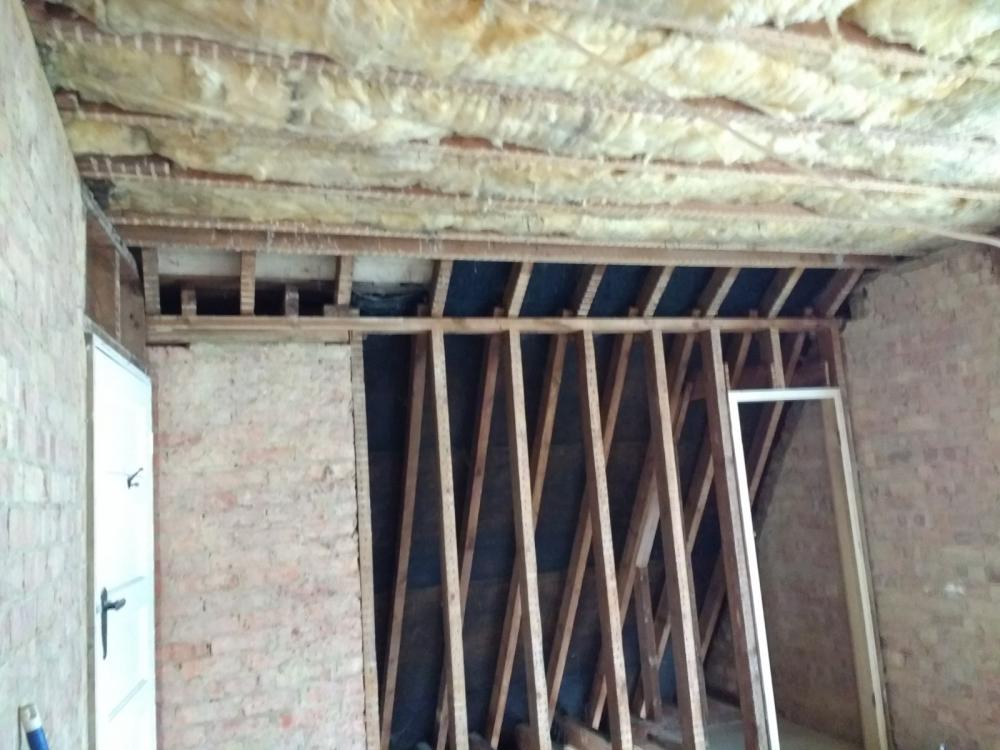
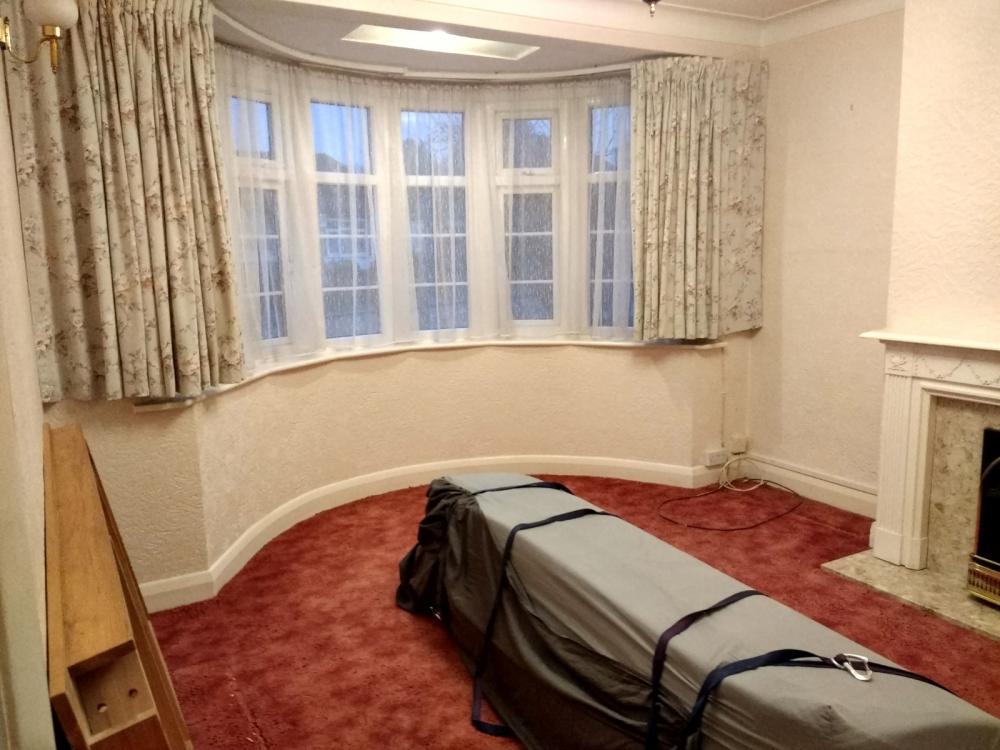
Hi Everyone. I started a post quite a while ago about renovating a 1930s Semi and its all been going horribly really well, and I've finally had to turn my attention to a certain piece of the house that I've been procrastinating over for a while. So the front of the house has a bay window up and downstairs, the downstairs wall below the window is a brick cavity wall which was cavity filled some time ago. But the upstairs is a timber frame with brick infill and plaster which has tiles hung on the outside. I know for a fact that this wall is going to be cold in the winter and is bound to suffer with condensation. So I've spoken to a few people about external insulation and the general consensus is that my best option is to insulate internally. But as to how I do this, is debatable. My plan was to make the wall air tight first (there are a few movement gaps from where windows have been changed in the past) build a stud wall upstairs and stuff it full of mineral wool/left over cavity insulation and then seal wrap it in a air tight VCL before plasterboarding it. I know celotex would be better, but the shape to fill would be a trapezoid and your trying to fit it through a narrow gap first, so its not practical. On further research, ive found that if theres any slight gap in the VCL, moisture would get in and rot things out. and considering that I was going to make this stud wall extend down through to the lower window and attach to a RSJ, making the VCL perfect seems impossible. So....any helpful thoughts or ideas? Do I persevere and make it work and potential risk moisture getting in, or just insulate upstairs. These sort of things infect my dreams these days.... Downstairs looking up Upstairs looking at the bay and cracks where the timber frame starts Look up from downstairs at where the RSJ meets/goes in to the cavity The upstairs bay.

-
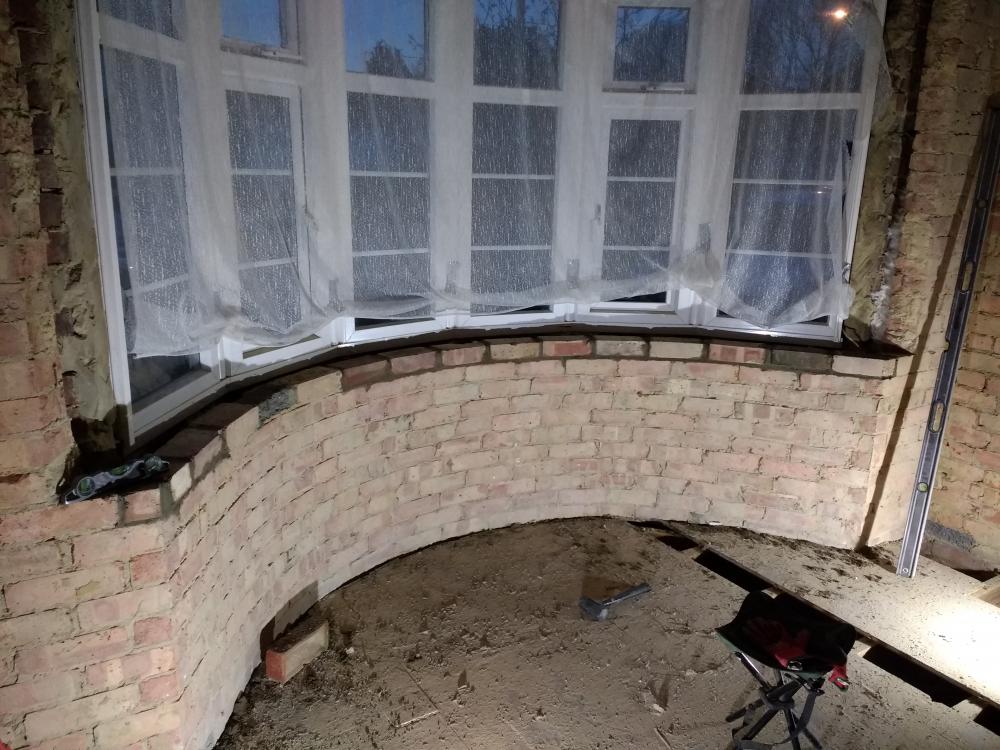
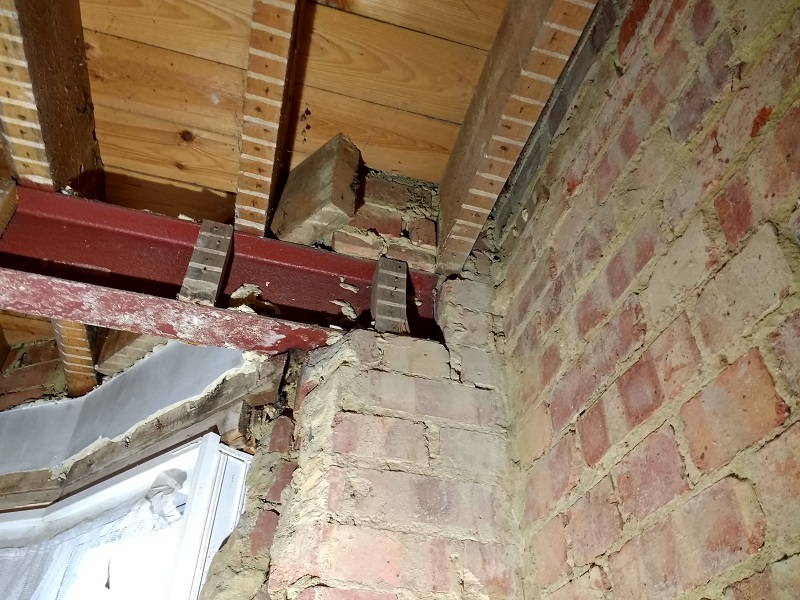
Thanks for the advice folks, I will be getting the RSJ on pad stones as after closer inspection the brickwork and mortar around it don't look in great condition. Got a very good price to get it all sorted out in one go so it seems like the best idea to get it done and currently its just holding me up on on other jobs. Got a fair bit done over the weekend, managed to get the front bedroom completely stripped of plaster and managed to get the ceiling down as well. There's so much weird stuff hiding just behind ever surface of this house. We've found magazines and newspapers above the ceiling, oldest from 1952, loads of old paperwork to do with investments in the middle eastern countries and the unbelievable birds nests, one accommodated 3 rafters, 2 over the bathroom and one going up to the loft, that one over filled a 40 Ltr bucket once compressed down. The other was in the chimney. At first we thought it was just dirt...then we found half a bun and quite a large stick, I think its safe to assume that the chimney isn't capped. Finally managed to start getting the bay window back together, apart from 2 bricks all the others just lifted off, the cement was pretty well bonded to the underside of the brick...just not to the brick below it. You can see in the pic below the giant wooden beam that's part of the roof and a burnt patch from where the light was (and still is) arcing slightly.
-
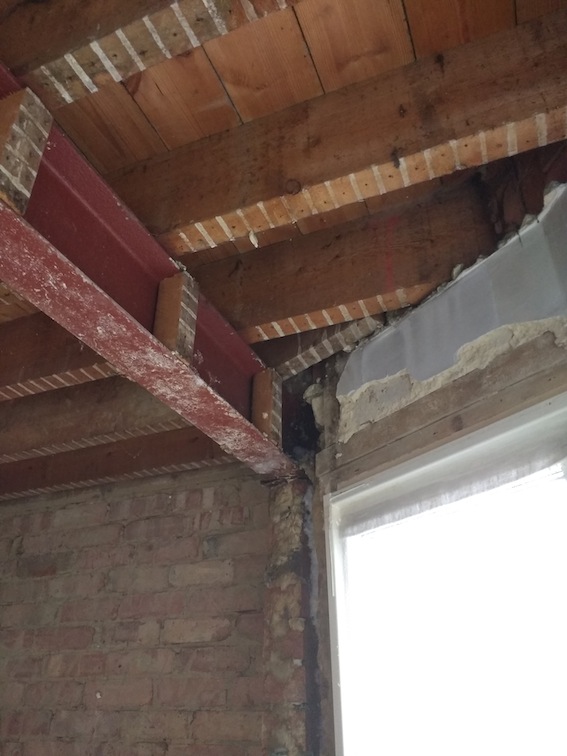
Not exactly pictures of the most recently development but just some more of the RSJ. So here's the weird bit, I do actually believe that this is part of the original house for a few reasons. Firstly the wood lathe strips that were on the ceiling leave a very obvious marking in the form of a line and two small splodges (technical term) on either side of the ceiling joists. These do not continue over the RSJ, so who ever fitted either went to a lot of effort the sand them off, or this went in before the ceiling was fitted. Secondly, the bricks it sits on are perpendicular to the rest and bridge from the inside leaf to the outside, again bit usual if it was retrofitted. Granted it would be incredibly rare for them to fit this in a 30s house so feel free to poke holes in my theory. But anyway, I had a builder come around yesterday to look at various jobs around the place and I got him to look at this as well. He said it looked "ok" (but did say only a SE would be able to confirm its load bearing abilities properly) but building control would specify that either end is to be on pad stones. He said we could leave it, until he noticed that one end was sat on a piece of folded over tar sheeting on one end and then changed the recommendation to pad stones. Apparently the window frame we have should be load bearing to help, but I can't confirm that they are. As I was planning on changing them I can ensure that this is the case in the future. As for the crack above the door, apparently its most likley unrelated to this and was most likely down to settlement from the wooden lintel above the door. I think I can confirm this when I lift the floor and see whats going on underneath. All in all, i felt the builder to be quite trustworthy compared to a lot of the others that I've met in the past, he was well recommended by a friend. Apart from getting a SE in, I'm not sure what else to do apart from to go with his advice and get it on pad stones.

-
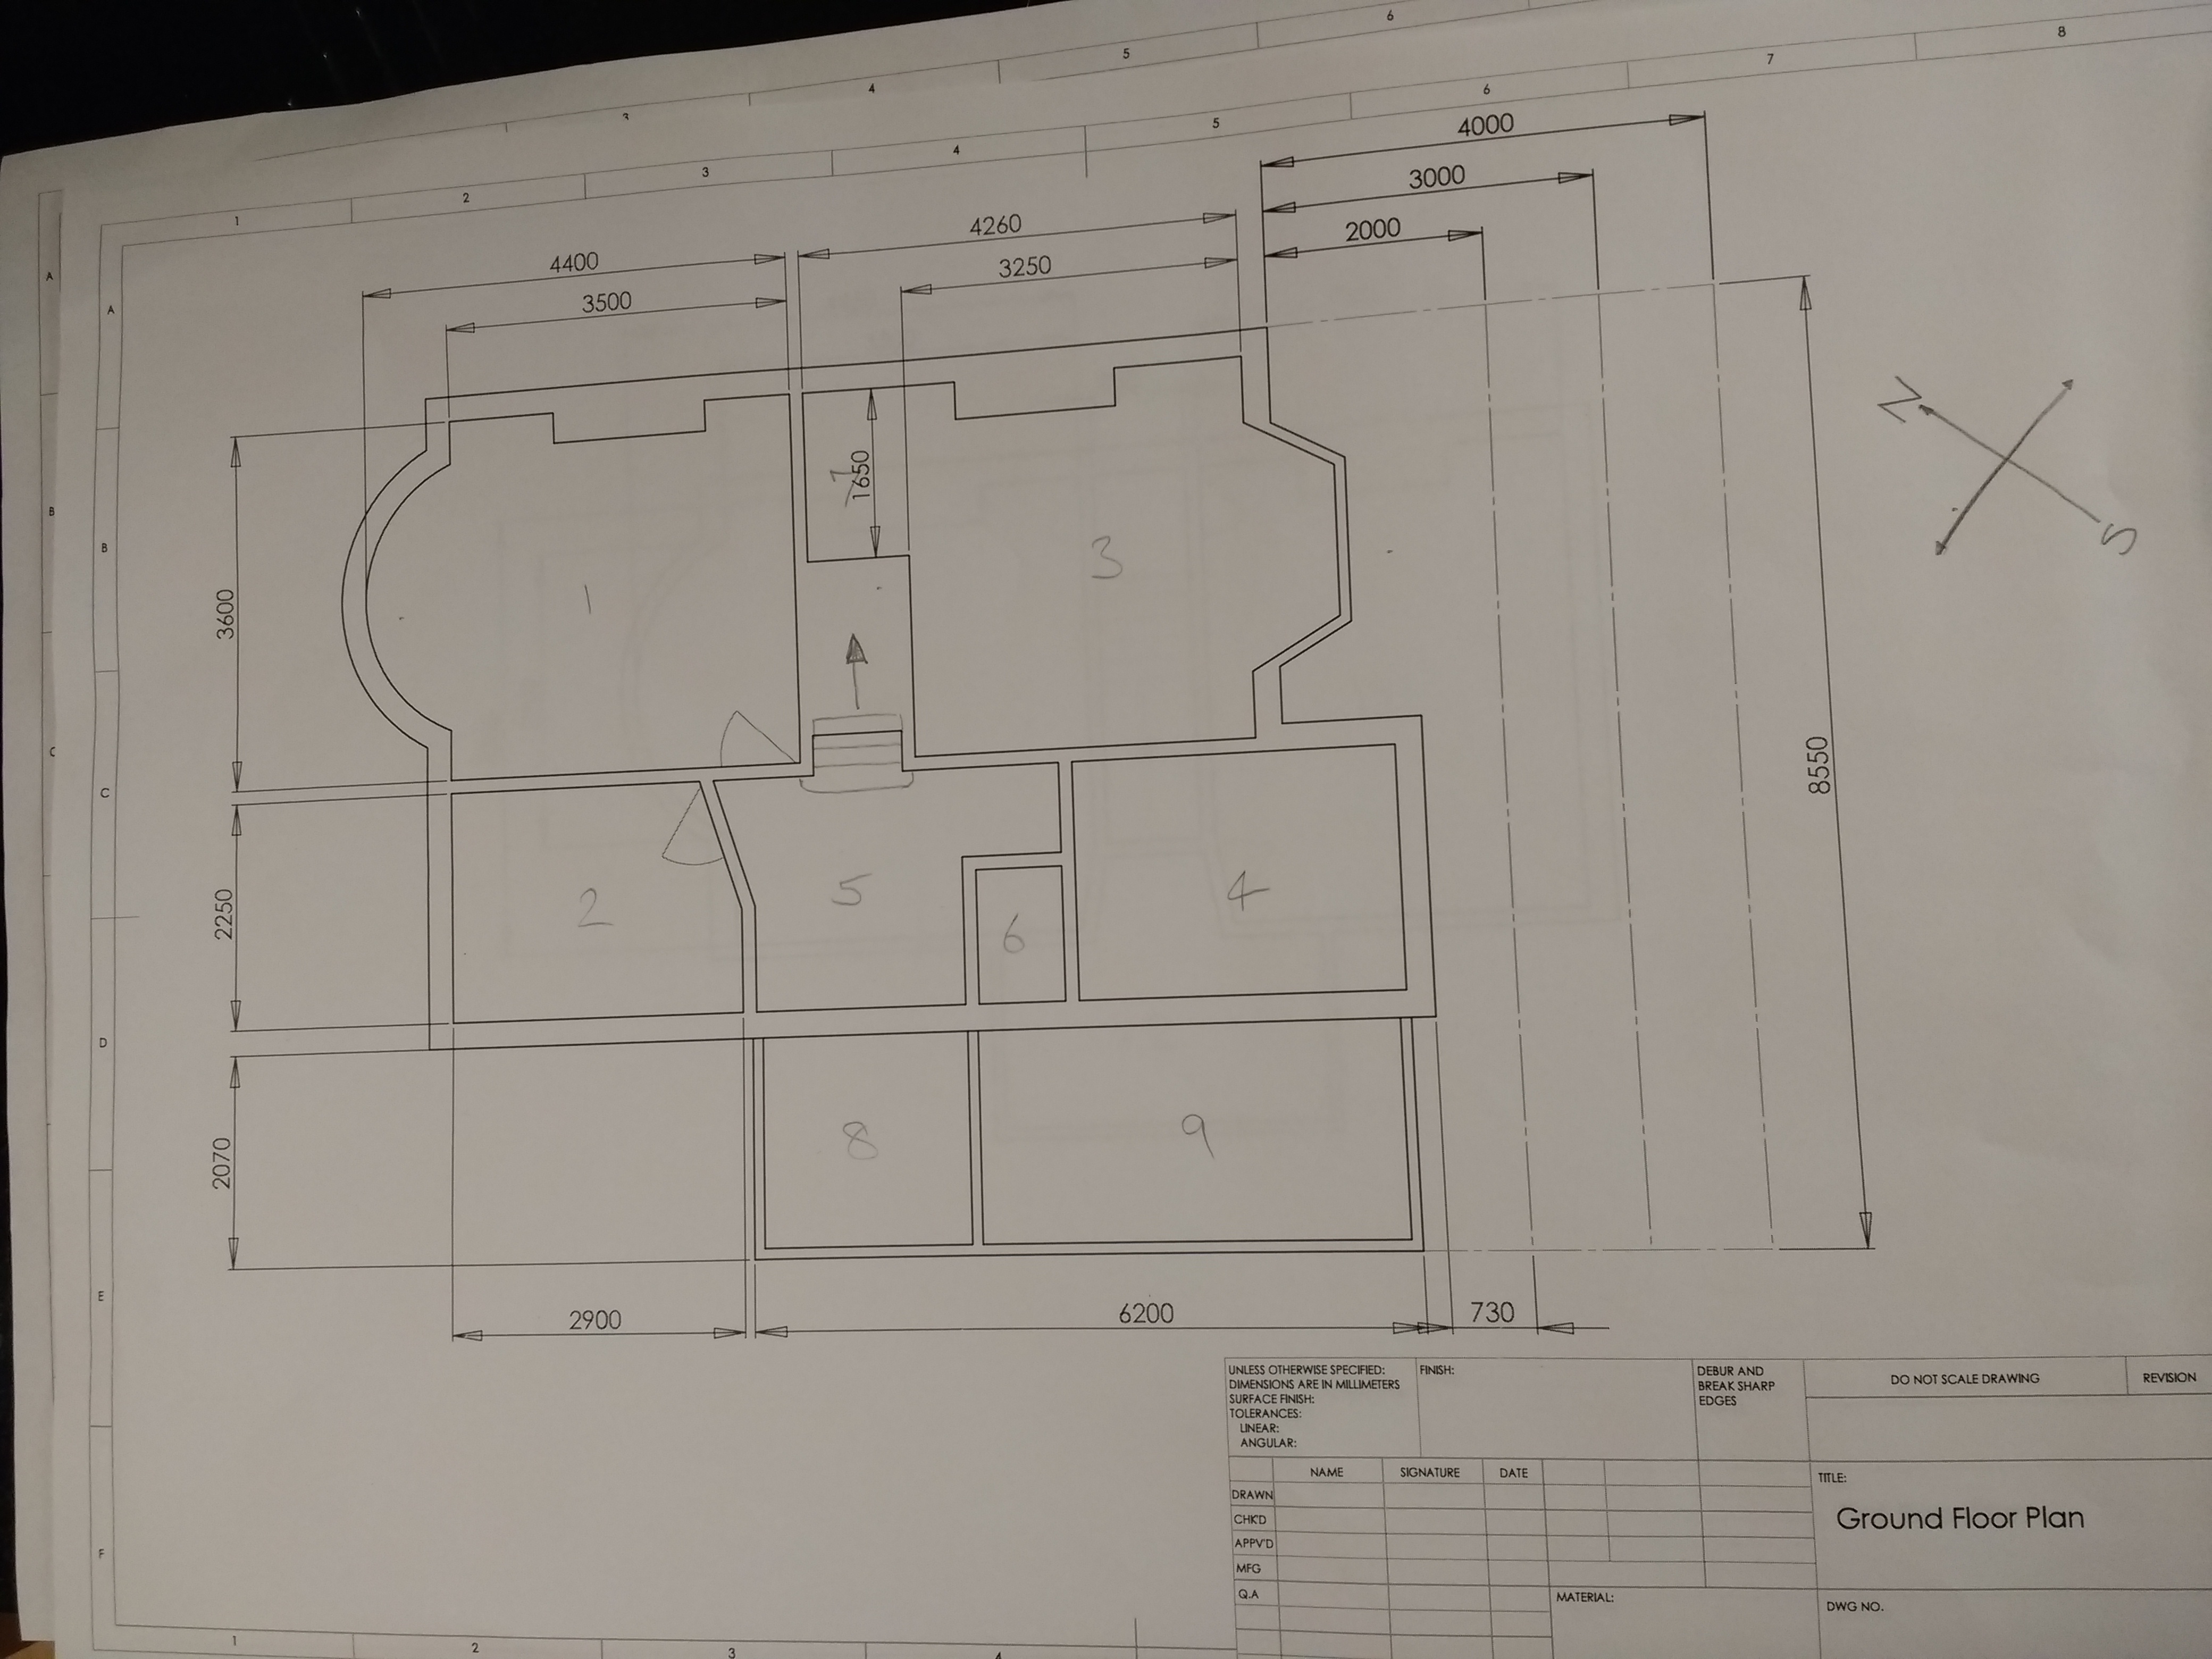
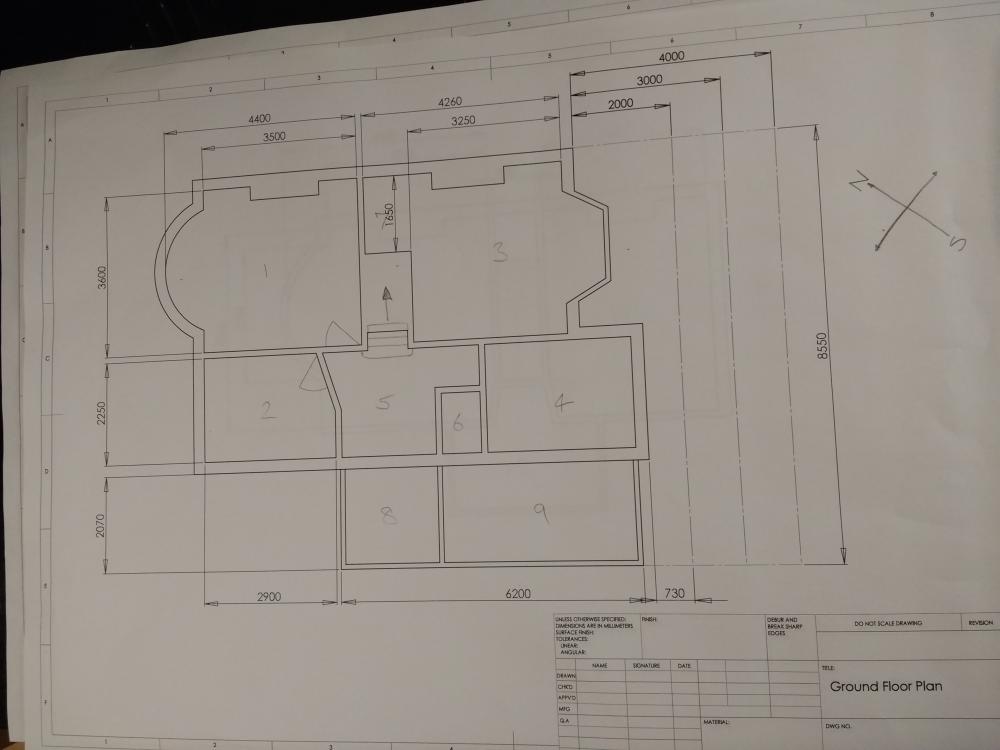
Hmmm....I will have to get a picture from the other side of the rsj to show you. But what your saying dosn't sound very good, I think it may be time to get some professional advice for sure. The door frame with the crack is as shown on the ground floor plan at the start of this post. It's on the wall which is perpendicular to the rsj in room 1, it does seem to have a good footing in the wall, but its definitely not on a pad stone, Its just sat on the brick, Some additional concerns that I have relate back to the room above this one, where the bay window wall has a crack either side of the bay running vertically from the window down to the floor. Again, will have to take some more photos tomorrow to show you all. If I had to guess, I would put money on the fact that a structural engineer has never stepped foot in this house. Hopefully the builder who's coming around soon can offer useful advice and not just try to take me for a fool.
-
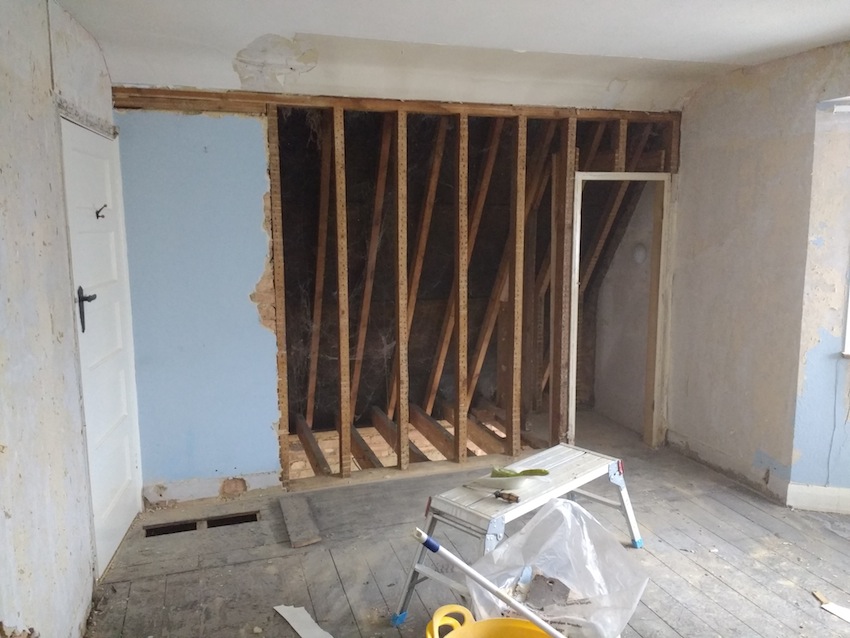
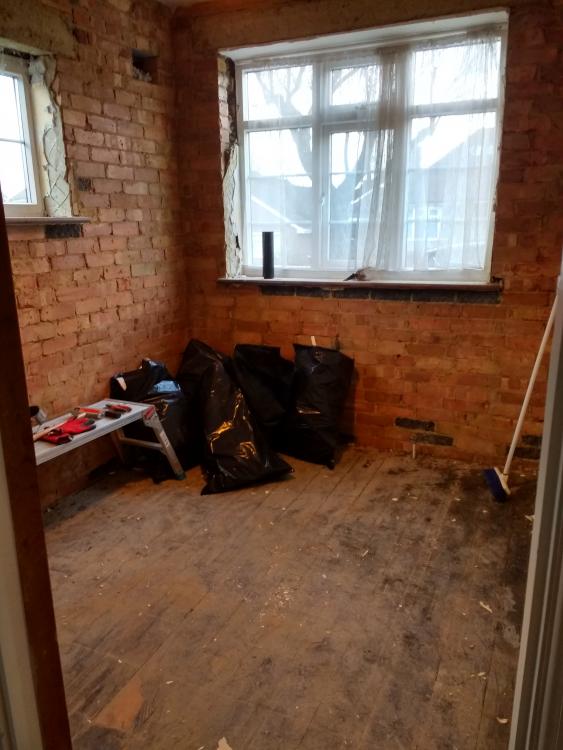
So I've made some progress recently. Got the two front rooms nearly completely stripped . Typically, one easy job has evolved in to several larger jobs. I started one job which was sorting out all the wirings hanging around in the bed room, only to find that some of the cables were so old that they snapped when bent and were still live, tried to chase them back to the next junction only to more horrors awaiting me such as lifting some of the floor boards and realising that they were running under a brick wall and actually supporting it. Fortunately my electrician friend has made my wiring "safe" for me by disconnecting everything and leaving me two working sockets...woo. Finally got around to speaking to my neighbours who let me know that over xmas an alarm in the property kept going off (we didn't own it at this point), turns out it was the CO alarm, so off the gas goes too. Owell, wasn't using it, this is what the place looks like at the moment. Found that the front room has a surprisingly large RSJ in it, pretty rare for a 1930 place. Got a suspicious crack above the door as well, the door frame is pretty out of square and the door keeps jamming, it got so bad that while trying to open it I had ripped the door handle off trapping myself is the room. Worryingly this is a load bearing wall. The bedroom is my next job to tackle, pulled down the wood lath wall exposing the eves. Going to insulate the eves and extended the cupboard behind it giving myself some space to stash suitcase and the usual junk that wont go through the loft hatch.

-
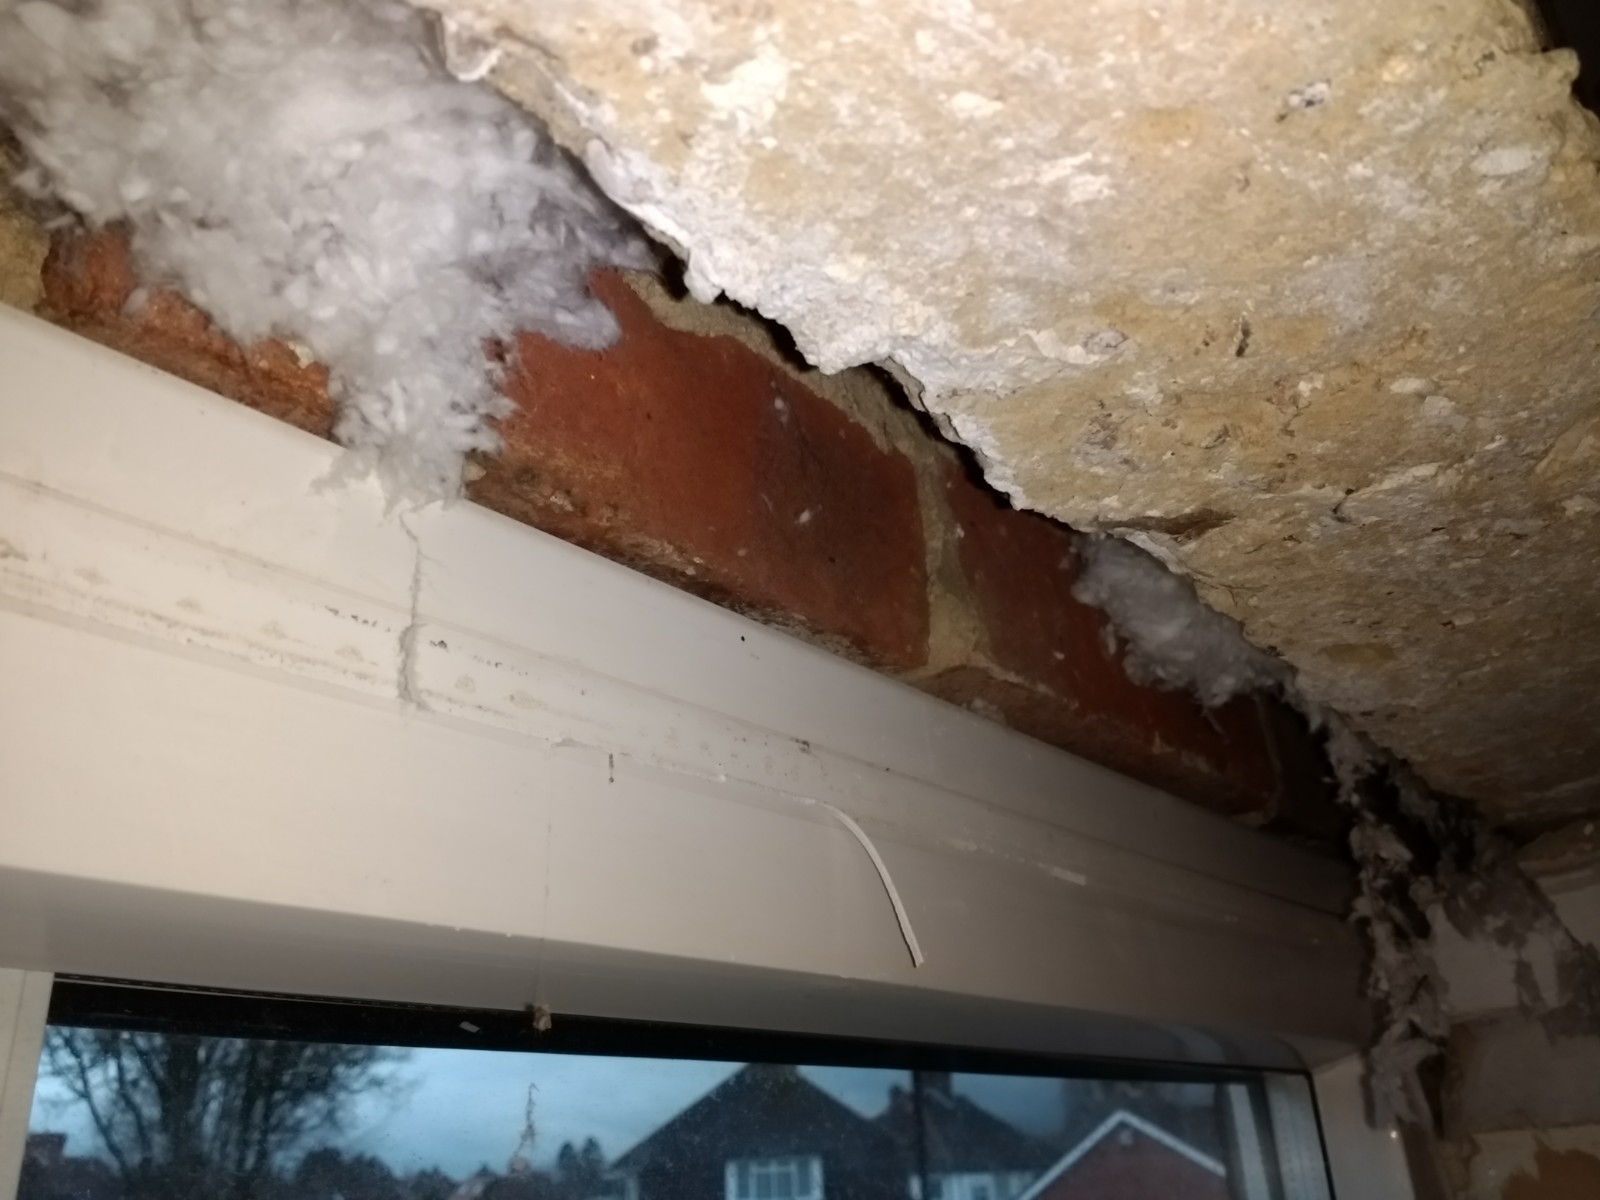
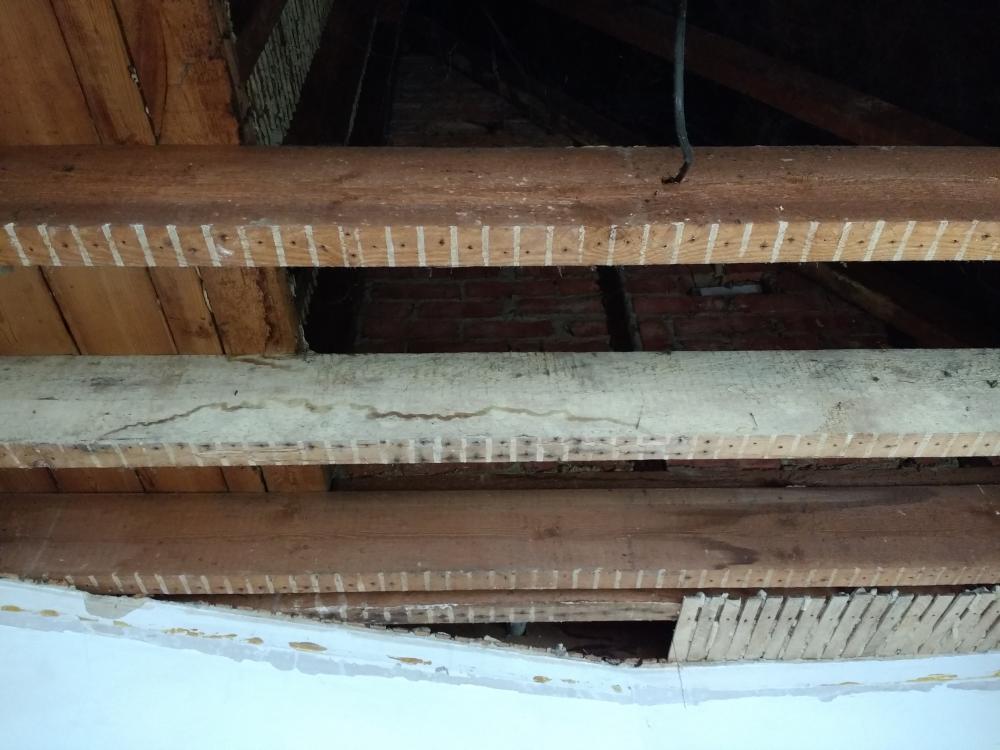
Unfortunately progress has been dead slow recently and so I've only managed to squeeze in 1 day of work in the last week and a half. So started with ripping out the old ceiling lath. Its only a small room but dam its a horrible job. Everything looks in good condition with space to fit insulation, downlights and ducting for the ventilation. But does anyone know why one off my roof/floor joists has this white coloured dust on only one side of the joist? The timber isn't rotten as its still solid, just unsure as to whats wrong with it. The plan is to starting wiring over the long weekend so I've got 2 other rooms to completely gut still and not much time to do it.
-
If the place was empty it would be nicer. The window actually has a large gap between it and the first course of bricks, theres not even any screws going up. All the window fitters in the past have probably seen this and avoided drilling up. Im surprised that drilling holes in it for the cavity insulation didn't shake them loose. Would you recommend something similar for walls with internal insulation? I don't really want to be cutting holes and making cold spots on the external walls but I dont have much of a choice in some places. The rest are easy because im stripping back all the walls and will clip and cap to the walls and dot and dab over the top. Im ddefiantly sure its cavity wall, can see straight in to it around the window reveals. I did consider external insulation and currently still considering it. Cant imagine the cost would actually be too bad, just because its not really a large area. Few issues I can think of is that the roof doesn't overhang the wall my more than 6 inches for some parts along the front and the upstairs bay window has a tiled front, would happily loose these though. At least with internal I can do it myself and in the front living room I can make a small void around the bay area which I can use for routing radial ducting which would look unnoticeable.
-
Thanks, well were actually classed as living in Croydon, I just haven't come to terms with it yet, and still struggle to admit it.
-
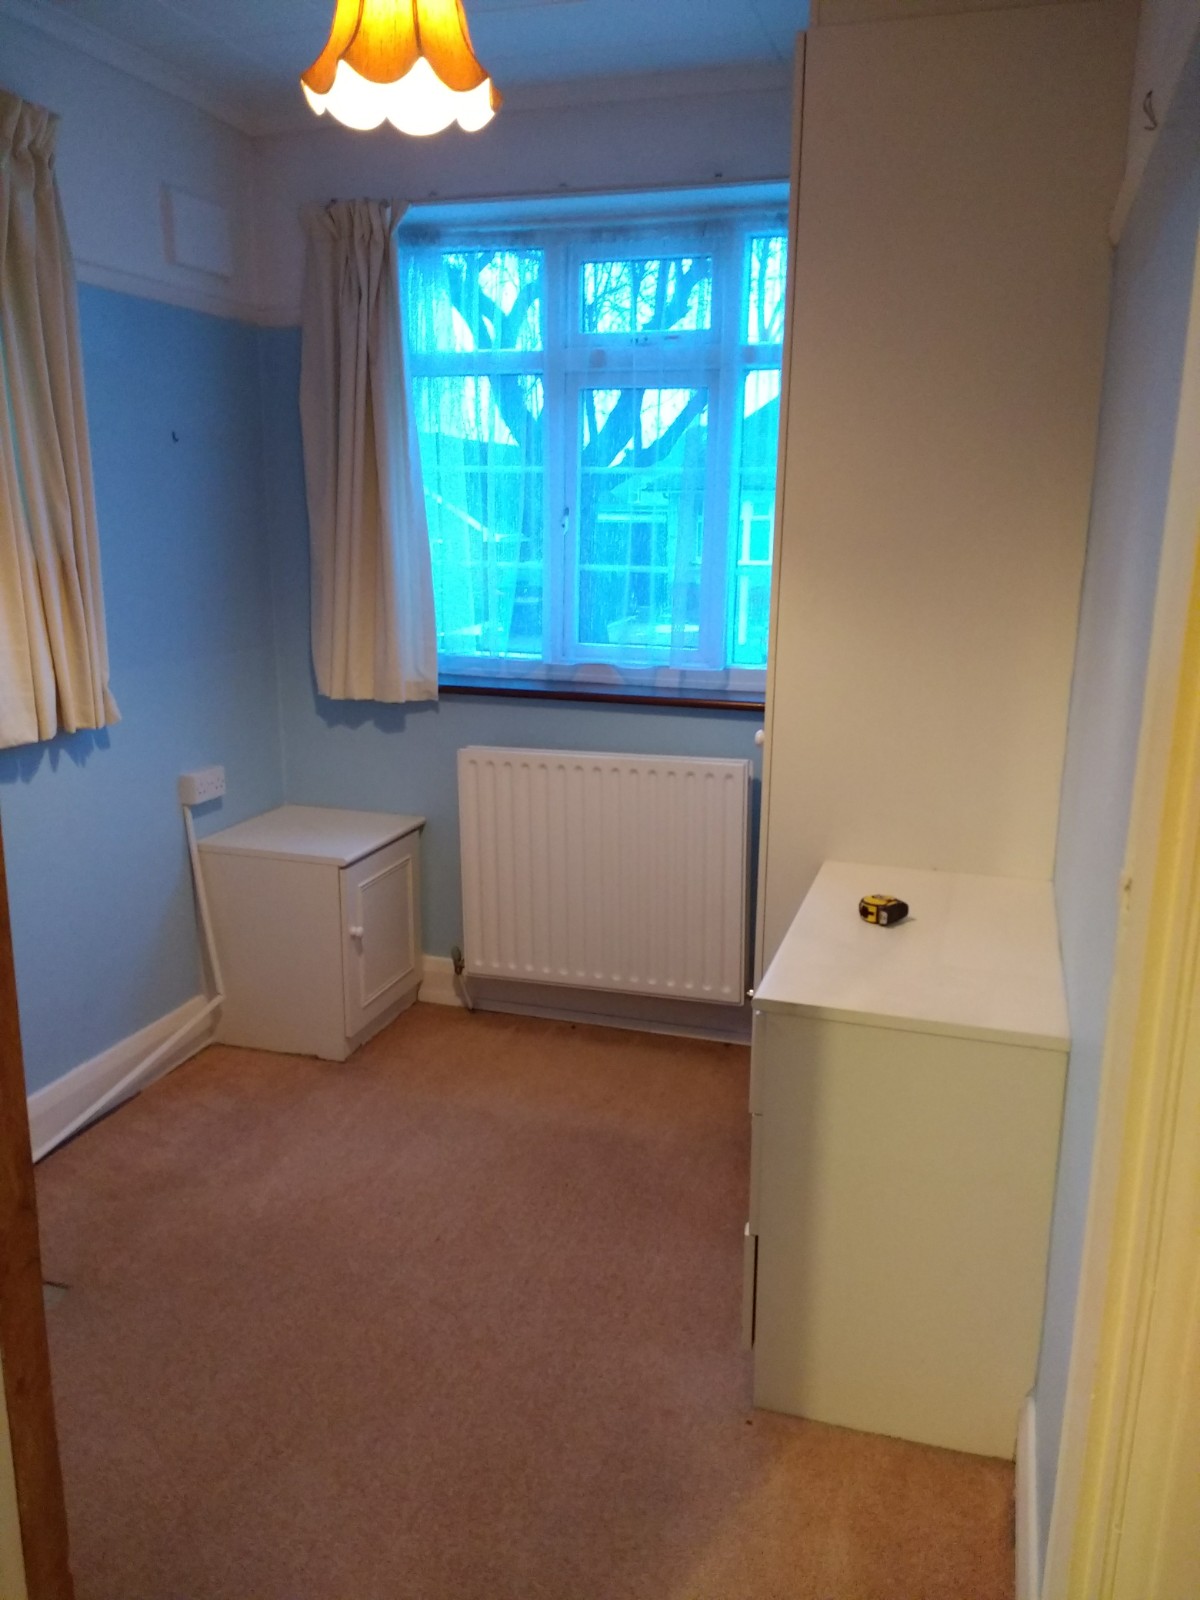
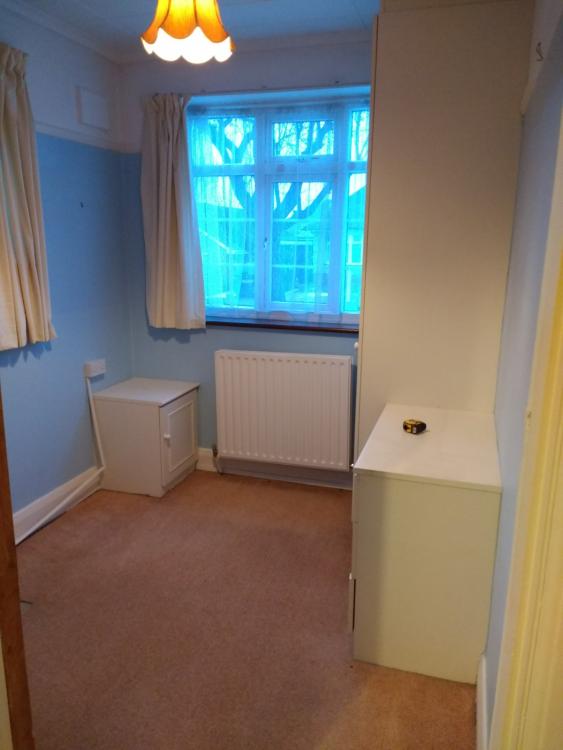
Sorry having to split the first few bits in to multiple posts because it makes my life easier. Right so the property is apparently already cavity wall insulated. But the bay at the front is a solid wall and because this is north facing my plan is to internally insulate it to keep it as warm as possible. Right, so maths isn't really my strong point here so working out bits such as U values is really done using online calculators, which is fine, but none of them seem to have the scenario of wanting to add insulation to a wall with blown insulation in it, so i'm guessing somewhat here (any help would be appreciated here). So starting with the box room which is 2.9m x 2.2m the plan is to internally insulate the walls with 50 PIR which will fixed one way or another to the external walls currently undecided on the method to use (please feel free to poke holes in this plan). So heres how I've started out so far. Most of the plaster came off pretty easy, had some issues with the cavity wall insulation falling out so left the window reveals in until I get some cavity closers in. Weird thing with the little window, theres no lintel holding up the external bricks, not sure to do with this. Its only got 3 rows of bricks until you get to a roof timber. Ironically, the other two walls in the room I only removed the wall paper but it took longer than chipping the plaster and turns out it all need to come down anyway. Next jobs are to pull down the ceiling, lift the floor then start building up again and making air tight as I go. One thing I'm still a bit puzzled over is how to fit sockets without ruining the internal insulation.

-
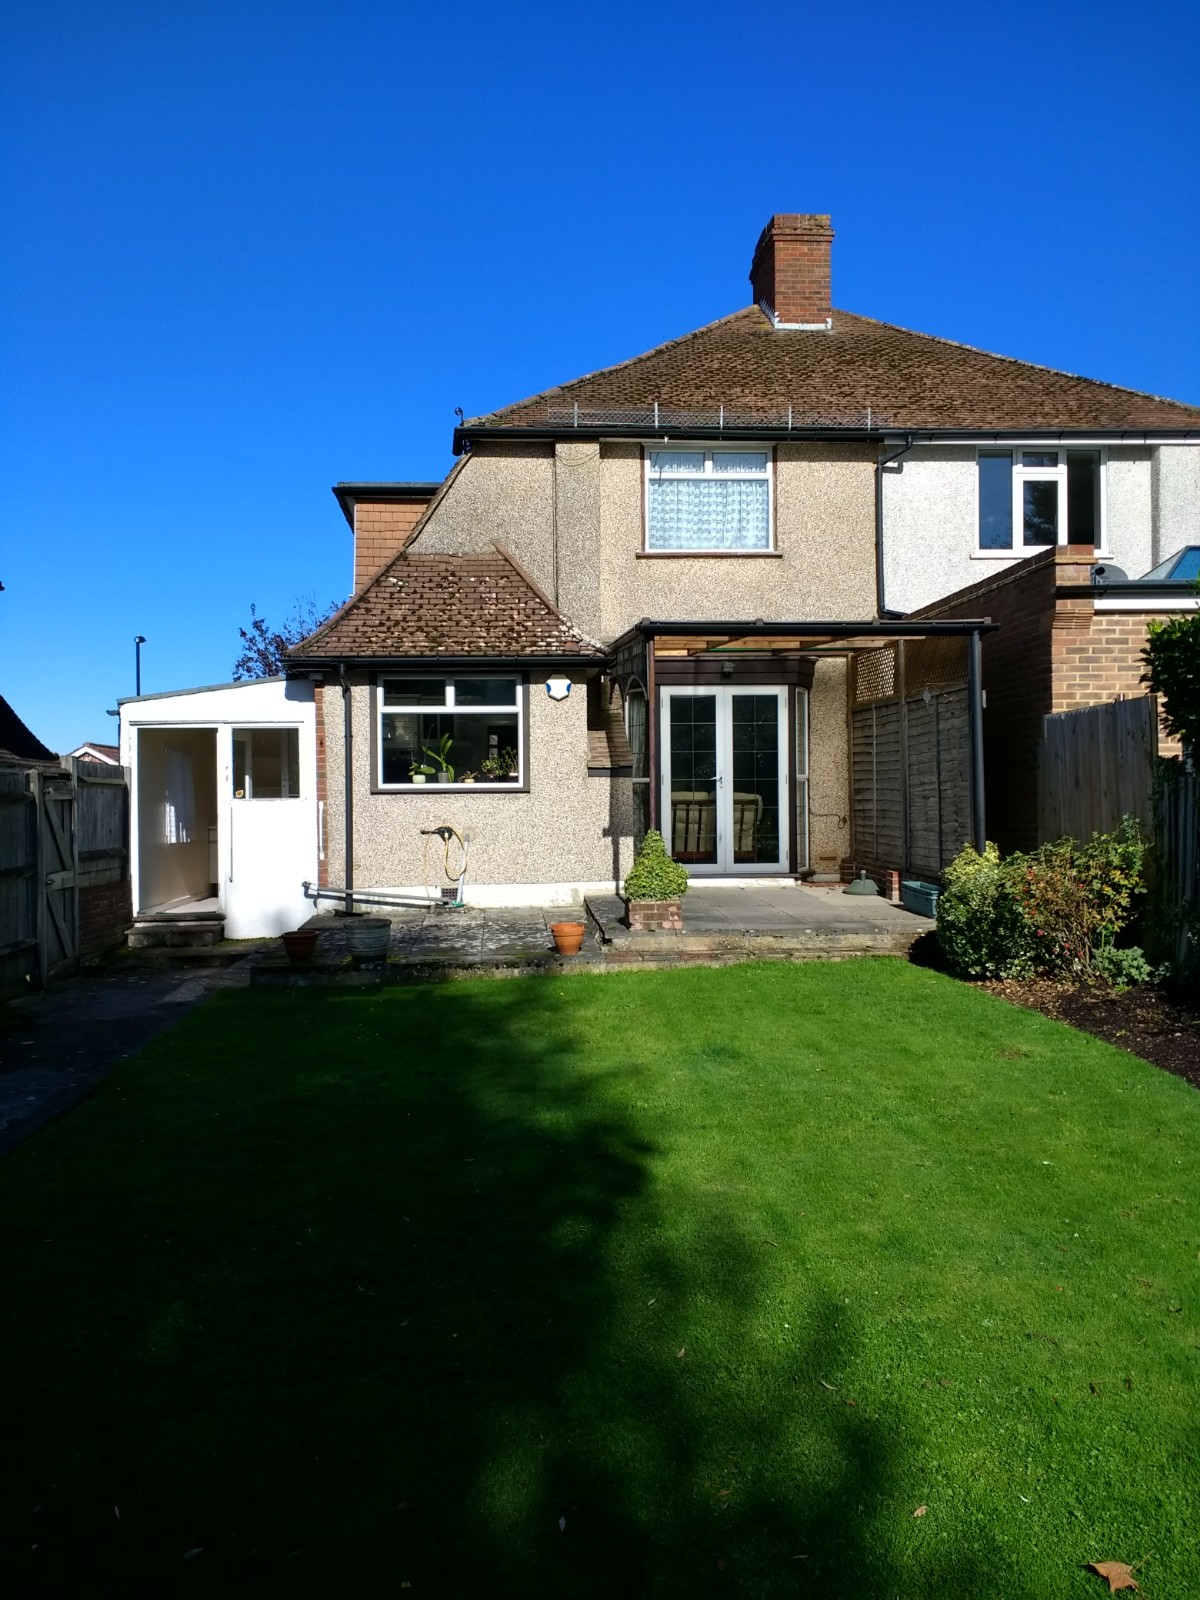
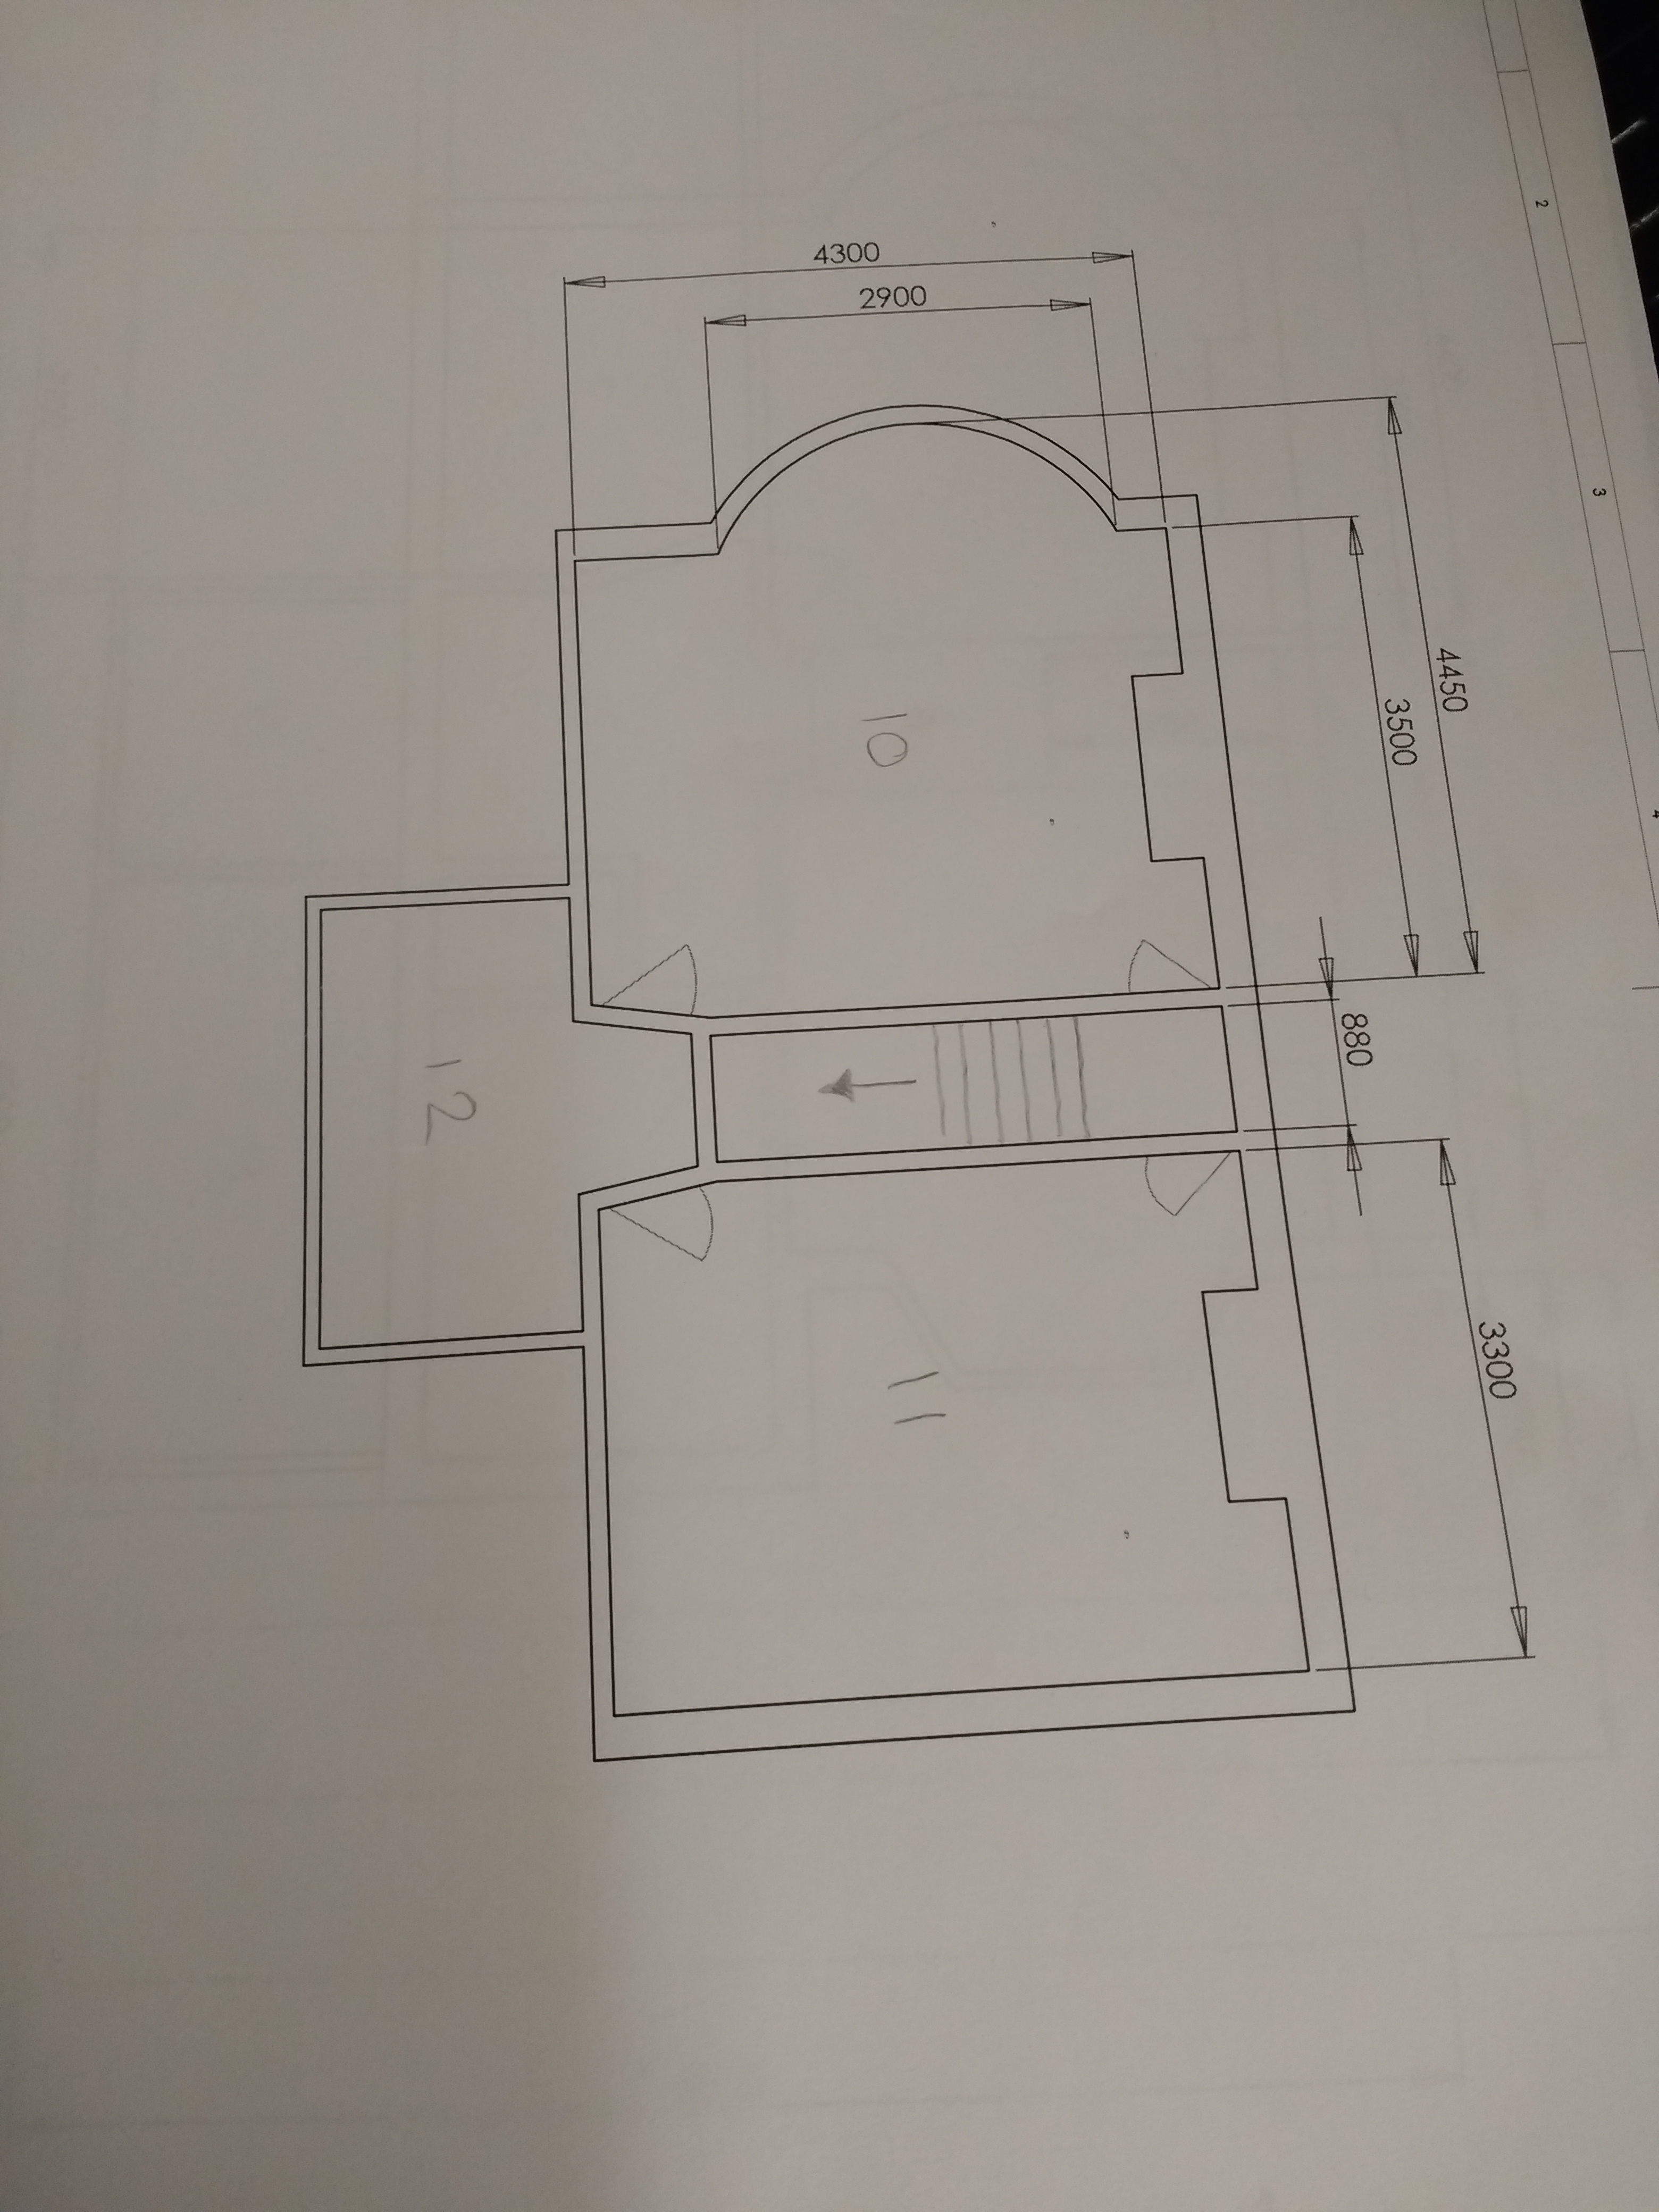
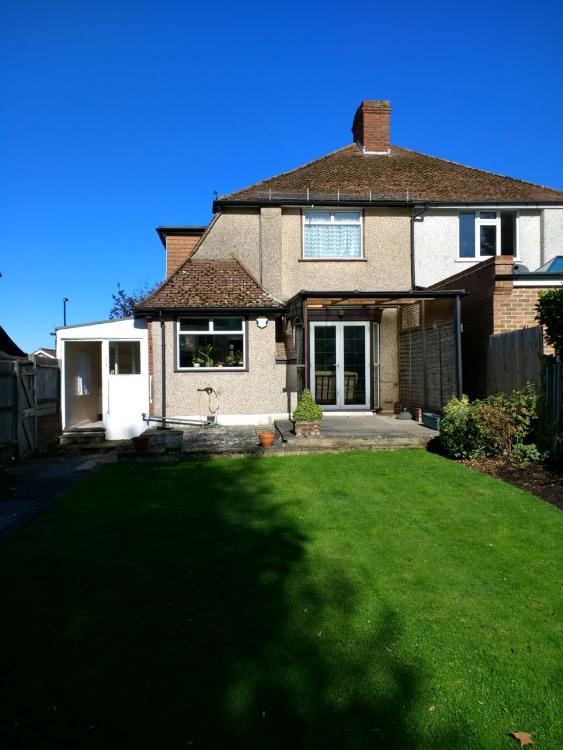
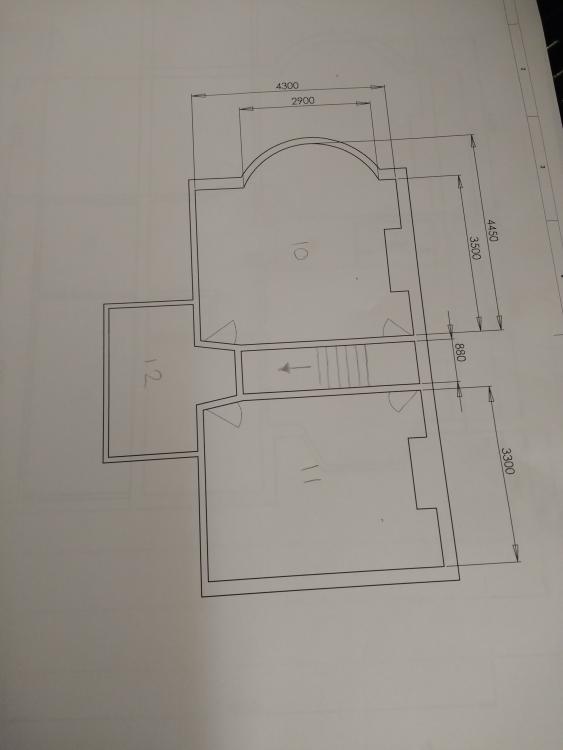
Thanks, Im south of London. But still some way from it. Right, picture time... So apparently I don't actually have a picture of the front of the house, but heres the back, just as good really. As you may have noticed, it has lovely pebble dashing, a lean to verander with a gutter that empties on to the grass and a very damp utility and porch stuck on the side. The long term plan is extend the house backwards similar to the neighbours, but to have the roof wrap around the side and include a rebuilt porch and utility. I've poorly drawn a few floor plans, excuse the missing info like doors and windows. I usually lay tracing paper over these and draw all the little bits and alterations by hand. Just to list the rooms on the ground floor we have the front rooms 1 & 2, These along with the upstairs bedrooms are my starting point, in about 2 months I need to have these 3 rooms in a liveable state as we intend on moving in to get our much desired private space back. 8 & 9 are the porch and utility, 5 Is the hallway, 6 downstairs toilet, 4 is the kitchen, 3 is the living room, 10 & 11 are the bedrooms and 12 is the Jack and Jill bathroom. Altho we want this extension (also needs a new roof) it could be a year before we get started with it, and as we need out private space back I plan to start working on the front of the house first as any future work should not disrupt it.
-
Hi everyone. My names Adam and my wife and I have just bought a (new to us) 1930s semi-detatched house together. Well thats the boring bit over, the fun bit is that this house is a wreck, not the worst i've seen but not really liveable at the moment. We got it just before the cold snap and it had no heating, the wiring looks old with quite a few sockets around that only have two two pin holes, theres a hole in the roof and the shower has been disconnected because it leaked for so long that a timber behind it rotted to the point where, when I pushed my key in to it, i actually lost it. So......the shortened version of the plan is to fix it, extend it and rebuild part of it. Apart from some of the largest bits of it, most of the work will be done by myself. My experience is a bit limited, I renovated my last flat myself, but it was far easier than this. I want this house to be more than just comfortable, I want to know that at the end of it I did everything reasonably possible to make it energy efficient and low cost for the future. I intend on achieving this by insulating everything within reach, completely sealing up every air gap, using MVHR which will be in the loft and hopefully solar panels on the extension which will go to a battery unsure as to weather a heat battery or electrical one yet. Pictures should follow shortly showing what it currently looks like.