
Leaderboard


Popular Content
Showing content with the highest reputation on 07/05/16 in all areas
-
2 points
-
He's already sacked ! Didn't fill the screw holes with silicone before putting the screws halfway in, and then another dab behind the screw head before fully tightening. . 8/10 I really don't like seeing compression going onto push fit and with those tails secured in the wall, if the plastic pipe got damaged prior to / during fitting, your buggered. I don't like those odds, especially when your tiled and grouted by that stage. He also didn't mention hand tightening one nut of the shower onto one fully tightened backplate, and then offering the other into a partially tightened backplate to allow some lateral movement. That way if your not dead on 150mm centres ( not the 1500mm he's says ! ) you can still get the second nut on, and then using a long reach pozidriver, you can tighten up the screws accordingly. Once tightened, remove the bar mixer, screw on the covers and refit the bar mixer, and then test. What he also doesn't say is that water can leak back down the pipe work from these kits, so you wouldn't know until a lot of water has gone behind the wall / void. Another reason why I insist on copper, as you can tighten the olive much more firmly. I did like the bit where he says "Lovely!" . Overall he gets a 6/10. Good, but no cigar sorry.2 points
-
Fill ya boots1 point
-
Quick update: The doors are painted and on. The GSE roof trays started tonight.
 1 point
 -
The adjustable bends Jeremy mentions usually have quite a large collar on each universal joint so can be quite wide, depending on manufacturer. Fwiw, I've done plenty of soil stacks and have always simply pulled the pipe square. Never had a leak or a comeback tbh. You could use a clip at the outer edges of the run, and then use patent band / similar to fix at the elbow I suppose. That would put the bend tight against the wall in the corner and remove 50% of the overshoot. Ive never had a problem using 92's for exact 90o bends, and, if it's 110mm pipe runs, I'm really struggling to see the issue if I'm completely honest. @ProDave Your issue will be worse as there's little to no 'give' in rainwater products I sell on all my exterior work tbh, so can't offer any help here, sorry.1 point
-
That's one of the problems with the ease of access to information we have via the web; we have no easy way of checking whether or not it's correct, unless we have a "Master Plumber" on hand to show us the errors!1 point
-
Ah, but it got you doing a detailed rebuttal, didn't it? Thanks for instructions on how to do it correctly. At least this means I can smile smugly at Jan, because I told her (i) you cant' safely use Hep2O pipe in a copper compression fitting and (ii) Hep2O pipe won't take the bend anyway. Her argument was: "that's what the guy did". So now you've got the casting vote.1 point
-
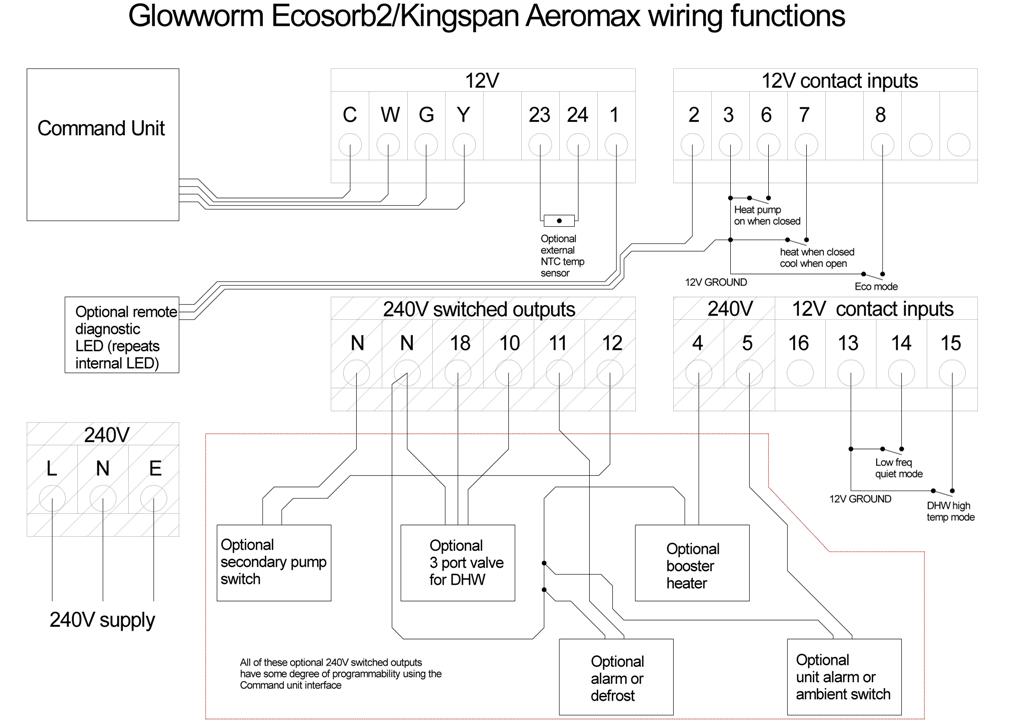
IIRC, all of the functions that can be operated by dry contacts in that diagram I drew, can also be operated by the Command Unit. There's a lot of flexibility there, in terms of being able to programme when switched 240V is available from the ancillary relay bank in the ASHP, the one that controls the optional extras inside the red box at the bottom. You don't have to use those relays to control the functions shown as they are just programmable outputs that could be used for several different purposes.1 point
-
On the last house refirb I did i had loads of downlights so I did as other suggested and loosely coiled the feeds and boarded over them and skimmed. I actually mapped all the layouts for the lights on the chipboard floors and then used a plumb-line lazer to place each cable point. Each point was marked on the floor using a small screw. Once the plasterer was gone I then found the points on the ceiling (Again using the lazer) and cut them out. Worked rather well! The screw was probably overkill but didn't want to lose the marks. I guess a thick sharpie and some lines would have been equally effective.1 point
-
Red diesel round here !!!!1 point
-
Our plasterer suggested I both cut all the pipes down to about the level of the plasterboard, so he could skim flat over the holes he'd cut in the boards, and also asked us to just coil up and record the down lighter positions, so the holes could be drilled after he'd skimmed. In my view anything that makes a blokes job easier is likely to either save you money or result in a better job (or, perhaps, both).1 point
-
I better sit down and refresh my memory on all the settings then, as I remember looking at how the Command Unit might be used as a complete programmer/controller/thermostat back when Joe90 found a cheap ASHP, some time ago, but I haven't pulled the manuals out and had another look since. Getting the unit running to test it is easy, but ideally you want to fill it and connect it to something like a coil of pipe, so you can get a feel for how it works. You can make it run in cooling mode simply by putting a wire link between pins 3 and 6 on the ASHP dry contact connections (next to live wires, so caution is needed!) and you can make it run in heating mode by connecting a wire link from pin 3 and pin 6 and another link from pin 3 to pin 7. Pin 3 is the ground connection line for the control circuit, pin 6 is the "heat pump on" command line, pin 7 is the "heat or cool" command line. I drew this diagram that sort of explains what the dry contact connections do:
 1 point
 -
For you, yes. I'll bet the plasterter cursed you doing that, and I wonder if the plaster finish around them was compromised either in flatness or quality of finish having to work round an obstruction?1 point
-
Ah, heart-in-mouth stuff this. The phone goes - new number - no half second when you can adjust to the person you know is on the other end because the name flashes up on the screen. Starting a phone conversation with a technical expert, but hoping for an emotionally literate, customer-focused, technically easy to understand response is not a pleasant feeling. Add to that a mobile phone with a hiccup and a slightly distracting tomcat (Sid) who fastens himself to my leg in mid-sentence, a recipe for miscommunication. Semi-Undaunted because I've done a bit of homework. I prepared a Briefing Pack for the Piling Contractors. They've got all the information I have got in front of them and I've asked for an initial chat. Important this: first impressions and all that. Imagine then my delight when I hear a man's voice says, you don't need [This Company X] because .............. and it would be better for you to use a different piling system because............ Customer Focus. Yippee! (PM me for the details of who and which company). And he proceeds to give me the low down on why screw piles are likely not the best system. Our Soil Investigation makes it clear that our land is not suitable for piling with screw piles. He's just saved me a lot of money. A lot. And I'm grateful. And they do MVHR and this and that and the other for new-builds. Who am I going to contact and ask for a quote for MVHR, this that and the other? Right. No brainer. Interesting then that another company [ Company Y] has already submitted a quote '... based on the information [ I ] have provided...' (which was exactly the same as to the former company) amounting to £23,000. Company Y manufacture the piles and licence an installer to do the work for them. In this case I would need to be really sure who takes appropriate professional responsibility for using screw piles - and be able to explain why they were not using another system instead. And in dealing with one quote which involves two companies, I'm asking myself where's the potential for conflict of interest? This sentence in their quote set my teeth on edge... '...As you are no doubt aware, some piling schemes are installed to a ‘set’. This means that the actual works and final costs can invariably increase on the day of installation...' 'Can' and 'invariably increase' written next to one another. The best I can say is that the sentence wasn't drafted with care. The Plot Thickens One contractor (PM for details) rings up and says. " Your piling requirement is for about 200Kn, so it can't be done with a mini piling system. So for the spec you have it'll need CFA (Continuous Flight Auger) piles - or some other system. Mind if we pop round to have a look at the site? I've had a look at the briefing pack you sent us, looked at Street View on Google Earth and I'm a bit concerned about access to your site. I just need to have a quick look. Will Wednesday morning be OK?" Customer focus writ large. Before the guy arrives (this is written on Tuesday, the day before he comes) I am well disposed to his company approach. He's told me that the two quotes I already have need to be re-read in the light of the access issue - and that one of them - the company that wants to use mini piles - probably hasn't read my briefing pack well enough. So that's why I changed the title of this post to [...], not so clueless of Lancaster So now I'm wondering whether the TAF (Temporary Amphibian Fence) forced on us by our blessed newts (I love them really) have screwed up access to the site. And in any case, this exercise has taught me that access needs to be considered for every large delivery. That is bigger than a 7.5 tonner. Hmm, how to do that efficiently? Ideas on a postcard please..... (06:00) Tuesday 08:10: See this comment by CalvinMiddle, and his further reference to this document...... (here). Bottom line; do your basic research. Interesting day ahead. Oh dear another over-long day ahead. Fun this retirement lark!1 point
-
Hi ProDave, interesting numbers. House is looking great with you - when we finish ours & I get back into the Scottish hills I must keep an eye out for it! Our build cost works out at £599/ internal m2 (house & garage m2) or if the garage cost is spread over the house m2 then its £734/m2. Ground works, all services connected, prof fees, timber frame, brick external, some external render, DG windows, roof on (expensive - but 4 gable ends & 5 dormers were never going to be cheap), all insulation, floor screed poured. Garage nearly done (another £2K should see it done). Nothing internal done & all externals yet to do. I'm hopeful to get it done for < £900 but wont be unhappy with £1k/m2. The BIG downside is that I'm doing the lot - so progress is slow - its going to be a 3 year build. Still enjoying it though. CC1 point


This leaderboard is set to London/GMT+01:00