ProDave
-
Posts
30809 -
Joined
-
Last visited
-
Days Won
427
Everything posted by ProDave
-
I just set the flow temp I want as the "heat pump water leaving temperature" and let the HP control it. the mixing valve is then irellevant. Not many of them work properly at low temperatures.
-
When you suck water, it is in fact just the air pressure that is pushing it up the pipe. Try and go beyond 1 bar and you just get a vacuum in the pipe above the water.
-
You can only suck up to 1 bar, just over 10 metres......
-

Ceramic element MVHR
ProDave replied to SteamyTea's topic in Mechanical Ventilation with Heat Recovery (MVHR)
A variant of this type that work with a slowly rotating disc made up of fins can work well, as the fins pass through the exhaust sector, they get heated and as they pass the inlet sector they give up their heat. But this "back and forth" variant. Well while you are extracting you lower the pressure in the room. Where is the air going to come from to make that up? And when you blow the air into the room, you will raise the pressure. Where will the air escape? -
That's the 433MHz transmitter integrated into the dump controller. I was going to mount the receiver with it's relay into one of my portable convector heaters, but can't see any easy way to do that. Instead I am going to make it more general purpose in the form of a wireless controlled switched extension lead. Simply a double 13A socket mounted in a 47mm deep back box that will have enough depth for the 433MHz receiver module and a small 12V power supply to feed it fitted in the bottom of the deep back box. Of course I didn't have a suitable little 12V power supply so that is now on it's way from Hong Kong. I did the "car test" and find when the transmitter is energised, now it is in it's final location, it does affect my car key fob slightly, but only in so far as I need to be closer to the car to make it work than normal. I can live with that. (When I had it on test on the bench, further away from the car, it didn't make any difference to the car keyfob range) I will need to quietly do the same test with SWMBO's car when she gets back.... EDIT: Tested, hers is not in the least disturbed by this 433MHz transmitter so should not be any "issues"
-
The point of talking to the borehole contractors first is they should look at the geology and tell you the likelyhood of finding water and at what depth. Rainwater systems work well in the Australian outback, I was impressed by the quality of the water when visiting my BIL in Queensland, but they collect the house rainwater in 2 small tanks, and the rainwater from 2 barns in larger tanks. All above ground tanks as no risk of freezing there. There are only 3 of them normally using that supply and even so in the dry season they have to be careful. But at least if they run low there is the infrastructure there to just go and buy in a tanker of water. With such a system here, would Scottish Water sell you a tanker full?
-
Have you talked to borehole people? Though that high up a borehole might end up very deep with the same problems.
-
An UFH manifold controller / wiring centre usually takes a number of thermostat inputs. When one (or more) thermostats opens, it turns on the manifold pump, opens the actuators for that zone, and calls for heat from the heating system. You can buy expensive ones that may have a few extra unique features, or you can but them as cheap as chips from ebay (they are the ones I have) I have my house zoned into 3 zones but as others have pointed out, you won't get much temperature difference between them. Perhaps the best reason for having zones might be if one room gets a lot of sun and another room faces north and never gets any sun, then on a bright winter day the sunny room may overheat, which would be less likely to happen if it's UFH was off.
-
I can see this one has many challenges.
-
Presumably you have a vehicle track to get to the plot. Can it not go under there though that would make it longer than straight up?
-
And today the 433Mhz receiver arrived. It paired to my chosen transmitter code without problem. So now to add them to the PV dump controller. Watch this space.
-
Wilo pumps are my favourite now, very quiet, even quieter than my previous favourite Grundfoss.
-
Wet towel (it grips better) wrapped several turns and then gently with a pair of gland pliers.
-
Our 5KW ASHP does DHW and UFH without problem.
-
Try closing one of them silently, e.g when using the loo in the night?
-
I read that as 1000 metres of pipe spread between 2 manifolds.
-
What size house? It would take a very large house or a very high (higher than normal) temperature to get that much out of under floor heating. I put no more than 3KW into ours, probably a lot less most of the time.
-
Here is a 5KW heat pump for £2195 including VAT. https://www.easyheatpumps.com/product/panasonic-h-generation-high-performance-55c-monobloc/?attribute_models=WH-MDC05H3E5&gclid=EAIaIQobChMI8anBycSF5QIVia3tCh1fkw-tEAQYASABEgI38PD_BwE That was just the first one that came up in a quick search, that is before you start looking for cheap deals etc. Don't let people tell you they are expensive.
-
Don't people that keep certain snakes need a constant supply of mice? Is this a business opportunity? I was once told a mouse can get through a hole the size of a Biro. I can well believe it, I have found one inside a consumer unit once with all the cable entries well packed and seemingly no way in.
-
I have to say, now having an air tight house, with a warm vaulted roof is a delight. There is nowhere for mice to get in. We have only had one in the house since we moved in, and that came in in the cat's mouth when we opened the door without paying attention. The cat soon caught it again and dispatched it. In the old house, around harvest time usually, the mice started coming into the cold loft. I was convinced they were climbing up the wall (rough cast render) and in through the obligatory soffit vents. Nothing you could to to stop them. Just put plenty of traps or poison. Or send the cat up into the loft.
-
If the house is 140 metres above the road, that's only 13.725 bar to get to the house (plus what head you want at the house.) If you think the mains will have 3 bar pressure, put your break tank and pump station 25 metres up the hill. It does not matter if the flow rate is a bit poor (only 0.5 bar left) as long as the tank is a reasonable size. To get the remaining 115 metres up the hill needs 11.27 bar at the pump, plus say another 2 bar to give you enough pressure at the house, a 14 bar pump and pipe should be plenty. Remember, your pump in the break tank should pump until the pressure in the accumulator at the house gets to the set pressure, AND the pump must stop if a float switch in the break tank detects low water (you have lost your feed) Get the water connection, measure the pressure at different times of day and make the final design on where to put the break tank when you know the facts. The one I saw, I think they had a pretty large break tank on the basis they thought at peak times the mains pressure may not be enough to reach it!
-
Stairs - Online resources
ProDave replied to Triassic's topic in General Self Build & DIY Discussion
As others have said. Don't extend the landing, increase the going of each stair to make them less steep. Beware there is a maximim going as well as a minimum. We did this and our stairs are about 38 degrees rather than the maximum allowable 42. -
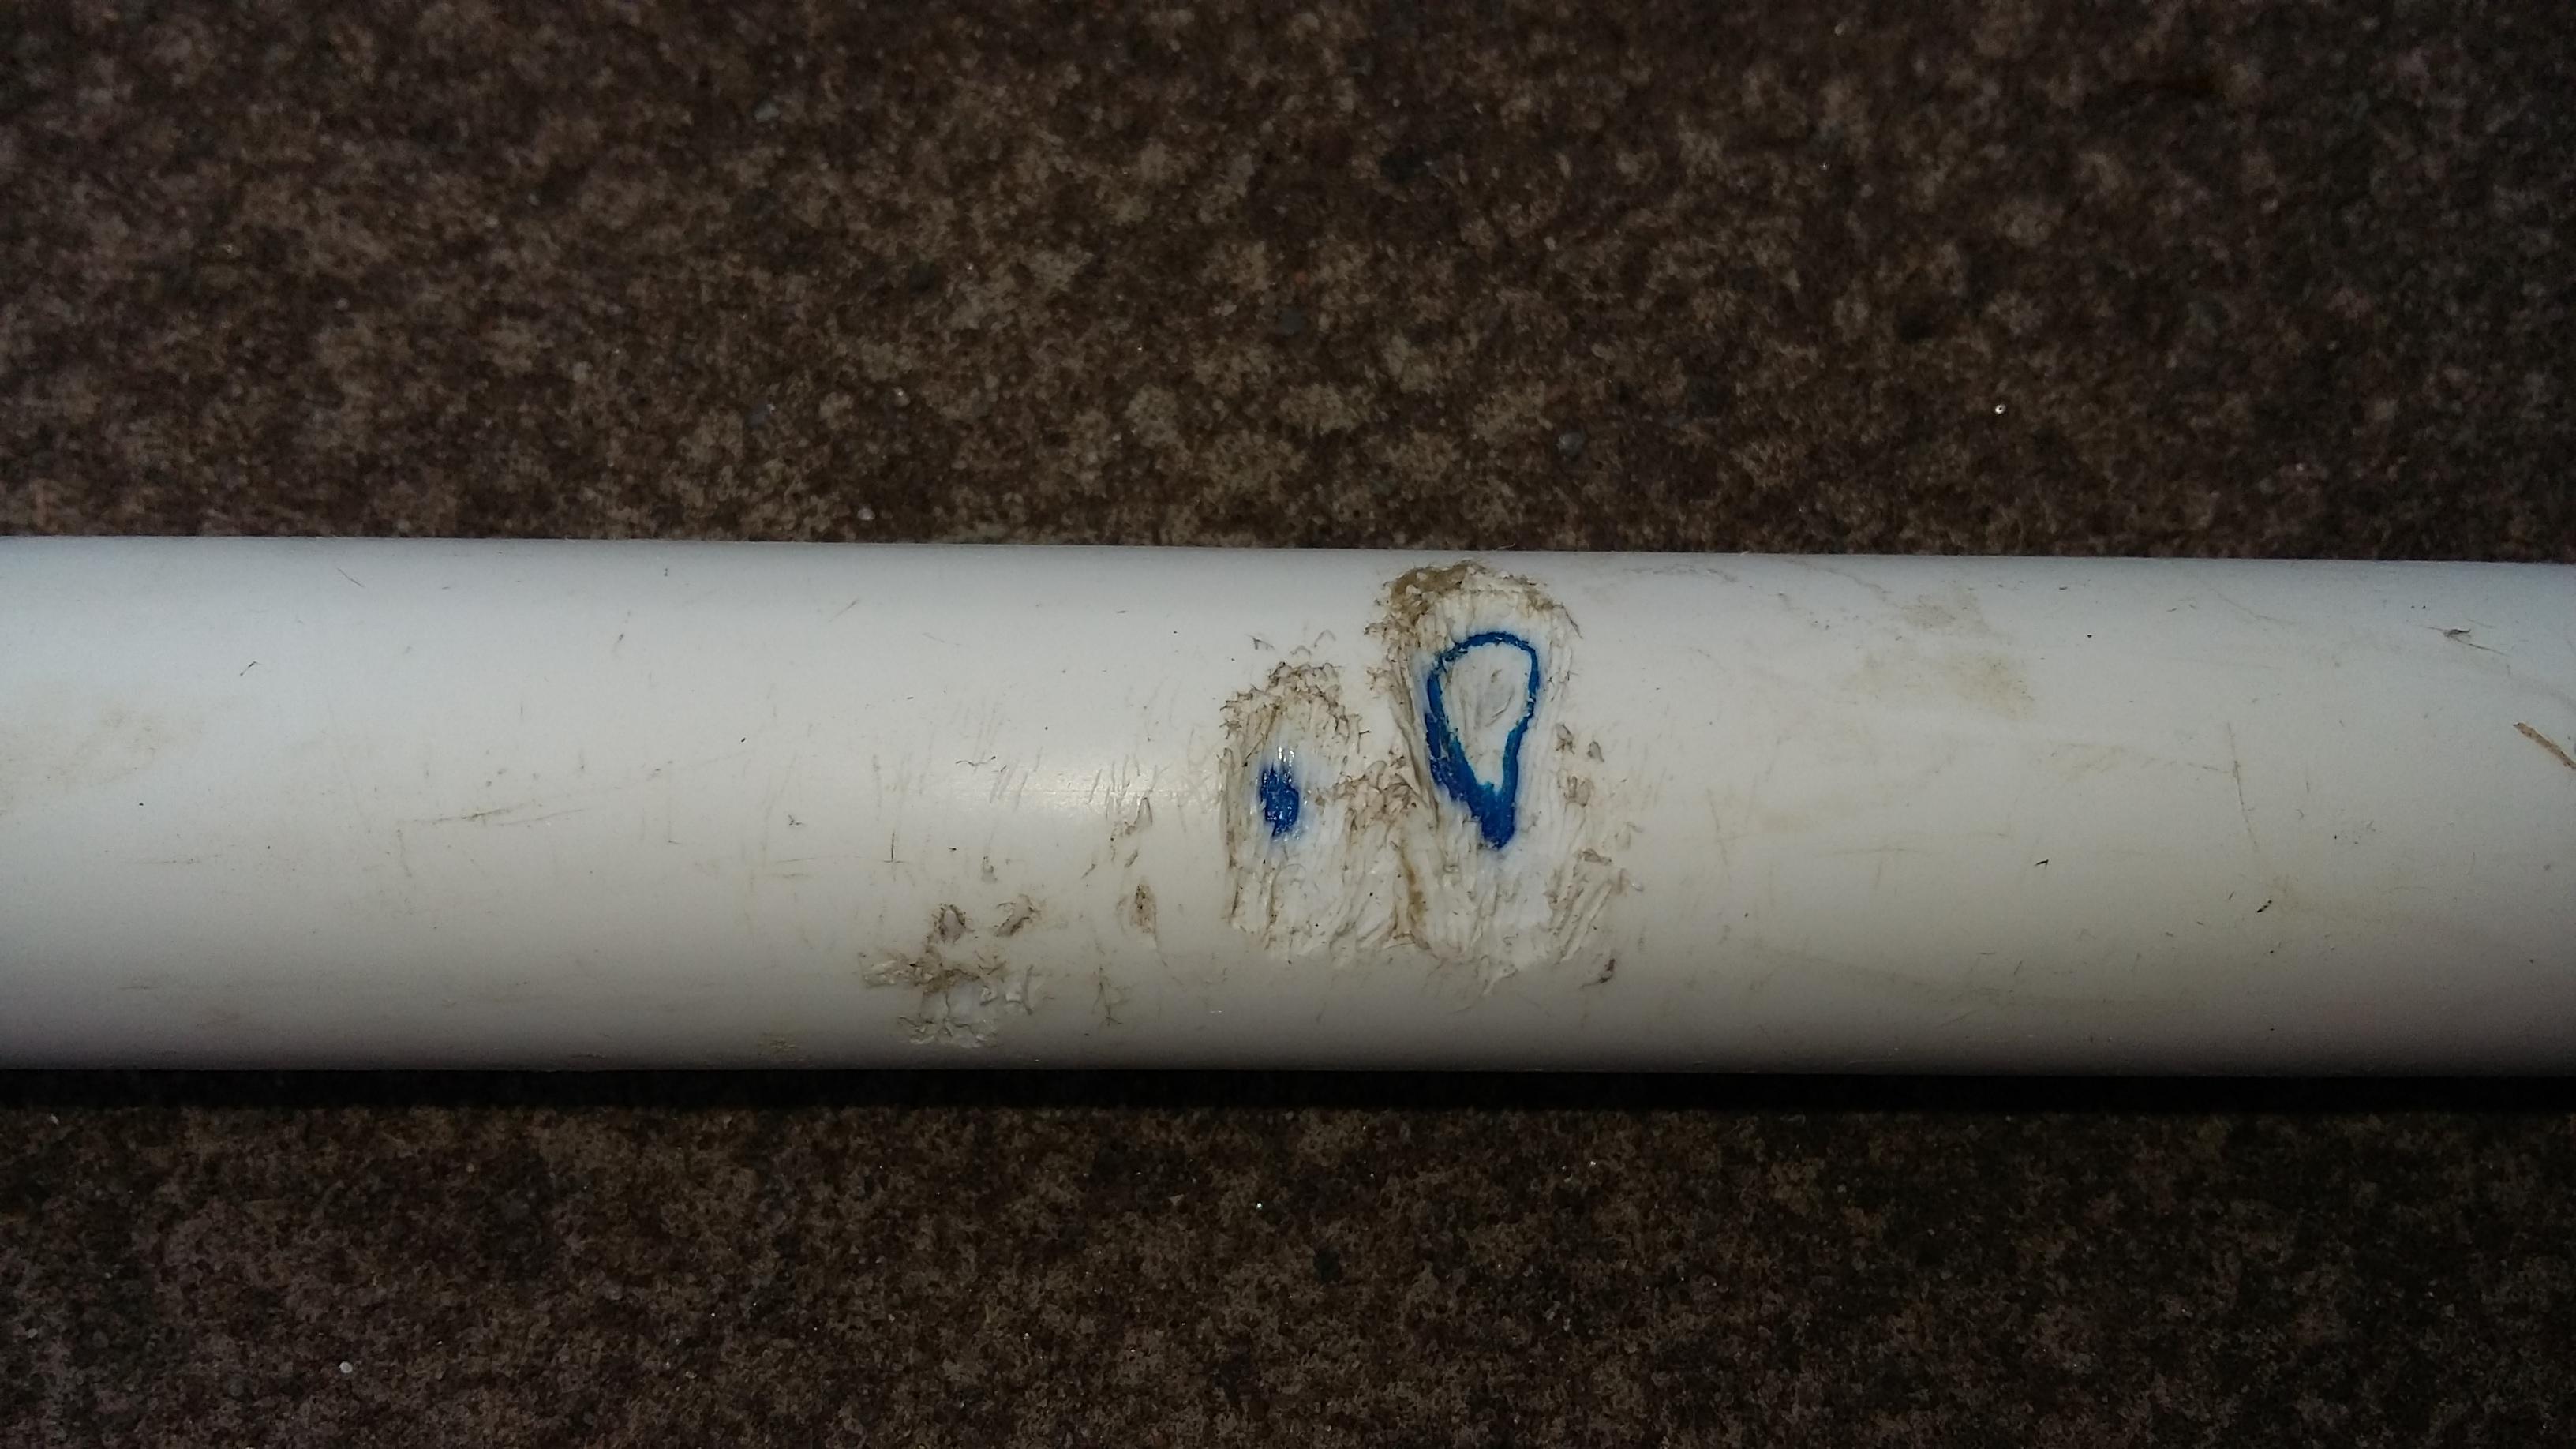
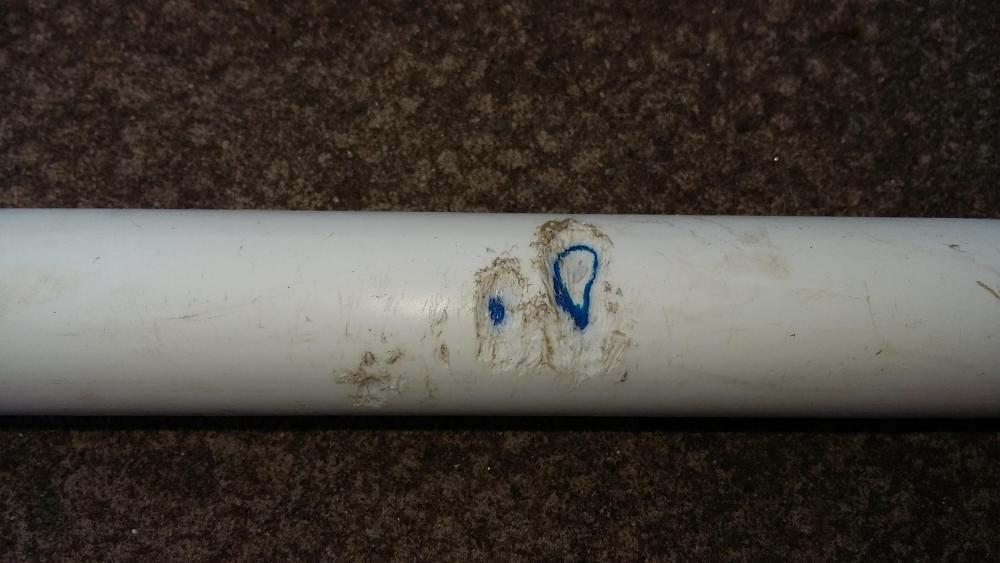
Back to my neighbours plumbing. Leak No 2 found and fixed. This was hot feed to the two en-suites. Mouse 1: Pipe 0 I have never been a great fan of plastic pipe. The mouse would not have done that to a length of copper. It was squirting out a fine jet of water that was landing on the ceiling about 2 feet away. Leak No 1 is as yet unfound, but it has (for the time being?) stopped leaking. That is "ongoing" The heating system had lost pressure overnight, so I left it pressurised a bit higher to provoke the leak to show itself. At least the mystery of 2 simultaneous leaks is solved. There is a moose loose in the hoose.
-
If you have mains water at sea level, then it will have enough pressure to get part way up the hill. You would need to measure the pressure to see how far. This is sounding like a house I worked on years ago in Glen Urquahart. The mains water went as far as it could up the hill and emptied into an underground break tank. From there it was pumped up with a borehole pump up to the house. You can't suck from the water main so it has to go via a break tank. You just need to see first if the mains pressure will get it high enough to do the second lift in one go with one pump.
-
So you are proposing to collect / treat your water supply lower down the hill and them pump it up 140 metres? What it the height above sea level of the actual house, sounds quite high. How about pumping the raw water up in a 2 stage process with a tank half way and doing the treatment at the house?