MikeGrahamT21
-
Posts
1897 -
Joined
-
Last visited
-
Days Won
1
Everything posted by MikeGrahamT21
-
deck in attic over mineral wool
MikeGrahamT21 replied to moldy's topic in General Construction Issues
Just use loft legs, far better at the job and designed for the purpose. Metal is one of the worst thermal bridges possible, you may as well not bother with the extra insulation -
I would say 0.15U target will be a cause for concern on the structure of the building, needs calculating very carefully to avoid any risk of condensation. Do you have any option to do External Wall Insulation?
-
Plastic vs Copper pipes for radiators
MikeGrahamT21 replied to Raks's topic in Central Heating (Radiators)
+1 for MLCP Pipe. I got 16mm pipe, manifold with 16mm eurocones, and eurocones for all of the radiator ends, and ran full lengths from manifold direct to rads. No joints at all, so no ability to leak in horrible hard to reach spaces! Using plastic pipe can be a bad idea for radiators, as the integral oxygen barrier of things like JG tend to only work up to 50C, which most heating systems will run above. MLCP has an aluminium liner, so doesn't suffer from this, so overall things should last a lot longer, and as a bonus, if you have any mice knocking about, they shouldn't get through aluminium. -
deck in attic over mineral wool
MikeGrahamT21 replied to moldy's topic in General Construction Issues
Yeah loft legs are brilliant, i've just done half of my loft out with loft leg XL which allows me to get 400mm in there, they're a small premium over the standard legs. -
MVHR newbie.. help needed
MikeGrahamT21 replied to Savage87's topic in Mechanical Ventilation with Heat Recovery (MVHR)
I'm sure you'll check it less once the novelty has worn off, i've been the same with heating controls and solar generation, but its dropped off more recently. Really interesting hearing people talking about how the MVHR helps greatly with holding temperatures, an effect i didn't realise would be so pronounced. I'm considering installing a unit here next year, or possibly year after depending what happens in the coming 6 months, though i'm not expecting such great efficiencies, as I'm far from airtight at the moment (Only 2 rooms and a hallway is truly airtight at present, another 5 larger rooms still need doing, though only one out of those is really poor for airtightness). -
MVHR newbie.. help needed
MikeGrahamT21 replied to Savage87's topic in Mechanical Ventilation with Heat Recovery (MVHR)
I haven't got MVHR yet, but I also plan to get to radial anti-static and anti-bacterial ducting. I have read articles in the past in building magazines about nasty bugs being found in ducting of MVHR due to the temperatures which run through it, so I would say its critical personally, and for the little extra outlay should be worth it. Anti-static should prevent dust from sticking to the inside of ducting in theory, it will still get there, but should be much reduced. I too keep looking at fancy controllers, in fact i've actually made it one of the things on my wish list, but in reality I dont think they are needed, I'm pretty sure a good MVHR unit should be a fit and forget solution, which shouldn't require controlling if its setup correctly, many have sensors built in to handle differing conditions, I suppose the only thing which is useful is the filter change reminder, but you could set a reminder on your phone as its based on operating hours. Perhaps a unit which connects to your phone rather than has a control panel may be a better option, but these are hard to come by at the minute. -
Angle is definitely a huge influencer. Length of day again a massive factor.
-
Ground floor for bungalow: joists better than a slab?
MikeGrahamT21 replied to Dreadnaught's topic in Timber Frame
Go with concrete every time i'd say. I have timber joists in ground floor, and though i'm very thankful with it being 1960's, that i don't have to dig up old concrete to insulate it, you always have thermal bridging with timber, which you wouldn't with concrete, plus the thermal store as you've said. With timber there is also the element of ventilation to consider, which you wouldn't with concrete, and depending on what timber they use for it, the chance of insect attack, woodworm is horrible! -
Urgent MVHR help needed
MikeGrahamT21 replied to vivienz's topic in Mechanical Ventilation with Heat Recovery (MVHR)
Pop the control panel off of the wall, should be a screw or two underneath, and it'll just lift off, couple of seconds then put it back, that should do the trick. -
Urgent MVHR help needed
MikeGrahamT21 replied to vivienz's topic in Mechanical Ventilation with Heat Recovery (MVHR)
If I remember right MVHR units use old fashioned COM style communications, these generally require that one end is powered on and operational before the other end is switched on. I would guess that the MVHR unit needs to be on and fully booted (give it a couple of mins to do this), before the control panel is turned on, essentially so it has something to connect to, it may only try once and then fail if it can't connect. -
Insulation thickness difference
MikeGrahamT21 replied to Russell griffiths's topic in Building Materials
Have you checked seconds and co for the insulation? You may be able to get phenolic insulation at a much cheaper price than PIR, and it tends to come in pretty much perfect condition, could save you a small fortune. I recently bought 21 100mm boards for a little over £400, retail these would have been astronomical. -
I’d say just some plastic sheeting to stop the water getting in will be the best thing, it’s the combo of wet and freeze thaw which has potential to damage them
-
Expensive pv panels or double the quantity
MikeGrahamT21 replied to gravelrash's topic in Photovoltaics (PV)
Since presumably you are installing Solar PV for environmental reasons, then go with less panels which are better, as they will have less embodied carbon, and all of the other chemicals and rubbish which get created during their production. And if nothing else, its less bits to go wrong! -
Thats a real shame it requires planning permission, i can understand it for a proper bay, as it will have foundations, but didn't think this would need it
-
I'm going to keep an eye on how this turns out, very interesting. I currently also have a bow window, but would like to replace it with a normal flat window, which is hung further out of the brickwork, partly to keep it a little more in line with external wall insulation, and partly to keep the deeper cill. I'm curious though, would this type of thing have to go through planning permission? I know for a proper bay window conversion you have to have planning, but I wonder if this would be covered under PD?
-
I did the utility with 20mm plastic conduit, and then got an electrician in who used singles, he said it would have been a lot easier to use 25mm conduit, and thats what he would have installed. Even so, the conduit houses sockets cabling 2.5mm and a lighting circuit 1.5mm, but it took them a while to thread so i'm guessing it was tight. I'm not sure if this helps, more of an observation, i put another run of conduit in for ethernet cables, and managed to just fit 4 of those down, so you don't have a lot of room to play with
-
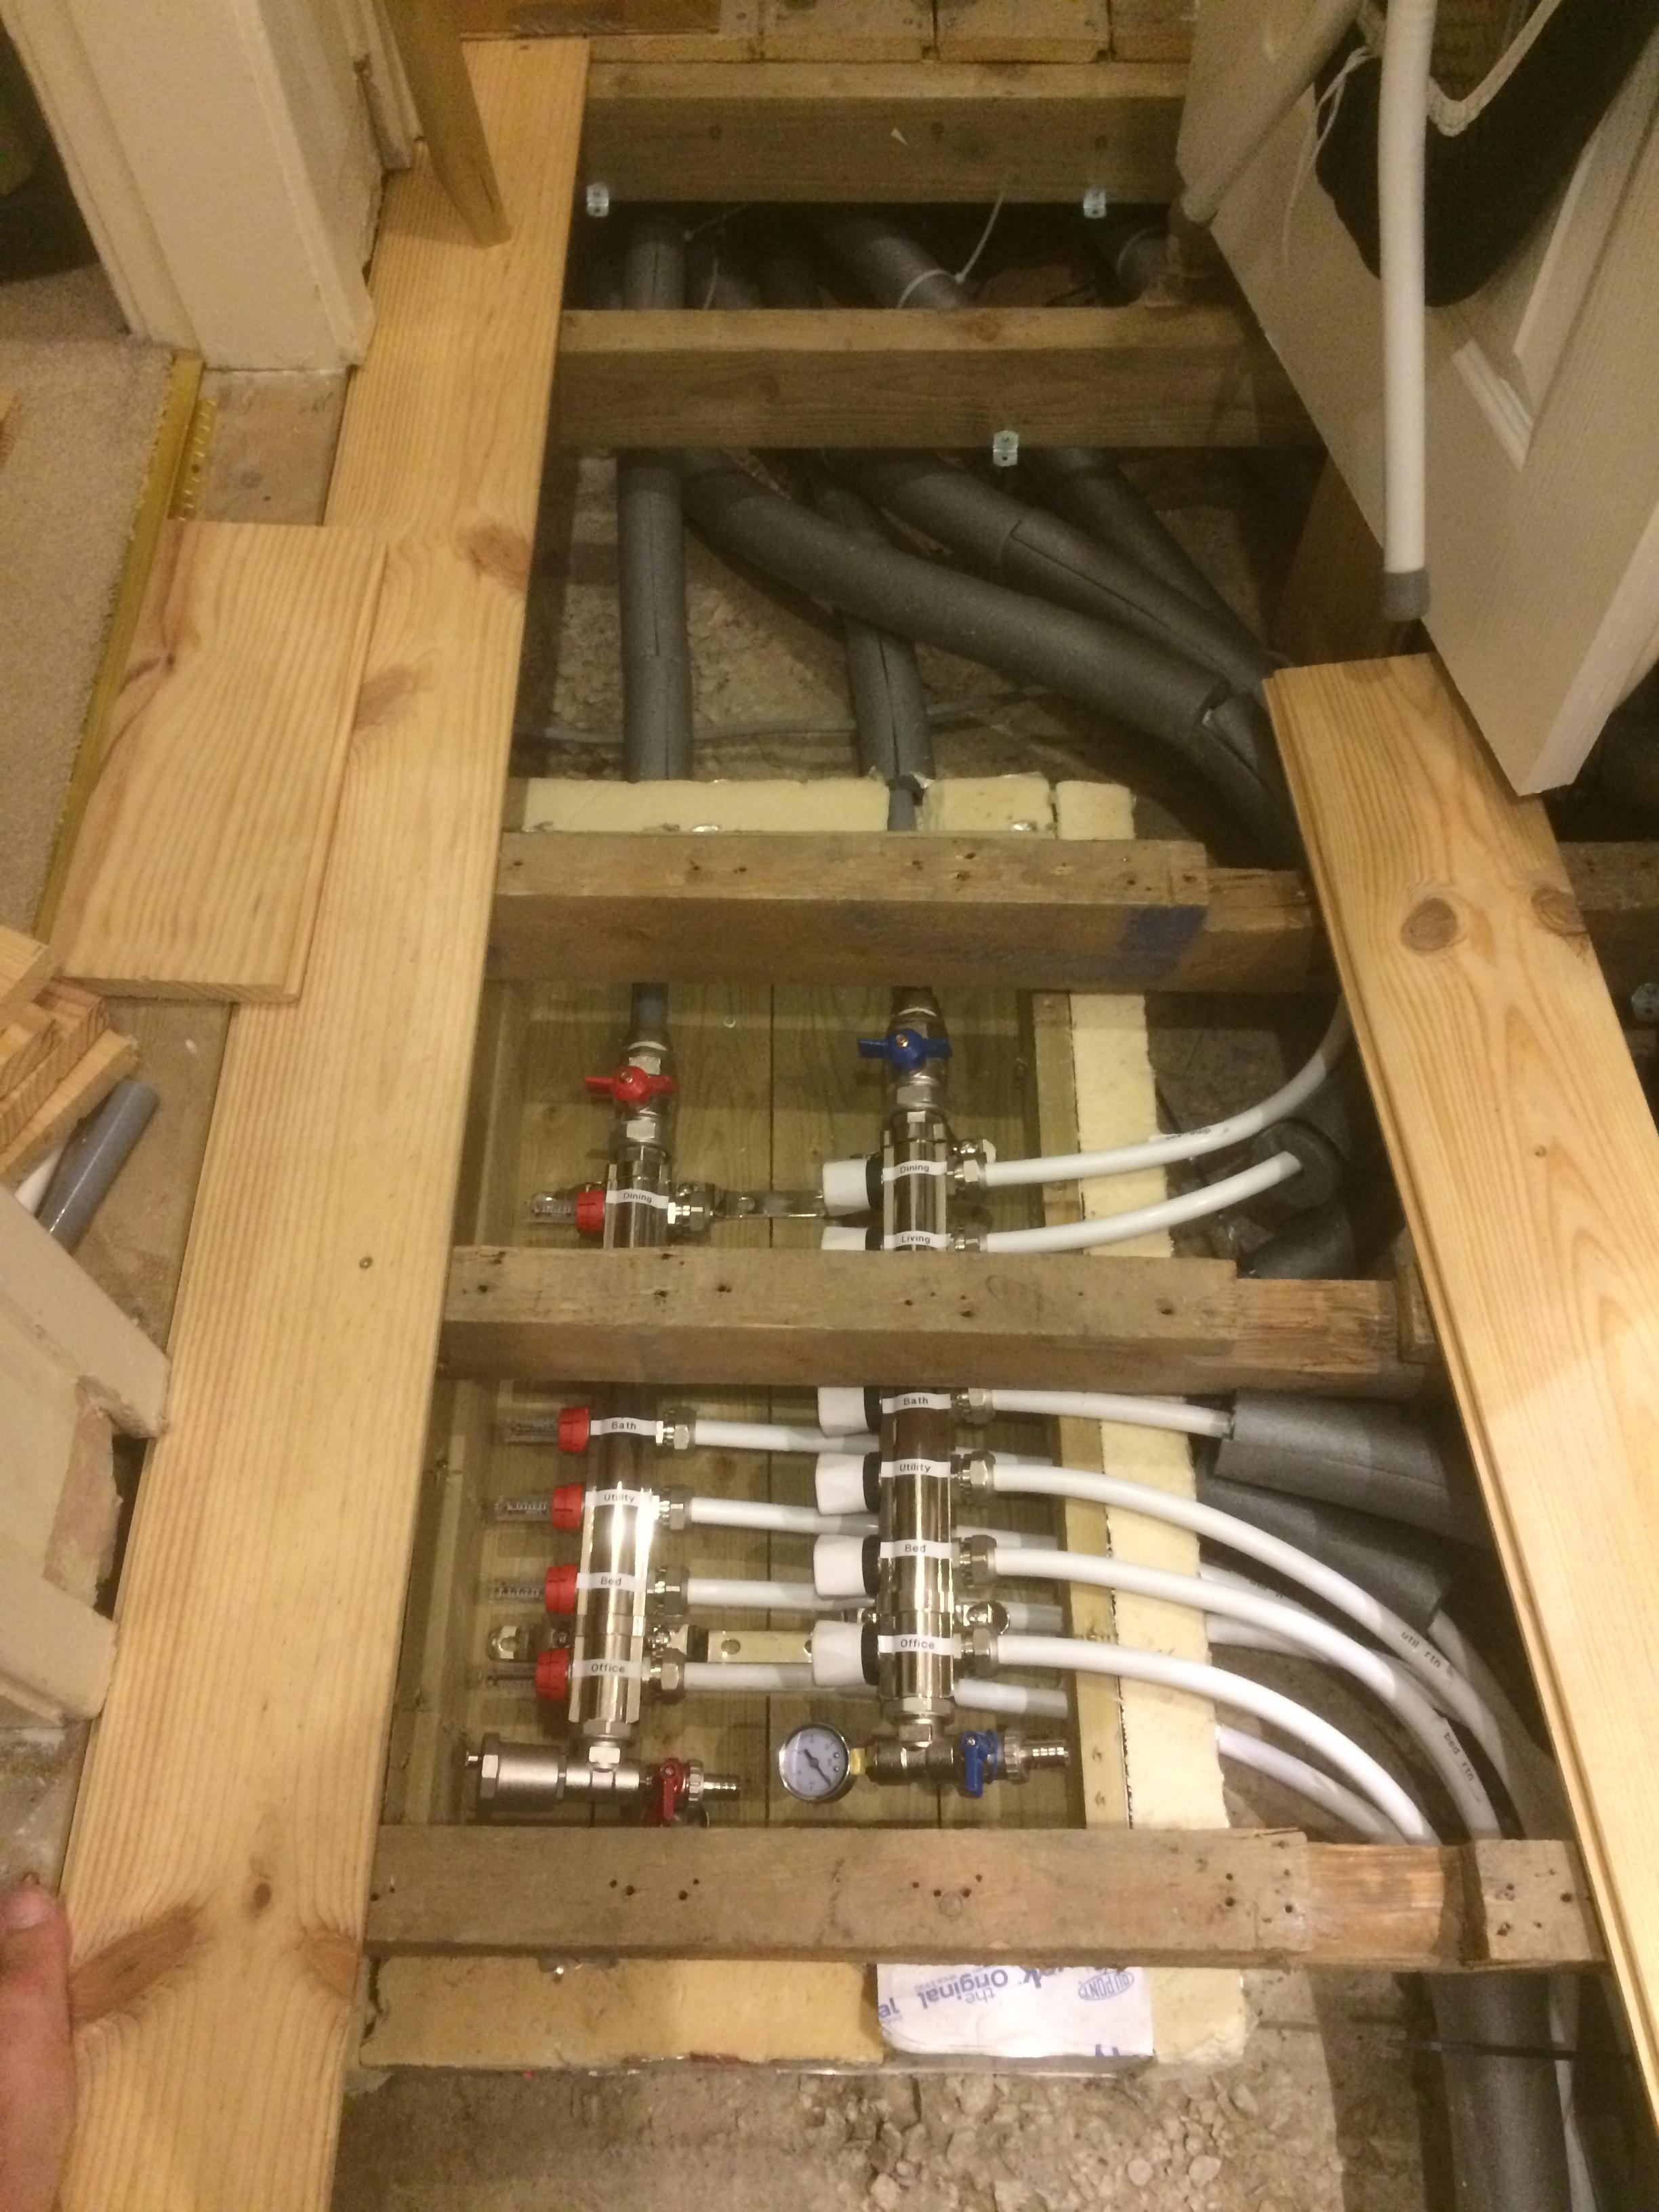
UFH for existing joist floors and manifolds for radiators
MikeGrahamT21 replied to Raks's topic in Underfloor Heating
Yeah good idea, I’ve got smart TRVs in each room to do the same job -
Dolby Atmos Speakers
MikeGrahamT21 replied to MikeGrahamT21's topic in Networks, AV, Security & Automation
Yeah I think I’ve one Blu-ray which has got it, a Harry Potter if I remember right, there is a lot of simulation stuff as well though like DTS Virtual X which is meant to be really good. I think for £99 it’s a sound investment. Glad to hear it works well in a real life situation too so thanks for that -
Dolby Atmos Speakers
MikeGrahamT21 replied to MikeGrahamT21's topic in Networks, AV, Security & Automation
So the IC600's were a bit bigger than anticipated!! Think I shall be returning them for some IC400's tomorrow. -
What rate do they pay the export tariff at for new installs these days? I just got £27 export for the last 3 months on my 4kwp system
-
UFH for existing joist floors and manifolds for radiators
MikeGrahamT21 replied to Raks's topic in Underfloor Heating
I can't comment on the underfloor heating product, as I don't have it, but I did recently change the Wall Hung Radiator pipework at my house to a manifold system, and MLCP pipe, and its so much better, easier to control, balance and portion of radiators if I need to remove them for whatever reason. We fed the pipes complete with insulation tie wrapped onto them throughout the entire house, with only a small 20cm2 hole in each room, and one access panel to give additional control, was a few hours work, and a lot of sweat and toil, but I'm really pleased with how it performs. In answer to your question, you can use any manifold, they're all the same, this was an underfloor heating manifold, with MLCP 16mm cones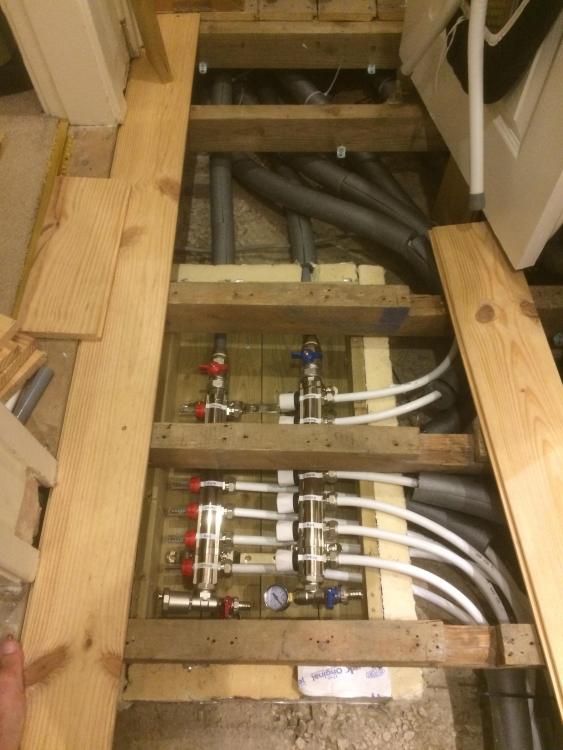
-
Dolby Atmos Speakers
MikeGrahamT21 replied to MikeGrahamT21's topic in Networks, AV, Security & Automation
I can't justify buying 4 ceiling speakers, I've gone for 2, Yamaha IC600's. Whilst I await an Atmos receiver (pending on when the TV gives up, so I can get a relevant one in terms of 4k/8k whatever is around at the time), I plan to connect these extra two up to an existing output on my Denon. Both sets of speakers are 8ohm, and receiver can handle up to 16ohms, so should be able to connect either parallel or series, depending on what is easiest. Power is my only concern, each channel is 75W, minimum power for the Yamaha's is 40W, so may be best (and more practical from an install perspective) going for parallel and sticking to 8ohms. -
Dolby Atmos Speakers
MikeGrahamT21 replied to MikeGrahamT21's topic in Networks, AV, Security & Automation
So you'd go for a 5.1.4 setup, rather than my proposed 5.1.2? Yeah the current AVR has self adjustment, but doesn't support Atmos. -
Dolby Atmos Speakers
MikeGrahamT21 replied to MikeGrahamT21's topic in Networks, AV, Security & Automation
One problem, i'm not at the point of being able to use them yet, as my current AVR isn't atmos capable, this is just a bit of future proofing as I know that it will form part of the next iteration of my home cinema. I'll just have to stick to the measurements dolby provide, i'm sure they'll be accurate. -
Dolby Atmos Speakers
MikeGrahamT21 replied to MikeGrahamT21's topic in Networks, AV, Security & Automation
I also think ceiling mounted would perform better, as the idea of Atmos is to give down firing sound, so makes sense having the speaker located above you, my only concern is if I get the positioning wrong, obviously with floor ones you could just move them. Looking at the Dolby docs theres a lot of emphasis on precise measurements and angles. I'm no expert though, and it may not matter that much if its not 100% precise.