markharro
-
Posts
634 -
Joined
-
Last visited
Everything posted by markharro
-
Fermacell vs backer board in bathroom
markharro replied to divorcingjack's topic in Wall Tiles & Tiling
Thanks very much @Nickfromwales v helpful -
Fermacell vs backer board in bathroom
markharro replied to divorcingjack's topic in Wall Tiles & Tiling
Thanks everyone. @Nickfromwales when you say primer - what product do you mean specifically? -
Fermacell vs backer board in bathroom
markharro replied to divorcingjack's topic in Wall Tiles & Tiling
I am about to tile onto Fermacell - quite large format limestone. Its not in a wet area - basically an alcove in the hall. Anything specific about tiling on Fermacell to know about that is different to using hardie cement board ? thanks -
Will need to bookmark this page- I have fitted a Geberit frame downstairs and thankfully managed not to balls it up! I have a Grohe frame to put in upstairs - bought it second hand so will need to hunt down the instructions online. There were really really useful videos for the Geberit frames which in no small measure allowed me as a numpty to fit it......I was hoping there would be similar for the Grohe. This has reminded me I will also need to source some extra parts eg the waste and water supply pipes will have been cut down to suit the previous install...can anyone recommend good source of spares?
-
Any input on my post above?
-
On the topic of levelling on timber, we have 22mm chipboard on the first floor and there is an issue where our landing butts onto our metal staircase top. Basically the board on one side is depressed by maybe around 6-7mm. Ultimately we are laying lino and the plan is to first fit plywood over the chipboard then an underlay and then the lino. The issue is how to level up at this junction. Its maybe no more than 1 square metre where the issue is. I understand the use of levelling compounds I think but can anyone guide me on these points - 1 Should I apply the levelling compound onto the chipboard before I put the ply down or should I screw down the ply first and level that and then add the underlay and then lino? I am thinking the former may be better? 2 This will be a high footfall area so I am a bit concerned the levelling mix may break down over time? Should I be? 3 Can anyone recommend a specific product to use? thanks
-
What battery drill should I buy? The choice is bewildering.
markharro replied to jimseng's topic in Tools & Equipment
I'm (finishing) a house build too and I have now got a pretty decent collection of Makita 18V tools. Started with drill/driver then hopped to impact driver and of course lots of other things too. For heavy drilling into concrete I use a corded Screwfix Titan SDS drill which cost less than £100 I think and is night and day compared to the battery tools. -
Hi @Iceverge what make of MVHR unit have you got? Interested how you learned how to self - maintain? Any good videos you can point to showing the procedures?
-
Whats the metal tape you have used here wrapped around the insulation and is it worth using?
-
Can I correct what someone has said about there being no 2 way chargers available atm. There is one - https://www.sigenergy.com/en/products/dc-charger I have been talking with an installer for the last few weeks about this product. The intriguing thing for me is that it appears to work (potentially) with cars that are not supposed to do 2 way charging like our own.
-
Very helpful replies thanks and think I know what I'm doing now. One more question however. An engineer pal has said to watch out for galling between stainless steel threads and nuts. For this static application can I use standard grease for this or something more specialist?
-
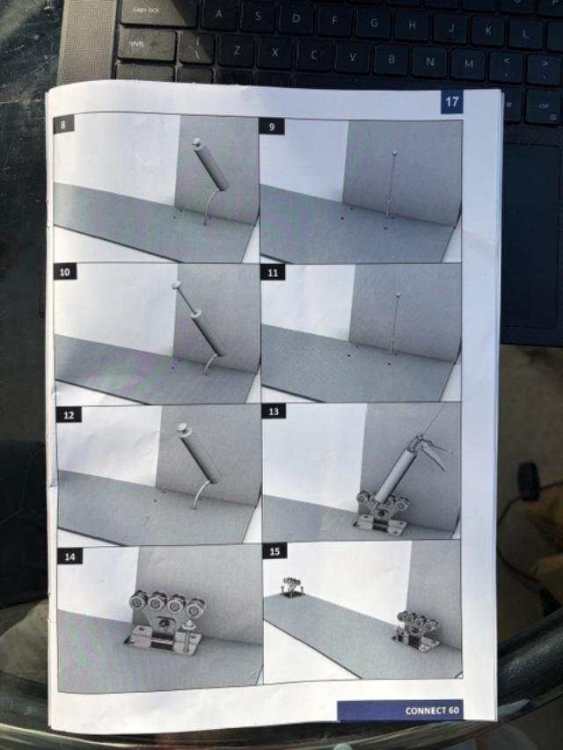
Thanks. I actually have a bit of 16mm threaded rod and it fits but maybe I want more wriggle room that I would get with 12mm to make sure I get both rollers in line? There is no guidance of the length of rod to bury in the concrete however? Also can anyone recommend a particular brand of resin? Do I need one of the tools shown to blown out the drill dust or will a vacuum do that?
-
Hi @Onoff @Conor too late now for the J bolts....the pad was placed ages ago. In any event here is the manual for the gate - it shows preparation for the fixings happening after the pad has gone in. No info on the diameter of bolt etc needed.
-
I need to bolt down a post and also 2 rollers being running gear for a cantilevered gate. what are the best bolts/fixings to use? thanks
-
I think it was a really important programme actually. Guy Martin is the modern day Fred Dibnah and people will sit up and take notice. Yes of course a 6 figure renovation is niche but the pre-fab terraces are the real takeaway message. We can and we should be building quality stuff like this and not the absolute C%$p that is the standard new build or indeed old build.
-
We have a beam in a wall between two rooms. I want to fill in the space with some form of insulation to contribute towards overall acoustic insulation between the the rooms. What would be best for this. I have some leftover PIR that would fit but I suspect I am better using some acoustic wool batt?
-
How do I avoid electrostatic shocks hand sanding drywall?
markharro replied to Beau's topic in Plastering & Rendering
I get this too with the same set up so would be interested to hear of any fix -
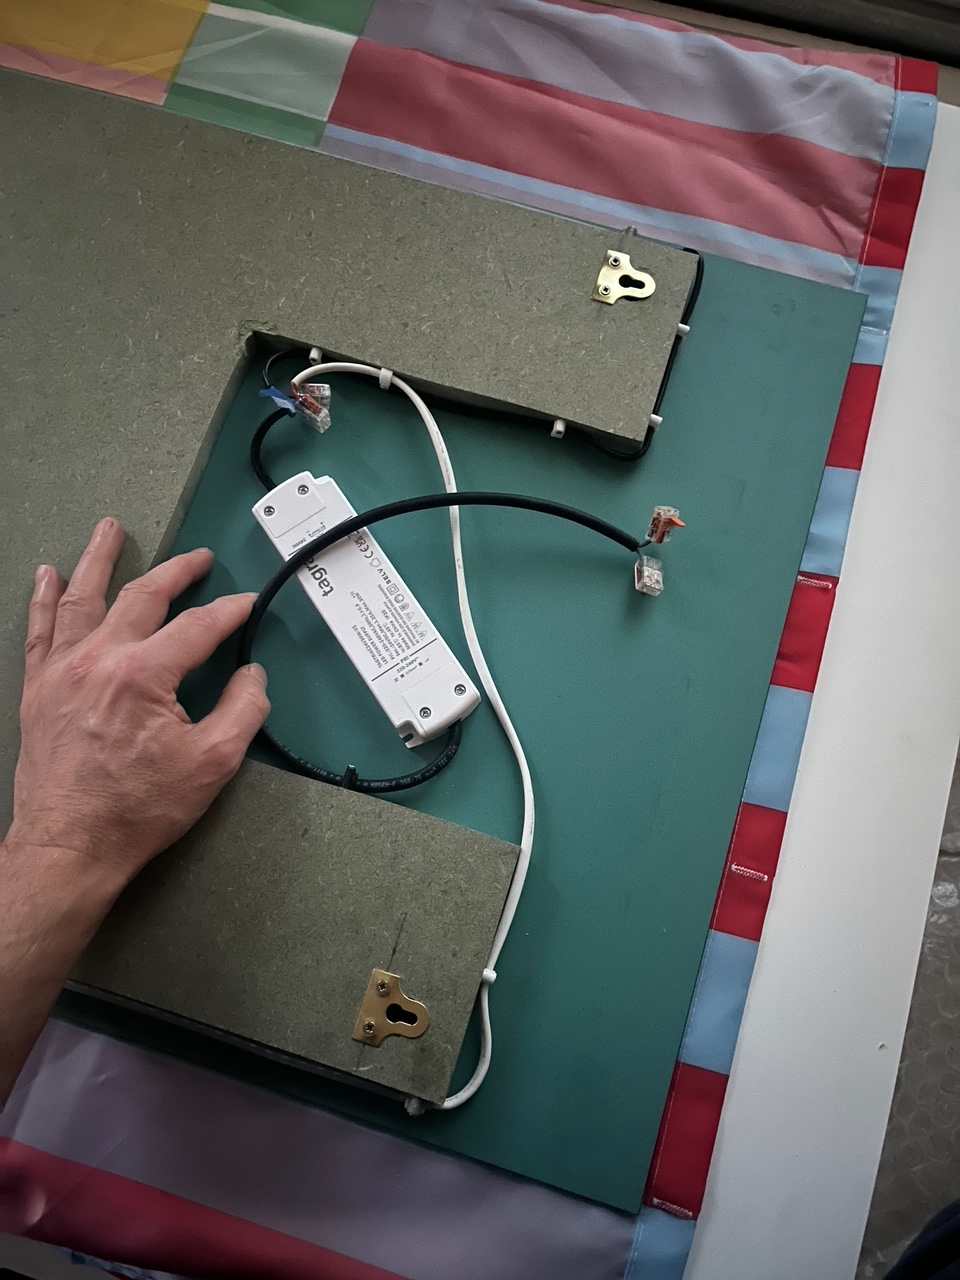
I have put this together to the stage shown - mirror stuck to MDF with LED strips down each long side of the MDF and wired into the driver - my question is whether there is any need for any sort of earthing of the mirror and if so how that is achieved? thanks

-
Hi thanks yes I think getting up to 1200mm is easy enough its when you go over. Having said that its sort of baffling that it seems impossible to source wider door blanks - surely there must be a source out there!?
-
High-jacking this thread slightly - we have a plan for an extra wide sliding pocket door - up to 1500mm! I have the sliding gear sorted I think (Hewa junior) but I am really struggling to find a door blank this wide ideally acoustic rated. Can anyone help?
-
Roller blinds.
markharro replied to Russell griffiths's topic in General Self Build & DIY Discussion
I have bought and fixed a couple of electric roller "Smartblinds". Probably around £300-400 from memory for the largest (about 1000x2000mm). I like them as they are Matter enabled and you can automate using Apple kit. -
I have flagged up that I may need to reject it. Will speak to them tomorrow. My point is that I was asked to make a plywood template to get it spot on which I did. I then drew on the precise measurements onto the ply so there could be no error - or so I thought. There was no mention of tolerances when I ordered. I assumed cutting glass would be done by a calibrated machine and would be a simple task of plugging in the measurements and then pressing go. Anyway, I will see how I get on tomorrow.
-
Yes they definitely got it wrong...what I dont understand is how because surely the cutting will be done by a machine and they programme the dimensions in and its accurate? 5mm out of 800mm is not an acceptable tolerance I am afraid. One issue is that the supplier is miles away so I think I will need to find a new (local) company....I dont fancy trying a DIY grind - would a local company be persuaded to attempt this do you think?
-
Well, with any self build you soon become used to the F^%k up after F&^k up that happens and its almost becomes notable when something goes without incident. So we ordered a panel of 8mm toughened glass about 5 weeks ago for a shower door. I spent about 2 hours measuing and cutting a template for it from ply. The top and bottom needed to be slightly different widths to fit the tiled enclosure. Despite the template and the clear measurements written on it for the 2 widths the company was got the top out by 2mm and the bottom out by 5mm. Maybe doesn't sound a lot but it means the panel will not fit into the space we have! Honestly, why do I bother! Anyway, I suspect I know the answer to this already but I take it that its not possible to cut or grind off the small sliver we need removed from toughened glass and that we will need to order a brand new piece?
-
Actually the Hafele stuff rings a bell ... I remember looking at their acoustic options ages ago. Another used this?