


Carrerahill
-
Posts
2122 -
Joined
-
Last visited
-
Days Won
10
Everything posted by Carrerahill
-
Yeah, best piece of advise when using resin, clean out the hole. I have seen these fail because muppets drill a hole and then just back fill with resin, it sets up a treat in the powder which is like a release agent!
-
Oddly our extension calls for almost an identical connection to the existing house - our building warrant drawings show M10 stainless threaded rod at 600mm centres using: http://www.rawlplug.co.uk/products/bonded-anchors/injection-cartridges-systems/polyester-resins/r-kf2/ I would check with your architect or engineer or inspector though.
-
Yes, they will all just have terminals for in and out - see edit in post above - I added a link. Normally I would suggest if you are not sure to seek pro help, but to be honest it's a very simple 2 wires one side, 2 wires the other side connection.
-
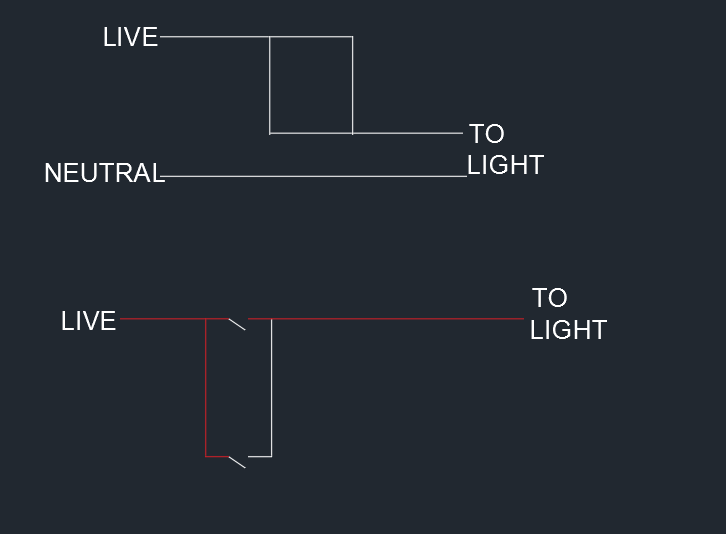
The emergency lighting is fine, we can essentially ignore it, it will have a live feed direct from the lighting circuit which is its permanent live to charge the batteries, there should be a little charge indicator LED. Just out of a matter of interest why do you have EM lighting in your home? It is very rare to see it in a domestic situation. So, you have a parallel switched circuit then. So look at my original reply regarding how it works and look at the attached image, basically if you imagine a piece of wire sitting horizontally in front of you, this is the live. Then imagine sitting below it horizontally another piece of wire, this is the connection to the light. Now if you want to switch it on you need to continue the circuit between the two, so you get another piece of wire and lay it across the two horizontal wires to bridge them - the power can flow from top wire to bottom wire and the circuit it closed. Now take another piece of wire and drop it across the two horizontal wires, nothing will happen, it just means there are two paths for electrons to flow. Now if you lift the first piece of bridge wire you put down the light will remain on unless someone lifts the second piece - your pneumatic switches work exactly the same way. The reason you have 2 wires at each terminal of the the switch is because that is the wire going on to the second switch to create your long horizontal wire in our explanation above. Look at the bottom diagram and you will see the red lives comes along, but another red live goes to the bottom switch. The white is the black in your case which goes back to the other side of the first switch it is paired up with a red which goes to the lights. Any pneumatic switch will work: http://www.screwfix.com/p/elkay-columbus-pneumatic-time-delay-switch/68088?kpid=68088&gclid=CM_gmKrnxNMCFQ0R0wodVGIE6A&gclsrc=aw.ds&dclid=CPTdp6rnxNMCFawB0wodjgYC-w
-
He does say he has a switch at the base and a switch at the top which made me write what I wrote - lets see what he says - if he forgot to mention a 3rd location then we can go back to the drawing board. However, if it was an int. switch circuit then the pneumatic switch wouldn't work the circuit properly because the wires have been combined so all three switches would need to be on for light. If it was in a combination with a 2 way switch it would also not work as the pneumatic switch would need to be on for anything to happen and regardless of switch position the lights would be on as the 2 way switch wires are combined.
-
Hang on, hold fire. I don't think this is as simple as replace with a normal switch. That is still known as a single gang switch, gangs in switches and sockets is how many independent circuits/sockets it has. I could do with a sketch here to show it but the circuit you have is a parallel switch arrangement. Typically used in corridors and stairs where pneumatic switches like the ones you had were fitted or now sensors. It is almost certainly not a two way switching arrangement. The way it works is that each switch simply closes the circuit at one end, light comes on, if you then hit the switch upstairs it closes it there too and the light comes on. When the switch(s) release there is open circuit in both areas and your light goes off. If you were to put a normal switch here you would loose the ability to switch off from upstairs, once the switch at the bottom is on, regardless of what the other switch does it would be on - you would need to go back downstairs and switch it off. Very difficult to know looking at 1 picture with 4 wires - but one of the red wires into Com will be the live feed, the second red wire in Com will run to the second switch. On the other terminal you have red and black wire, one of them, probably the black will be the return from the other switch so would I be right in saying it only has a red and black wire going into it? The red in with the black will then go to the light. It looks like there is a neutral connection in the back box, that will be the feed direct to the light. This means you probably only have 2 wires between the switches... so 2-way switching arrangements will not be possible. However, just in case: If live and neutral exist in the same box and run out then you will need 3 wires between the switches. If however, live starts at one end and goes to a switched output at the opposite and neutral is at the rose then you MIGHT get away with 2 wires between the switches but from what I can spy I think not. Best best, another pneumatic switch or a PIR face-plate assuming you do have a neutral.
-
Courier reqd for Kitchen Sink - Urgent!
Carrerahill replied to Fallingditch's topic in Kitchen Units & Worktops
No worries, I will help with all I can on this forum as much as I can as I am sure going to have a fair number of questions for you guys! UPS are pretty good. I would rate them amongst the best of the bunch. -
Courier reqd for Kitchen Sink - Urgent!
Carrerahill replied to Fallingditch's topic in Kitchen Units & Worktops
No they will offer up to a grand, just type the value into the box then it will ask if you want extra cover, will cost a bit more but if you want it for peace of mind then it is worth it. -
Courier reqd for Kitchen Sink - Urgent!
Carrerahill replied to Fallingditch's topic in Kitchen Units & Worktops
Get yourself over to Interparcel, basically a broker: https://uk.interparcel.com/ I have business accounts with TNT and UPS but actually find these guys to be cheaper. I probably use these guys on average of once a week - never had an issue yet and you can deal directly with the courier you then choose to book with. Just get the sink well boxed up and send away - if sinks are on some list then say it is ceramic components. I don't know the dims and weight but I just got a price as an idea for a 25Kg package 500 x 500 x 500 from one end of the country to the other and it was about £12 with tax. These guys are brilliant for eBay sales. I send gearboxes and differentials and all sorts with them - heavy heavy objects. -
That would annoy me as I want the old garage to store stuff in until the new one is built, if it doesn't fall down beforehand!
-
To be honest for the cost of a staircase you would end up making a lot more work for yourself and probably end up costing more unless you have a free supply of angle. By the time you work out all the geometry and start drilling for angles to be mounted and all sorts you will wish you had just bought a staircase.
-
Ah right OK, so you would take the skin down to the floor. I guess if the top of a block was AFFL then I could take it down to the next and then build it back up with bricks and mortar etc, then just sit the wall plate on the floor/top of the block work. That would give me a 100mm cavity mind you - that is 50mm more than the BW drawings. So I would still be tempted to overlap it about 40mm into the inside of the cavity so with the ply on it would be 49 leaving the as prescribed 50mm clear cavity and I don't loose the full 50mm in my room.
-
Wise words and I know what you are saying but I won't demolish the current garage until the new one is up anyway, I was just wanting to know if I need to tell building control.
-
Our planning application is in for our new extension and new garage, I know I don't need planning for my existing garage demolition but do I need a building warrant. My thinking is no. Thoughts? Thanks.
-
Of course, building control down south. No the warrant drawings do no show a detail for the connection of the new build to the existing sadly, to be honest it looks like a fairly standard plan he uses, my extension is shown in the middle with standard details written for all the different services and construction. If they approve what is shown, and it comes to the bit I will just need to demo the inner skin and build the timber frame up from the deck. I have also asked this question of my architect so I will see what he says. I will be pretty annoyed if demo has to take place as I told him I wanted to build up from what was existing. I wish I had just submitted a notice now and then let the inspector advise as to what he/she wants to see. It would be a shame thought as it would mean lifting the floor, lifting the chipboard, removing the insulation and removing all the joists take the wall down to the slab then starting again in timber.
-
Hi Dave, so basically the full wall construction method must be followed, it is not well written. So in a round about way it is basically saying 145mm studs filled with insulation then 70mm insulation over that lot then PB. Fine I can deal with that. I would however prefer not to have to take the wall down to floor level since slab level is about 1400mm below FFL. I am beginning to wonder if I should just change it over to a block cavity wall, fill the 100mm cavity with insulation. At that what would would be required? Yes I am in Scotland, what gave it away?
-
I would call them up, draw their attention to your planning application number and say I would like to notify you that we are going to proceed to demolish the building as per your approval are you happy for me to begin - they will probably just say yes, and I would ask for them to send this to you in an email at the time too. You can now demolish safe in the knowledge you have done this correctly. Then submit your new planning application. On that planning application you can simply ask for planning for the new building and state that under previous planning the house was removed. Waiting for them to grant new PP will set you back a fair bit - mind you, depends on the house but I would imagine it could be down and cleared in less than a week. Edit: Just read the bats bit - game changer - no luck!
-
Hi all - new member with a build starting soon.
Carrerahill replied to Carrerahill's topic in Introduce Yourself
Thanks gents. I am looking forward to getting stuck in. As soon as planning comes through, assuming I get approval for the location of the garage in the first instance, I am going to get my garage slab done. Photo stream will start then - I assume like other forums we all like photos! -
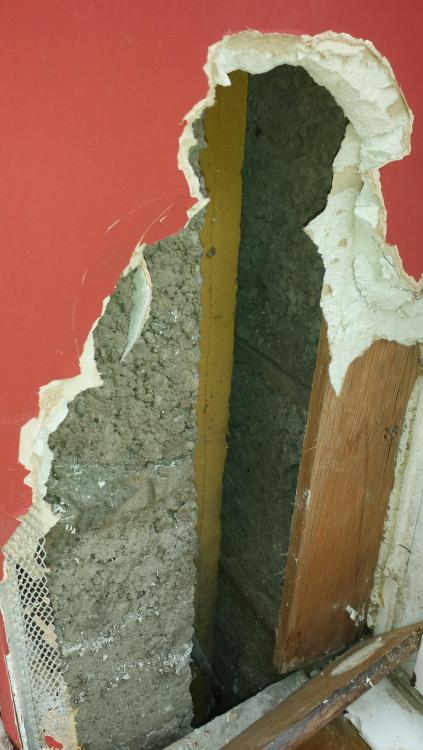
Hi guys, I am converting a sun-room into a kitchen, I am currently waiting on planning and warrant. To put you in the picture the existing sunroom is constructed of a cavity wall to about 600mm AFFL but externally about 1500mm above ground level, so the wall is actually about a 2000mm wall from the foundations, it has a 100mm cavity and is built in 100mm concrete block - see photo attached, I removed some PB to do an inspection. The top of this wall is then closed, and UPVC windows are fitted around 3 walls. The proposal is to convert it into a proper room which the kitchen shall move out to. So the questions begin! I had a look through the building warrant drawing and this is what it says: Cavity wall construction consisting of 19mm render on 100mm block with 50mm clear cavity and 145mm internal timber frame construction consisting of Tyvek Reflex insulating breather membrane to BS 4016 on 10mm plywood sheathing on 47 x 145mm SC4 pressure impregnated timber studs at 600mm centres. Walls finished internally with 12.5mm Foiled Back plasterboard on 70mm insulation on perimeter walls internal areas as standard plasterboard and 12.5mm moisture resistant plasterboard to en-suites, bathrooms and utility room, all joints taped and filled. 140mm thick Celotex XR4000 or equal fixed between timber studs with Visqueen vapor barrier stapled to internal face of studs in Bathrooms. Within 125mm studs allowance of 25mm given to run services within timber framing. This is clearly my architects standard paragraph, but to adhere to it as closely as possible my thinking is that I shall need to sit a 145mm sole plate on the top of the inner concrete block, but what about the 45mm difference, the construction method above says a 50mm clear cavity, so my thought is that if acceptable I can allow the timber to overhang 45mm into the cavity, but with 10mm ply (local merchant does 9mm or 12mm ply and OSB... so I was going to use 9) but that then means the clear cavity is only 46mm - I suspect I may get away with this or do I need to overlap the frame 5/6mm into the inside of the room. Anyway, I am sort of thinking aloud there, what is acceptable - 145mm frame on a 100mm block wall? The next thing I note is it says, "Walls finished internally with 12.5mm Foiled Back plasterboard on 70mm insulation on perimeter walls" so does that mean that between the studs in my extension I need to put 70mm (seems a bit thin by today's standards) insulation, then attach foil-backed PB to the studs - job done wall built. But I then read the sentence about the 140mm Celotex as saying I need to put 140mm insulation between the studs and a Visqueen VB if a bathroom, OR does the whole sentence apply only to bathrooms? Badly written sentence frankly, 2 interpretations for sure. If it does only apply to bathrooms it should say, " Within bathrooms 140mm thick Celotex XR4000...". What are your thoughts here? Thanks
-
Hi all, just joined the forum as I am about to build an extension and thought being a member of this forum would be helpful in helping me through with some of the questions I am going to no doubt have. A little about me, I am a consultant engineer, my discipline is electrical but I am always closely involved with the mechanical and structures and architects so after many years of looking at drawings and visiting building sites you can get an idea of things that are not your area which is helpful. My interests and hobbies include running, walking, all things DIY; from woodwork to automotive repairs. When I have finished our house renovation and build I am not sure what will replace that! I do almost all my own work and hate bodging. We moved into our current 1960's semi 2 years ago and so far we have totally renovated upstairs (except the bathroom but there is a reason connected to the extension), this included things like properly bricking up, venting and capping the fireplace in the master, rewiring small power and lighting circuits with new centralised lighting control which can be tied into a BMS system eventually, running in RF/data/phone etc to all rooms, over-boarding ceilings, plastering and fitting plaster cornices, shaker panelling to the master wall in the master bedroom, walls plastered where needed including the whole ground and 1st hall, all new skirting/window surrounds and architraves, removed the solid balustrade to the stairs and opened it all up, removed the wall to the under-stair cupboard and fitted 2 large drawers and a single cupboard. The living room was gutted and had a wood stove installed, I also built out the chimney breast on either side with plasterboard shelves, again over-boarded the ceiling, plastered, fitted plaster cornice and laid Ted Todd flooring throughout the ground floor. I also rebuilt a column to the front of the drive, someone had opened the wall up a bit to make way for modern sized vehicles, but they had just left the end of the wall cut with no column to match the opposite side. Oh and we had the guttering and soffit and fascia boards replaced to the front of the house. So far the trades I have used are stove man who is also the roofing/gutter man and my plasterers. I am about to build an extension which the kitchen shall move out into and a new garage. On the extension I am able to cheat a bit as I am already out of the ground because there is a large sun room which we will dismantle and build up from. Planning application is in for both garage and ext. and application for building warrant is in for the extension - they have been in about 2 weeks now so hopefully we will have something in about 4 weeks according to my architect. I was studying the warrant drawings and have started to QS the project to get an idea of cost but also to start understanding what I am going to have to build so the questions are building up. I shall start posting; hopefully in the correct sections, my questions on bits and pieces I want to start bottoming out.

