


PeterW
-
Posts
18480 -
Joined
-
Days Won
207
Everything posted by PeterW
-
Never seen UFH crack a slab with 35°C water .... What does it show if you push the sun/snowflake ..? Nothing will happen unless the UFH is calling for heat. Need to turn the room stat up and then let the UFH kick in, then the ASHP will run and you’ll see the flow temp on the top rail thermostat.
-
Right so EW can’t go above 28°C surface temperature, so you’re probably talking a max flow of 38°C or so. I would run it at max 35°C to see what the ASHP does as that is the sweet spot for them to run at but you may have to tweak it up slightly. And the dehumidifier will be pumping heat out too - surprising how quick they can heat a room !!
-
How well insulated is the house ..? And what are your floor coverings ..??
-
Yes and yes ..!!
-
Only thing you need to fiddle with is the black mixer with the white dots on it in the UFH box to change the flow temp but I would check what it is doing now with the gauges on the manifold first.
-
Sorry they aren’t wiring drawings they are schematics of components. What have Secom provided ..? Have they provided the UFH too..? Or the Thermostat ..? Difficult to diagnose this from a distance as I don’t know what the supplier has provided or has been asked for.
-

Where can I get these products urgently?
PeterW replied to canalsiderenovation's topic in Photovoltaics (PV)
What panels have you got, and what’s on the invoice for the panel connects ..? Just ring the supplier and get them to expedite 4 of the same ones and pay the courier (not Royal Mail..!!!) -
Where can I get these products urgently?
PeterW replied to canalsiderenovation's topic in Photovoltaics (PV)
They are Cat5 patch cables not solar ..!!! what does he actually mean ..? Is it the ones from the panels to the isolators as they are different. -
Where can I get these products urgently?
PeterW replied to canalsiderenovation's topic in Photovoltaics (PV)
Oh and ask him why not a 32A double string isolator as that is fail safe when working on an inverter as you take both strings out .. -
Where can I get these products urgently?
PeterW replied to canalsiderenovation's topic in Photovoltaics (PV)
Cables from Wagner..?? Isolators are in stock with CEF or even Toolstation..! Is the sparky related to the plumber by any chance ....?? -
Ok so that could be a 24V valve ...! What label is on it ..?? So it’s part of the heat pump set up and I can now see why the installer wants you to use their wiring ... that’s not ideal as the high level stat I expect needs 230v to operate so you can’t wire this as a normal W Plan or S plan if they have provided a 24v valve (and I think that’s diverter but not sure without the model number off the valve) Did Secon provide this all as a kit that works as one ..? I am concerned that if you wire it as per their description and something is “wrong” then Panasonic may not pay out as it is not wired as per MIs Did Secon provide any other info..? And is there a buffer in all this ..??
-
Ok so what you’re saying is that you don’t have a pair of zones but a diverter valve ..? 3 or 5 wire..?? model number ..?
-
So that other box is the high temp stat. You need to wire as the thermistor wiring or the lower diagram.
-
What’s the make and model of that cylinder ..? Something odd going on there ..!
-
I would move the builders cheap crap to the end - guaranteed to be 100mm stuff - and make layers of it so you only move it once. So the furthest from the hatch is just 400mm of builders orange fluff but installed properly. First layer - between the joists and see what you can get down the skielings Second layer half up the wall and then in strips so it covers the first - this will go over the joists. Third layer laid same as first Last layer - rolled over at 90 degrees to the rest nice and tight. Not the best way but it then means you can start with fresh stuff properly. Get a 100mm Rockwool or recycled plastic combi roll and cut it in half with a hand saw First layer between the joists as before Now get a second roll of 200mm, leave it full width. Measure your gap from hatch to the end of the builder shite, and cut a length. Roll it up, put it into the attic and unroll to the end. Same again on the other side. Last off, get the remains of the 100mm and unroll it over the 200mm stuff at 90 degrees, tucking it down the sides close the hatch and forget it forever ....
-
No there is a gland on the right hand side. Oddly I think that may need batteries !!
-
Ok has the tank got a pocket for the sensor ..?? And does the controller have a timer on it or is it just to control the temperature of the system ..?
-
Actually ignore me..!!! That looks like a tank stat so should be hooked up to the DHW on the controller. So controller should say go for DHW when that is open. Is this a pre-plumbed cylinder ..?
-
Yeh that is a standard boost immersion - look at where it says “Boost Immersion” on the wiring diagram.
-
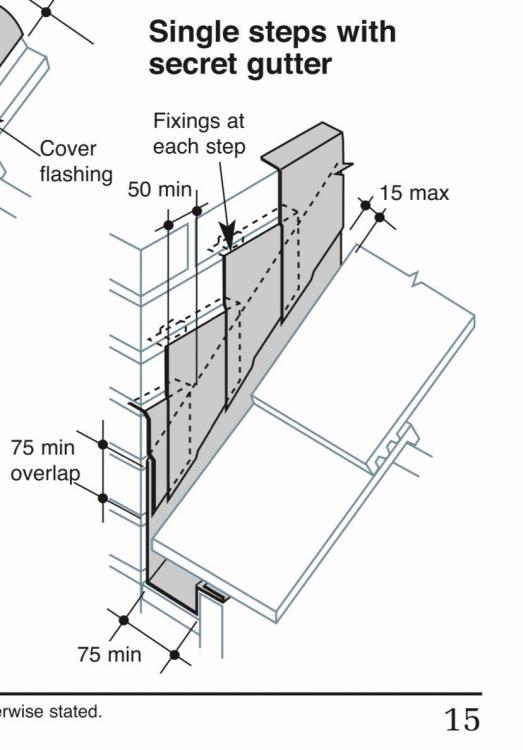
No I mean a secret gutter as per page 15 of the leadwork manual Depending on how far down you can get (as per comment from @Temp about joists etc) you can essentially remove the soaker completely and do a single lap onto the verge. Essentially you want 150mm from the bottom of the gutter up to the bottom of the tiles of the roofline above as a minimum, and this is one way of achieving it.
-
Architect Invoice Much Higher than Expected - Options?
PeterW replied to greido's topic in Surveyors & Architects
Well technically they can ... and unless this is an “agreed in writing” then the OP has very little by way of leverage. As @the_r_sole says, it’s a sure fire way of grinding everything to a halt. @greido what is the main issue here ..? Is it that you have a budget that you gave the architect and they ignored it, and you now have a scheme that is twice as expensive; or is it that you asked them to simplify and they have charged you £1000 and it’s still much more than the budget ..? Main questions for me would be did you tell them the budget at the outset, and is it a realistic budget ..? I’ve seen plenty of requests for extensions and conversions where the budget and expectation is £600-1000/sqm, and the actual pricing comes in nearer £2000/sqm for something pretty simple. Unless you are going to be very hands on, the cost of partial demolition can sometimes double the cost of a scheme as materials are removed by hand and it takes twice as long to remove and stack for re-use and the costs outweigh the pricing of using new or reclaimed materials. Likewise with trying to retain ceilings in loft conversions - it can add £1-2000 in labour to ensure they are not damaged when patching and re-skimming would be half of that and get a better and more consistent finish. It would be useful to know the brief you gave the architect at the outset, as this is normally where the problems stem from as expectations rarely meet reality. -
Approved inspector or LABC..?
-
Non issue - has a loft ladder so isn’t habitable. Use of it as a habitable space would be at owners risk.
-
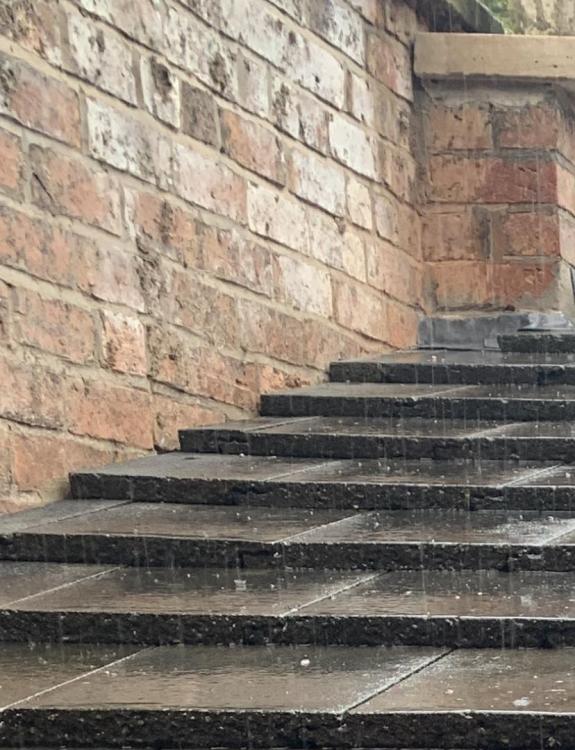
No I’ve definitely been talking about a leadwork secret gutter, not a GRP one. Decent leadwork manual here https://www.calderlead.co.uk/uploads/documentsearch/id4/Calder-GTGLW-210213.pdf It buys you a lot more as a standard set of soakers will need 120mm vertically above the tiles, which in that picture you don’t have, more if it’s cut and stepped. This has a secret gutter cut into the brickwork below the roofline as it was quicker and easier than stepped flashing - all done with a single length of lead replacement as it’s only an outbuilding. leadwork round the top is around a pillar but the remainder is below the roofline. Quick and simple and no leaks and allows the wall to remain as is.
-
How do you know that ..?? Depending on the staircase, it could be an existing one and the loft was converted in the 1970’s and it is perfectly legal. A steep staircase does not indicate no building regulations compliance as otherwise there are a lot of 1920’s terraces that are no longer “legal”. On what basis have the agents advised ..? Have the vendors told them..? Or is it “opinion”..?? If it’s the former then I would want to know what else has been done , and what other changes have been made and by whom. If the Vendor has done the conversion then not only would the stairs need to be resolved, there would be questions on the window (existing or new) and also insulation, structure and wiring. Start with the question of “When was the conversion done” and work back from there.


